Page 72 of 604

Safety features of your vehicle
12
3
Storing positions into memory
using the buttons on the door
Storing driver’s seat positions
1. Shift the shift lever into P while the engine start/stop button is ON.
2. Adjust the driver’s seat and out- side rearview mirror comfortable
for the driver.
3. Press SET button on the control panel. The system will beep once.
4. Press one of the memory buttons (1 or 2) within 5 seconds after
pressing the SET button. The sys-
tem will beep twice when memory
has been successfully stored.
When recalling an adjustment mem-
ory button while sitting in the vehicle,
you can be surprised by the setting
chosen if the memory has been
adjusted by someone else. If that
occurs, immediately push the seat
position control knob in the direction
of the desired position to stop further
undesired movement. Recalling positions from memory
1. Shift the shift lever into P while the
engine start/stop button is ON.
2. To recall the position in the memo- ry, press the desired memory but-
ton (1 or 2). The system will beep
once, then the driver’s seat will
automatically adjust to the stored
position.
Adjusting the control switch for the
driver’s seat while the system is
recalling the stored position will
cause the movement to stop and
move in the direction that the control
switch is moved.
Easy access function (if equipped)
The system will move the driver's
seat automatically as follows:
With smart key system - It will move the driver’s seat rear-ward when the engine start/stop
button is changed to the OFF
position.
- It will move the driver’s seat for- ward when the engine start/stop
button is changed to the ACC or
START position.
You can activate or deactivate this
feature. Refer to "User settings" in
chapter 4.
Page 182 of 604
Features of your vehicle
52
4
Instrument Cluster Control
Adjusting Instrument Cluster
Illumination
The brightness of the instrument
panel illumination is changed by
pressing the illumination control but-
ton (“+” or “-”) when Engine
Start/Stop button is ON, or the tail-
lights are turned on. If you hold the illumination control
button (“+” or “-”), the brightness
will be changed continuously.
If the brightness reaches to the maximum or minimum level, an
alarm will sound.
LCD Display Control
The LCD display modes can be
changed by using the control buttons
on the steering wheel.
OJF045036
OJFH046132NOJF045037L
OJF045038L
■Type A
■Type B
Page 247 of 604
4117
Features of your vehicle
✽
✽NOTICE
Never place anything over the sensor
located on the instrument panel to
ensure better control of the heating
and cooling system.
Manual heating and air condi-
tioning
The heating and cooling system can
be controlled manually by pressing
buttons or turning knob(s) other than
the AUTO button. In this case, the
system works sequentially according
to the order of buttons or knob(s)
selected.
1. Start the engine.
2. Set the mode to the desired posi-
tion.
For improving the effectiveness of
heating and cooling;- Heating:
- Cooling:
3. Set the temperature control to the desired position. 4. Set the air intake control to the
outside (fresh) air position.
5. Set the fan speed control to the desired speed.
6. If air conditioning is desired, turn the air conditioning system on.
Press the AUTO button in order to
convert to full automatic control of
the system.
OJF045086
■Type A
■Type B
OJFA045086
Page 253 of 604
4123
Features of your vehicle
OFF mode
Press the front blower OFF button to
turn off the front air climate control
system. However, you can still oper-
ate the mode and air intake buttons
as long as the ignition switch is in the
ON position.
Climate information screen selection (if equipped)
Press the climate information screen
selection button to display climate
information on the screen.
WARNING - Recirculated
Air
Continued use of the climate
control system in the recirculat-
ed air position can cause
drowsiness or sleepiness, and
loss of vehicle control. Set the
air intake control to the outside
(fresh) air position as much as
possible while driving.
WARNING - Sleeping with
AC on
Do not sleep in a vehicle with
the air conditioning or heating
on as this may cause serious
harm or death due to a drop in
the oxygen level and/or body
temperature.OJFH045094
OJFH045095
Page 274 of 604

Audio system
53
✽
✽NOTICE
Tinted rear window may affect the
proper functioning of the antenna.
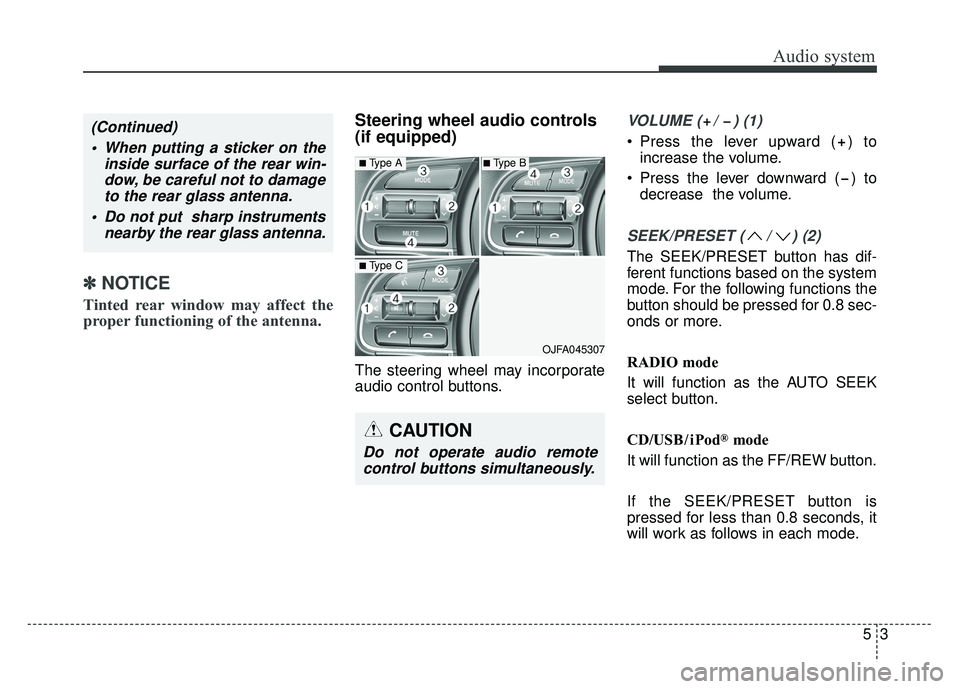
Steering wheel audio controls
(if equipped)
The steering wheel may incorporate
audio control buttons.
VOLUME ( / ) (1)
• Press the lever upward ( ) to
increase the volume.
Press the lever downward ( ) to decrease the volume.
SEEK/PRESET ( / ) (2)
The SEEK/PRESET button has dif-
ferent functions based on the system
mode. For the following functions the
button should be pressed for 0.8 sec-
onds or more.
RADIO mode
It will function as the AUTO SEEK
select button.
CD/USB/ iPod
®mode
It will function as the FF/REW button.
If the SEEK/PRESET button is
pressed for less than 0.8 seconds, it
will work as follows in each mode.CAUTION
Do not operate audio remote control buttons simultaneously.
OJFA045307
■Type A
■Type C
■Type B
(Continued)
When putting a sticker on the inside surface of the rear win-dow, be careful not to damageto the rear glass antenna.
Do not put sharp instruments nearby the rear glass antenna.
Page 275 of 604

Audio system
45
RADIO mode
It will function as the PRESET STA-
TION buttons.
CD/USB/ iPod
®mode
It will function as TRACK UP/DOWN
button.
MODE (3)
Press the button to change audio
source.
FM(1~2)
➟ AM ➟ SAT(1~3) ➟ CD ➟
USB (iPod®) ➟AUX ➟ MY MUSIC ➟
BT Audio ➟ FM...
In addition to mode change, Power
on/off can be made by pressing this
button when the ignition switch is on
ACC or ON.
- Power ON: Press the button when the audio is off
- Power OFF: Press the button for more than 0.8 seconds when the
audio is on.
MUTE (4, if equipped)
Press the button to mute the sound.
Press the button to turn off the microphone during a telephone
call.
Detailed information for audio control
buttons are described in the following
pages in this section.
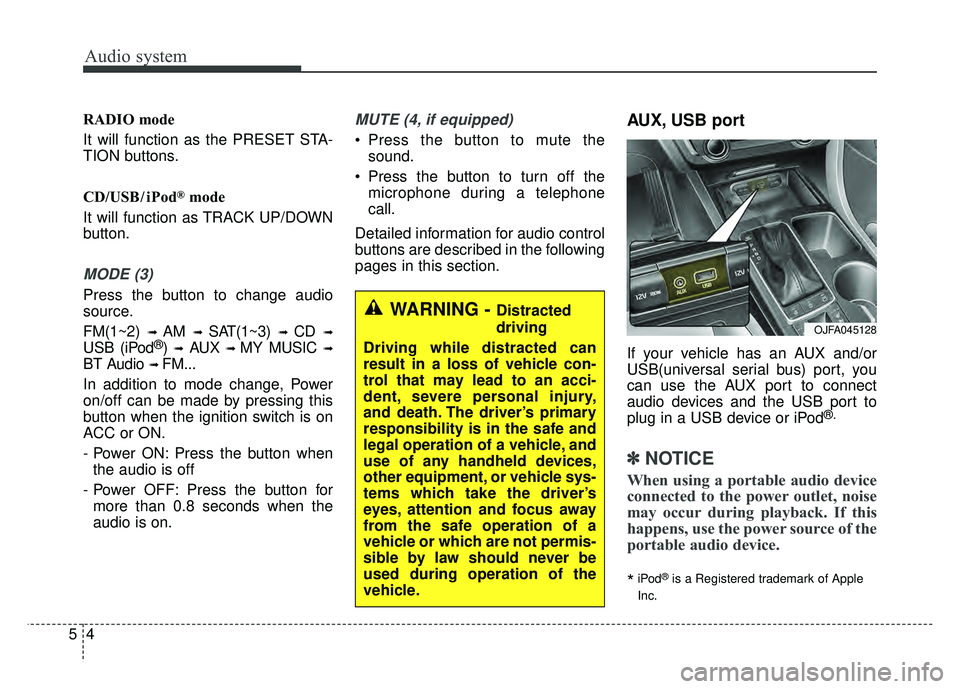
AUX, USB port
If your vehicle has an AUX and/or
USB(universal serial bus) port, you
can use the AUX port to connect
audio devices and the USB port to
plug in a USB device or iPod
®.
✽ ✽ NOTICE
When using a portable audio device
connected to the power outlet, noise
may occur during playback. If this
happens, use the power source of the
portable audio device.
*iPod®is a Registered trademark of Apple
Inc.
OJFA045128
WARNING - Distracted
driving
Driving while distracted can
result in a loss of vehicle con-
trol that may lead to an acci-
dent, severe personal injury,
and death. The driver’s primary
responsibility is in the safe and
legal operation of a vehicle, and
use of any handheld devices,
other equipment, or vehicle sys-
tems which take the driver’s
eyes, attention and focus away
from the safe operation of a
vehicle or which are not permis-
sible by law should never be
used during operation of the
vehicle.
Page 291 of 604
Audio system
20
5
Radio Mode
Radio Mode Display Controls
(1) Mode Display
Displays current operating mode.
(2) Frequency
Displays the current frequency.
(3) Preset
Displays current preset number [1] ~
[6].
(4) Preset Display
Displays preset buttons.
(5) A.Store
Automatically saves frequencies with
superior reception to Preset buttons.With the Radio Mode Button
Pressing the [RADIO] button will
change the operating mode in order
of FM1
➟ FM2 ➟ AM ➟ SAT1 ➟ SAT2
➟ SAT3
If [Mode Pop up] is turned on within
[SETUP] �[Display], then pressing
the [RADIO] button will display the
Radio Mode Pop up screen.
Turn the TUNE knob to move the
focus. Press the knob to select.
Page 292 of 604
Audio system
521
SEEK
Press the [SEEK TRACK]button to
play the previous/next frequency.
TUNE
Turn the TUNE knob to select the
desired frequency.
Selecting Presets/Saving Presets
Press the [Preset] button to display
the broadcast information for the fre-
quency saved to each button.
Press the [1] ~ [6] buttons to play the
desired preset.
While listening to a frequency you
want to save as a preset, press and
hold one of the [1] ~ [6] preset but-
tons to save the current frequency to
the selected preset.A.Store(Auto Store)
Press the [A.Store] button to auto-
matically save receivable frequen-
cies to Preset buttons.
Scan
Press the [SCAN]
button to preview
frequencies with superior reception
for 5 seconds each.
Press and hold the [SCAN] button to
preview presets for 5 seconds each.
Once scan is complete, the previous
frequency will be restored. While
Scan is operating, pressing the
[SCAN] button will cancel the scan-
ning.