2017 KIA OPTIMA PHEV check engine
[x] Cancel search: check enginePage 2 of 54

GETTING TO KNOW YOUR
OPTIMA PLUG-IN HYBRID
Congratulations on Your New Kia Purchase!
Your new Kia vehicle has been designed, engineered and manufactured to provide you with years of comfortable and dependable
driving. Kia is committed to quality, innovation, safety and — above all — your satisfaction.
Using This Guide
The information contained in this guide is a brief overview that will help you become familiar with the operation and features of your
new Kia vehicle. The flipbook format facilitates information access, while the detailed illustrations help to ensure the instructions are
easy to follow.
This Features & Functions Guide, and the specific operational and safety information it provides, is not a substitute for your Owner’s
Manual. In the interest of your safety and that of your family, and to help you avoid risks that may result in death or serious injury,
Kia reminds you to carefully read your Owner’s Manual in order to fully familiarize yourself with the important information it contains.
While the information contained in this guide is accurate at the time of printing, Kia may change vehicle specifications without
notice in advance or after the fact, and assumes no liability in connection with such changes.
www.kia.com
Consumer - Roadside Assistance
1-800-333-4KIA (4542)
See Back Pages for Vehicle Maintenance Schedule
Always check the Owner’s Manual for complete operating information and safety warnings.
Page 9 of 54

7*IF EQUIPPED
ALWAYS CHECK THE OWNER’S MANUAL FOR COMPLETE OPER ATING INFORMATION AND SAFET Y WARNINGS .
Trip Modes / Trip Computer
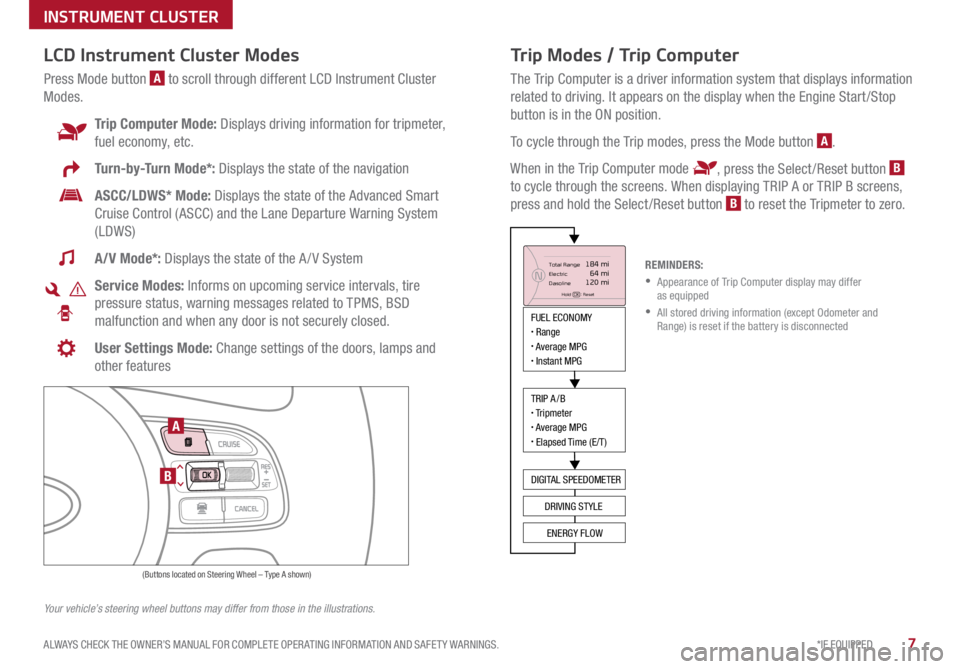
The Trip Computer is a driver information system that displays information
related to driving . It appears on the display when the Engine Start /Stop
button is in the ON position .
To cycle through the Trip modes, press the Mode button
A .
When in the Trip Computer mode
, press the Select /Reset button B
to cycle through the screens . When displaying TRIP A or TRIP B screens,
press and hold the Select /Reset button
B to reset the Tripmeter to zero .
LCD Instrument Cluster Modes
Press Mode button A to scroll through different LCD Instrument Cluster
Modes .
Trip Computer Mode: Displays driving information for tripmeter,
fuel economy, etc .
Turn-by-Turn Mode*: Displays the state of the navigation
ASCC/LDWS* Mode: Displays the state of the Advanced Smart
Cruise Control (ASCC) and the Lane Departure Warning System
(LDWS)
A/V Mode*: Displays the state of the A / V System
Service Modes: Informs on upcoming service intervals, tire
pressure status, warning messages related to TPMS, BSD
malfunction and when any door is not securely closed .
User Settings Mode: Change settings of the doors, lamps and
other features
Your vehicle’s steering wheel buttons may differ from those in the illustrations. REMINDERS:
• Appearance of Trip Computer display may differ
as equipped
• All stored driving information (except Odometer and
Range) is reset if the battery is disconnected
INSTRUMENT CLUSTER
MODE
RES
CRUISE
CAN CELOKSET
MODE
RES
CRUISE
CAN CELOKSET
MODE
FUEL ECONOMY• Range• Average MPG• Instant MPG
TRIP A/B• Tripmeter• Average MPG• Elapsed Time (E/T)
DIGITAL SPEEDOMETER
DRIVING STYLE
ENERGY FLOW
Total Range
Elec tric
Dasoline
Hold OK : Reset
184 mi 64 mi
120 miN
(Buttons located on Steering Wheel – Type A shown)
A
B
Page 11 of 54

9*IF EQUIPPED
ALWAYS CHECK THE OWNER’S MANUAL FOR COMPLETE OPER ATING INFORMATION AND SAFET Y WARNINGS .
Service Mode
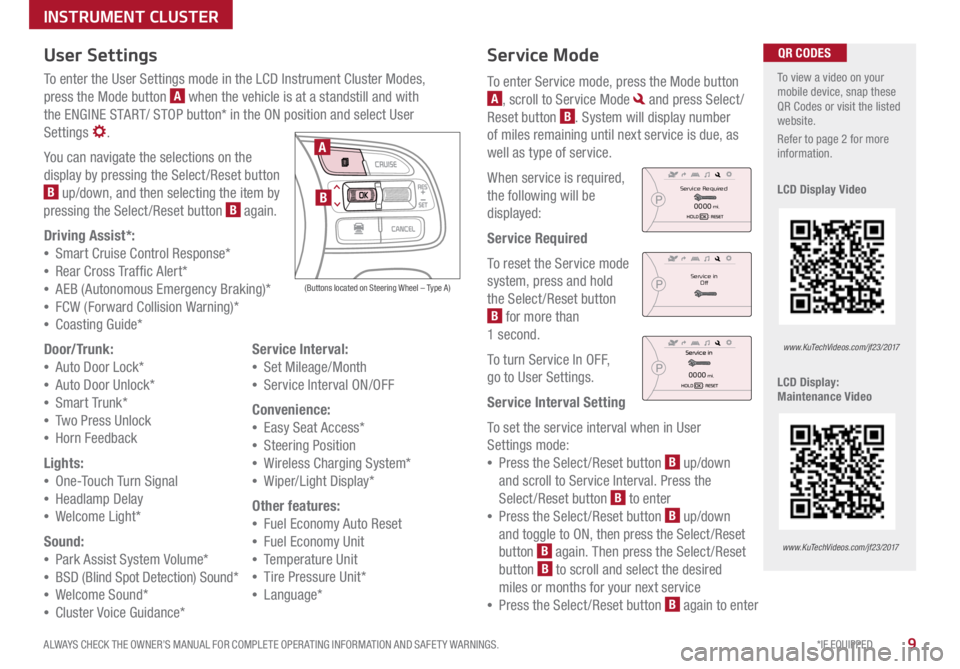
To enter Service mode, press the Mode button
A, scroll to Service Mode and press Select /
Reset button
B . System will display number
of miles remaining until next service is due, as
well as type of service .
When service is required,
the following will be
displayed:
Service Required
To reset the Service mode
system, press and hold
the Select /Reset button
B for more than
1 second .
To turn Service In OFF,
go to User Settings .
Service Interval Setting
To set the service interval when in User
Settings mode:
• Press the Select /Reset button
B up/down
and scroll to Service Interval . Press the
Select /Reset button
B to enter
• Press the Select /Reset button
B up/down
and toggle to ON, then press the Select/Reset
button
B again
. Then press the Select /Reset
button B to scroll and select the desired
miles or months for your next service
• Press the Select /Reset button
B again to enter
User Settings
To enter the User Settings mode in the LCD Instrument Cluster Modes,
press the Mode button
A when the vehicle is at a standstill and with
the ENGINE START/ STOP button* in the ON position and select User
Settings
.
You can navigate the selections on the
display by pressing the Select /Reset button
B up/down, and then selecting the item by
pressing the Select /Reset button B again .
Driving Assist*:
• Smart Cruise C ontrol Response*
• Rear Cross Traffic Alert*
• AEB (Autonomous Emergency Braking)*
• FCW (Forward Collision Warning)*
• Coasting Guide*
Door/Trunk:
• Auto Door Lock*
• Auto Door Unlock*
• Smart Trunk*
• Two Press Unlock
• Hor n Feedback
Lights:
• On e-Touch Turn Signal
• Headlamp Delay
• We lcome Light*
Sound:
• Park Assist System Volume*
• BSD (Blind Spot Detection) Sound*
• Welcome Sound*
• Cluster Voice Guidance* Service Interval:
• Set Mileage/Month
• Service Interval ON/OFF
Convenience:
• Easy Seat Access*
• Steering Position
• Wireless Charging System*
• Wiper/Light Display*
Other features:
• Fuel Economy Auto Reset
• Fuel Economy Unit
• Temperature Unit
• Tire Pressure Unit*
• Language*
To view a video on your
mobile device, snap these
QR Codes or visit the listed
website .
Refer to page 2 for more
information .
LCD Display Video
LCD Display:
Maintenance Video QR CODES
www.KuTechVideos.com/jf23/2017
www.KuTechVideos.com/jf23/2017
(Buttons located on Steering Wheel – Type A)
MODE
RES
CRUISE
CAN CELOKSET
MODE
RES
CRUISE
CAN CELOKSET
MODE
A
B
Service in
Off
Service Required
0000mi.
0000mi.
INSTRUMENT CLUSTER
Page 13 of 54

11*IF EQUIPPED
ALWAYS CHECK THE OWNER’S MANUAL FOR COMPLETE OPER ATING INFORMATION AND SAFET Y WARNINGS .
UVO eServices with Premium Navigation*
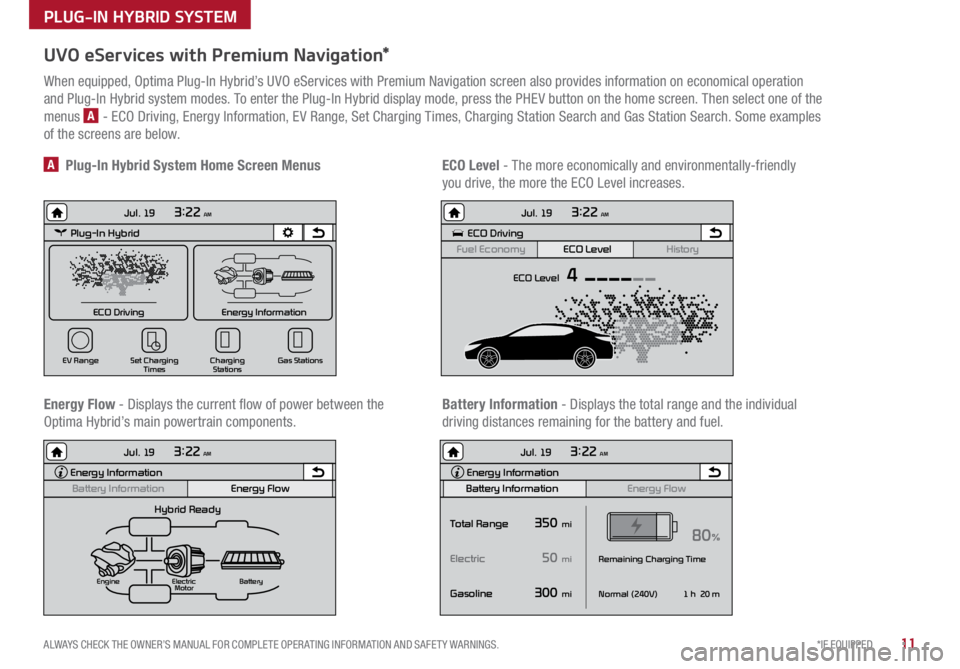
When equipped, Optima Plug-In Hybrid’s UVO eServices with Premium Navigation screen also provides information on economical operation
and Plug-In Hybrid system modes . To enter the Plug-In Hybrid display mode, press the PHEV button on the home screen . Then select one of the
menus
A - ECO Driving, Energy Information, EV Range, Set Charging Times, Charging Station Search and Gas Station Search . Some examples
of the screens are below .
Energy Flow - Displays the current flow of power between the
Optima Hybrid’s main powertrain components . ECO Level
- The more economically and environmentally-friendly
you drive, the more the ECO Level increases .
A Plug-In Hybrid System Home Screen Menus
Battery Information - Displays the total range and the individual
driving distances remaining for the battery and fuel .
Plug-In Hybrid
ECO Driving
Jul. 193:22 AM
Energy Information
Charging
Stations
Set Charging
Times
EV Range
Gas Stations
ECO Driving
ECO Level
Fuel Economy History
Jul. 19
3:22 AM
ECO Level 4
Energy Information
Energy Flow
Hybrid Ready
Engine Electric
Motor Battery
Battery InformationJul. 19
3:22 AM
Energy Information
Energy Flow
Battery Information Jul. 19
3:22 AM
Total Range
Electric
Remaining Charging Time
GasolineNormal (240V)
1 h 20 m
35080%
50
300
mi
mi
mi
Plug-In Hybrid
ECO Driving
Jul. 193:22 AM
Energy Information
Charging Stations
Set Charging
Times
EV Range
Gas Stations
ECO Driving
ECO Level
Fuel Economy History
Jul. 19
3:22 AM
ECO Level 4
Energy Information
Energy Flow
Hybrid Ready
Engine Electric
Motor Battery
Battery InformationJul. 19
3:22 AM
Energy Information
Energy Flow
Battery Information Jul. 19
3:22 AM
Total Range
Electric
Remaining Charging Time
GasolineNormal (240V)
1 h 20 m
35080%
50
300
mi
mi
mi
PLUG-IN HYBRID SYSTEM
Page 15 of 54

13*IF EQUIPPED
ALWAYS CHECK THE OWNER’S MANUAL FOR COMPLETE OPER ATING INFORMATION AND SAFET Y WARNINGS .
Instrument Cluster - Energy Flow
Optima Plug-In Hybrid’s instrument cluster LCD screen displays the following hybrid system modes to inform the driver of its status . To change modes,
go to User Settings in the LCD Instrument Cluster modes .
Power Reserve - While the engine powers the
vehicle, it is also recharging the hybrid battery .Engine Brake/Regeneration
- The regenerative
braking system is recharging the hybrid battery .
Vehicle Stop - The vehicle’s hybrid system is
standing by . Engine Generation/Regeneration
- The engine
and the regenerative braking system are both
recharging the hybrid battery .
PLUG-IN HYBRID SYSTEM
Page 19 of 54

17*IF EQUIPPED
ALWAYS CHECK THE OWNER’S MANUAL FOR COMPLETE OPER ATING INFORMATION AND SAFET Y WARNINGS .
DRIVER'S PANEL
Lane Departure Warning System (LDWS)*
With the ENGINE START/STOP button in the ON position, press the
LDWS button
D to turn system ON . The instrument cluster
indicator
will illuminate .
If the LDWS detects that you are veering outside of your lane, the
system may issue a warning on the LCD screen and an alert may
sound, while applying a slight adjustment to the steering, trying to
prevent the vehicle from moving outside its lane .
Standard LDWS is the operating mode by default when the button
is depressed to ON . To switch to Active LDWS mode or standard mode,
go to User Settings in the Instrument Cluster .
If the LDWS detects that you are veering outside of your lane, the
system may issue a warning on the LCD screen and an alert may sound .
All systems will operate under the following conditions:
• The vehicle exceeds approximately 55 mph
• The LDWS system recognizes the lane the vehicle is traveling in
• LDWS will stay on when the ignition is cycled
REMINDER: LDWS will not issue a warning if the turn signal is activated .
Autonomous (Assist) Emergency Braking (AEB) / Forward Collision Warning (FCW)*
The AEB helps to alert the driver when rapidly approaching a vehicle that is slowing down, braking
or stopped
E . A warning message will appear on the LCD screen and a chime will sound . The AEB
will become active when the vehicle is traveling more than 6 mph .
To turn the AEB off, go to User Settings in the LCD Instrument Cluster modes .
REMINDER: The AEB will be activated by default when vehicle power is cycled on, even when previously set to off
Autonomous (Assist) Emergency Braking is not a substitute for safe driving, and may not detect all objects in front of vehicle. Always drive safely and use caution.
When the LK AS sensor detects
the lane traveling in, both lanes
are illuminatedWhen the LK AS sensor does
not detect the lane traveling in
the lanes are not illuminated
When the LK AS sensor detects the vehicle veering outside of the lane traveling
in, a yellow indicator will illuminate either on the left or right lane (shown in both
images above)
Lane Keep Assist
Lane Keep Assist Lane Keep Assist
Lane Keep Assist
Lane Keep Assist
Lane Keep Assist
Lane Keep Assist
Lane Keep Assist
Lane Keep Assist
Lane Keep AssistLane Keep Assist
Lane Keep Assist
Lane Keep Assist
Lane Keep AssistLane Keep Assist
Lane Keep Assist
E
Lane Departure Warning
System Video
To view a video on your
mobile device, snap this
QR Code or visit the listed
website
.
Refer to page 2 for more
information .
www.KuTechVideos.com/jf23/2017
QR CODE
Page 21 of 54

19*IF EQUIPPED
ALWAYS CHECK THE OWNER’S MANUAL FOR COMPLETE OPER ATING INFORMATION AND SAFET Y WARNINGS .
To use electrical accessories:
ACC position
•When in the OFF position and without depressing the brake pedal, press the ENGINE START/STOP button once (amber light A )
ON position
•When already in the ACC position (amber light A ) and without depressing the brake pedal, press the ENGINE START/STOP button
again (red light B )
• When in the OFF position and without depressing the brake pedal, press the ENGINE START/STOP button twice (red light B )
Keeping the vehicle in ACC or ON position without turning engine on may discharge the vehicle’s battery .
QUICK TIPS
Engine Start/Stop Button
& Smart Key Video
To view a video on your
mobile device, snap this
QR Code or visit the listed
website .
Refer to page 2 for more
information .QR CODE
www.KuTechVideos.com/jf23/2017
AB
REMINDERS:
• In an emergency situation while the vehicle is in motion, you are able to turn the engine off and to
the ACC position by pressing the ENGINE START/STOP button for more than 2 seconds or 3 times
successively within 3 seconds
• If the Smart Key battery is weak or not working properly, hold the Smart Key fob up to the ENGINE START/
STOP button (Lock button side closest) and press to start engine
Engine Start/Stop Button
To start the engine:
1 . Depress the brake pedal
2 . Press the ENGINE START/STOP button while gear shift is in P (Park)
To turn the vehicle OFF, press the ENGINE START/STOP button .
To use the ENGINE START/STOP button, you must have the Smart Key fob
on your person .
DRIVER'S PANEL
Page 23 of 54

21*IF EQUIPPED
ALWAYS CHECK THE OWNER’S MANUAL FOR COMPLETE OPER ATING INFORMATION AND SAFET Y WARNINGS .
Headlight position
Parking light position
AUTO *AFLS (Adaptive Front Lighting System)* /High Beam
Assist position / Daytime Running Lights (DRL)
OFF OFF position
Headlights & High Beams
To o p e rate:
• Rotate lever to change the Headlight function
• Push lever to turn High Beams ON
• Pull leve r to flash Headlights/High Beams
AFLS (Adaptive Front Lighting System)* — When switch is in the AUTO
position and the vehicle’s ignition or the Engine Start /Stop button* is on, the
AFLS system will operate . To turn the system off, change the switch setting .
After turning the system off, headlamp swiveling no longer occurs, but leveling
operates continuously .
High Beam Assist* — The High Beam Assist will automatically adjust the
brightness depending on brightness of oncoming vehicles and road conditions .
When switch is in the AUTO position and the vehicle’s ignition or the Engine
Start /Stop button* is on, the High Beam Assist will operate . To turn the system
off, change the switch setting .
Daytime Running Lights (DRL)* — DRL may help others to see the front of
your vehicle during the day . The lights will be on automatically when the ignition
or ENGINE START/STOP button* is ON and the headlight switch is in the AUTO
position, unless one of the following occurs:
• Headlights are on
• Parking brake is applied
• Fog lights are on
• Engine is turned off
Turn Signals & Fog Lights
To o p e r a t e :
• Tu r n Signals - Move lever Up/Down for Right /Left Turn Signal
• Fog Lights - Rotate lever ring to turn Fog Lights ON/OFF
REMINDER: Headlights must be ON for Fog Light operation .
One-Touch Lane Change Signal is activated by moving the
Turn Signal Lever slightly for less than 1 second and then
releasing . The lane change signal will blink 3 times .
To change how many times (3/5/7) the Lane Change Signal
blinks, go to User Settings Mode in the LCD Instrument Cluster
modes .
REMINDERS:
•DRL only operates during the daytime
• The DRL system turns off when the headlights are ON, parking brake is applied
or the front fog lights are tuned on
STEERING WHEEL CONTROLS