2017 KIA NIRO instrument cluster
[x] Cancel search: instrument clusterPage 304 of 552

Driving your vehicle
16
6
To hold the vehicle on a hill use the
foot brake or the parking brake. If
the vehicle is held by applying the
accelerator pedal on a hill the
clutch and transmission will be
overheated resulting in damage.
At this time, a warning message
(“Steep grade! Press brake pedal”)
will appear on the LCD display and
you may feel a vibration.
If the clutch becomes overheated by excessive use of the clutch to
hold on a hill, you may notice a
shudder feeling and a blinking dis-
play on the instrument cluster.
When this occurs, the clutch is dis-
abled until the clutch cools to nor-
mal temperatures. If this occurs,
pull over to a safe location, shift
into P (Park) and apply the foot
brake for a certain time on the LCD
warning until it disappears.
If the LCD warning is active, the foot brake must be applied.
Ignoring the warnings can lead to damage to the transmission. If the display continues to blink, for
your safety, we recommend that you
contact an authorized Kia dealer.
Under certain conditions such as repeated launch on steep grades,
the clutch in the transmission could
overheat.
When the clutch is overheated, the
safe protection mode engages. If
the safe protection mode engages,
the gear position indicator on the
cluster blinks with a chime sound.
At this time, a warning message
(“Transmission temp. is high! Stop
safely”, “Trans hot! Park with engine
on”, “Trans Cooling. Remain parked
for 00 min.”, “Trans Cooled. Resume
driving”) will appear on the LCD dis-
play and driving may not be smooth.
If you ignore this warning, the driv-
ing condition may become worse.
To return the normal driving condi-
tion, stop the vehicle and apply the
foot brake for a few minutes before
driving off. Gear shifts may be more notice-
able than a conventional automatic
transmission. This is a normal
characteristic of this type of dual
clutch transmission.
During the first 1,500 km (1,000 miles), you may feel that the vehi-
cle may not be smooth when accel-
erating at low speed. During this
break-in period, the shift quality
and performance of your new vehi-
cle is continuously optimized.
Always come to a complete stop before shifting into D (Drive) or R
(Reverse).
Do not put the shift lever in N (Neutral) while driving.
Page 308 of 552
Driving your vehicle
20
6
SPORT Mode / ECO Mode
When you drive after changing the
gear shift lever to manual mode, the
vehicle will automatically shift to
SPORT mode. When you drive the
vehicle after putting the gear shift
lever to ‘D’, the vehicle will automati-
cally shift to ECO mode. Each auto-
matic change in shift will be dis-
played on the instrument cluster.
ECO mode
This driving mode increases fuel effi-
ciency. The actual fuel mileage will
depend on your driving habits and
road conditions.
SPORT mode
This driving mode provides sporty
driving experience. Be aware that fuel
efficiency may decrease in this mode.Shift lock system
For your safety, the dual clutch trans-
mission has a shift lock system which
prevents shifting the transaxle from P
(Park) into R (Reverse) unless the
brake pedal is depressed.
To shift the transaxle from P (Park)
into R (Reverse):
1. Depress and hold the brake pedal.
2. Start the engine or turn the ignition
switch to the ON position.
3. Move the shift lever.
If the brake pedal is repeatedly
depressed and released with the shift
lever in the P (Park) position, a chat-
tering noise & vibration near the shift
lever may be heard. This is a normal
condition. Shift-lock override
If the shift lever cannot be moved
from the P (Park) position into R
(Reverse) position with the brake
pedal depressed, continue depress-
ing the brake, then do the following:
1. Place the ignition switch in the
LOCK/OFF position.
2. Apply the parking brake.
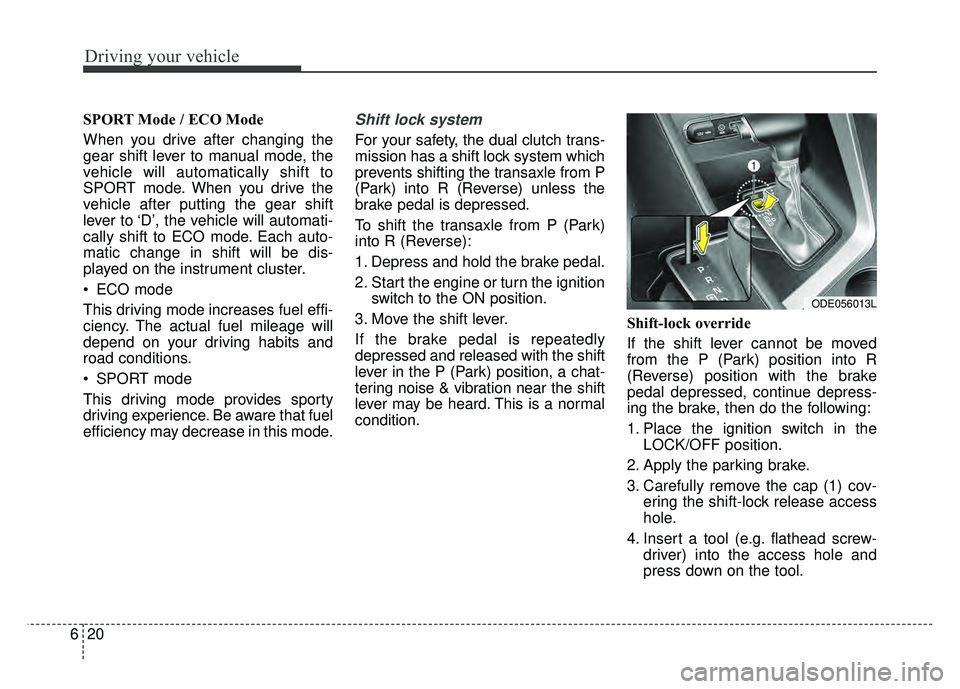
3. Carefully remove the cap (1) cov- ering the shift-lock release access
hole.
4. Insert a tool (e.g. flathead screw- driver) into the access hole and
press down on the tool.
ODE056013L
Page 321 of 552
633
Driving your vehicle
VSM operation
When the VSM is in operation, ESC
indicator light ( ) blinks.
When the vehicle stability manage-
ment is operating properly, you can
feel a slight pulsation in the vehicle
and/or abnormal steering responses
(EPS- Electronic Power Steering).
This is only the effect of brake and
EPS control and indicates nothing
unusual.
The VSM does not operate when:
Driving on a sloping road such as agradient or incline
Driving in reverse
ESC OFF indicator light ( ) remains on the instrument cluster
EPS indicator light remains on the instrument cluster
VSM operation off
If you press the ESC OFF button to
turn off the ESC, the VSM will also
cancel and the ESC OFF indicator
light ( ) illuminates.
To turn on the VSM, press the button
again. The ESC OFF indicator light
goes out.
Malfunction indicator
The VSM can be deactivated even if
you don’t cancel the VSM operation
by pressing the ESC OFF button. It
indicates that a malfunction has
been detected somewhere in the
Electric Power Steering system or
VSM system. If the ESC indicator
light ( ) or EPS warning light
remains on, take your vehicle to an
authorized Kia dealer and have the
system checked.
✽ ✽ NOTICE
• The VSM is designed to function
above approximately 13 mph (22
km/h) on curves.
• The VSM is designed to function above approximately 6 mph (10
km/h) when a vehicle is braking on
a split-mu surface. A split-mu sur-
face is made of two surfaces which
have different friction forces.
Page 325 of 552

637
Driving your vehicle
The warning light illumi-
nates on the LCD display,
when you cancel the AEB
system. The driver can
monitor the AEB ON/OFF status on
the LCD display. When the warning
light remains ON with the AEB acti-
vated, have your vehicle inspected
by an authorized Kia dealer.
The driver can select the initial warn-
ing activation time in the User
Settings in the instrument cluster
LCD display. The options for the ini-
tial Forward Collision Warning
include the following:
selected, the initial
Forward Collision Warning
is activated earlier than
normal. This setting maxi-
mizes the amount of dis-
tance between the vehicle
or pedestrian ahead before
the initial warning occurs.
The driver feels it is too
sensitive to activate than
expectation, change it to
Normal. If the vehicle in
front stops abruptly, the
driver can notice the warn-
ing alarm is late even
though the early option is
selected.
selected, the initial
Forward Collision
Warning is activated nor-
mally. This setting allows
for a nominal amount of
distance between the
vehicle or pedestrian
ahead before the initial
warning occurs.
selected, the initial Forward
Collision Warning is activat-
ed later than normal. This
setting reduces the amount
of distance between the
vehicle or pedestrian ahead
before the initial warning
occurs. The driver can use it
when the traffic is not busy
on the road and driving
speed is lower.
Page 336 of 552
Driving your vehicle
48
6
To set cruise control speed:
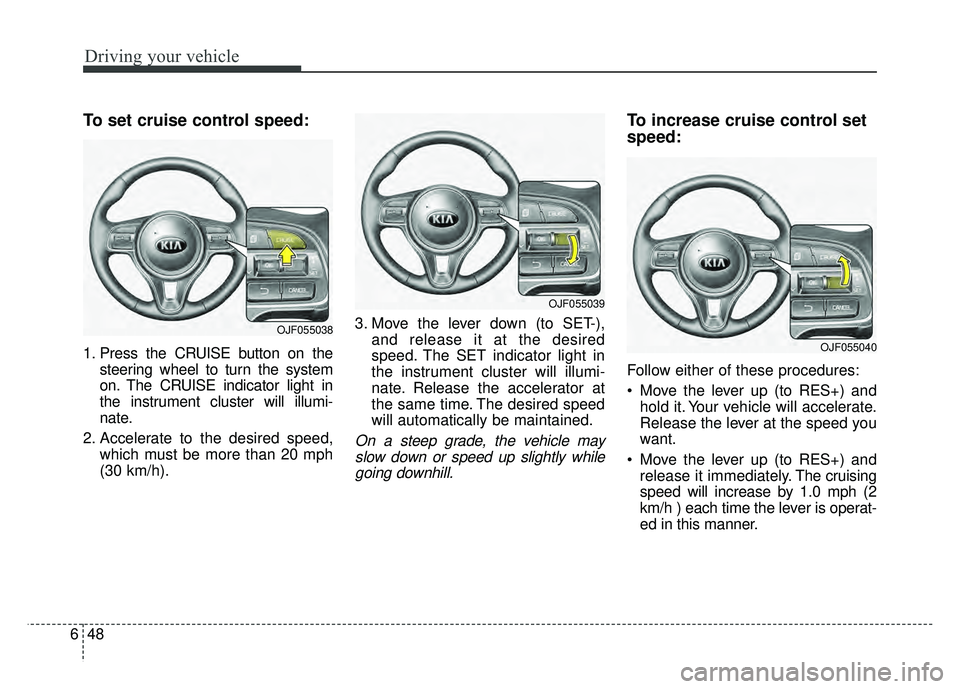
1. Press the CRUISE button on the
steering wheel to turn the system
on. The CRUISE indicator light in
the instrument cluster will illumi-
nate.
2. Accelerate to the desired speed, which must be more than 20 mph
(30 km/h). 3. Move the lever down (to SET-),
and release it at the desired
speed. The SET indicator light in
the instrument cluster will illumi-
nate. Release the accelerator at
the same time. The desired speed
will automatically be maintained.
On a steep grade, the vehicle mayslow down or speed up slightly whilegoing downhill.
To increase cruise control set
speed:
Follow either of these procedures:
Move the lever up (to RES+) and hold it. Your vehicle will accelerate.
Release the lever at the speed you
want.
Move the lever up (to RES+) and release it immediately. The cruising
speed will increase by 1.0 mph (2
km/h ) each time the lever is operat-
ed in this manner.
OJF055038
OJF055039
OJF055040
Page 338 of 552

Driving your vehicle
50
6
Each of these actions will cancel
cruise control operation (the SETindicator light in the instrument clus-ter will go off), but it will not turn thesystem off. If you wish to resumecruise control operation, move thelever up (to RES+). You will return toyour previously preset speed.To resume cruising speed at
more than approximately 20
mph (30 km/h):
If any method other than the
CRUISE ON-OFF switch was used
to cancel cruising speed and the sys-
tem is still activated, the most recent
set speed will automatically resume
when you move the lever up.
It will not resume, however, if the
vehicle speed has dropped below
approximately 20 mph (30 km/h).
To turn cruise control off, do
one of the following:
Press the CRUISE button (the CRUISE indicator light in the
instrument cluster will go off).
Turn the engine start/stop button off.
Both of these actions will cancel the cruise control operation. If you wantto resume the cruise control opera-tion, repeat the steps provided in “Toset cruise control speed” on the pre-vious page.
OJF055040
OJF055038
Page 339 of 552
651
Driving your vehicle
SMART CRUISE CONTROL SYSTEM (SCC) (IF EQUIPPED)
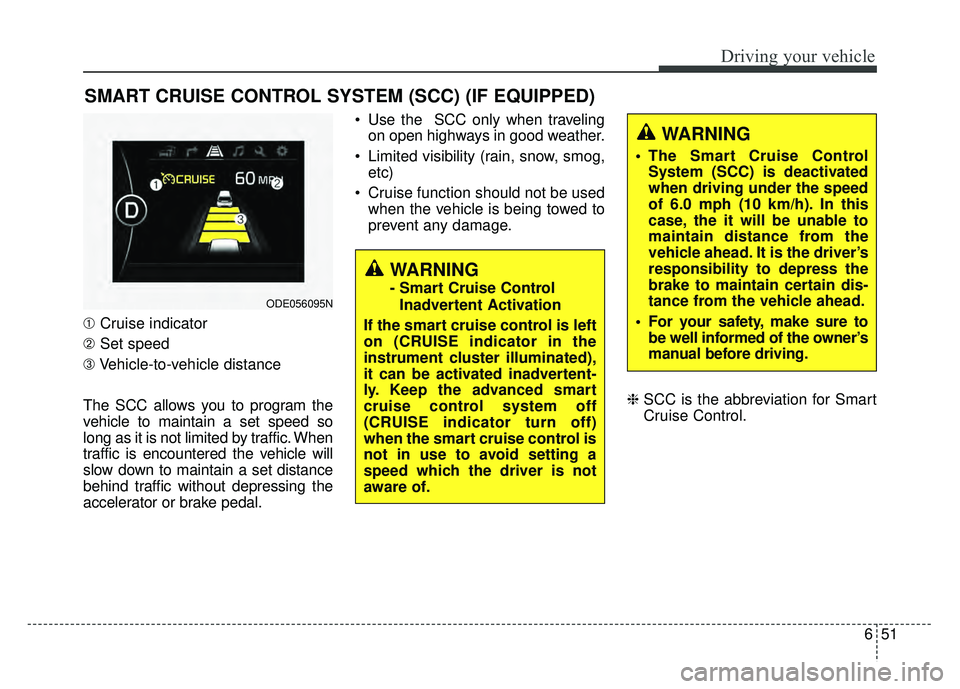
➀Cruise indicator
➁ Set speed
➂ Vehicle-to-vehicle distance
The SCC allows you to program the
vehicle to maintain a set speed so
long as it is not limited by traffic. When
traffic is encountered the vehicle will
slow down to maintain a set distance
behind traffic without depressing the
accelerator or brake pedal. Use the SCC only when traveling
on open highways in good weather.
Limited visibility (rain, snow, smog, etc)
Cruise function should not be used when the vehicle is being towed to
prevent any damage.
\bSCC is the abbreviation for Smart
Cruise Control.
WARNING
- Smart Cruise Control
Inadvertent Activation
If the smart cruise control is left
on (CRUISE indicator in the
instrument cluster illuminated),
it can be activated inadvertent-
ly. Keep the advanced smart
cruise control system off
(CRUISE indicator turn off)
when the smart cruise control is
not in use to avoid setting a
speed which the driver is not
aware of.ODE056095N
WARNING
The Smart Cruise Control System (SCC) is deactivated
when driving under the speed
of 6.0 mph (10 km/h). In this
case, the it will be unable to
maintain distance from the
vehicle ahead. It is the driver’s
responsibility to depress the
brake to maintain certain dis-
tance from the vehicle ahead.
For your safety, make sure to be well informed of the owner’s
manual before driving.
Page 340 of 552
Driving your vehicle
52
6
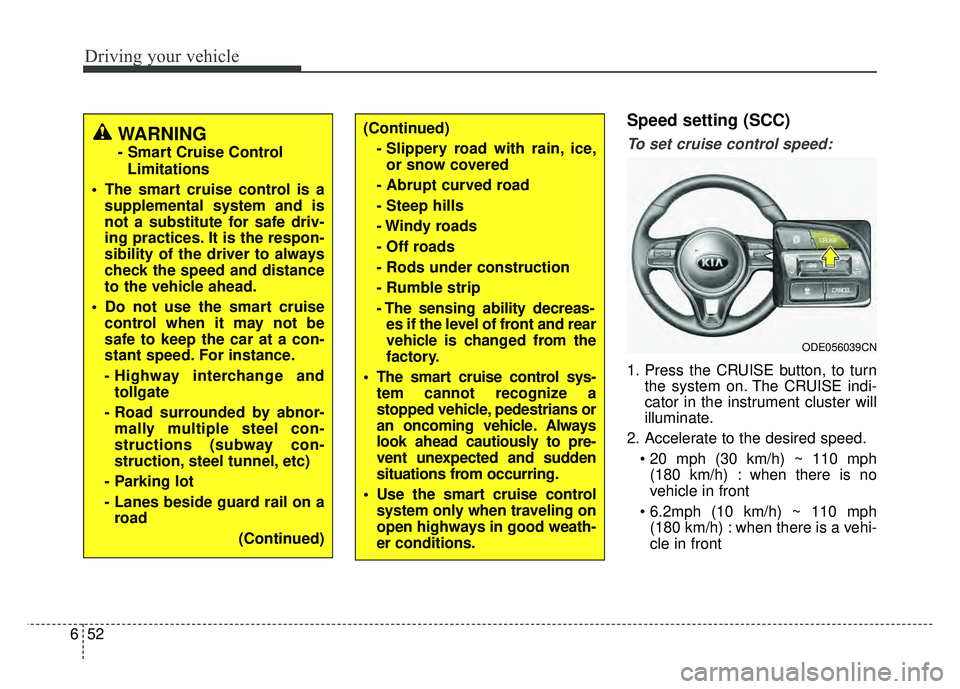
Speed setting (SCC)
To set cruise control speed:
1. Press the CRUISE button, to turn
the system on. The CRUISE indi-
cator in the instrument cluster will
illuminate.
2. Accelerate to the desired speed. (180 km/h) : when there is no
vehicle in front
(180 km/h) : when there is a vehi-
cle in front
(Continued)
- Slippery road with rain, ice,or snow covered
- Abrupt curved road
- Steep hills
- Windy roads
- Off roads
- Rods under construction
- Rumble strip
- The sensing ability decreas- es if the level of front and rear
vehicle is changed from the
factory.
The smart cruise control sys- tem cannot recognize a
stopped vehicle, pedestrians or
an oncoming vehicle. Always
look ahead cautiously to pre-
vent unexpected and sudden
situations from occurring.
Use the smart cruise control system only when traveling on
open highways in good weath-
er conditions.
ODE056039CN
WARNING
- Smart Cruise Control
Limitations
The smart cruise control is a supplemental system and is
not a substitute for safe driv-
ing practices. It is the respon-
sibility of the driver to always
check the speed and distance
to the vehicle ahead.
Do not use the smart cruise control when it may not be
safe to keep the car at a con-
stant speed. For instance.
- Highway interchange andtollgate
- Road surrounded by abnor- mally multiple steel con-
structions (subway con-
struction, steel tunnel, etc)
- Parking lot
- Lanes beside guard rail on a road
(Continued)