2017 KIA NIRO service
[x] Cancel search: servicePage 25 of 54
23*IF EQUIPPED ALWAYS CHECK THE OWNER’S MANUAL FOR COMPLETE OPER ATING INFORMATION AND SAFET Y WARNINGS .
Voice Recognition and Phone
Contact Tips
The Kia Voice Recognition System may
have difficulty understanding some accents
or uncommon names . When using Voice
Recognition to place a call, speak in a
moderate tone, with clear pronunciation .
Help your Bluetooth® Wireless Technology
Voice Recognition performance by making
a few simple changes to your phone
contacts:
•Use full names vs . short or single-syllable
names (“John Smith” vs . “Dad”; “Smith
Residence” vs . “Home”)
•Avoid using special characters or hyphens
(@, &, #, /, -, *, +, etc . )
•Avoid using acronyms (“In Case
Emergency” vs . “ICE”)
•Spell words completely, no abbreviations
(“Doctor Goodman” vs . “Dr . Goodman”)
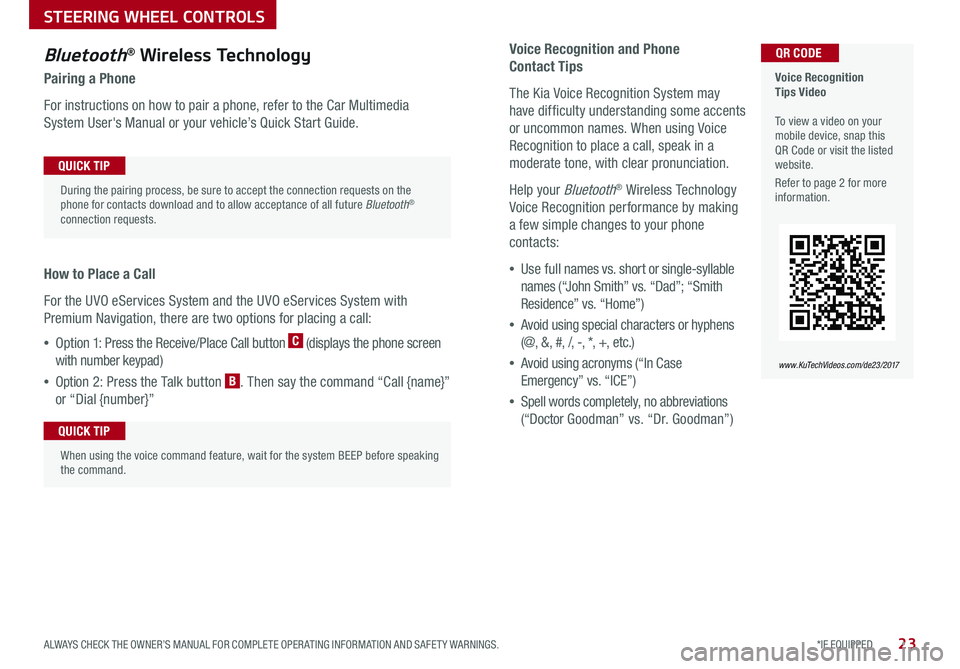
Bluetooth® Wireless Technology
Pairing a Phone
For instructions on how to pair a phone, refer to the Car Multimedia
System User's Manual or your vehicle’s Quick Start Guide .
How to Place a Call
For the UVO eServices System and the UVO eServices System with
Premium Navigation, there are two options for placing a call:
•Option 1: Press the Receive/Place Call button C (displays the phone screen
with number keypad)
•Option 2: Press the Talk button B . Then say the command “Call {name}”
or “Dial {number}”
Voice Recognition Tips Video To view a video on your mobile device, snap this QR Code or visit the listed website .
Refer to page 2 for more information .
www.KuTechVideos.com/de23/2017
QR CODE
During the pairing process, be sure to accept the connection requests on the phone for contacts download and to allow acceptance of all future Bluetooth® connection requests .
QUICK TIP
When using the voice command feature, wait for the system BEEP before speaking the command .
QUICK TIP
STEERING WHEEL CONTROLS
Page 29 of 54
AUDIO SYSTEMS
27*IF EQUIPPED ALWAYS CHECK THE OWNER’S MANUAL FOR COMPLETE OPER ATING INFORMATION AND SAFET Y WARNINGS .
For further UVO eServices System operations, refer to the Car Multimedia System User's Manual. For other audio system information, refer to pages 28-29.
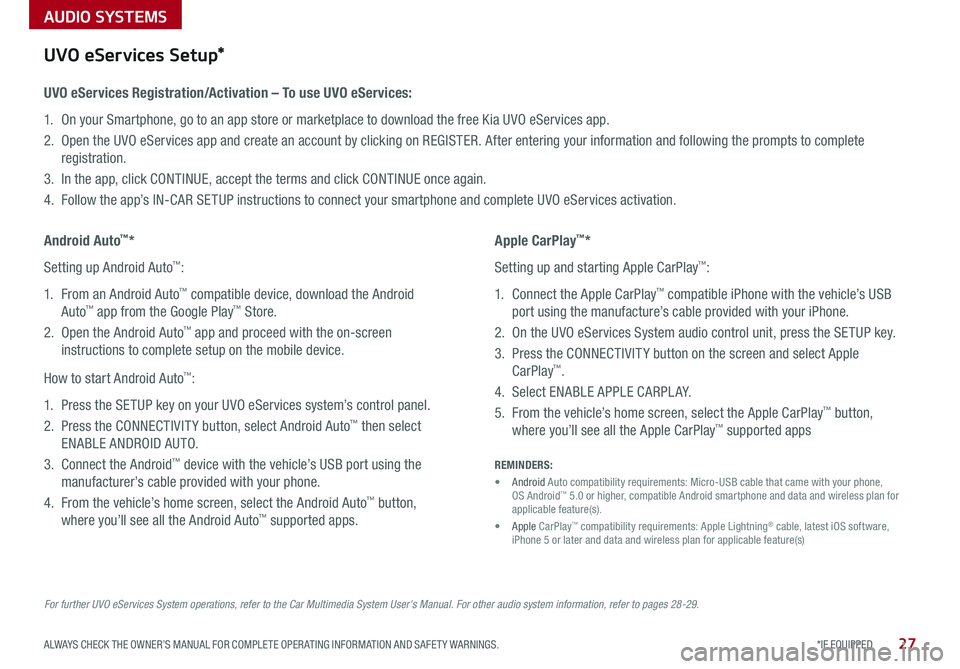
UVO eServices Setup*
UVO eServices Registration/Activation – To use UVO eServices:
1 . On your Smartphone, go to an app store or marketplace to download the free Kia UVO eServices app .
2 . Open the UVO eServices app and create an account by clicking on REGISTER . After entering your information and following the prompts to complete
registration .
3 . In the app, click CONTINUE, accept the terms and click CONTINUE once again .
4 . Follow the app’s IN-CAR SETUP instructions to connect your smartphone and complete UVO eServices activation .
Apple CarPlay™*
Setting up and starting Apple CarPlay™:
1 . Connect the Apple CarPlay™ compatible iPhone with the vehicle’s USB
port using the manufacture’s cable provided with your iPhone .
2 . On the UVO eServices System audio control unit, press the SETUP key .
3 . Press the CONNECTIVIT Y button on the screen and select Apple
CarPlay™ .
4 . Select ENABLE APPLE CARPL AY .
5 . From the vehicle’s home screen, select the Apple CarPlay™ button,
where you’ll see all the Apple CarPlay™ supported apps
Android Auto™*
Setting up Android Auto™:
1 . From an Android Auto™ compatible device, download the Android
Auto™ app from the Google Play™ Store .
2 . Open the Android Auto™ app and proceed with the on-screen
instructions to complete setup on the mobile device .
How to start Android Auto™:
1 . Press the SETUP key on your UVO eServices system’s control panel .
2 . Press the CONNECTIVIT Y button, select Android Auto™ then select
ENABLE ANDROID AUTO .
3 . Connect the Android™ device with the vehicle’s USB port using the
manufacturer’s cable provided with your phone .
4 . From the vehicle’s home screen, select the Android Auto™ button,
where you’ll see all the Android Auto™ supported apps .
REMINDERS:
• Android Auto compatibility requirements: Micro-USB cable that came with your phone, OS Android™ 5 .0 or higher, compatible Android smartphone and data and wireless plan for applicable feature(s) .
• Apple CarPlay™ compatibility requirements: Apple Lightning® cable, latest iOS software, iPhone 5 or later and data and wireless plan for applicable feature(s)
Page 30 of 54
AUDIO SYSTEMS
UVO eServices System Videos To view a video on your mobile device, snap this QR Code or visit the listed website .
Refer to page 2 for more information .
QR CODE
www.KuTechVideos.com/audio/uvo3_eservices
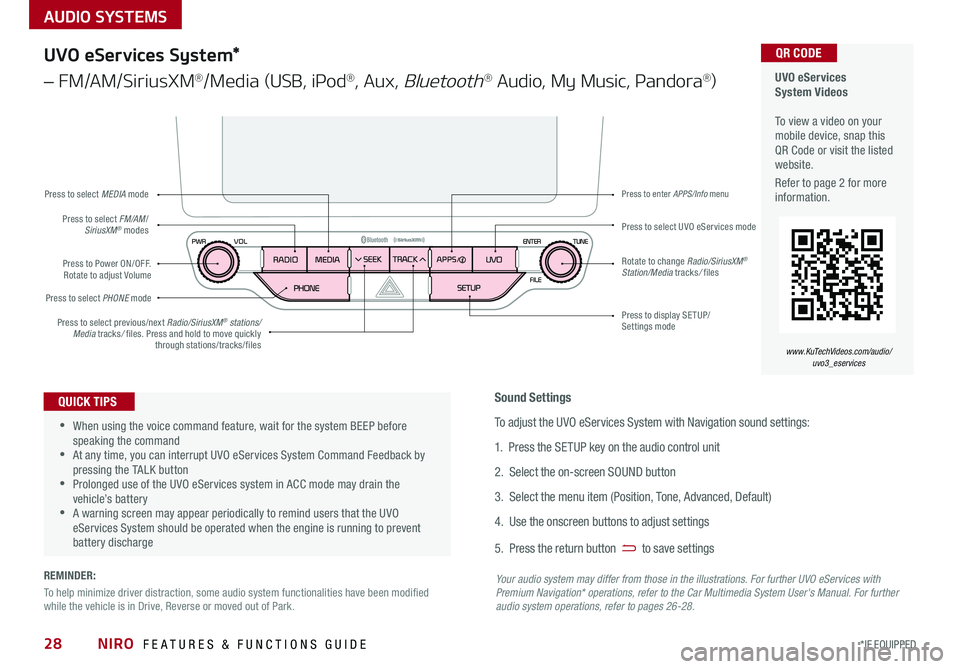
UVO eServices System*
– FM/AM/SiriusXM®/Media (USB, iPod®, Aux, Bluetooth® Audio, My Music, Pandora®)
•When using the voice command feature, wait for the system BEEP before speaking the command •At any time, you can interrupt UVO eServices System Command Feedback by pressing the TALK button •Prolonged use of the UVO eServices system in ACC mode may drain the vehicle’s battery •A warning screen may appear periodically to remind users that the UVO eServices System should be operated when the engine is running to prevent battery discharge
QUICK TIPSSound Settings
To adjust the UVO eServices System with Navigation sound settings:
1 . Press the SETUP key on the audio control unit
2 . Select the on-screen SOUND button
3 . Select the menu item (Position, Tone, Advanced, Default)
4 . Use the onscreen buttons to adjust settings
5 . Press the return button to save settings
Your audio system may differ from those in the illustrations. For further UVO eServices with Premium Navigation* operations, refer to the Car Multimedia System User's Manual. For further audio system operations, refer to pages 26-28.
Press to Power ON/OFF . Rotate to adjust Volume
Press to select PHONE mode
Press to select UVO eServices modePress to select FM/AM/SiriusXM® modes
Press to select MEDIA mode
Press to display SE TUP/Settings mode
Press to enter APPS/Info menu
Press to select previous/next Radio/SiriusXM® stations/Media tracks/ files . Press and hold to move quickly through stations/tracks/files
Rotate to change Radio/SiriusXM® Station/Media tracks/ files
NIRO FEATURES & FUNCTIONS GUIDE28*IF EQUIPPED
REMINDER:
To help minimize driver distraction, some audio system functionalities have been modified while the vehicle is in Drive, Reverse or moved out of Park .
Page 31 of 54
AUDIO SYSTEMS
29*IF EQUIPPED ALWAYS CHECK THE OWNER’S MANUAL FOR COMPLETE OPER ATING INFORMATION AND SAFET Y WARNINGS .
UVO eServices with Premium Navigation Videos To view a video on your mobile device, snap this QR Code or visit the listed website .
Refer to page 2 for more information .
QR CODE
www.KuTechVideos.com/audio/avn4
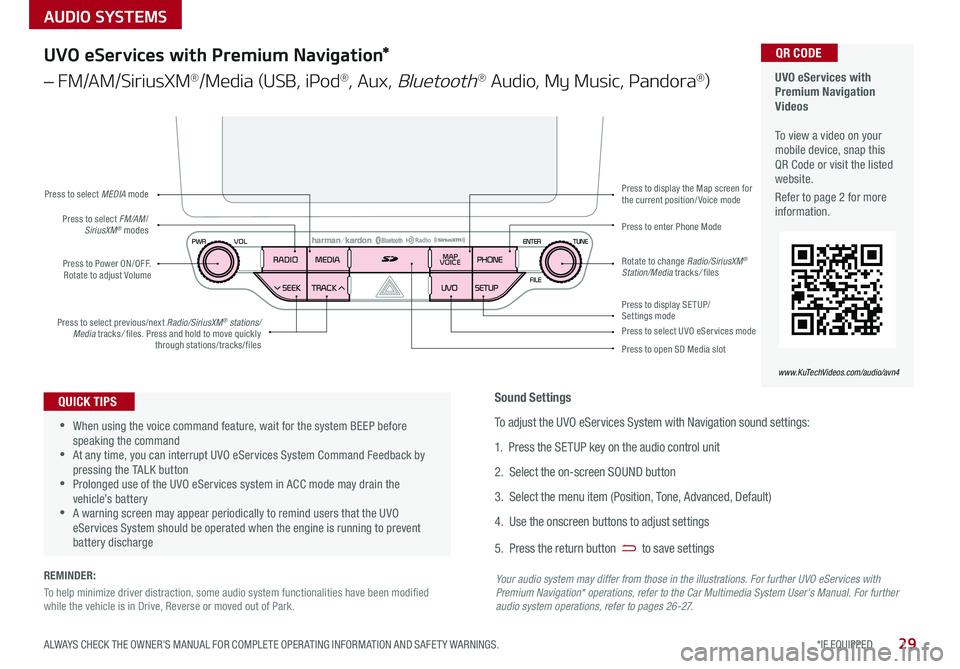
UVO eServices with Premium Navigation*
– FM/AM/SiriusXM®/Media (USB, iPod®, Aux, Bluetooth® Audio, My Music, Pandora®)
Press to Power ON/OFF . Rotate to adjust Volume
Press to enter Phone ModePress to select FM/AM/SiriusXM® modes
Press to select MEDIA mode
Press to display SE TUP/Settings mode
Press to display the Map screen for the current position/ Voice mode
Press to select UVO eServices mode
Press to open SD Media slot
Press to select previous/next Radio/SiriusXM® stations/Media tracks/ files . Press and hold to move quickly through stations/tracks/files
Rotate to change Radio/SiriusXM® Station/Media tracks/ files
•When using the voice command feature, wait for the system BEEP before speaking the command •At any time, you can interrupt UVO eServices System Command Feedback by pressing the TALK button •Prolonged use of the UVO eServices system in ACC mode may drain the vehicle’s battery •A warning screen may appear periodically to remind users that the UVO eServices System should be operated when the engine is running to prevent battery discharge
QUICK TIPSSound Settings
To adjust the UVO eServices System with Navigation sound settings:
1 . Press the SETUP key on the audio control unit
2 . Select the on-screen SOUND button
3 . Select the menu item (Position, Tone, Advanced, Default)
4 . Use the onscreen buttons to adjust settings
5 . Press the return button to save settings
Your audio system may differ from those in the illustrations. For further UVO eServices with Premium Navigation* operations, refer to the Car Multimedia System User's Manual. For further audio system operations, refer to pages 26-27.
REMINDER:
To help minimize driver distraction, some audio system functionalities have been modified while the vehicle is in Drive, Reverse or moved out of Park .
Page 32 of 54
NIRO FEATURES & FUNCTIONS GUIDE30*IF EQUIPPED
Digital Clock
UVO eServices System* / UVO eServices with
Premium Navigation System* Clock Setup:
Press the SETUP key on the head unit . Then
press the on-screen Clock icon to enter clock
settings . Follow the onscreen options to adjust
the clock settings .
Press the on-screen return icon to save changes .
QUICK TIP
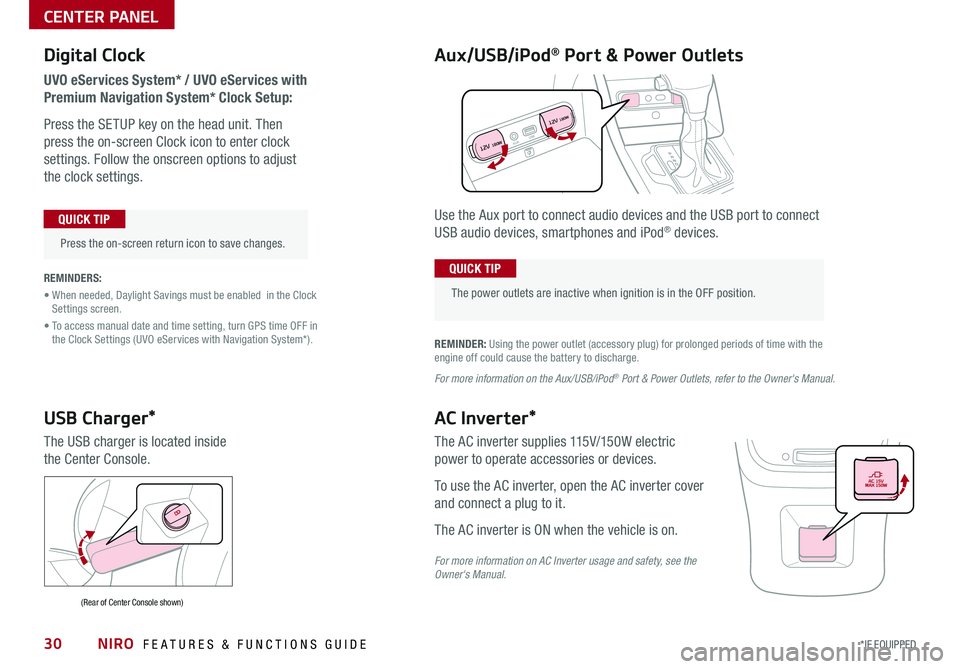
Aux/USB/iPod® Port & Power Outlets
The power outlets are inactive when ignition is in the OFF position .
QUICK TIP
REMINDER: Using the power outlet (accessory plug) for prolonged periods of time with the engine off could cause the battery to discharge .
For more information on the Aux/USB/iPod® Port & Power Outlets, refer to the Owner's Manual.
REMINDERS:
• When needed, Daylight Savings must be enabled in the Clock Settings screen .
• To access manual date and time setting, turn GPS time OFF in the Clock Settings (UVO eServices with Navigation System*) .
Use the Aux port to connect audio devices and the USB port to connect
USB audio devices, smartphones and iPod® devices .
USB Charger*
The USB charger is located inside
the Center Console .
(Rear of Center Console shown)
AC Inverter*
The AC inverter supplies 115V/150W electric
power to operate accessories or devices .
To use the AC inverter, open the AC inverter cover
and connect a plug to it .
The AC inverter is ON when the vehicle is on .
For more information on AC Inverter usage and safety, see the Owner's Manual.
AUXUSB
12V 180W
12V 180W
CENTER PANEL
Page 34 of 54

Automatic Climate Control*
(Type B – Vehicles equipped with UVO eServices)
Your Automatic Climate Control system may differ from those in the illustrations. See your Owner’s Manual for more details.
A Climate Control display
B Mode Selection button
C ECON (Economy Air Conditioning) button
D Dual Climate Control Button
E Dual Temperature Control knob
F Air Conditioning On/Off button
G Recirculated Air button
H Fan Speed Control buttons
I System OFF button
J Automatic Climate Control button
K Temperature Control knob
L Front Windshield Defroster
M Driver Only Fan Control
N Rear Windshield Defroster
Automatic Climate Control*
(Type A – Vehicles equipped with UVO eServices with Premium Navigation)
A Mode Selection button
B ECON (Economy Air Conditioning) button
C Dual Climate Control Button
D Dual Temperature Control knob
E Air Conditioning On/Off button
F Recirculated Air button
G Rear Windshield Defroster
H Fan Speed Control buttons
I System OFF button
J Climate information screen selection button
K Automatic Climate Control button
L Temperature Control knob
M Driver Only Fan Control
N Front Windshield Defroster
A
G
DE
F
FFG
HI
IHH
MJK
LN
J
KCDLMNE
CENTER PANEL
NIRO FEATURES & FUNCTIONS GUIDE32*IF EQUIPPED
Page 43 of 54

41*IF EQUIPPED ALWAYS CHECK THE OWNER’S MANUAL FOR COMPLETE OPER ATING INFORMATION AND SAFET Y WARNINGS .
Parking Assist System*
The Parking Assist System* is not a safety device . The Parking Assist
System* is a supplemental system that assists the driver by chiming if any
object is detected within the sensing area to the front, rear and side of the
vehicle when moving forward or backing up .
The system is activated when the ignition is ON and the vehicle is in R
(Reverse) .To deactivate the system,
press the Parking Assist System*
button A LED illuminated), when
vehicle is in D (Drive) or R (Reverse) .
To activate, press button A again
(LED not illuminated) .
REMINDERS:
•If the vehicle is moving at speeds over 3 mph, the system may not activate correctly
•
When more than two objects are sensed at the same time, the closest one will be recognized first
•
The above images are for illustration purposes only and may not reflect actual operation
The Parking Assist System* is not a substitute for proper and safe parking and backing-up procedures. Always drive safely and use caution when backing up. The Parking Assist System* may not detect every object in front of or behind the vehicle.
Rear-Camera Display*
The Rear-Camera Display system is not a safety device . It is a
supplemental system that displays the view behind the vehicle through the
rearview display mirror or the UVO eServices System/UVO eServices with
Premium Navigation System* screens while the vehicle is in Reverse .
The Rear-Camera Display activates when the:
•ENGINE START/STOP button is in the ON position (green light)
•Gear Shift Lever is in the R (Reverse) position
REMINDERS:
•The above images are for illustration purposes only and may not reflect actual operation
•
UVO eServices System* — While camera is active, only the volume controls on the Audio System can be operated .
•
UVO eServices System/UVO eServices with Premium Navigation System* — While camera is active, only the Audio System can be operated on the Steering Wheel and Audio Control Unit . Navigation features are disabled .
The Rear-Camera Display is not a substitute for proper and safe backing-up procedures. The Rear-Camera Display may not display every object behind the vehicle. Always drive safely and use caution when backing up
A
OTHER KEY FEATURES
Page 47 of 54
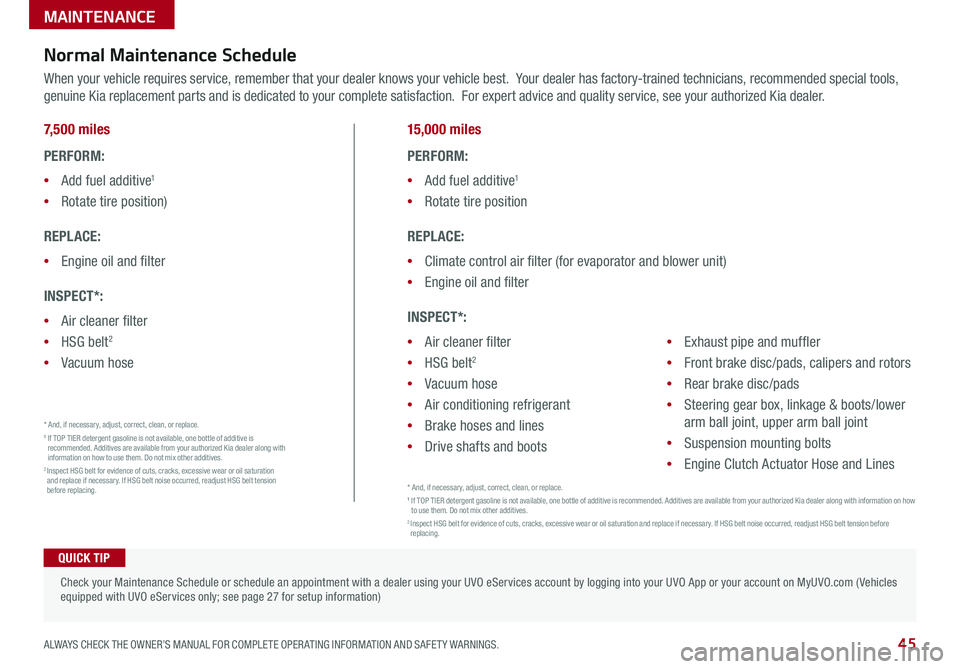
Normal Maintenance Schedule
When your vehicle requires service, remember that your dealer knows your vehicle best . Your dealer has factory-trained technicians, recommended special tools,
genuine Kia replacement parts and is dedicated to your complete satisfaction . For expert advice and quality service, see your authorized Kia dealer .
* And, if necessary, adjust, correct, clean, or replace .1 If TOP TIER detergent gasoline is not available, one bottle of additive is recommended . Additives are available from your authorized Kia dealer along with information on how to use them . Do not mix other additives .2 Inspect HSG belt for evidence of cuts, cracks, excessive wear or oil saturation and replace if necessary . If HSG belt noise occurred, readjust HSG belt tension before replacing .* And, if necessary, adjust, correct, clean, or replace .1 If TOP TIER detergent gasoline is not available, one bottle of additive is recommended . Additives are available from your authorized Kia dealer along with information on how to use them . Do not mix other additives .2 Inspect HSG belt for evidence of cuts, cracks, excessive wear or oil saturation and replace if necessary . If HSG belt noise occurred, readjust HSG belt tension before replacing .
MAINTENANCE
45ALWAYS CHECK THE OWNER’S MANUAL FOR COMPLETE OPER ATING INFORMATION AND SAFET Y WARNINGS .
Check your Maintenance Schedule or schedule an appointment with a dealer using your UVO eServices account by logging into your UVO App or your account on MyUVO . com ( Vehicles equipped with UVO eServices only; see page 27 for setup information)
QUICK TIP
7,500 miles
PERFORM:
•Add fuel additive1
•Rotate tire position)
REPLACE:
•Engine oil and filter
INSPECT*:
•Air cleaner filter
•HSG belt2
•Vacuum hose
15,000 miles
PERFORM:
•Add fuel additive1
•Rotate tire position
REPLACE:
•Climate control air filter (for evaporator and blower unit)
•Engine oil and filter
INSPECT*:
•Air cleaner filter
•HSG belt2
•Vacuum hose
•Air conditioning refrigerant
•Brake hoses and lines
•Drive shafts and boots
•Exhaust pipe and muffler
•Front brake disc/pads, calipers and rotors
•Rear brake disc/pads
•Steering gear box, linkage & boots/lower
arm ball joint, upper arm ball joint
•Suspension mounting bolts
•Engine Clutch Actuator Hose and Lines