2017 KIA CEED lock
[x] Cancel search: lockPage 43 of 653
Safety features of your vehicle
26
3
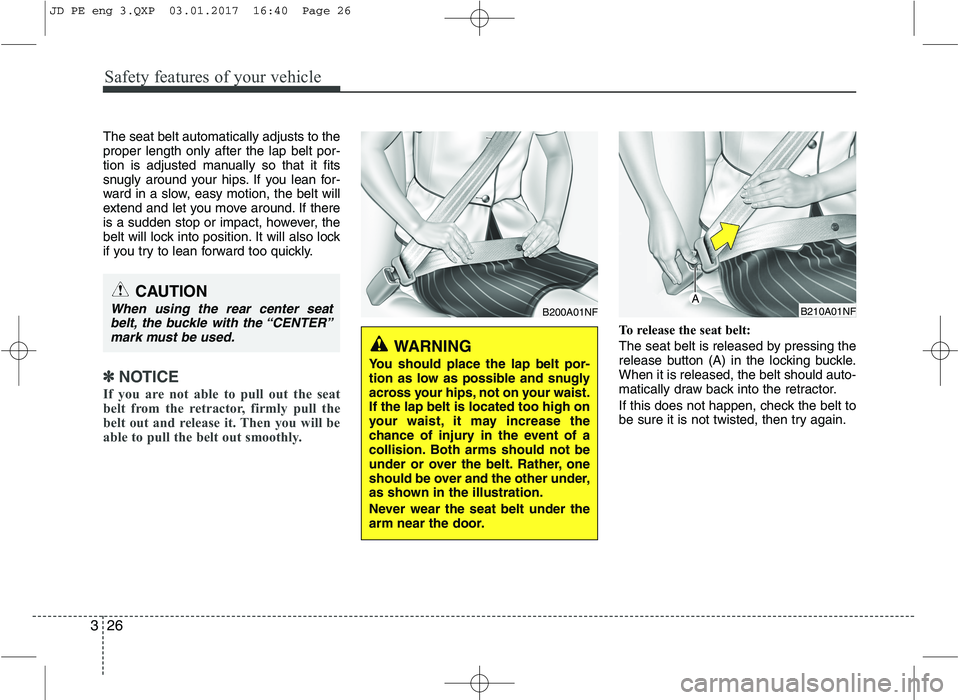
The seat belt automatically adjusts to the proper length only after the lap belt por-
tion is adjusted manually so that it fits
snugly around your hips. If you lean for-
ward in a slow, easy motion, the belt will
extend and let you move around. If there
is a sudden stop or impact, however, the
belt will lock into position. It will also lock
if you try to lean forward too quickly.
✽✽
NOTICE
If you are not able to pull out the seat
belt from the retractor, firmly pull the
belt out and release it. Then you will be
able to pull the belt out smoothly.
To release the seat belt:
The seat belt is released by pressing the
release button (A) in the locking buckle.When it is released, the belt should auto-
matically draw back into the retractor.
If this does not happen, check the belt to
be sure it is not twisted, then try again.
CAUTION
When using the rear center seat belt, the buckle with the “CENTER”
mark must be used.B200A01NF
WARNING
You should place the lap belt por-
tion as low as possible and snugly
across your hips, not on your waist.If the lap belt is located too high on
your waist, it may increase the
chance of injury in the event of a
collision. Both arms should not be
under or over the belt. Rather, one
should be over and the other under,
as shown in the illustration.
Never wear the seat belt under the
arm near the door.
B210A01NFA
JD PE eng 3.QXP 03.01.2017 16:40 Page 26
Page 44 of 653
327
Safety features of your vehicle
Pre-tensioner seat belt
Your vehicle is equipped with driver's and front passenger's pre-tensioner seat
belts. The purpose of the pre-tensioner is
to make sure that the seat belts fit tightly
against the occupant's body in certain
frontal collisions. The pre-tensioner seat
belts may be activated in crashes where
the frontal collision is severe enough.When the vehicle stops suddenly, or if
the occupant tries to lean forward too
quickly, the seat belt retractor will lock
into position. In certain frontal collisions,
the pre-tensioner will activate and pullthe seat belt into tighter contact against
the occupant's body.
If the system senses excessive seat belt
tension on the driver or passenger's seat
belt when the pre-tensioner activates, theload limiter inside the pre-tensioner willrelease some of the pressure on the
affected seat belt.
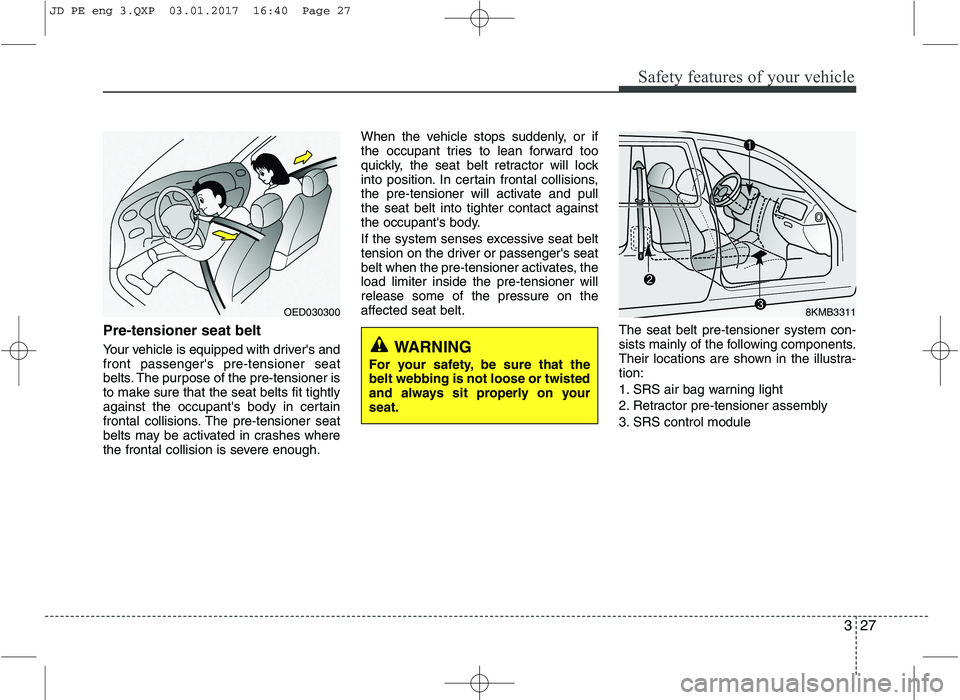
The seat belt pre-tensioner system con-
sists mainly of the following components.
Their locations are shown in the illustra-tion:
1. SRS air bag warning light
2. Retractor pre-tensioner assembly
3. SRS control module
WARNING
For your safety, be sure that the belt webbing is not loose or twisted
and always sit properly on yourseat.
OED0303008KMB3311
JD PE eng 3.QXP 03.01.2017 16:40 Page 27
Page 51 of 653

Safety features of your vehicle
34
3
(Continued)
Never leave children unattended
in a vehicle – not even for a short
time. The car can heat up very
quickly, resulting in serious
injuries to children inside. Even
very young children may inadver-
tently cause the vehicle to move,entangle themselves in the win-
dows, or lock themselves or oth-
ers inside the vehicle.
Never allow two children, or any two persons, to use the sameseat belt.
Children often squirm and repo- sition themselves improperly.
Never let a child ride with theshoulder belt under their arm or
behind their back. Always prop-
erly position and secure childrenin the rear seat.
Never allow a child to stand-up or kneel on the seat or floorboard of
a moving vehicle. During a colli-
sion or sudden stop, the child
can be violently thrown against
the vehicles interior, resulting in
serious injury.
(Continued)(Continued)
Never use an infant carrier or achild safety seat that "hooks"
over a seatback, it may not pro-vide adequate security in an acci-dent.
Seat belts can become very hot, especially when the car is parked
in direct sunlight. Always check
seat belt buckles before fasten-
ing them over a child.
After an accident, we recommend that the system be checked by an
authorized Kia dealer.
If there is not enough space to place the child restraint systembecause of the driver's seat,
install the child restraint systemin the rear right seat.WARNING
To reduce a risk of serious or fatal injuries:
Children of all ages are safer when restrained in the rear seat.
A child riding in the front passen-
ger seat can be forcefully struck
by an inflating air bag resulting inserious or fatal injuries.
Always follow the instructions for installation and use of the child
restraint maker.
Always make sure the child seat is secured properly in the car and
your child is securely restrained
in the child seat.
Never hold a child in your arms or lap when riding in a vehicle. The
violent forces created during a
crash will tear the child from your
arms and throw the child against
the car’s interior.
Never put a seat belt over your- self and a child. During a crash,the belt could press deep into the
child causing serious internalinjuries.
(Continued)
JD PE eng 3.QXP 03.01.2017 16:40 Page 34
Page 53 of 653
Safety features of your vehicle
36
3
Installing a child restraint system by
lap/shoulder belt
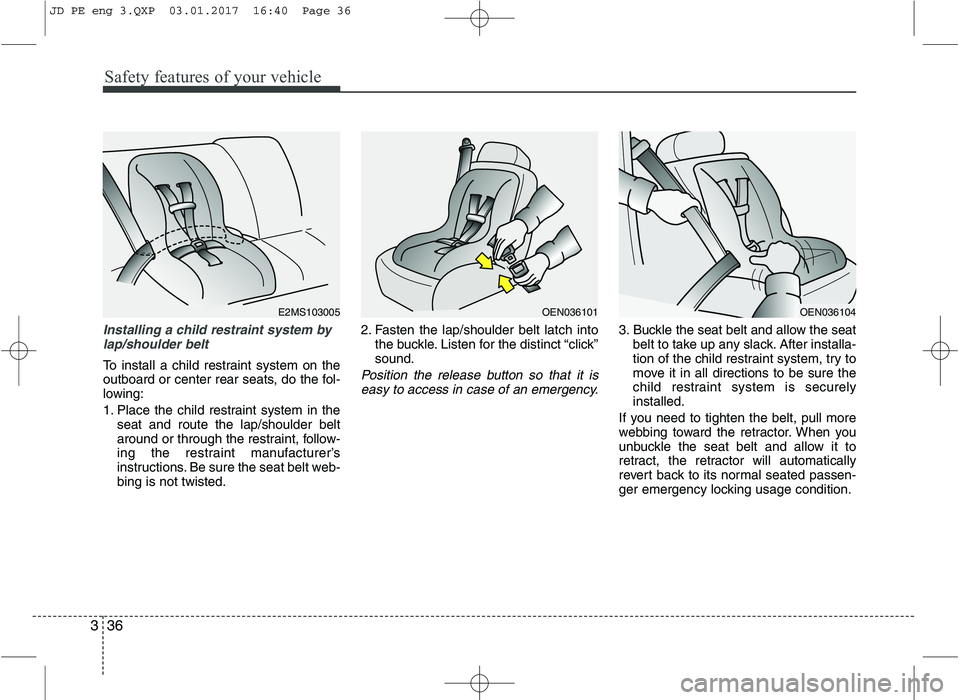
To install a child restraint system on the
outboard or center rear seats, do the fol-
lowing:
1. Place the child restraint system in the seat and route the lap/shoulder belt
around or through the restraint, follow-
ing the restraint manufacturer’s
instructions. Be sure the seat belt web-bing is not twisted. 2. Fasten the lap/shoulder belt latch into
the buckle. Listen for the distinct “click”sound.Position the release button so that it is
easy to access in case of an emergency.
3. Buckle the seat belt and allow the seat belt to take up any slack. After installa-
tion of the child restraint system, try to
move it in all directions to be sure the
child restraint system is securelyinstalled.
If you need to tighten the belt, pull more
webbing toward the retractor. When you
unbuckle the seat belt and allow it to
retract, the retractor will automatically
revert back to its normal seated passen-
ger emergency locking usage condition.
OEN036101OEN036104E2MS103005
JD PE eng 3.QXP 03.01.2017 16:40 Page 36
Page 64 of 653
347
Safety features of your vehicle
Do not install a child restraint on thefront passenger’s seat
Never place a rear-facing child restraint
in the front passenger’s seat. If the air
bag deploys, it would impact the rear-fac-
ing child restraint, causing serious or
fatal injury.
In addition, do not place front-facing child
restraints in the front passenger’s seat
either. If the front passenger air bag
inflates, it would cause serious or fatal
injuries to the child.
If your vehicle is equipped with the pas-
senger’s front air bag ON/OFF switch,
you can activate or deactivate the front
passenger’s air bag when necessary.
For more details, please refer to 3-52 page. Air bag warning and indicator
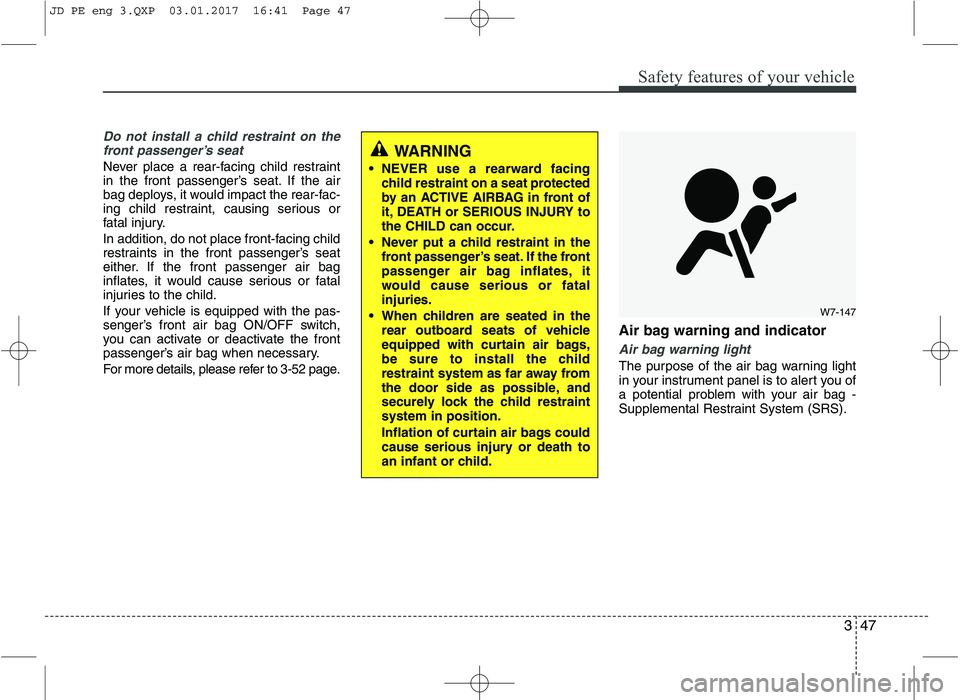
Air bag warning light
The purpose of the air bag warning light
in your instrument panel is to alert you of
a potential problem with your air bag -
Supplemental Restraint System (SRS).
WARNING
NEVER use a rearward facing child restraint on a seat protected
by an ACTIVE AIRBAG in front of
it, DEATH or SERIOUS INJURY to
the CHILD can occur.
Never put a child restraint in the front passenger’s seat. If the front
passenger air bag inflates, it
would cause serious or fatalinjuries.
When children are seated in the rear outboard seats of vehicle
equipped with curtain air bags,
be sure to install the child
restraint system as far away from
the door side as possible, and
securely lock the child restraintsystem in position.
Inflation of curtain air bags could
cause serious injury or death to
an infant or child.
W7-147
JD PE eng 3.QXP 03.01.2017 16:41 Page 47
Page 68 of 653

351
Safety features of your vehicle
WARNING
If an air bag deploys, there may be a loud noise followed by a fine
dust released in the vehicle.These conditions are normal and
are not hazardous - the air bags
are packed in this fine powder.
The dust generated during air
bag deployment may cause skin
or eye irritation as well as aggra-
vate asthma for some persons.
Always wash all exposed skin
areas thoroughly with cold waterand a mild soap after an accident
in which the air bags were
deployed.
(Continued)(Continued)
The SRS can function only whenthe ignition key is in the ON posi-
tion. If the SRS air bag warning
light does not illuminate, or con-
tinuously remains on after illumi-
nating for about 6 seconds when
the ignition key is turned to the
ON position, or after the engine is
started, comes on while driving,
the SRS is not working properly.
If this occurs, we recommend
that the system be inspected by
an authorized Kia dealer.
Before you replace a fuse or dis- connect a battery terminal, turn
the ignition switch to the LOCK
position and remove the ignition
key. Never remove or replace the
air bag related fuse(s) when the
ignition switch is in the ON posi-
tion. Failure to heed this warning
will cause the SRS air bag warn-
ing light to illuminate.
WARNING
Do not install or place any acces- sories (drink holder, cassette
holder, sticker, etc.) on the front
passenger's panel above the
glove box in a vehicle with a pas-
senger's air bag. Such objects
may become dangerous projec-
tiles and cause injury if the pas-
senger's air bag inflates.
When installing a container of liq- uid air freshener inside the vehi-
cle, do not place it near the
instrument cluster nor on the
instrument panel surface.
It may become dangerous projec-
tiles and cause injury if the pas-
senger's air bag inflates.
B240B05L
Passenger’s front air bag
JD PE eng 3.QXP 03.01.2017 16:41 Page 51
Page 76 of 653
359
Safety features of your vehicle
(Continued)
Do not allow the passengers tolean their heads or bodies onto
doors, put their arms on the
doors, stretch their arms out of
the window, or place objects
between the doors and passen-
gers when they are seated onseats equipped with side and/or
curtain air bags.
Never try to open or repair any components of the side curtain
air bag system. We recommend
that the system be serviced by an
authorized Kia dealer.
Failure to follow the above men-tioned instructions can result in
injury or death to the vehicle occu-pants in an accident.WARNING
Do not hang heavy items on the coat hooks for safety reasons.
In order for side impact and cur- tain air bags to provide the best
protection, both front seat occu-
pants and both outboard rearoccupants should sit in anupright position with the seat
belts properly fastened.
Importantly, children should sit in
a proper child restraint system inthe rear seat.
When children are seated in the rear outboard seats, they must be
seated in the proper childrestraint system.
Make sure to put the child
restraint system as far away from
the door side as possible, and
secure the child restraint system
in a locked position.
(Continued)WARNING - No attaching objects
Do not place any objects over the air bag. Also, do not attach any
objects around the area the air
bag inflates such as the door, side
door glass, front and rear pillar,
roof side rail.
Do not hang hard or breakable objects on the clothes hanger.
JD PE eng 3.QXP 03.01.2017 16:42 Page 59
Page 85 of 653

Features of your vehicle
Keys . . . . . . . . . . . . . . . . . . . . . . . . . . . . . . . . . . . . . . 4-4 Record your key number . . . . . . . . . . . . . . . . . . . . . . . 4-4
Key operations . . . . . . . . . . . . . . . . . . . . . . . . . . . . . . . . 4-4
Immobilizer system . . . . . . . . . . . . . . . . . . . . . . . . . . . . 4-4
Remote keyless entry . . . . . . . . . . . . . . . . . . . . . . . . 4-6 Remote keyless entry system operations . . . . . . . . . . . 4-6
Transmitter precautions . . . . . . . . . . . . . . . . . . . . . . . . 4-8
Battery replacement . . . . . . . . . . . . . . . . . . . . . . . . . . . 4-9
Smart key . . . . . . . . . . . . . . . . . . . . . . . . . . . . . . . . 4-11 Smart key function . . . . . . . . . . . . . . . . . . . . . . . . . . . 4-11
Smart key precautions . . . . . . . . . . . . . . . . . . . . . . . . 4-13
Door lock/unlock in an emergency situation . . . . . . 4-13
Theft-alarm system . . . . . . . . . . . . . . . . . . . . . . . . 4-14 Armed stage . . . . . . . . . . . . . . . . . . . . . . . . . . . . . . . . . 4-14
Theft-alarm stage . . . . . . . . . . . . . . . . . . . . . . . . . . . . 4-15
Disarmed stage. . . . . . . . . . . . . . . . . . . . . . . . . . . . . . . 4-16
Door locks . . . . . . . . . . . . . . . . . . . . . . . . . . . . . . . . 4-17 From outside . . . . . . . . . . . . . . . . . . . . . . . . . . . . . . . . 4-17
From inside . . . . . . . . . . . . . . . . . . . . . . . . . . . . . . . . . 4-18
Deadlocks . . . . . . . . . . . . . . . . . . . . . . . . . . . . . . . . . . . 4-20
Door lock/unlock features. . . . . . . . . . . . . . . . . . . . . . 4-20
Child-protector rear door lock. . . . . . . . . . . . . . . . . . 4-21
Tailgate . . . . . . . . . . . . . . . . . . . . . . . . . . . . . . . . . . 4-22 Opening the tailgate . . . . . . . . . . . . . . . . . . . . . . . . . . 4-22
Closing the tailgate . . . . . . . . . . . . . . . . . . . . . . . . . . . 4-22
Emergency tailgate safety release . . . . . . . . . . . . . . . 4-23
Windows . . . . . . . . . . . . . . . . . . . . . . . . . . . . . . . . . 4-24 Power windows . . . . . . . . . . . . . . . . . . . . . . . . . . . . . . 4-25 Manual windows . . . . . . . . . . . . . . . . . . . . . . . . . . . . . 4-28
Hood. . . . . . . . . . . . . . . . . . . . . . . . . . . . . . . . . . . . . 4-29 Opening the hood . . . . . . . . . . . . . . . . . . . . . . . . . . . . 4-29
Closing the hood . . . . . . . . . . . . . . . . . . . . . . . . . . . . . 4-30
Fuel filler lid . . . . . . . . . . . . . . . . . . . . . . . . . . . . . . 4-31 Opening the fuel filler lid . . . . . . . . . . . . . . . . . . . . . . 4-31
Closing the fuel filler lid . . . . . . . . . . . . . . . . . . . . . . . 4-31
Panorama sunroof . . . . . . . . . . . . . . . . . . . . . . . . . 4-34 Sunroof open warning. . . . . . . . . . . . . . . . . . . . . . . . . 4-35
Sunshade . . . . . . . . . . . . . . . . . . . . . . . . . . . . . . . . . . . 4-35
Sliding the sunroof . . . . . . . . . . . . . . . . . . . . . . . . . . . 4-35
Tilting the sunroof . . . . . . . . . . . . . . . . . . . . . . . . . . . . 4-36
Closing the sunroof . . . . . . . . . . . . . . . . . . . . . . . . . . . 4-36
Resetting the sunroof . . . . . . . . . . . . . . . . . . . . . . . . . 4-37
Steering wheel . . . . . . . . . . . . . . . . . . . . . . . . . . . . . 4-39 Electronic power steering . . . . . . . . . . . . . . . . . . . . . . 4-39
Tilt and telescopic steering . . . . . . . . . . . . . . . . . . . . . 4-40
Heated steering wheel . . . . . . . . . . . . . . . . . . . . . . . . . 4-40
Horn . . . . . . . . . . . . . . . . . . . . . . . . . . . . . . . . . . . . . . . 4-41
Flex steering wheel . . . . . . . . . . . . . . . . . . . . . . . . . . . 4-42
Mirrors . . . . . . . . . . . . . . . . . . . . . . . . . . . . . . . . . . 4-44 Inside rearview mirror . . . . . . . . . . . . . . . . . . . . . . . . 4-44
Outside rearview mirror. . . . . . . . . . . . . . . . . . . . . . . 4-45
Instrument cluster (Normal vision) . . . . . . . . . . . 4-48 Instrument panel illumination . . . . . . . . . . . . . . . . . . 4-49
Gauges . . . . . . . . . . . . . . . . . . . . . . . . . . . . . . . . . . . . . 4-49
Manual transaxle shift indicator . . . . . . . . . . . . . . . . 4-51
Automatic transaxle shift position indicator . . . . . . 4-51
4