Page 601 of 653
,Position light/DRL (LED type)
If the light does not operate, we recom-
mend that the system be checked by an
authorized Kia dealer.
✽✽ NOTICE
HID lamps h")
783
Maintenance
Headlight (Low, HID type),Position light/DRL (LED type)
If the light does not operate, we recom-
mend that the system be checked by an
authorized Kia dealer.
✽✽ NOTICE
HID lamps have superior performance
vs. halogen bulbs. HID lamps are esti-
mated by the manufacturer to last twice
as long or longer than halogen bulbs
depending on their frequency of use.
They will probably require replacement
at some point in the life of the vehicle.
Cycling the headlamps on and off more
than typical use will shorten HID lamps
life. HID lamps do not fail in the same
manner as halogen incandescent lamps.
If a headlamp goes out after a period of
operation but will immediately relight
when the headlamp switch is cycled it is
likely the HID lamp needs to be replaced.
HID lighting components are more com-
plex than conventional halogen bulbs
thus have higher replacement cost.
❈❈ Traffic Change (For Europe)
The low beam light distribution is asym-
metric. If you go abroad to a country with
opposite traffic direction, this asymmetric
part will dazzle oncoming car driver. To
prevent dazzle, ECE regulation demand
several technical solutions (ex. automatic
change system, adhesive sheet, down
aiming). This headlamps are designed
not to dazzle opposite drivers. So, you
need not change your headlamps in a
country with opposite traffic direction.
WARNING - HID Headlight
low beam (if equipped)
Do not attempt to replace or
inspect the low beam (XENON bulb)
due to electric shock danger. If the
low beam (XENON bulb) is not
working, we recommend that the
system be checked by an author-
ized Kia dealer.
OHD076046
WARNING - Halogen bulbs
Halogen bulbs contain pressurized
gas that will produce flying pieces
of glass if broken.
Always handle them carefully, and avoid scratches and abrasions. If
the bulbs are lit, avoid contact with
liquids. Never touch the glass with
bare hands. Residual oil may cause
the bulb to overheat and burst
when lit. A bulb should be operated
only when installed in a headlight.
If a bulb is damaged or cracked, replace it immediately and carefullydispose of it.
Wear eye protection when chang- ing a bulb. Allow the bulb to cool
down before handling it.
JD PE eng 7.QXP 03.01.2017 17:22 Page 83
Page 602 of 653
Maintenance
84
7
Turn signal light
Follow the steps 1 to 7 from the previous
page.
8. Remove the socket from the assembly
by turning the socket counterclockwise
until the tabs on the socket align with
the slots on the assembly.
9. Remove the bulb from the socket by pressing it in and rotating it counter-
clockwise until the tabs on the bulb
align with the slots in the socket. Pull
the bulb out of the socket.
10. Insert a new bulb by inserting it into the socket and rotating it until it locks
into place. 11. Install the socket in the assembly by
aligning the tabs on the socket with
the slots in the assembly. Push the
socket into the assembly and turn the
socket clockwise.
Front fog light, Daytime running light
(if equipped)
1. Pull the wheel guard down by rotating the screws.
2. Reach your hand into the back of the front bumper.
3. Disconnect the power connector from the socket.
OJD072044OJD072050
JD PE eng 7.QXP 03.01.2017 17:22 Page 84
Page 603 of 653

785
Maintenance
4. Remove the bulb-socket from thehousing by turning the socket counter
clockwise until the tabs on the socketalign with the slots on the housing.
5. Install the new bulb-socket into the housing by aligning the tabs on the
socket with the slots in the housing.
Push the socket into the housing and
turn the socket clockwise.
6. Connect the power connector to the socket. Headlight and front fog light aim-
ing (for Europe)
Headlight aiming
Without AFLS
1. Inflate the tires to the specified pres-
sure and remove any loads from the
vehicle except the driver, spare tire,
and tools.
2. The vehicle should be placed on a flat floor.
3. Draw vertical lines (Vertical lines pass- ing through respective head lamp cen-
ters) and a horizontal line (Horizontalline passing through center of headlamps) on the screen. 4. With the head lamp and battery in nor-
mal condition, aim the head lamps so
the brightest portion falls on the hori-
zontal and vertical lines.
5. To aim the low beam left or right, turn the driver (1) clockwise or counter-
clockwise. To aim the low beam up or
down, turn the driver (2) clockwise or
counterclockwise.
To aim the high beam up or down, turnthe driver (3) clockwise or counter-
clockwise.
OJD072027
■ Fog light
■Fog light+DRL (Bulb type) ■
DRL
OJD073067/OJD073068/OJD073069
JD PE eng 7.QXP 03.01.2017 17:22 Page 85
Page 604 of 653

Maintenance
86
7
With AFLS
1. Turn off the engine
2. Turn the light switch to the low beam
position.
3. Position the tires straight ahead with
the steering wheel.
4. Turn on the engine.
5. Inflate the tires to the specified pres-
sure and remove any loads from the
vehicle except the driver, spare tire,
and tools.
6. The vehicle should be placed on a flat
floor.
7. Draw vertical lines (Vertical lines pass- ing through respective head lamp cen-
ters) and a horizontal line (Horizontalline passing through center of headlamps) on the screen.
8. With the head lamp and battery in nor- mal condition, aim the head lamps so
the brightest portion falls on the hori-
zontal and vertical lines.
9. To aim the low beam left or right, turn the driver (1) clockwise or counter-
clockwise. To aim the low beam up or
down, turn the driver (2) clockwise or
counterclockwise. To aim the high
beam up or down, turn the driver (3)
clockwise or counterclockwise.Front fog light aiming
The front fog lamp can be aimed as the same manner of the head lamps aiming.
With the front fog lamps and battery nor-
mal condition, aim the front fog lamps. To
aim the front fog lamp up or down, turn the
driver (1) clockwise or counterclockwise.
OJD075028
OJD075070
OJD073082
■Type A
■Type B
■Type C
JD PE eng 7.QXP 03.01.2017 17:22 Page 86
Page 610 of 653
Maintenance
92
7
�
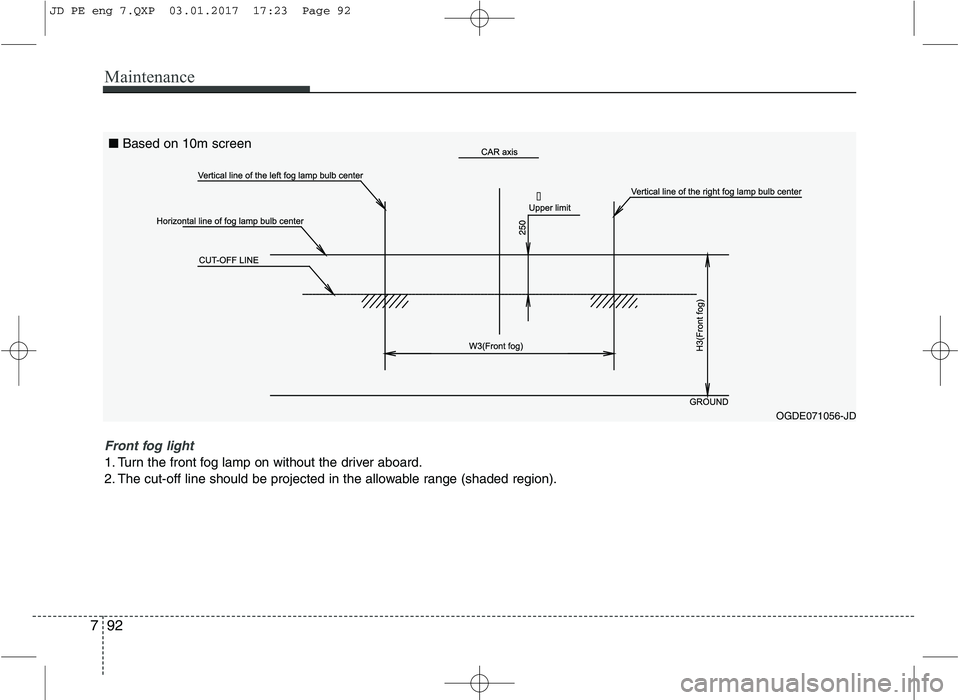
OGDE071056-JD
Front fog light
1. Turn the front fog lamp on without the driver aboard.
2. The cut-off line should be projected in the allowable range (shaded region). ■
Based on 10m screen
JD PE eng 7.QXP 03.01.2017 17:23 Page 92
Page 611 of 653
793
Maintenance
Side repeater light bulb replace- ment
If the light bulb does not operate, we rec-
ommend that the system be checked by
an authorized Kia dealer.(1) Rear turn signal light (2) Stop/tail light
(3) Back-up light (for 3 Door and 5 Door)
(4) Tail light or stop/tail light (for LED type) (5) Rear fog light (for 5 Door), Rear fog
light (Driver’s side) or back-up light
(Passenger’s side), (for wagon)
(6) Rear fog light (for 3 Door)
(7) Stop light (for 3 Door)
(8) Tail light (for 3 Door)
OJD072029
Rear combination light bulb replacement
■5 Door
■Wagon
■ 3 Door
OJD075030/OJD075063/OJD073072/OJD073072
JD PE eng 7.QXP 03.01.2017 17:23 Page 93
Page 612 of 653

Maintenance
94
7
❈ The actual rear combination lamp shape in
the vehicle may differ from illustration.
Outside light
Rear turn signal light and stop/tail light
1. Turn off the engine.
2. Open the tailgate.
3. Loosen the light assembly retaining screws with a cross-tip screwdriver.
4. Remove the rear combination light assembly from the body of the vehicle. 5. Remove the socket from the assembly
by turning the socket counterclockwise
until the tabs on the socket align with
the slots on the assembly.
6. Remove the bulb from the socket by pressing it in and rotating it counter-
clockwise until the tabs on the bulb
align with the slots in the socket. Pull
the bulb out of the socket.
7. Insert a new bulb by inserting it into the socket and rotating it until it locks
into place.
8. Install the socket in the assembly by aligning the tabs on the socket with the
slots in the assembly. Push the socket
into the assembly and turn the socket
clockwise.
9. Reinstall the light assembly to the body of the vehicle.
OJD072057
OJD072064
■
5 Door
■Wagon
OJD073073
■ 3 Door
Turn signal light
Stop/tail light
Stop or Stop/tail light
Turn signal light
Stop/tail light
OJD072045
Turn signal light
JD PE eng 7.QXP 03.01.2017 17:23 Page 94
Page 613 of 653
795
Maintenance
Stop and tail light or tail light (LED type)
If the light does not operate, we recom-
mend that the system be checked by an
authorized Kia dealer.
Inside light (5 Door and Wagon)
1. Turn off the engine.
2. Open the tailgate.
3. Remove the service cover using a flat-blade screwdriver. ❈
These below steps (4~6) only for the 5 Door
vehicle.
4. Loosen the retaining nuts.
5. Disconnect the power connector.
6. Remove the rear combination light assembly from the body of the vehicle.
OJD072048OJD072047
JD PE eng 7.QXP 03.01.2017 17:23 Page 95

 Rear turn signal light (2) Stop")

If the light does not operate, we recom-
mend that the system be checked by an
authorized Kia dealer.
Inside light (5 Door and Wagon)
1.")