Page 219 of 723

4123
Features of your vehicle
They will self-cancel after a turn is
completed. If the indicator continues
to flash after a turn, manually return
the lever to the OFF position.
To signal a lane change, move the
turn signal lever slightly and hold it in
position (B). The lever will return tothe OFF position when released.
If an indicator stays on and does not
flash or if it flashes abnormally, one of
the turn signal bulbs may be burnedout and will require replacement.One-touch lane change function
To activate an one-touch lane
change function, move the turn sig-
nal lever slightly and then release it.
The lane change signals will blink 3,
5 or 7 times.
You can choose one-touch lane
change blinking function in “One
touch turn lamp” of “User setting”.
Refer to “User setting” in chapter 4.
✽✽NOTICE
If an indicator flash is abnormally
quick or slow, bulb may be burned
out or have a poor electrical connec-
tion in the circuit.
Front fog light (if equipped)
Fog lights are used to provide
improved visibility when visibility is
poor due to fog, rain or snow, etc.
ORP042122
ORP042122R
■ Type A
■Type B
Page 652 of 723
865
Maintenance
Inner panel fuse replacement
1. Turn the ignition switch and allother switches off.
2. Open the fuse panel cover. 3. Pull the suspected fuse straight
out. Use the removal tool provided
in the engine compartment fusepanel.
4. Check the removed fuse; replace it if it is blown.
5. Push in a new fuse of the same rating, and make sure it fits tightly
in the clips.
If it fits loosely, we recommend that
you consult an authorised Kia dealer.
If you do not have a spare, use a fuse of the same rating from a circuityou may not need for operating the vehicle, such as the cigar lighterfuse. If the headlights, fog lights, turn sig-
nal lights, position lights or interior lights do not work and there is noth-ing wrong with the bulbs, we recom-mend that you consult with an autho- rised Kia dealer.
ORP072014R
ORP072015
Page 671 of 723

Maintenance
84
8
LIGHT BULBS
Use only the bulbs of the specified
wattage.
✽✽ NOTICE
After driving in heavy rain or wash-
ing the vehicle, headlight and tail-
light lenses could appear foggy. This
condition is caused by the tempera-
ture difference between the lamp
inside and outside. This is similar to
the condensation on your windows
inside your vehicle during rain and
does not indicate a problem with
your vehicle. If the water leaks into
the lamp bulb circuitry, we recom-
mend that the system be checked by
an authorised Kia dealer.WARNING - Working on
the lights
Prior to working on the light,
firmly apply the parking brake,
ensure that the ignition switch
is turned to the “LOCK” position
(smart key: turn off the engine)
and turn off the lights to avoid
sudden movement of the vehi-
cle and burning your fingers or
getting an electric shock.
CAUTION
Be sure to replace the burned- out bulb with one of the samewattage rating. Otherwise, it may cause damage to the fuseor electric wiring system.
CAUTION
If you do not have necessarytools, the correct bulbs and theexpertise, we recommend that you consult an authorised Kiadealer. In many cases, it is diffi-cult to replace vehicle lightbulbs because other parts of the vehicle must be removed beforeyou can get to the bulb. This isespecially true if you have to remove the headlight assemblyto get to the bulb(s).
Removing/installing the head-light assembly can result indamage to the vehicle.
Page 672 of 723
885
Maintenance
Front light replacement (1) Headlight (High) (2) Static bending light
(3) Headlight (Low)
(4) Position light/Daytime runninglight (DRL, LED Type) (if equipped)
(5) Front turn signal light
(6) Front fog light (if equipped) 1. Turn off the engine and open the
bonnet.
2. Disconnect the power connector front the back of the headlight
assembly.Static bending light
Follow the steps 1 to 2 from the pre-
vious chapter.
3. Remove the headlight bulb coverby turning it counterclockwise.
4. Disconnect the headlight bulb socket-connector.
5. Unsnap the headlight bulb retain- ing wire by depressing the end
and pushing it upward.
6. Remove the bulb from the head- light assembly.
ORP072057ORP076026L
Page 676 of 723
889
Maintenance
5. Insert a new bulb by inserting itinto the socket and rotating it until
it locks into place.
6. Install the socket in the assembly by aligning the tabs on the socket
with the slots in the assembly.
Push the socket into the assembly
and turn the socket clockwise.Front fog light (if equipped)
1. Pull the wheel guard down byrotating the screws.
2. Reach your hand into the back of the front bumper.
3. Disconnect the power connector from the socket. 4. Remove the bulb-socket from the
housing by turning the socket
counter clockwise until the tabs on
the socket align with the slots onthe housing.
5. Install the new bulb-socket into the housing by aligning the tabs on
the socket with the slots in the
housing. Push the socket into the
housing and turn the socket clock-
wise.
6. Connect the power connector to the socket.
ORP072063
OJD072050
Page 681 of 723
Maintenance
94
8
+10
-10
�b�i�a�ž�ž
ORP076082L
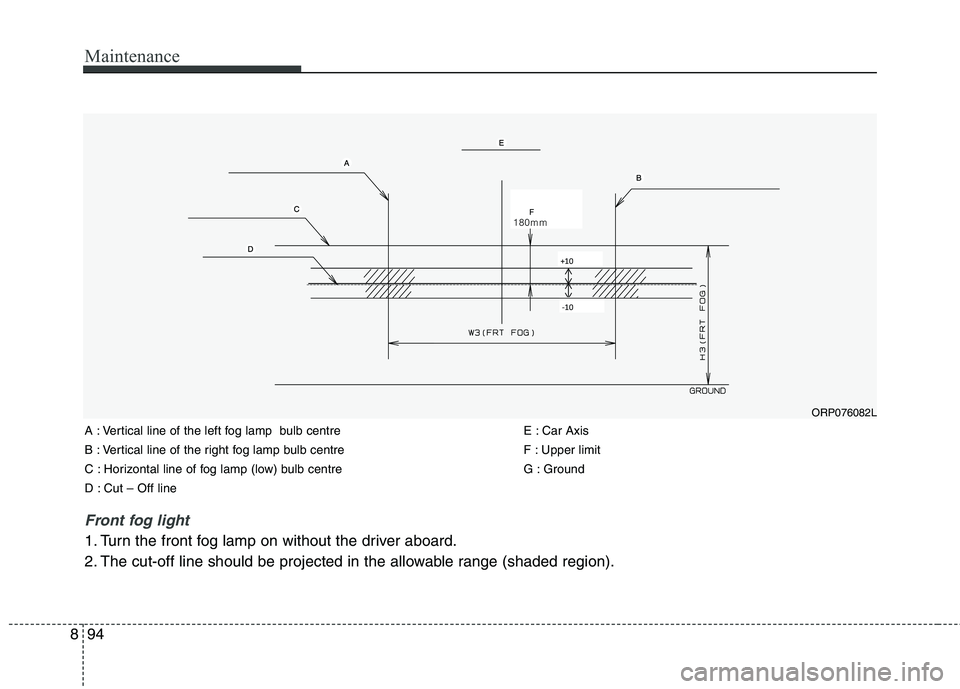
Front fog light
1. Turn the front fog lamp on without the driver aboard.
2. The cut-off line should be projected in the allowable range (shaded region).
A : Vertical line of the left fog lamp bulb centre
B : Vertical line of the right fog lamp bulb centre
C : Horizontal line of fog lamp (low) bulb centre
D : Cut – Off line
E : Car Axis
F : Upper limit
G : Ground
Page 682 of 723
895
Maintenance
Side repeater light bulb replacement
If the light bulb does not operate, we recommend that the system be
checked by an authorised Kia dealer.Rear combination light bulb replacement
(1) Rear turn signal light (2) Stop/tail light
(3) Back-up light (4) Tail light or stop/tail light
(for LED type)
(5) Rear fog & Reflex reflector light
ORP076035R
ORP072036
ORP072037
■ Type A
■Type B
Page 685 of 723
Maintenance
98
8
Rear fog light (if equipped)
1. Remove the socket from the
assembly by turning the socket
counterclockwise until the tabs on
the socket align with the slots on
the assembly.
2. Pull the bulb out of the socket.
3. Insert a new bulb into the socket.
4. Install the socket into the assem- bly by aligning the tabs on the
socket with the slots on the
assembly and turning the socket
clockwise.
5. Reinstall the light assembly to the body of the vehicle. Tail light or stop and tail light
(LED type)
If the light does not operate, we rec-
ommend that the system be checked
by an authorised Kia dealer.
High mounted stop light bulb replacement
If the light does not operate, we rec-
ommend that the system be checked
by an authorised Kia dealer.
ODMEMC2012
ORP072043

 Headlight (High) (2) Static bending light
(3) Headlight (Low)
(4) Position light/Daytime runninglight (DRL, LED Type) (if equipped)
(5) Front turn signal")


1. Remove the socket from the
assembly by turning the socket
counterclockwise until the tabs on
the socket align with the slots on
the assembly.
2. Pul")