2017 JEEP GRAND CHEROKEE remote start
[x] Cancel search: remote startPage 287 of 372

MULTIMEDIA
CYBERSECURITY............287
OFFROADPAGES—IF
EQUIPPED................ .288
Off Road Pages Status Bar........288
Drivetrain ...................288
Suspension ..................289
Accessory Gauges ..............289
Selec-Terrain .................289
TIPS CONTROLS AND GENERAL
INFORMATION ............ .290
Steering Wheel Audio Controls ......290
Reception Conditions ............290
Care And Maintenance ...........290
Anti-theft Protection ............291
UCONNECT ACCESS .........291
Uconnect Access — If Equipped (Available
On Uconnect 8.4/8.4 NAV — U.S.
Residents Only)...............291
Uconnect Access Registration (Uconnect
8.4/8.4 NAV, U.S. 48 Contiguous States,
Alaska And Hawaii) ............293
Download The Uconnect Access App . .293 Via Mobile Apps — If Equipped
.....294
Vehicle Finder ................295
Send&Go ..................296
Renewing Subscriptions And
Purchasing 3G Wi-Fi Hotspot (Uconnect
8.4/8.4 NAV, U.S. 48 Contiguous States,
Alaska And Hawaii) .............296
Getting Started With Apps ........297
Maintaining Your Uconnect Access
Account ....................298
Built-In Features ..............298
Vehicle Health Report/Alert ........301
Uconnect Access Remote Features . . .301
UCONNECT 5.0 .............305
Controls On The Front Panel .......305
Clock Setting .................306
Equalizer, Balance And Fade .......306
Radio Mode ..................307
Media Mode .................307
Bluetooth Source ..............310
iPod/USB/SD Card/AUX/Media Player
Control Support ...............311 USB/Audio Jack (AUX)/Bluetooth
Operation
...................311
Phone Mode .................312
SiriusXM Premier Over 160 Channels . .315
UCONNECT 8.4/8.4 NAV ......316
Uconnect 8.4/8.4 NAV At A Glance . . .316
Personalized Menu Bar...........318
Radio Mode ..................318
SiriusXM Premier Over 160 Channels .319
UCONNECT TOUCH SETTINGS . .322
IPOD/USB/SD CARD/MEDIA
PLAYERCONTROL ..........322
Audio Jack (AUX) ..............323
USB Port ...................323
SD Card ....................323
Bluetooth Streaming Audio ........323
Media Controls ................324
UCONNECT REAR SEAT ENTER-
TAINMENT (RSE) SYSTEM — IF
EQUIPPED................ .324
Getting Started...............324
MULTIMEDIA
285
Page 294 of 372
Uconnect Access enhances your ownership
and driving experience by connecting your
vehicle to an operable 1X (voice/data) or 3G
(data) network. When connected to an oper-
able 1X (voice/data) or 3G (data) network,
you can:
• Place a call to a local 9-1-1 Operator foremergency assistance.
• Remotely lock/unlock your doors and start your vehicle from virtually anywhere, using
the Uconnect Access App from your de-
vice. You can also do so by logging into
your owner site, or by calling Uconnect
Access Care when your vehicle has an
operable 1X (voice/data) or 3G (data) net-
work connection. Services can only be
used where coverage is available; see cov-
erage map for details.
• Turn your vehicle into a 3G Wi-Fi Hotspot and connect your devices to the internet.
• Receive text or email notifications if your vehicle's security alarm goes off.
• Receive stolen vehicle assistance, using GPS technology to help authorities locate
your vehicle if it is stolen. • Listen to your text messages or send free-
form text messages with your voice while
keeping your hands on the wheel, using
the Voice Texting feature. Requires a de-
vice that supports Bluetooth Message Ac-
cess Profile (MAP).
• Search for places to eat, shop, relax and play with Yelp, using your voice or on-
screen menu. Then navigate to them
(navigation standard on Uconnect
8.4 NAV, optional on Uconnect 8.4).
• Get operator assistance using the ASSIST button on your interior rearview mirror.
Before you drive, familiarize yourself with the
easy-to-use Uconnect Access services.
1. The ASSIST and 9-1-1 buttons are lo- cated on your rearview mirror. The ASSIST
button is used for contacting Roadside
Assistance, Vehicle Care and Uconnect
Access Care. The 9-1-1 button connects
you to emergency services. NOTE:
Vehicles sold in Canada and Mexico DO
NOT have 9-1-1 call system capabilities.
9-1-1 or other emergency line operators in
Canada and Mexico may not answer or
respond to 9-1-1 system calls.
2. The Uconnect “Apps
” button is lo-
cated in the center of the menu bar of the
radio touchscreen. This is where you can
manage your Apps and purchase 3G Wi-Fi
on demand.
3. The Uconnect Voice Command and Uconnect Phone buttons are located on
the left side of your steering wheel. These
buttons let you use your voice to give
commands, make phone calls, send and
receive text messages hands-free, enter
navigation destinations, and control your
radio and media devices.
Included Trial Period For New Vehicles
Your new vehicle may come with an included
trial period for use of the Uconnect Access
Services starting at the date of vehicle pur-
chase (date based on vehicle sales notifica-
tion from your dealer). To activate the trial, you
must first register with Uconnect Access. After
MULTIMEDIA
292
Page 303 of 372
3G Wi-Fi Hotspot
3G Wi-Fi Hotspot is an in-vehicle feature that
connects your device to an operable 1X
(voice/data) or 3G (data) network using
Uconnect Access and is ready to go where
ever you are. Once your vehicle is registered
for Uconnect Access, you can purchase a 3G
Wi-Fi Hotspot subscription at the Uconnect
Store. After you've made your purchase, turn
on your signal and connect your passengers’
devices. It's never been easier to bring your
home or office with you.
WARNING!
NEVER use the 3G Wi-Fi Hotspot when
you are driving the vehicle. As the driver,
you should only use the 3G Wi-Fi Hotspot
when the vehicle is parked in a safe loca-
tion. Failure to do so may result in an
accident involving serious injury or death.
Vehicle Health Report/Alert
Your vehicle will send you a monthly email
report, which summarizes the performance of
your vehicle’s key systems so you can stay ontop of your vehicle’s maintenance needs.
Your vehicle will also send you Vehicle Health
Alerts when it detects issues with its key
systems that need your attention. For further
information, go to the Mopar Owner Connect
website moparownerconnect.com.
Uconnect Access Remote Features
If you own a compatible iPhone or Android
powered device, the Uconnect Access App
allows you to remotely lock or unlock your
doors, start your engine or activate your horn
and lights from virtually anywhere. Your ve-
hicle must be equipped with remote start and
your vehicle must have an operable 1X (voice/
data) or 3G (data) network connection). Ser-
vices can only be used where coverage is
available; see coverage map for details. You
can download the App from Mopar Owner
Connect or from the App Store (iPhone) or
Google Play Store (Android). Visit
UconnectPhone.com to determine if your de-
vice is compatible. For Uconnect Phone cus-
tomer support and to determine if your device
is compatible.
U.S. residents - visit UconnectPhone.com or
call 1-877-855-8400.
Remote Start (If Equipped)
This feature provides the ability to start the
engine on your vehicle, without the keys and
from virtually any distance. You can send a
request to your vehicle in one of two ways:
1. Using the Uconnect Access App from a
compatible device.
2. From the Mopar Owner Connect website.
• After 15 minutes if you have not en-tered your vehicle with the key, the
engine will shut off automatically.
• You can also send a command to turn- off an engine that has been remote
started.
• This remote function requires your ve- hicle to be equipped with a factory-
installed Remote Start system. To uti-
lize this feature after the Uconnect
Access App is downloaded, login with
your user name and password.
To use this feature after the Uconnect Access
App is downloaded, login using your user
name and password. You will need your four
301
Page 304 of 372
digit Uconnect Security PIN to confirm the
request. Press the “remote start” icon on
your Uconnect Access App to remotely start
the vehicle.
You can set-up notifications for your account
to receive an email or text (SMS) message
every time a command is sent. Login to
Mopar Owner Connect
moparownerconnect.com and click on Edit
Profile to manage Uconnect Notifications.
Remote Door Lock/Unlock
This feature provides the ability to lock or
unlock the door on your vehicle, without the
keys and from virtually any distance. You can
send a request to your vehicle in one of three
ways:
1. Using the Uconnect Access App from acompatible device.
2. From the Mopar Owner Connect website.
3. By contacting the Uconnect Care on the phone.
To use this feature after the Uconnect Access
App is downloaded, login using your user
name and password. You will need your four digit Uconnect Security PIN to confirm the
request. Press the “closed lock” icon on your
Uconnect Access App to lock the doors, and
press the “open lock” icon to unlock the
driver’s door.
You can set-up notifications for your account
to receive an email or text (SMS) message
every time a command is sent. Login to
Mopar
Owner Connect
moparownerconnect.com and click on Edit
Profile to manage Uconnect Notifications.Remote Horn And Lights
It’s easy to locate a vehicle in a dark, crowded
or noisy parking area by activating the horn
and lights. It may also help if you need to
draw attention to your vehicle for any reason.
You can send a request to your vehicle in one
of three ways:
1. Using the Uconnect Access App from a compatible device.
2. From the Mopar Owner Connect website.
3. By contacting the Uconnect Care on the phone. To use this feature after the Uconnect Access
App is downloaded, login using your user
name and password. You will need your four
digit Uconnect Security PIN to confirm the
request. You can set-up notifications for your
account to receive an email or text (SMS)
message every time a command is sent.
Login to Mopar Owner Connect
moparownerconnect.com and click on Edit
Profile to manage Uconnect Notifications.
Voice Texting
Want to dictate a personal message? Register
with Uconnect Access to take advantage of a
new, cloudbased Voice Texting service, an
enhancement to Voice Text Reply.
Voice Texting allows you to compose a new
text or reply to an incoming text message.
Before you attempt to use the Voice Texting
feature, check to ensure you have the follow-
ing:
1. A paired, Bluetooth enabled device with
the Message Access Profile (MAP). Not all
Bluetooth enabled devices support MAP,
MULTIMEDIA
302
Page 310 of 372
Media Mode is entered by pushing the ME-
DIA button located on the faceplate. Once in
Media Mode, press the “Source” button on
the touchscreen and the desired mode button
on the touchscreen. Disc (if equipped), USB,
SD Card (if equipped), AUX and Bluetooth (if
equipped), are the Media sources available.
When available, you can select the “Browse”
button on the touchscreen to be given these
options:
• Now Playing
• Artists
• Albums
• Genres
• Songs
• Playlists
• Folders
Source
Press the “Source” button on the touch-
screen to select the desired audio source:
Disc (if equipped), USB, SD (if equipped),
AUX and Bluetooth (if equipped). This screen
will time out after a few seconds and return to
the main radio screen if no selection is made.You can press the “Source,” “Pause/Play” or
the “Info” button on the touchscreen for
artist information on the current song play-
ing.
Disc Mode — If Equipped
Your vehicle may have a remote Disc player
located in the center console storage bin.
Disc Mode is entered by either inserting a
CD/Disc or by pushing the MEDIA button on
the faceplate. Once in Media Mode, press the
“Source” button on the touchscreen and se-
lect “Disc.”
Inserting Compact Disc
Gently insert one disc into the disc player
with the disc label following the illustration
indicated on the player. The disc will auto-
matically be pulled into the disc player and
the disc icon will illuminate on the radio
display. If a disc does not go into the slot
more than 1.0 inch (2.5 cm), a disc may
already be loaded and must be ejected before
a new disc can be loaded.
If you insert a disc with the ignition ON and
the radio ON, the unit will switch to disc
mode and begin to play when you insert the
disc. The display will show the track number
and index time in minutes and seconds. Play
will begin at the start of track 1.
Browse
Press the “Browse” button on the touch-
screen to scroll through and select a desired
track on the Disc. Press the “Exit” button on
the touchscreen if you wish to cancel the
browse function.
Eject Button — Ejecting a Disc
Push the eject button to eject the disc. If you
have ejected a disc and have not removed it
within 10 seconds, it will be reloaded. If the
Disc is not removed, the radio will reinsert
the disc but will not play it.
A disc can be ejected with the radio and
ignition OFF.
MULTIMEDIA
308
Page 324 of 372
our satellite service area and in AK and HI.
©2016 Sirius XM Radio Inc. Sirius, XM
and all related marks and logos are trade-
marks of Sirius XM Radio Inc.
UCONNECT TOUCH
SETTINGS
The Uconnect system allows you to access
Customer Programmable feature settings
such as Display, Voice, Clock, Safety & Driv-
ing Assistance, Lights, Doors & Locks,
Auto-On Comfort & Remote Start, Engine Off
Options, Compass Settings, Audio, Phone/
Bluetooth, Suspension, SiriusXM Setup, Re-
store Settings, Clear Personal Data, and Sys-
tem Information through buttons on the
touchscreen.
Push the SETTINGS button (Uconnect 5.0),
or press the “Apps” button (Uconnect 8.4)
located near the bottom of the touchscreen,
then press the “Settings” button on the
touchscreen to access the Settings screen.
When making a selection, scroll up or down
until the preferred setting is highlighted,
then press the preferred setting until a check-mark appears next to the setting, showing
that setting has been selected. The following
feature settings are available:
• Display
• Engine Off Op-
tions
• Voice • Suspension
• Clock • Audio
• Safety & Driving Assistance • Phone/Bluetooth
• Lights • SiriusXM Setup
• Doors & Locks • Restore Settings
• Auto-On Comfort & Remote Start • Clear Personal
Data
• Compass (Uconnect 5.0) • System Informa-
tion
NOTE:
Depending on the vehicles options, feature
settings may vary.
Refer to “Uconnect Settings/Customer Pro-
grammable Features” in the “Multimedia”
Chapter on
www.jeep.com/en/owners/manuals/ for fur-
ther information.
IPOD/USB/SD CARD/MEDIA
PLAYER CONTROL
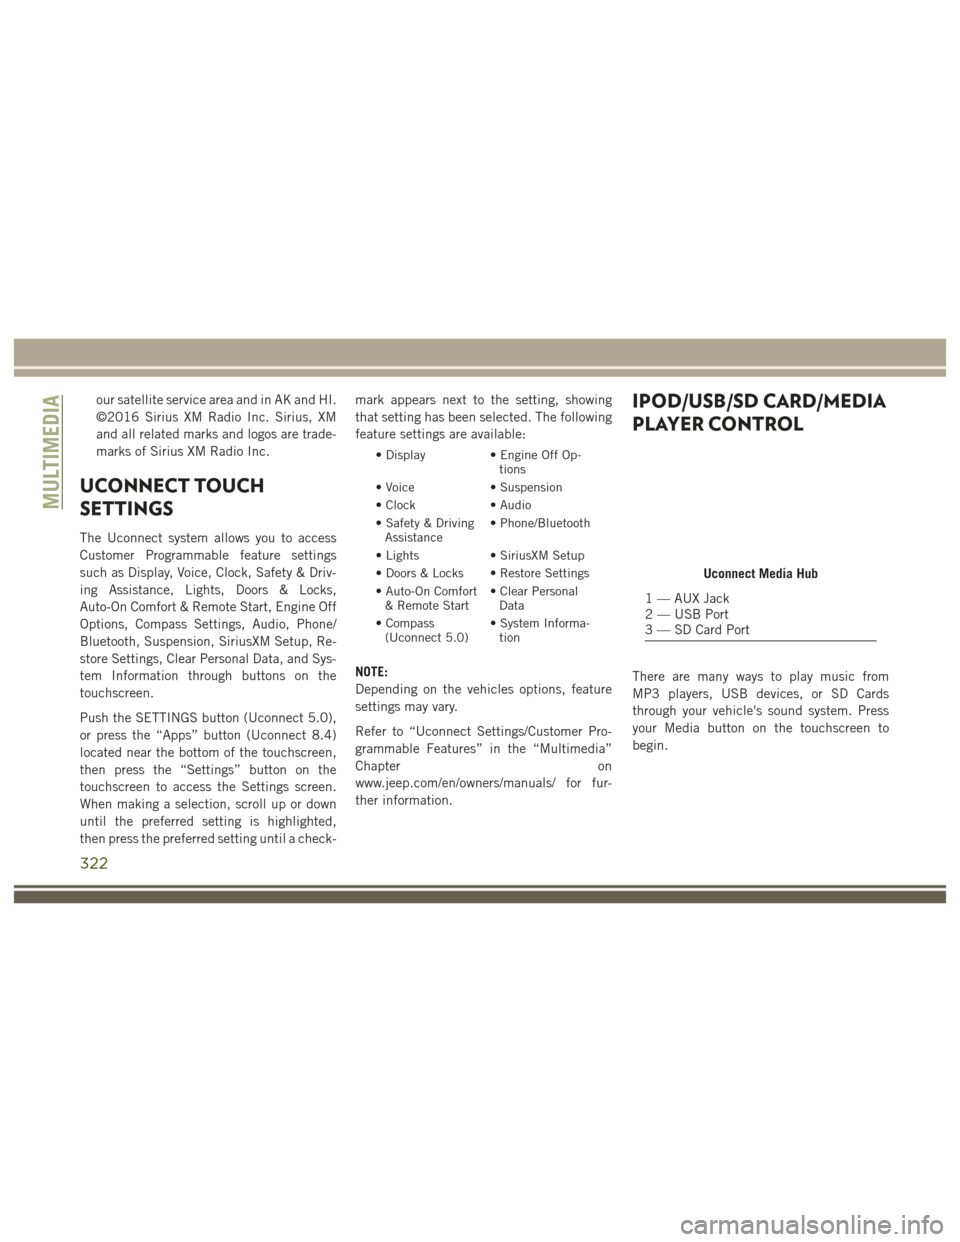
There are many ways to play music from
MP3 players, USB devices, or SD Cards
through your vehicle's sound system. Press
your Media button on the touchscreen to
begin.
Uconnect Media Hub
1 — AUX Jack
2 — USB Port
3 — SD Card Port
MULTIMEDIA
322
Page 326 of 372

Media ControlsThe controls are accessed by pressing the
desired button on the touchscreen and
choosing between Disc, AUX, USB,
Bluetooth or SD Card.
NOTE:
Uconnect will automatically switch to the
appropriate mode when something is first
connected or inserted into the system.
UCONNECT REAR SEAT
ENTERTAINMENT (RSE)
SYSTEM — IF EQUIPPED
Your Rear Seat Entertainment System is de-
signed to give your family years of enjoyment.
You can play your favorite CDs, DVDs or
Blu-ray Discs, listen to audio over the wire-
less headphones, or plug and play a variety of
standard video games or audio devices.
Please review this Owner's Manual to become
familiar with its features and operation.
Getting Started
•Screen(s) located in the rear of front seats:
Open the LCD screen cover by lifting up on
cover. • Place the ignition in the ON or ACC posi-
tion.
• Your vehicle may be equipped with a Blu- ray Disc Player. If equipped with a Blu-ray
disc player, the icon will be present on the
Player.
• Turn on the Rear Seat Entertainment sys- tem by pushing the power button on the
remote control.
Media Controls
1 — Repeat
Music Track
2 — Music
Track And Time
3 — Shuffle
Music Tracks
4 — Music
Track Informa-
tion5 — Show
Songs Currently
In Cue To Be
Played
6 — Browse
Music By
7 — Music
SourceRSE System Screen
MULTIMEDIA
324
Page 328 of 372

Dual Video Screen
NOTE:
Typically there are two different ways to op-
erate the features of the Rear Seat Entertain-
ment System.
• The Remote Control
• The Touchscreen Radio (If Equipped)
Blu-ray Disc Player
Play A Blu-ray Disc
The Blu-ray disc player is located in the
center console.1. Insert a Blu-ray disc into the VES discplayer with the label facing as indicated
on the Blu-ray player. The radio automati-
cally selects the appropriate mode after
the disc is recognized and displays the
menu screen, the language screen, or
starts playing the first track. 2. To watch a Blu-ray disc on Rear 1 for
driver's side rear passengers, ensure the
Remote Control and Headphone switch is
on Rear 1.
3. To watch a Blu-ray disc on Rear 2 for passenger side rear passengers, ensure
the Remote Control and Headphone
switch is on Rear 2.
NOTE:
• To view a Blu-ray disc on the radio, press the “Media” button on the touchscreen,
and then press the “Disc” button. Press
the “Play” button, and then the “full
screen” button.
• Viewing a Blu-ray disc on the radio screen is not available in all states/provinces. The
vehicle must be stopped, and the gear
selector must be in the PARK position for
vehicles with automatic transmission.
Blu-ray Disc Player Location
MULTIMEDIA
326