Page 169 of 615

SAFETY
CONTENTS
�SAFETY FEATURES ..................... .168
▫ Anti-Lock Brake System (ABS) .............168
▫ Electronic Brake Control System ............169
� AUXILIARY DRIVING SYSTEMS .............184
▫ Blind Spot Monitoring (BSM) — If Equipped . . .184
▫ Forward Collision Warning (FCW)
With Mitigation — If Equipped ............191
▫ Tire Pressure Monitor System (TPMS) ........195
� OCCUPANT RESTRAINT SYSTEMS ..........201
▫ Occupant Restraint Systems Features ........201
▫ Important Safety Precautions ..............201▫
Seat Belt Systems ..................... .202
▫ Supplemental Restraint System (SRS) .........214
▫ Child Restraints ...................... .234
▫ Transporting Pets ..................... .251
� SAFETY TIPS .......................... .252
▫ Transporting Passengers ..................252
▫ Exhaust Gas ......................... .252
▫ Safety Checks You Should Make
Inside The Vehicle ..................... .253
▫ Periodic Safety Checks You Should Make
Outside The Vehicle ....................255
5
Page 186 of 615
•The cluster icon and switch lamp will flash for several
seconds then extinguish when the driver pushes the SSC
switch but enable conditions are not met.
• The cluster icon and switch lamp will flash for several
seconds then extinguish when SSC disables due to
excess speed.
• The cluster icon and switch lamp will flash then extin-
guish when SSC deactivates due to overheated brakes.
WARNING!
SSC is only intended to assist the driver in controlling
vehicle speed when driving in off road conditions. The
driver must remain attentive to the driving conditions
and is responsible for maintaining a safe vehicle speed.
AUXILIARY DRIVING SYSTEMS
Blind Spot Monitoring (BSM) — If Equipped
The Blind Spot Monitoring (BSM) system uses two radar-
based sensors, located inside the rear bumper fascia, to
detect highway licensable vehicles (automobiles, trucks,
motorcycles, etc.) that enter the blind spot zones from the
rear/front/side of the vehicle.
Rear Detection Zones
184 SAFETY
Page 412 of 615
CavityBlade Fuse Cartridge Fuse Description
F72 10 Amp Red –Heated Mirrors —
If Equipped
F73 –20 Amp Blue Trailer Tow Back Up —
If Equipped
F74 –30 Amp Pink Rear Defroster
F75 20 Amp Yellow –Cigar Lighter —
If Equipped
F76 20 Amp Yellow –Rear Differential Module
(RDM) — If Equipped
F77 10 Amp Red –Fuel Door Release/Brake
Pedal Switch
F78 10 Amp Red –Diagnostic Port/Digital TV
(Japan Only)
F79 10 Amp Red –Integrated Center Stack
(ICS)/HVAC/Aux Switch Bank Module (ASBM)/
Instrument Panel Cluster (IPC)
F80 20 Amp Yellow –Radio / CD — If Equipped
F81 ––Not Used
F82 ––Not Used
410 IN CASE OF EMERGENCY
Page 415 of 615
Interior Fuses
The interior fuse panel is located on the Body Control
Module (BCM) in the passenger compartment on the left
side dash panel under the instrument panel.
CavityBlade Fuse Description
F13 15 Amp Blue Low Beam Left
F32 10 Amp Red Interior Lighting
F36 10 Amp Red Intrusion Module/Siren – If Equipped
F38 20 Amp Yellow Deadbolt All Unlock
F43 20 Amp Yellow Washer Pump Front
F48 25 Amp Clear Fog Lamp Rear Left/Right – If Equipped
F49 7.5 Amp Brown Lumbar Support
F50 7.5 Amp Brown Wireless Charging Pad – If Equipped
F51 10 Amp RedDriver Window Switch/Power Mirrors – If Equipped
F53 7.5 Amp Brown UCI Port (USB & AUX)
F89 10 Amp Red Door Locks – Driver Unlock
F91 7.5 Amp Brown Fog Lamp Front Left
F92 7.5 Amp Brown Fog Lamp Front Right
F93 10 Amp Red Low Beam Right
7
IN CASE OF EMERGENCY 413
Page 548 of 615
Setting NameAdjustable Options
AUX Volume Offset — If Equipped OnOff
NOTE:
The “AUX Volume Offset” feature provides the ability to tune the audio level for portable devices connected through
the AUX input
Phone/Bluetooth
After pressing the “Phone/Bluetooth” button on the touchscreen, the following settings will be available:
Setting Name Selectable Options
Paired Phones List Of Paired Phones
NOTE:
The “Paired Phones” feature shows which phones are paired to the Phone/Bluetooth system. For further information,
refer to the Uconnect Owner ’s Manual Supplement. Paired Audio Sources List Of Paired Audio Sources
NOTE:
The “Paired Audio Sources” feature shows which Audio Sources are paired to the Phone/Bluetooth system. For fur-
ther information, refer to the Uconnect Owner ’s Manual Supplement.
546 MULTIMEDIA
Page 565 of 615

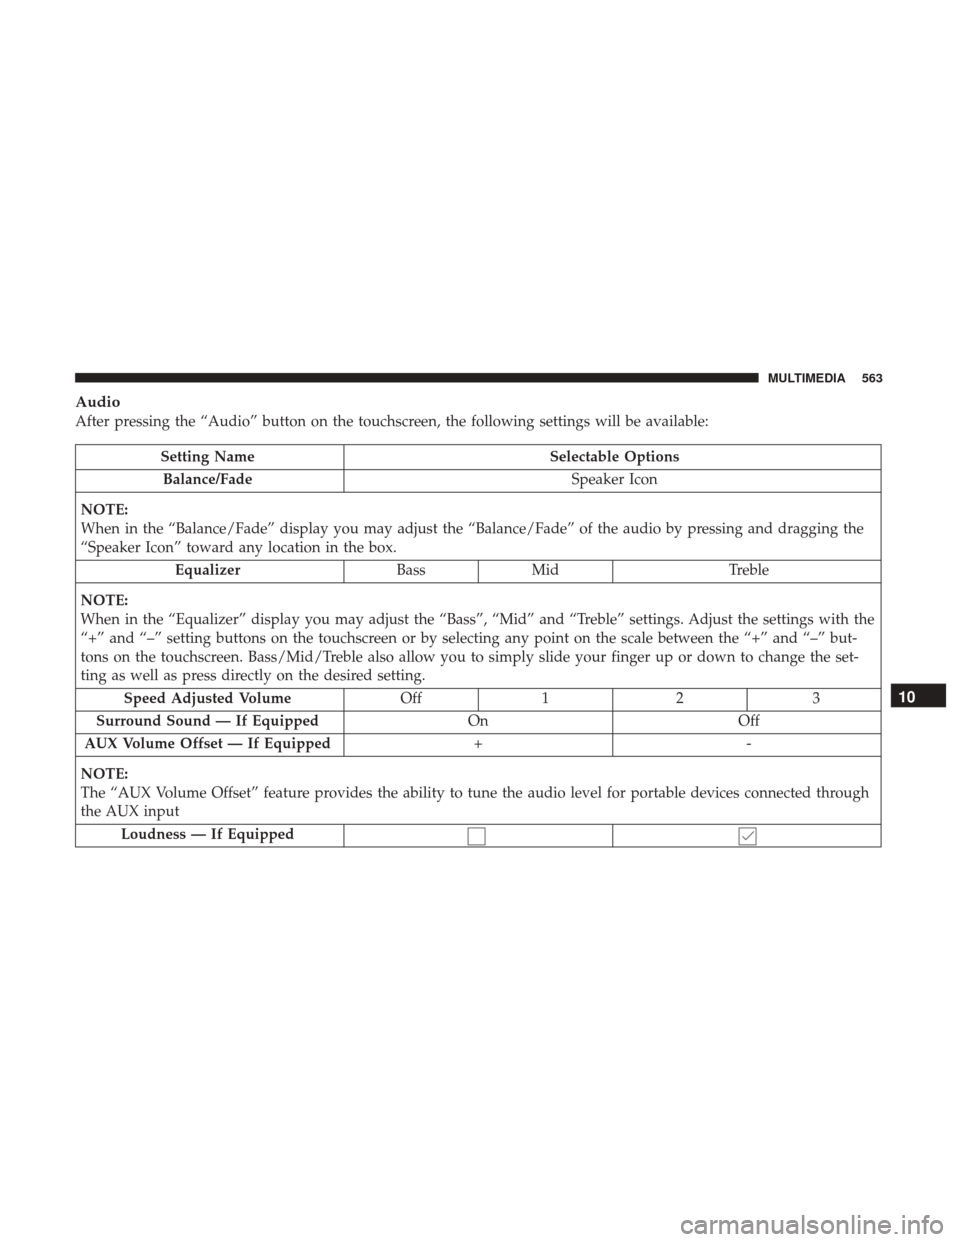
Audio
After pressing the “Audio” button on the touchscreen, the following settings will be available:
Setting NameSelectable Options
Balance/Fade Speaker Icon
NOTE:
When in the “Balance/Fade” display you may adjust the “Balance/Fade” of the audio by pressing and dragging the
“Speaker Icon” toward any location in the box. Equalizer BassMid Treble
NOTE:
When in the “Equalizer” display you may adjust the “Bass”, “Mid” and “Treble” settings. Adjust the settings with the
“+” and “–” setting buttons on the touchscreen or by selecting any point on the scale between the “+” and “–” but-
tons on the touchscreen. Bass/Mid/Treble also allow you to simply slide your finger up or down to change the set-
ting as well as press directly on the desired setting. Speed Adjusted Volume Off12 3
Surround Sound — If Equipped OnOff
AUX Volume Offset — If Equipped +-
NOTE:
The “AUX Volume Offset” feature provides the ability to tune the audio level for portable devices connected through
the AUX input Loudness — If Equipped
10
MULTIMEDIA 563
Page 569 of 615

STEERING WHEEL AUDIO CONTROLS —
IF EQUIPPED
The remote sound system controls are located on the rear
surface of the steering wheel. Reach behind the wheel to
access the switches.The right-hand control is a rocker-type switch with a
pushbutton in the center and controls the volume and
mode of the sound system. Pushing the top of the rocker
switch will increase the volume, and pushing the bottom of
the rocker switch will decrease the volume.
Pushing the center button will make the radio switch
between the various modes available (AM/FM/SXM/CD/
AUX, etc.).
The left-hand control is a rocker-type switch with a push-
button in the center. The function of the left-hand control is
different depending on which mode you are in.
The following describes the left-hand control operation in
each mode.
Radio Operation
Pushing the top of the switch will “Seek” up for the next
listenable station and pushing the bottom of the switch will
“Seek” down for the next listenable station.
The button located in the center of the left-hand control
will tune to the next preset station that you have pro-
grammed in the radio preset button.
Remote Sound System Controls
(Back View Of Steering Wheel)
10
MULTIMEDIA 567
Page 570 of 615
CD Player
Pushing the top of the switch once will go to the next track
on the CD. Pushing the bottom of the switch once will go
to the beginning of the current track, or to the beginning of
the previous track if it is within eight seconds after the
current track begins to play.
If you push the switch up or down twice, it plays the
second track; three times, it will play the third, etc.
The center button on the left side rocker switch has no
function for a single-disc CD player. However, when a
multiple-disc CD player is equipped on the vehicle, the
center button will select the next available CD in the player.
MEDIA HUB — IF EQUIPPED
Located in the front storage area, this feature allows an
External USB device, SD card or AUX electronic device to
be plugged into the port, slot or jack.
For further information, refer to the Uconnect Owner ’s
Manual Supplement.
Media Hub
1 — USB Port
2 — SD Card Slot
3 — AUX Jack
568 MULTIMEDIA