Page 410 of 615
CavityBlade Fuse Cartridge Fuse Description
F60 20 Amp Yellow –Power Outlet - Center
Console
F61 20 Amp Yellow –Trailer Tow Lights Right —
If Equipped
F62 20 Amp Yellow –Windshield de-icer —
If Equipped
F63 20 Amp Yellow –Front Heated/Vented Seats
— If Equipped
F64 20 Amp Yellow –Heated Steering Wheel —
If Equipped
F65 10 Amp Red –In Vehicle Temperature
Sensor/Humidity Sensor/
Driver Assist System Mod- ule (DASM)/Park Assist
(PAM) — If Equipped With Stop/Start option
F66 15 Amp Blue –HVAC (ECC)/Instrument
Panel Cluster (IPC)
408 IN CASE OF EMERGENCY
Page 449 of 615

SCHEDULED SERVICING
Your vehicle is equipped with an automatic oil change
indicator system. The oil change indicator system will
remind you that it is time to take your vehicle in for
scheduled maintenance.
Based on engine operation conditions, the oil change
indicator message will illuminate. This means that service
is required for your vehicle. Operating conditions such as
frequent short-trips, trailer tow, extremely hot or cold
ambient temperatures will influence when the “Oil Change
Required” message is displayed. Severe Operating Condi-
tions can cause the change oil message to illuminate as
early as 3,500 miles (5,600 km) since last reset. Have your
vehicle serviced as soon as possible, within the next 500
miles (805 km).
Your authorized dealer will reset the oil change indicator
message after completing the scheduled oil change. If a
scheduled oil change is performed by someone other than
your authorized dealer, the message can be reset by
referring to the steps described under “Instrument Cluster
Display” in “Understanding Your Instrument Panel” for
further information.NOTE:
Under no circumstances should oil change inter-
vals exceed 10,000 miles (16,000 km), twelve months or 350
hours of engine run time, whichever comes first. The 350
hours of engine run or idle time is generally only a concern
for fleet customers.
Severe Duty All Models
Change Engine Oil at 4,000 miles (6,500 km) if the vehicle
is operated in a dusty and off road environment or is
operated predominately at idle or only very low engine
RPM’s. This type of vehicle use is considered Severe Duty.
Once A Month Or Before A Long Trip:
• Check engine oil level.
• Check windshield washer fluid level.
• Check tire pressure and look for unusual wear or
damage. Rotate tires at the first sign of irregular wear,
even if it occurs before the oil indicator system turns on.
• Check the fluid levels of the coolant reservoir and brake
master cylinder, fill as needed.
• Check function of all interior and exterior lights.
8
SERVICING AND MAINTENANCE 447
Page 507 of 615

NOTE:When the vehicle has not been started or driven for
at least 30 days, an Extended Park Start Procedure is
required to start the vehicle. Refer to “Starting Procedures”
in “Starting And Operating” for further information.
CAUTION!
Before removal of the positive and negative terminals
to the battery, wait at least a minute with ignition
switch in the OFF position and close the drivers door.
When reconnecting the positive and negative terminals
to the battery be sure the ignition switch is in the OFF
position and the drivers door is closed.
BODYWORK
Protection From Atmospheric Agents
Vehicle body care requirements vary according to geographic
locations and usage. Chemicals that make roads passable in
snow and ice and those that are sprayed on trees and road
surfaces during other seasons are highly corrosive to the
metal in your vehicle. Outside parking, which exposes your
vehicle to airborne contaminants, road surfaces on which the
vehicle is operated, extreme hot or cold weather and other
extreme conditions will have an adverse effect on paint,
metal trim, and underbody protection.
The following maintenance recommendations will enable
you to obtain maximum benefit from the corrosion resis-
tance built into your vehicle.
What Causes Corrosion?
Corrosion is the result of deterioration or removal of paint
and protective coatings from your vehicle.
The most common causes are:
• Road salt, dirt and moisture accumulation.
• Stone and gravel impact.
• Insects, tree sap and tar.
• Salt in the air near seacoast localities.
• Atmospheric fallout/industrial pollutants.
Body And Underbody Maintenance
Cleaning Headlights
Your vehicle is equipped with plastic headlights and fog
lights that are lighter and less susceptible to stone breakage
than glass headlights.
Plastic is not as scratch resistant as glass and therefore
different lens cleaning procedures must be followed.
8
SERVICING AND MAINTENANCE 505
Page 532 of 615

Buttons On The Faceplate
Buttons on the faceplate are located below the Uconnect
system in the center of the instrument panel. In addition,
there is a Scroll/Enter control knob located on the right
side of the Climate Controls in the center of the instrument
panel. Turn the control knob to scroll through menus and
change settings (i.e., 30, 60, 90), push the center of the
control knob one or more times to select or change a setting
(i.e., ON, OFF).
Your Uconnect system may also have Screen Off and Back
buttons located below the Uconnect system.
Push the Screen Off button to turn off the Uconnect
touchscreen. Push the Screen Off button a second time to
turn the touchscreen on.
Push the Back button to exit out of a Menu or certain
option on the Uconnect system.
Buttons On The Touchscreen
Buttons on the touchscreen are accessible on the Uconnect
display.
Customer Programmable Features/Personal
Settings — Uconnect 5.0 Settings
Push the SETTINGS or the MORE button on the faceplate,
then the “Settings” button on the touchscreen (if equipped)
to display the menu setting screen. In this mode the
Uconnect system allows you to access programmable fea-
tures that may be equipped such as Display, Voice, Clock &
Date, Safety & Assistance, Lights, Doors & Locks, Auto-On
Comfort, Engine Off Options, Compass Settings, Audio,
Phone/Bluetooth, Sirius Setup, Restore Settings, and Clear
Personal Data, Brakes and System Information.
NOTE:Only one category may be selected at a time.
When making a selection, press the button on the touch-
screen to enter the desired mode. Once in the desired
mode, press and release the preferred setting and make
your selection. Once the setting is complete, either press
the Back Arrow/Done button on the touchscreen or the
Back button on the faceplate to return to the previous menu
or press the “X” button on the touchscreen to close out of
the settings screen. Pressing the Up or Down Arrow
buttons on the right side of the screen will allow you to
toggle up or down through the available settings.
530 MULTIMEDIA
Page 533 of 615

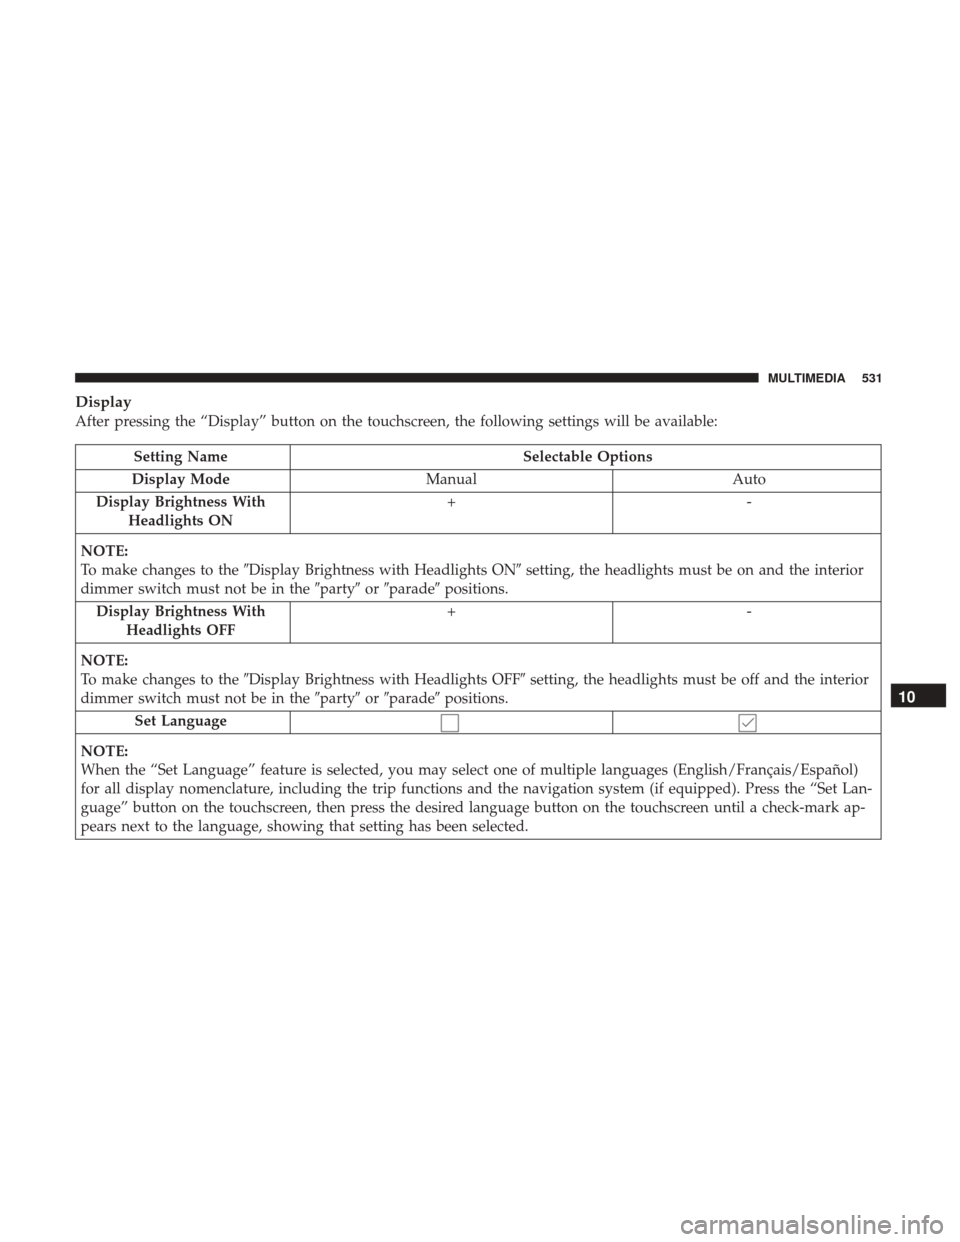
Display
After pressing the “Display” button on the touchscreen, the following settings will be available:
Setting NameSelectable Options
Display Mode Manual Auto
Display Brightness With Headlights ON +-
NOTE:
To make changes to the �Display Brightness with Headlights ON� setting, the headlights must be on and the interior
dimmer switch must not be in the �party�or�parade� positions.
Display Brightness With Headlights OFF +-
NOTE:
To make changes to the �Display Brightness with Headlights OFF� setting, the headlights must be off and the interior
dimmer switch must not be in the �party�or�parade� positions.
Set Language
NOTE:
When the “Set Language” feature is selected, you may select one of multiple languages (English/Français/Español)
for all display nomenclature, including the trip functions and the navigation system (if equipped). Press the “Set Lan-
guage” button on the touchscreen, then press the desired language button on the touchscreen until a check-mark ap-
pears next to the language, showing that setting has been selected.
10
MULTIMEDIA 531
Page 538 of 615

Setting NameSelectable Options
Blind Spot Alert — If Equipped Off
LightsLights and Chime
NOTE:
When the “Blind Spot Alert” feature is selected, the Blind Spot Monitor (BSM) system is activated and will show a
visual alert in the outside mirrors, or it will show a visual alert in the outside mirrors as well as play an audible alert
when the turn signal is on. When “Off” is selected, the Blind Spot Monitor (BSM) system is deactivated.
If your vehicle has experienced any damage in the area where the sensor is located, even if the fascia is not damaged,
the sensor may have become misaligned. Take your vehicle to an authorized dealer to verify sensor alignment. A sen-
sor that is misaligned will result in the BSM not operating to specification. ParkView Backup Camera Active Guide Lines — If Equipped
ParkView Backup Camera Fixed Guide Lines — If Equipped
ParkView Backup Camera Delay Enable
Disable
NOTE:
When the “ParkView Backup Camera Delay” feature is enabled, it will allow the ParkView Backup Camera display to
remain on while in drive for up to 10 seconds, or 8 mph (13 km/h).
536 MULTIMEDIA
Page 539 of 615
Setting NameSelectable Options
Rain Sensing Auto Wipers
Electric Park Brake Service Mode
NOTE:
The “Electric Park Brake Service Mode “ feature provides a means for a technician or vehicle owner to utilize a ve-
hicle integrated, menu driven system, to command the electric park brake retraction, to service the rear foundation
brakes (brake pads, calipers, rotors, etc.).
Lights
After pressing the “Lights” button on the touchscreen the following settings will be available:
Setting Name Selectable Options
Headlight Off Delay 0 sec30 sec 60 sec 90 sec
NOTE:
When the “Headlight Off Delay” feature is selected, it allows the adjustment of the amount of time the headlights
remain on after the engine is shut off. Headlights With Wipers —
If Equipped
10
MULTIMEDIA 537
Page 540 of 615
Setting NameSelectable Options
Headlight Illumina- tion On Approach 0 sec
30 sec 60 sec 90 sec
NOTE:
When the “Headlight Illumination On Approach” feature is selected, it allows the adjustment of the amount of time
the headlights remain on after the doors are unlocked with the key fob. Auto High Beam — If Equipped On
Off
NOTE:
When the “Auto High Beams” is selected, the high beam headlights will activate/deactivate automatically under
certain conditions. Daytime Running Lights Ye s
N o
Flash Lights With Lock On
Off
538 MULTIMEDIA