Page 32 of 580

WARNING!
•Do not start or run an engine in a closed garage or
confined area. Exhaust gas contains Carbon Monox-
ide (CO) which is odorless and colorless. Carbon
Monoxide is poisonous and can cause serious injury
or death when inhaled.
• Keep key fobs away from children. Operation of the
Remote Start System, windows, door locks or other
controls could cause serious injury or death.
Remote Start Abort Message On The Instrument
Cluster Display
The following messages will display in the instrument
cluster display if the vehicle fails to remote start or exits
remote start prematurely:
• Remote Start Aborted — Door Open
• Remote Start Aborted — Hood Open
• Remote Start Aborted — Fuel Low
• Remote Start Aborted — Liftgate Open
• Remote Start Disabled — Start Vehicle To Reset
• Remote Start Aborted — Too Cold
• Remote Start Aborted — Time Expired The message will stay active until the ignition is turned to
the ON/RUN position.
To Enter Remote Start Mode
Push and release the remote start button on the key fob
twice within five seconds. The vehicle doors will lock, the
parking lights will flash, and the horn will chirp twice (if
programmed). Then, the engine will start, and the vehicle
will remain in the Remote Start mode for a 15-minute cycle.
NOTE:
•
If an engine fault is present or fuel level is low, the
vehicle will start and then shut down in 10 seconds.
• The park lamps will turn on and remain on during
Remote Start mode.
• For security, power window and power sunroof opera-
tion (if equipped) are disabled when the vehicle is in the
Remote Start mode.
• The engine can be started two consecutive times with
the key fob. However, the ignition must be cycled by
pushing the START/STOP button twice (or the ignition
switch must be cycled to the ON/RUN position) before
you can repeat the start sequence for a third cycle.
30 GETTING TO KNOW YOUR VEHICLE
Page 38 of 580

WARNING!
•For personal security and safety in the event of a
collision, lock the vehicle doors before you drive as
well as when you park and exit the vehicle.
• When exiting the vehicle, always remove the key fob
from the vehicle and lock your vehicle. If equipped
with Keyless Enter-N-Go — Ignition, always make
sure the keyless ignition node is in “OFF” mode,
remove the key fob from the vehicle and lock the
vehicle. Unsupervised use of vehicle equipment may
cause severe personal injuries or death.
•
Never leave children alone in a vehicle, or with access
to an unlocked vehicle. Allowing children to be in a
vehicle unattended is dangerous for a number of
reasons. A child or others could be seriously or fatally
injured. Children should be warned not to touch the
parking brake, brake pedal or the gear selector.
• Do not leave the key fob in or near the vehicle, or in
a location accessible to children, and do not leave the
ignition of a vehicle equipped with Keyless Enter-
N-Go — Ignition the ACC or ON/RUN mode. A child
could operate power windows, other controls, or
move the vehicle.
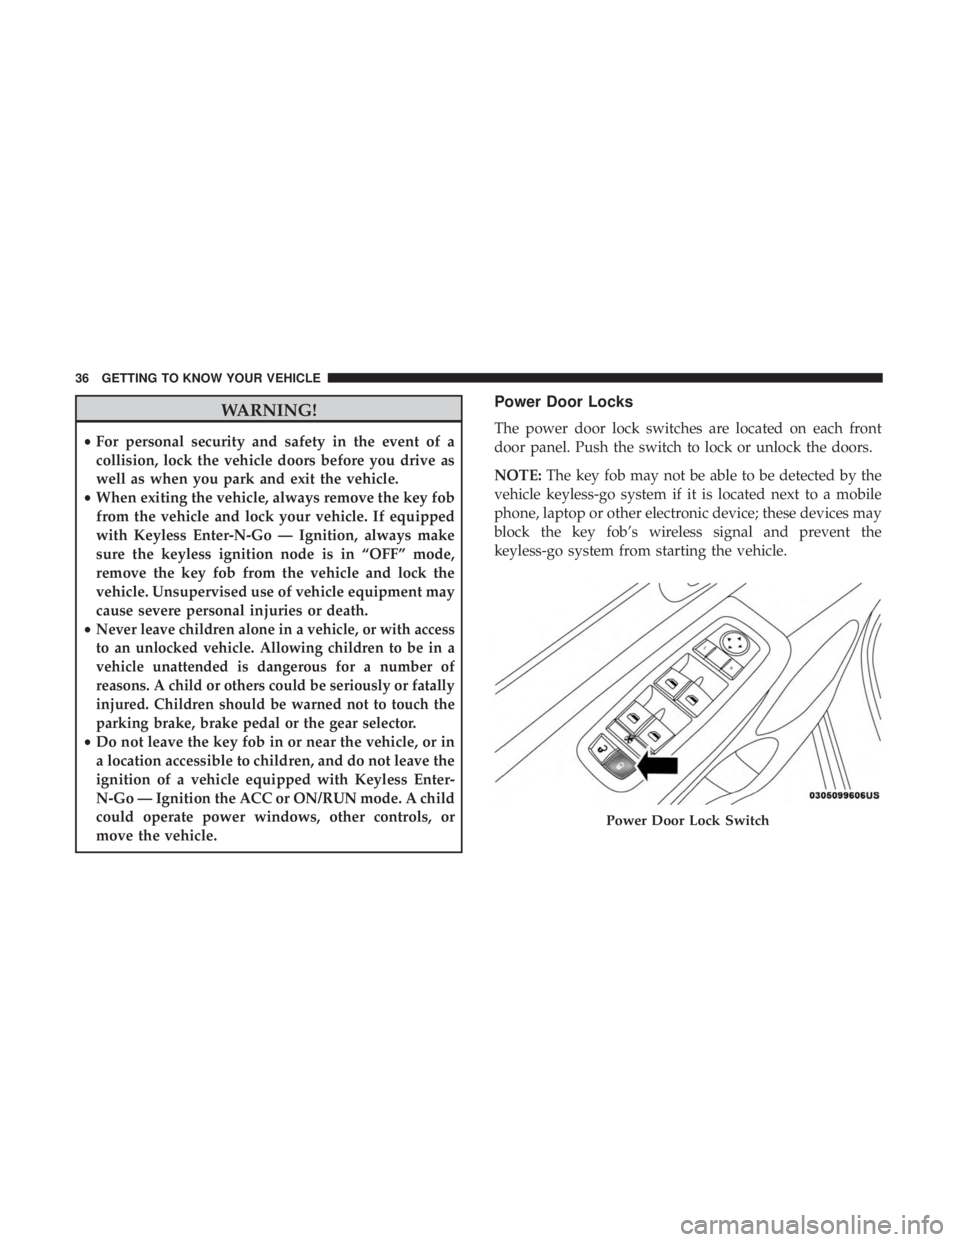
Power Door Locks
The power door lock switches are located on each front
door panel. Push the switch to lock or unlock the doors.
NOTE: The key fob may not be able to be detected by the
vehicle keyless-go system if it is located next to a mobile
phone, laptop or other electronic device; these devices may
block the key fob’s wireless signal and prevent the
keyless-go system from starting the vehicle.
Page 44 of 580
NOTE:
•When the child lock system is engaged, the door can be
opened only by using the outside door handle even
though the inside door lock is in the unlocked position.
• After engaging or disengaging the Child-Protection
Door Lock system, always test the door from the inside
to make certain it is in the desired position.
• For emergency exit with the system engaged, rotate the
door lock button until the lock indicator is hidden
(unlocked position), roll down the window, and open
the door with the outside door handle.
Page 196 of 580
occupant’s mid-section so as to not activate the ALR. If the
ALR is activated, you will hear a clicking sound as the seat
belt retracts. Allow the webbing to retract completely in
this case and then carefully pull out only the amount of
webbing necessary to comfortably wrap around the occu-
pant’s mid-section. Slide the latch plate into the buckle
until you hear a�click.�
In Automatic Locking Mode, the shoulder belt is automati-
cally pre-locked. The seat belt will still retract to remove
any slack in the shoulder belt. Use the Automatic Locking
Mode anytime a child restraint is installed in a seating
position that has a seat belt with this feature. Children 12
years old and under should always be properly restrained
in a vehicle with a rear seat.
Page 197 of 580
WARNING!(Continued)
•Do not use the Automatic Locking Mode to restrain
occupants who are wearing the seat belt or children
who are using booster seats. The locked mode is only
used to install rear-facing or forward-facing child
restraints that have a harness for restraining the
child.
Supplemental Restraint Systems (SRS)
Some of the safety features described in this section may be
standard equipment on some models, or may be optional
equipment on others. If you are not sure, ask your autho-
rized dealer.
The air bag system must be ready to protect you in a
collision. The Occupant Restraint Controller (ORC) moni-
tors the internal circuits and interconnecting wiring asso-
ciated with the electrical Air Bag System Components.
Your vehicle may be equipped with the following Air Bag
System Components:
Air Bag System Components
• Occupant Restraint Controller (ORC)
• Air Bag Warning Light
5
SAFETY 195
Page 227 of 580
Options for installing two child seats using the LATCH
anchorages in this vehicle:
1. Right and left outboard seating positions (1 and 3):Install the child seats in the right and left outboard
seating positions using lower anchorages A and B, and
D and E. Do not use the center seat anchorage, C. If the
child seats do not block the center seat belt webbing and
buckle, the center seat belt can be used to restraint an
occupant or child restraint in the center seating position. 2. Right outboard and center seating positions (1 and 2):
Install the first child seat in the right outboard seating
position using lower anchorages A and B. Install the
second child seat using the center anchorages, C and D.
Do not use the outer anchorage closest to the opposite
door, E. Do not use the remaining left outboard seating
position (3) for any occupant. The center child restraint
will block the seat belt buckle for this position.
Page 228 of 580

WARNING!(Continued)
anchor for the center position. You must use the
LATCH anchors to install the child seat in position
(3), behind the driver. You may use either the LATCH
anchors or the vehicle’s seat belt for installing the
child seat in position (1), behind the front passenger.
Please refer to “Installing the LATCH-Compatible
Child Restraint System” for typical installation in-
structions.
Always follow the directions of the child restraint manu-
facturer when installing your child restraint. Not all child
restraint systems will be installed as described here.
To Install A LATCH-Compatible Child Restraint
If the selected seating position has a Switchable Automatic
Locking Retractor (ALR) seat belt, stow the seat belt,
following the instructions below. See the section “Installing
Child Restraints Using the Vehicle Seat Belt” to check what
type of seat belt each seating position has.
1.
Loosen the adjusters on the lower straps and on the tether
strap of the child seat so that you can more easily attach
the hooks or connectors to the vehicle anchorages.
2. Place the child seat between the lower anchorages for that seating position. For some second row seats, you
may need to recline the seat and / or raise the head
restraint to get a better fit. If the rear seat can be moved
forward and rearward in the vehicle, you may wish to
move it to its rear-most position to make room for the
child seat. You may also move the front seat forward to
allow more room for the child seat.
3. Attach the lower hooks or connectors of the child restraint to the lower anchorages in the selected seating
position.
4. If the child restraint has a tether strap, connect it to the top tether anchorage. See the section “Installing Child
Restraints Using the Top Tether Anchorage” for direc-
tions to attach a tether anchor.
5. Tighten all of the straps as you push the child restraint rearward and downward into the seat. Remove slack in
the straps according to the child restraint manufactur-
er ’s instructions.
6. Test that the child restraint is installed tightly by pulling back and forth on the child seat at the belt path. It
should not move more than 1 inch (25.4 mm) in any
direction.
226 SAFETY
Page 229 of 580
How To Stow An Unused Switchable-ALR (ALR)
Seat Belt:
When using the LATCH attaching system to install a child
restraint, stow all ALR seat belts that are not being used by
other occupants or being used to secure child restraints.
An unused belt could injure a child if they play with it and
accidentally lock the seat belt retractor. Before installing a
child restraint using the LATCH system, buckle the seat
belt behind the child restraint and out of the child’s reach.
If the buckled seat belt interferes with the child restraint
installation, instead of buckling it behind the child re-
straint, route the seat belt through the child restraint belt
path and then buckle it. Do not lock the seat belt. Remind
all children in the vehicle that the seat belts are not toys and
that they should not play with them.