Page 369 of 580
WARNING!(Continued)
to turn around. To do so may result in tipping and
rolling the vehicle. Always back straight down a hill in
REVERSE gear carefully. Never back down a hill in
NEUTRAL using only the brake.
NOTE: Remember, never drive diagonally across a hill -
drive straight up or down.
If the wheels start to slip as you approach the crest of a hill,
ease off the accelerator and maintain headway by turning
the front wheels slowly left and right. This may provide a
fresh “bite” into the surface and may provide traction to
complete the climb.
Traction Downhill
Shift the transmission into a low gear and the 4WD System
to 4WD LOW range or Select Hill Descent Control if
equipped (refer to �Safety Features�in the “Safety” section
for further information). Let the vehicle go slowly down
the hill with all four wheels turning against engine com-
pression drag. This will permit you to control the vehicle
speed and direction. When descending mountains or hills, repeated braking can
cause brake fade with loss of braking control. Avoid
repeated heavy braking by downshifting the transmission
whenever possible.
After Driving Off-Road
Off-road operation puts more stress on your vehicle than
does most on-road driving. After going off-road, it is
always a good idea to check for damage.
•
Completely inspect the underbody of your vehicle.
Check tires, body structure, steering, suspension, and
exhaust system for damage.
• Inspect the radiator for mud and debris and clean as
required.
• Check threaded fasteners for looseness, particularly on
the chassis, drivetrain components, steering, and sus-
pension. Retighten them, if required, and torque to the
values specified in the Service Manual.
• Check for accumulations of plants or brush. These things
could be a fire hazard. They might hide damage to fuel
lines, brake hoses, axle pinion seals, and propeller shafts.
6
STARTING AND OPERATING 367
Page 412 of 580
WARNING!
You or others can be badly burned by hot engine
coolant (antifreeze) or steam from your radiator. If you
see or hear steam coming from under the hood, do not
open the hood until the radiator has had time to cool.
Never try to open a cooling system pressure cap when
the radiator or coolant bottle is hot.
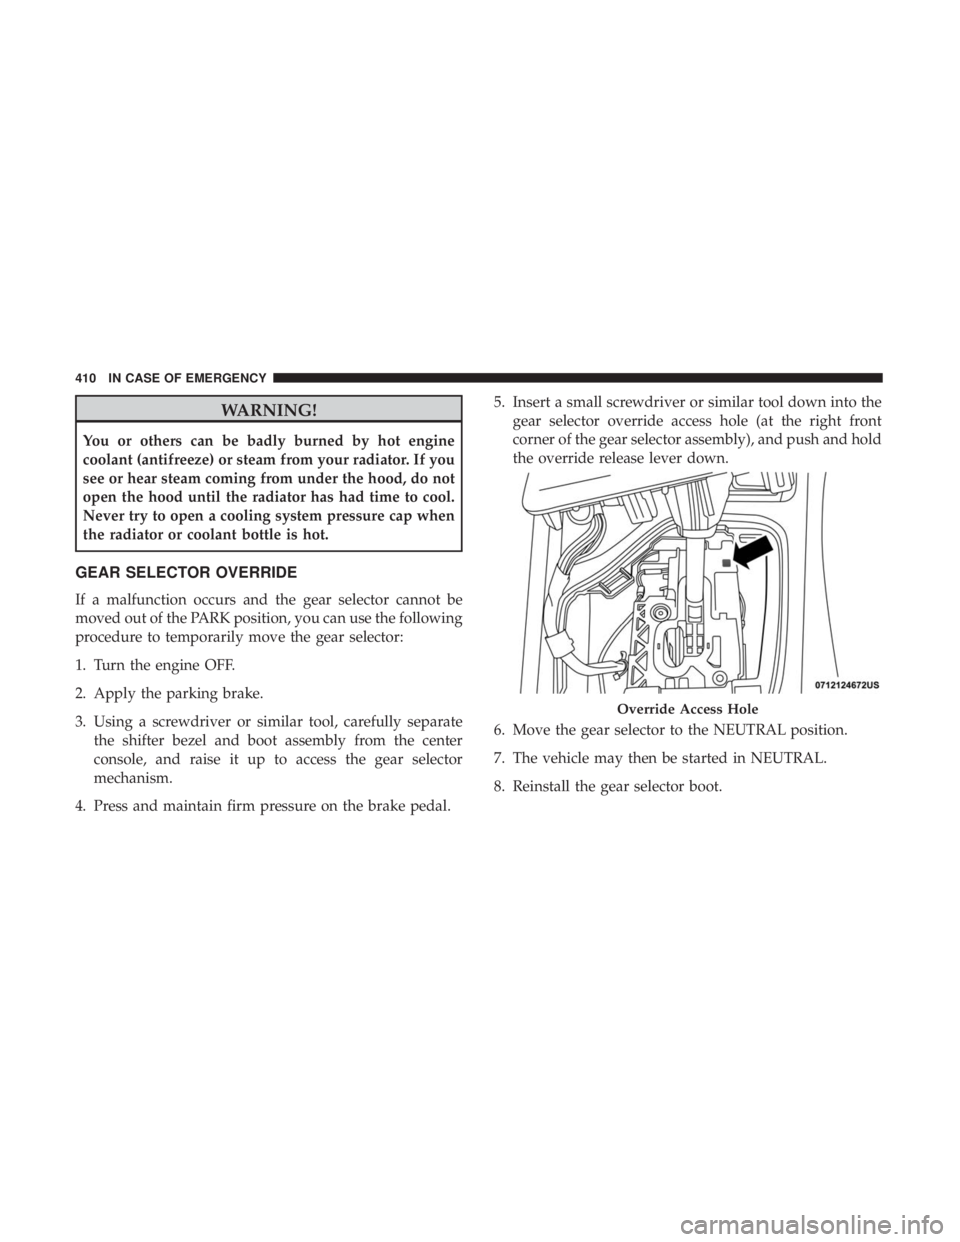
GEAR SELECTOR OVERRIDE
If a malfunction occurs and the gear selector cannot be
moved out of the PARK position, you can use the following
procedure to temporarily move the gear selector:
1. Turn the engine OFF.
2. Apply the parking brake.
3. Using a screwdriver or similar tool, carefully separatethe shifter bezel and boot assembly from the center
console, and raise it up to access the gear selector
mechanism.
4. Press and maintain firm pressure on the brake pedal. 5. Insert a small screwdriver or similar tool down into the
gear selector override access hole (at the right front
corner of the gear selector assembly), and push and hold
the override release lever down.
6. Move the gear selector to the NEUTRAL position.
7. The vehicle may then be started in NEUTRAL.
8. Reinstall the gear selector boot.
Page 413 of 580
FREEING A STUCK VEHICLE
If your vehicle becomes stuck in mud, sand or snow, it can
often be moved using a rocking motion. Turn the steering
wheel right and left to clear the area around the front
wheels. Push and hold the lock button on the gear selector.
Then shift back and forth between DRIVE and REVERSE,
while gently pressing the accelerator.
NOTE:Shifts between DRIVE and REVERSE can only be
achieved at wheel speeds of 5 mph (8 km/h) or less.
Whenever the transmission remains in NEUTRAL for more
than two seconds, you must press the brake pedal to
engage DRIVE or REVERSE.
Use the least amount of accelerator pedal pressure that will
maintain the rocking motion without spinning the wheels
or racing the engine.
Page 424 of 580
WARNING!
•You can be badly injured working on or around a
motor vehicle. Do only service work for which you
have the knowledge and the right equipment. If you
have any doubt about your ability to perform a
service job, take your vehicle to a competent me-
chanic.
• Failure to properly inspect and maintain your vehicle
could result in a component malfunction and effect
vehicle handling and performance. This could cause
an accident.
Heavy Duty Use Of The Vehicle
Change engine oil at 4,000 miles (6,500 km) or 350 hours of
engine run time if the vehicle is operated in a dusty and off
road environment or is operated predominately at idle or
only very low engine RPM’s. This type of vehicle use is
considered Severe Duty.
422 SERVICING AND MAINTENANCE
Page 431 of 580
Disposing Of Used Engine Oil And Oil Filters
Care should be taken in disposing of used engine oil and
oil filters from your vehicle. Used oil and oil filters,
indiscriminately discarded, can present a problem to the
environment. Contact an authorized dealer, service station
or governmental agency for advice on how and where used
oil and oil filters can be safely discarded in your area.
Engine Oil Filter
The engine oil filter should be replaced with a new filter at
every engine oil change.
Engine Oil Filter Selection
This manufacturer’s engines have a full-flow type dispos-
able oil filter. Use a filter of this type for replacement. The
quality of replacement filters varies considerably. Only
high quality filters should be used to assure most efficient
service. Mopar engine oil filters are high quality oil filters
and are recommended.
Engine Air Cleaner Filter
Refer to the “Maintenance Plan” in this section for the
proper maintenance intervals.
NOTE:Be sure to follow the “Severe Duty Conditions”
maintenance interval if applicable.
Page 434 of 580
Engine Air Cleaner Filter Installation
NOTE:Inspect and clean the housing if dirt or debris is
present before replacing the air filter element.
1. Install the air cleaner filter element into the housing assembly with the air cleaner filter inspection surface
facing downward.
2. Install the air cleaner cover onto the housing assembly locating tabs.
3. Install screws to secure the air cleaner cover to the housing assembly and install air hose (if equipped).
Accessory Drive Belt Inspection
Page 444 of 580
Installing The Rear Wiper
1. Lift the rear wiper arm pivot cap away from the glass toallow the rear wiper blade to be raised off of the glass.
NOTE: The rear wiper arm cannot be fully raised off the
glass unless the wiper arm pivot cap is unsnapped first.
Attempting to fully raise the rear wiper arm without
unsnapping the wiper arm pivot cap may damage the
vehicle.
2. Lift the rear wiper arm fully off the glass.
3. Insert the wiper blade pivot pin into the opening on the end of the wiper arm. Grab the bottom end of the wiper
arm with one hand, and apply pressure on the wiper
blade flush with the wiper arm until it snaps into place.
4. Lower the wiper blade onto the glass and snap the wiper arm pivot cap back into place.
Exhaust System
The best protection against carbon monoxide entry into the
vehicle body is a properly maintained engine exhaust system.
If you notice a change in the sound of the exhaust system;
or if the exhaust fumes can be detected inside the vehicle;
or when the underside or rear of the vehicle is damaged; have an authorized technician inspect the complete ex-
haust system and adjacent body areas for broken, dam-
aged, deteriorated, or mispositioned parts. Open seams or
loose connections could permit exhaust fumes to seep into
the passenger compartment. In addition, have the exhaust
system inspected each time the vehicle is raised for lubri-
cation or oil change. Replace as required.
Page 445 of 580
CAUTION!
•The catalytic converter requires the use of unleaded
fuel only. Leaded gasoline will destroy the effective-
ness of the catalyst as an emissions control device
and may seriously reduce engine performance and
cause serious damage to the engine.
• Damage to the catalytic converter can result if your
vehicle is not kept in proper operating condition. In
the event of engine malfunction, particularly involv-
ing engine misfire or other apparent loss of perfor-
mance, have your vehicle serviced promptly. Contin-
ued operation of your vehicle with a severe
malfunction could cause the converter to overheat,
resulting in possible damage to the converter and
vehicle.
Under normal operating conditions, the catalytic converter
will not require maintenance. However, it is important to
keep the engine properly tuned to assure proper catalyst
operation and prevent possible catalyst damage.
NOTE: Intentional tampering with emissions control sys-
tems can result in civil penalties being assessed against
you. In unusual situations involving grossly malfunctioning
engine operation, a scorching odor may suggest severe and
abnormal catalyst overheating. If this occurs, stop the
vehicle, turn off the engine and allow it to cool. Service,
including a tune-up to manufacturer’s specifications,
should be obtained immediately.
To minimize the possibility of catalytic converter damage:
•
Do not interrupt the ignition when the transmission is in
gear and the vehicle is in motion.
• Do not try to start the vehicle by pushing or towing the
vehicle.
• Do not idle the engine with any ignition components
disconnected or removed, such as when diagnostic
testing, or for prolonged periods during very rough idle
or malfunctioning operating conditions.
Cooling System