2017 INFINITI QX50 light
[x] Cancel search: lightPage 3 of 20

A\f\fitio\bal i\bformatio\b \.about your vehicle is\. also available i\b \.your Ow\ber’s Ma\bual, \.Navigatio\b System Ow\be\.r’s Ma\bual a\b\f at www.InfinitiUSA.co\Tm.
Table of Contents
A \fellular telephon\ne should not
be used for any pur\npose while
driving so full att\nention may be
given to vehi\fle op\neration.
Always wear your s\neat belt.
Supplemental air ba\ngs do not
repla\fe proper seat\n belt usage.
Children 12 and under\n
should always ride\n in the
rear seat properly\n se\fured
in \fhild restraints \nor seat
belts a\f\fording to t\nheir age
and weight.
Do not drink and d\nrive. For more information, refer to the “Safety — Seats, seat
belts and supplemental restraint system (section 1)”,
the “Display screen, heater and air conditioner, and
audio system (section 4)” and the “Starting and driving
(section 5)” of yo\Tur Owner’s Manual.\T
PLEASE SEE YOUR OWNER’S MANUAL FOR IMPORTANT SAFETY INFORMATION AND SYSTEM OPERATION LIMITATIONS.
Co\fkpit Overview ..................\n..................\n..................\n..................\n..... 1
Instrument Panel ..................\n..................\n..................\n..................\n..... 3
Meters and Gauges ..................\n..................\n..................\n..................\n.. 5
Conne\fting your Cell\nular Phone or Devi\f\ne via Bluetooth
® ................. 7
Bluetooth® Streaming Audio (i\nf so equipped) ..................\n................. 7
Intelligent Cruse C\nontrol (ICC) (if so\n equipped) ..................\n.............. 8
Navigation System (\nif so equipped) ..................\n..................\n............. 9
Infiniti Intelligent\n Key System ..................\n..................\n..................\n.. 10
Seat Adjustments ..................\n..................\n..................\n..................\n.. 10 Opening the Liftgat\ne ..................\n..................\n..................\n................ 11
Sun Visors ..................\n..................\n..................\n..................\n............. 11
USB Conne\ftion Port..................\n..................\n..................\n................ 11
Exterior Light Ope\nration ..................\n..................\n..................\n........... 12
Windows ..................\n..................\n..................\n..................\n............... 12
Clo\fk Set/Adjustment\n ..................\n..................\n..................\n.............. 13
Trip Computer ..................\n..................\n..................\n..................\n........ 13
Wiper and Washer Sw\nit\fh ..................\n..................\n..................\n........ 14
Brightness Control \nSwit\fhes ..................\n..................\n..................\n.... 14
Page 5 of 20

2
Cockpit Overview
1 Intelligent Cruise Control (ICC) switches (if so equipped)
2 Cruise control switches
3 Wiper and washer switch
4 Vehicle information display
5 Combined turn signal/Headlight control switch
6 Vehicle information display and audio control switches
7 Bluetooth® control switches
For more information, refer to your Owner
Page 11 of 20
8
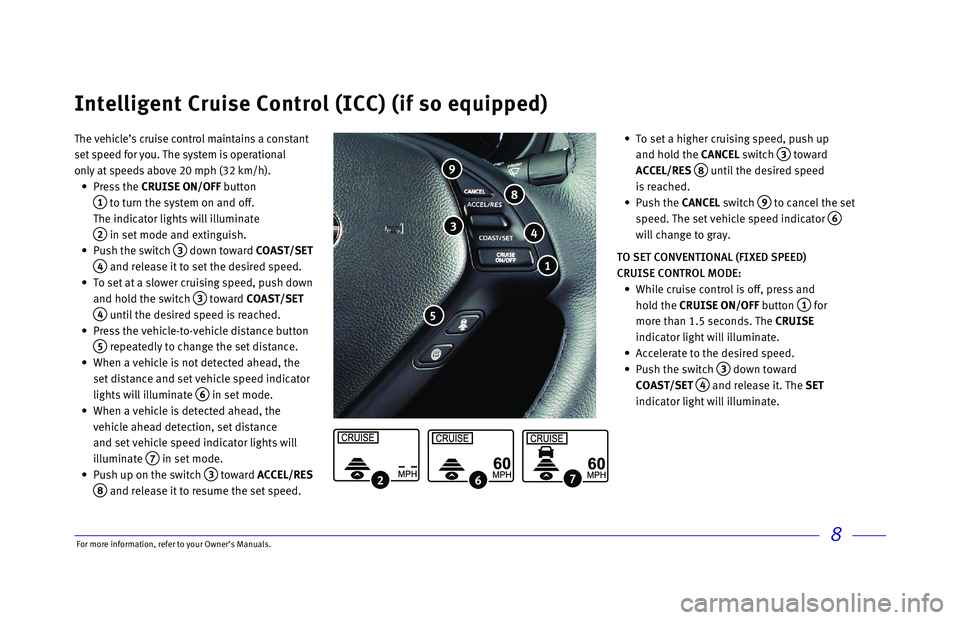
The vehicle’s cruise control maintains a constant
set speed for you. The system is operational
only at speeds above 20 mph (32 km/h).
•
Press
the CRUISE ON/OFF button
1 to turn the system on and off.
The indicator lights will illuminate
2 in set mode and extinguish.
•
Push the switch 3 down toward COAST/SET
4 and release it to set the desired speed.
•
To set at a slower cruising speed, push down
and hold the switch
3 toward COAST/SET
4 until the desired speed is reached.
•
Press the vehicle-to-vehicle distance button
5 repeatedly to change the set distance.
•
When a vehicle is not detected ahead, the
set distance and set vehicle speed indicator
lights will illuminate
6 in set mode.
•
When a vehicle is detected ahead, the
vehicle ahead detection, set distance
and set vehicle speed indicator lights will
illuminate
7 in set mode.
•
Push up on the switch 3 toward ACCEL/RES
8 and release it to resume the set speed.
•
To set a higher cruising speed, push up
and hold the
CANCEL switch
3 toward
ACCEL/RES 8 until the desired speed
is reached.
•
Push
the CANCEL switch
9 to cancel the set
speed. The set vehicle speed indicator 6
will change to gray.
TO SET CONVENTIONAL (FIXED SPEED)
CRUISE CONTROL MODE:
•
While cruise control is off, press and
hold the CRUISE ON/OFF
button
1 for
more than 1.5 seconds. The CRUISE
indicator light will illuminate.
• Accelerate to the desired speed.
•
Push the switch 3 down toward
COAST/SET
4 and release it. The SET
indicator light will illuminate.
Intelligent Cruise Control (ICC) (if so equipped)
2 6 7
1
3
5
8
4
9
For more information, refer to your Owner
Page 12 of 20
9
• Your Navigation System can calculate
a route from your current location to a
preferred destination. The real-time map
display and turn-by-turn voice guidance will
lead you along the route.
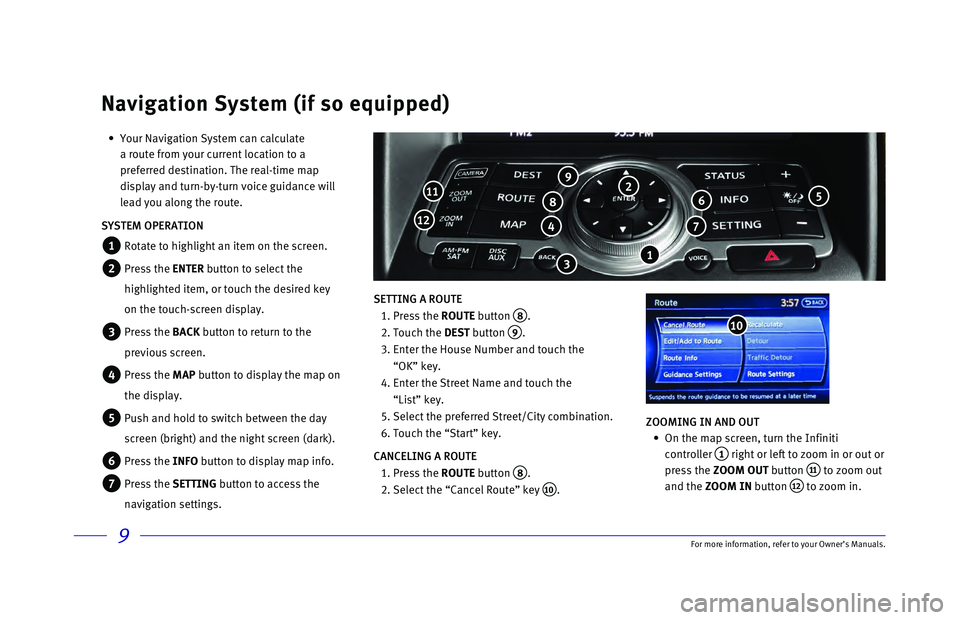
SYSTEM OPERATION
1 Rotate to highlight an item on the screen.
2 Press the ENTER button to select the
highlighted item, or touch the desired key
on the touch-screen display.
3 Press the BACK button to return to the
previous screen.
4 Press the MAP button to display the map on
the display.
5 Push and hold to switch between the day
screen (bright) and the night screen (dark).
6 Press the INFO button to display map info.
7 Press the SETTING button to access the
navigation settings. SETTING A ROUTE
1. Press the ROUTE
button
8.
2. Touch the DEST
button
9.
3. Enter the House Number and touch the
“OK” key.
4. Enter the Street Name and touch the
“List” key.
5. Select the preferred
Street/City combination.
6. Touch the “Start” key.
CANCELING A ROUTE
1. Press the ROUTE
button
8.
2. Select the “Cancel Route” key 10. ZOOMING IN AND OUT
•
On the map screen, turn the Infiniti
controller
1 right or left to zoom in or out or
press the ZOOM OUT button
11 to zoom out
and the ZOOM IN button
12 to zoom in.
Navigation System (if so equipped)
6
7 4
811
12
10
9
3
5 2
1
For more information, refer to your Owner
Page 14 of 20
11\bor more informatio\nn, refer to your Ow\nner’s Manuals.
3
Opening the Liftga\Tte Sun Visors
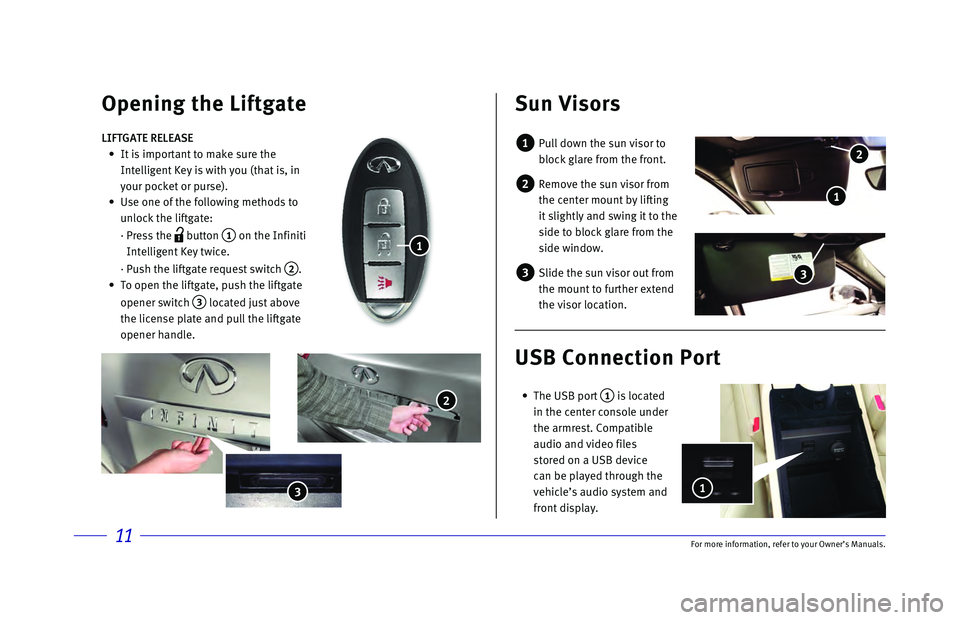
1 Pull down the sun v\nisor to
blo\fk glare from th\ne front.
2 Remove the sun viso\nr from
the \fenter mount by \nlifting
it slightly and swi\nng it to the
side to blo\fk glare\n from the
side window.
3 Slide the sun visor\n out from
the mount to furthe\nr extend
the visor lo\fation.\n
LIFTGATE RELEASE
It is important to \nmake sure the
Intelligent Key is \nwith you (that is,\n in
your po\fket or purs\ne).
Use one of the foll\nowing methods to
unlo\fk the liftgate:\n
· Press the
button
1 on the Infiniti
Intelligent Key twi\n\fe.
· Push the liftgate \nrequest swit\fh
2.
To open the liftgat\ne, push the liftga\nte
opener swit\fh
3 lo\fated just above\n
the li\fense plate a\nnd pull the liftgat\ne
opener handle.
1
2
3
USB Connection \fort\T
The USB port 1 is lo\fated
in the \fenter \fonsole\n under
the armrest. Compa\ntible
audio and video fil\nes
stored on a USB dev\ni\fe
\fan be played throu\ngh the
vehi\fle’s audio sys\ntem and
front display.
1
2
1
Page 15 of 20
12
6
7
Exterior Light Operation Windows
3
4 5
1
2
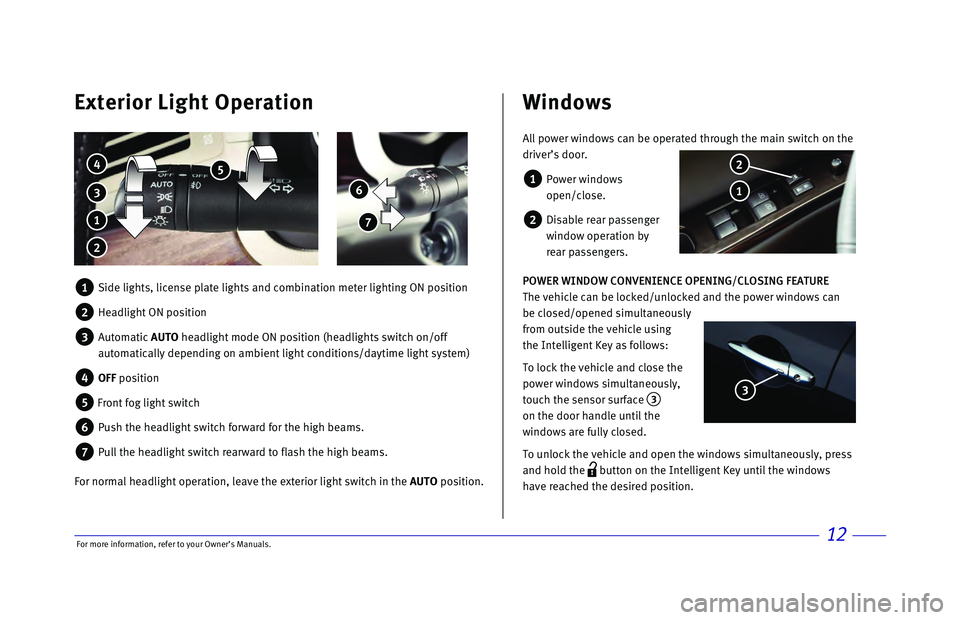
All power windows can be operated through the main switch on the
driver’s door.
1 Power windows
open/close.
2 Disable rear passenger
window operation by
rear passengers.
POWER WINDOW CONVENIENCE OPENING/CLOSING FEATURE
The vehicle can be locked/unlocked and the power windows can
be closed/opened simultaneously
from outside the vehicle using
the Intelligent Key as follows:
To lock the vehicle and close the
power windows simultaneously,
touch the sensor surface
3
on the door handle until the
windows are fully closed.
To unlock the vehicle and open the windows simultaneously, press
and hold the
button on the Intelligent Key until the windows
have reached the desired position.
1
2
3
1 Side lights, license plate lights and combination meter lighting ON posi\
tion
2 Headlight ON position
3 Automatic AUTO headlight mode ON position (headlights switch on/off
automatically depending on ambient light conditions/daytime light system\
)
4 OFF position
5 Front fog light switch
6 Push the headlight switch forward for the high beams.
7 Pull the headlight switch rearward to flash the high beams.
For normal headlight operation, leave the exterior light switch in the AUTO position.
For more information, refer to your Owner
Page 16 of 20
13
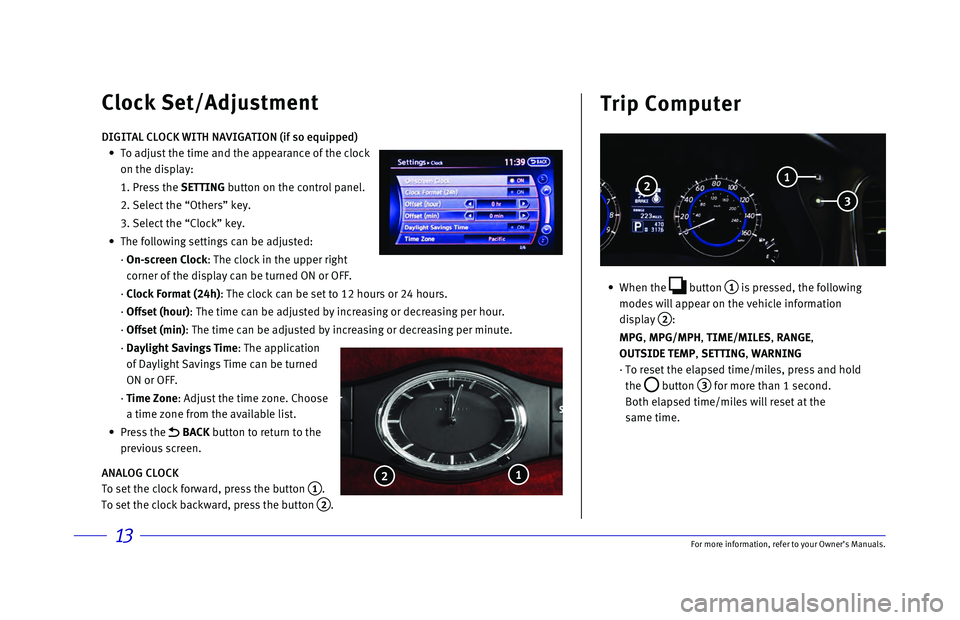
• When the button
1 is pressed, the following
modes will appear on the vehicle information
display
2:
MPG
, MPG/MPH, TIME/MILES, RANGE,
OUTSIDE TEMP, SETTING, WARNING
· To reset the elapsed time/miles, press and hold
the
button 3 for more than 1 second.
Both elapsed time/miles will reset at the
same time.
Clock Set/Adjustment Trip Computer
DIGITAL CLOCK WITH NAVIGATION (if so equipped)
•
To adjust the time and the appearance of the clock
on the display:
1. Press the SETTING
button on the control panel.
2. Select the “Others” key.
3. Select the “Clock” key.
•
The following settings can be adjusted:
· On-screen Clock: The clock in the upper right
corner of the display can be turned ON or OFF.
· Clock Format (24h): The clock can be set to 12 hours or 24 hours.
· Offset (hour): The time can be adjusted by increasing or decreasing per hour.
· Offset (min): The time can be adjusted by increasing or decreasing per minute.
· Daylight Savings Time: The application
of Daylight Savings Time can be turned
ON or OFF.
· Time Zone: Adjust the time zone. Choose
a time zone from the available list.
•
Press
the
BACK button to return to the
previous screen.
ANALOG CLOCK
To set the clock forward, press the button
1.
To set the clock backward, press the button
2.
1
2
2
3
1
For more information, refer to your Owner