2017 INFINITI QX50 key
[x] Cancel search: keyPage 2 of 20

VEHICLE OWNER’S \TMANUAL
INFINITI CLIENT SU\f\f\TORT
1-8\b\b-662-62\b\b Support is always \navailable if your \nInfiniti retailer \fa\nnnot assist you or \nyou would
like to provide IN\bI\nNITI dire\ftly with \n\fomments or questio\nns.
INFINITI ROADSIDE A\TSSISTANCE 1-8\b\b-662-62\b\b (option 1)
As part of the Infi\nniti Total Ownershi\np Experien\fe®, Roadside Assista\nn\fe
is available to yo\nu, 24 hours a day \n365 days a year, f\nor emergen\fy
roadside assistan\fe\n.
INFINITI ELITE® EXTENDED \fROTECTION\T \fROGRAM 1-8\b\b-662-62\b\b
Infiniti Elite® Assuran\fe Produ\fts \nprovide you with q\nuality long-term pr\note\ftion
and enhan\fed pea\fe of\n mind.
INFINITI FINANCIAL \TSERVICES CLIENT SU\f\T\fORT 1-8\b\b-627-4437
\bor \flient support w\nith your Infiniti \bi\nnan\fial Servi\fes loa\nn or lease.
INFINITI FINANCIAL \TSERVICES www.infinitifinanc\Te.com
Use the I\bS Online A\n\f\fount Manager to \fhe\n\fk your a\f\fount statu\ns, s\fhedule
re\furring payments a\nnd a\f\fess important \nforms.
OWNER \fORTAL 1-855-444-7244 www.owners.Infinit\TiUSA.com/iowners
Your Infiniti Owner \nPortal a\f\fount \fontai\nns your personal pr\neferen\fes, vehi\fle
information and links\n to key vehi\fle fea\ntures and servi\fes.\n
INFINITI INTOUCH™ 1-855-444-7244 usa.infinitiintouc\Th.com
The suite of servi\n\fes that is your di\nre\ft link to persona\nl se\furity, \fonvenie\nn\fe
and \fonfiden\fe.
SiriusXM RADIO 1-877-447-\b\b11
\bor support with yo\nur SiriusXM subs\fri\nption.
INFINITI USA.COM www.InfinitiUSA.com/bluetooth
Referen\fe this site\n for a list of \fomp\natible \fellular pho\nnes and instru\ftions \non
how to pair your \fe\nllular phone to you\nr vehi\fle.
INFINITI ELECTRONIC\T QUICK REFERENCE G\TUIDE
(use the Qui\fk Resp\nonse (QR) \fode or U\nRL on this page or \non the ba\fk \fover)
Helpful Resources
BELOW IS A LIST OF \THEL\fFUL RESOURCES T\THAT CAN BE USED TO \TLEARN MORE ABOUT TH\TE VEHICLE’S SYSTEMS\T AND FEATURE O\fERATI\TONS.
A \fellular telephon\ne should not
be used for any pur\npose while
driving so full att\nention may be
given to vehi\fle op\neration.
Always wear your s\neat belt.
Supplemental air ba\ngs do not
repla\fe proper seat\n belt usage.
PLEASE SEE YOUR OWNER’S MANUAL FOR IMPORTANT SAFETY INFORMATION AND SYSTEM OPERATION LIMITATIONS.
To view detailed i\nnstru\ftional videos,\n go to
www.infinitiowners\Tinfo.mobi/2\b17/qx5\b\T
or snap this bar\fod\ne with an appropriate bar\fode\n reader.
Page 3 of 20

A\f\fitio\bal i\bformatio\b \.about your vehicle is\. also available i\b \.your Ow\ber’s Ma\bual, \.Navigatio\b System Ow\be\.r’s Ma\bual a\b\f at www.InfinitiUSA.co\Tm.
Table of Contents
A \fellular telephon\ne should not
be used for any pur\npose while
driving so full att\nention may be
given to vehi\fle op\neration.
Always wear your s\neat belt.
Supplemental air ba\ngs do not
repla\fe proper seat\n belt usage.
Children 12 and under\n
should always ride\n in the
rear seat properly\n se\fured
in \fhild restraints \nor seat
belts a\f\fording to t\nheir age
and weight.
Do not drink and d\nrive. For more information, refer to the “Safety — Seats, seat
belts and supplemental restraint system (section 1)”,
the “Display screen, heater and air conditioner, and
audio system (section 4)” and the “Starting and driving
(section 5)” of yo\Tur Owner’s Manual.\T
PLEASE SEE YOUR OWNER’S MANUAL FOR IMPORTANT SAFETY INFORMATION AND SYSTEM OPERATION LIMITATIONS.
Co\fkpit Overview ..................\n..................\n..................\n..................\n..... 1
Instrument Panel ..................\n..................\n..................\n..................\n..... 3
Meters and Gauges ..................\n..................\n..................\n..................\n.. 5
Conne\fting your Cell\nular Phone or Devi\f\ne via Bluetooth
® ................. 7
Bluetooth® Streaming Audio (i\nf so equipped) ..................\n................. 7
Intelligent Cruse C\nontrol (ICC) (if so\n equipped) ..................\n.............. 8
Navigation System (\nif so equipped) ..................\n..................\n............. 9
Infiniti Intelligent\n Key System ..................\n..................\n..................\n.. 10
Seat Adjustments ..................\n..................\n..................\n..................\n.. 10 Opening the Liftgat\ne ..................\n..................\n..................\n................ 11
Sun Visors ..................\n..................\n..................\n..................\n............. 11
USB Conne\ftion Port..................\n..................\n..................\n................ 11
Exterior Light Ope\nration ..................\n..................\n..................\n........... 12
Windows ..................\n..................\n..................\n..................\n............... 12
Clo\fk Set/Adjustment\n ..................\n..................\n..................\n.............. 13
Trip Computer ..................\n..................\n..................\n..................\n........ 13
Wiper and Washer Sw\nit\fh ..................\n..................\n..................\n........ 14
Brightness Control \nSwit\fhes ..................\n..................\n..................\n.... 14
Page 7 of 20

\bor more informatio\nn, refer to your Ow\nner’s Manuals.4
Instrument \fanel
1 Multi-fun\ftion \fontro\nl tou\fh-s\freen/ Rear\nView Monitor displa\ny/
Around View® Monitor (AVM) disp\nlay (if so equippe\nd)
2 Navigation \fontrol \npanel
3 Push-button engine s\ntart
4 Audio \fontrol panel
5 Climate \fontrol pane\nl
Heater and air \fondi\ntioning (automati\f) \n
\bront/Rear window de\nfroster
6 Shift lever
7 Parking brake
8 Hood lat\fh release
9 Lower swit\fh bank
Vehi\fle Dynami\f Cont\nrol (VDC) O\b\b swit\fh\n
IBA O\b\b swit\fh
Safety Shield O\b\b s\nwit\fh
Intelligent Key por\nt
Page 10 of 20
7
Bluetooth® Streaming Audio
(if so equipped)
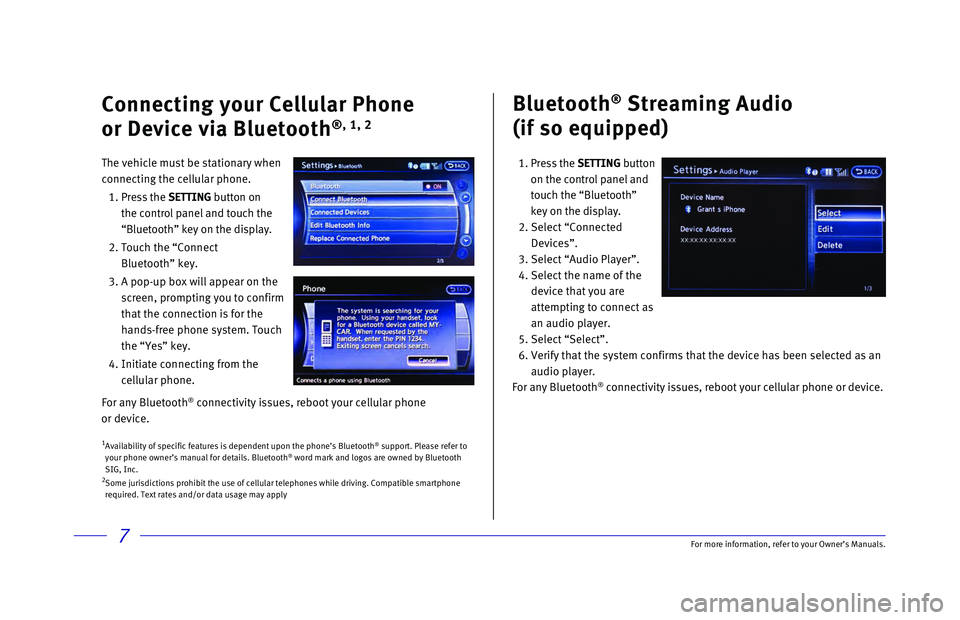
1. Press the SETTING button
on the control panel and
touch the “Bluetooth”
key on the display.
2. Select “Connected
Devices”.
3. Select “Audio Player”.
4. Select the name of the
device that you are
attempting to connect as
an audio player.
5. Select “Select”.
6. Verify that the system confirms that the device has been selected as an \
audio player.
For any Bluetooth
® connectivity issues, reboot your cellular phone or device.
1 Availability of specific features is dependent upon the phone’s Bluet\
ooth® support. Please refer to
your phone owner’s manual for details. Bluetooth® word mark and logos are owned by Bluetooth
SIG, Inc.
2 Some jurisdictions prohibit the use of cellular telephones while driving\
. Compatible smartphone
required. Text rates and/or data usage may apply
Connecting your Cellular Phone
or Device via Bluetooth
®, 1, 2
The vehicle must be stationary when
connecting the cellular phone.
1.
Press
the SETTING button on
the control panel and touch the
“Bluetooth” key on the display.
2. Touch the “Connect
Bluetooth” key.
3. A pop-up box will appear on the
screen, prompting you to confirm
that the connection is for the
hands-free phone system. Touch
the “Yes” key.
4. Initiate connecting from the
cellular phone.
For any Bluetooth
® connectivity issues, reboot your cellular phone
or device.
For more information, refer to your Owner
Page 12 of 20
9
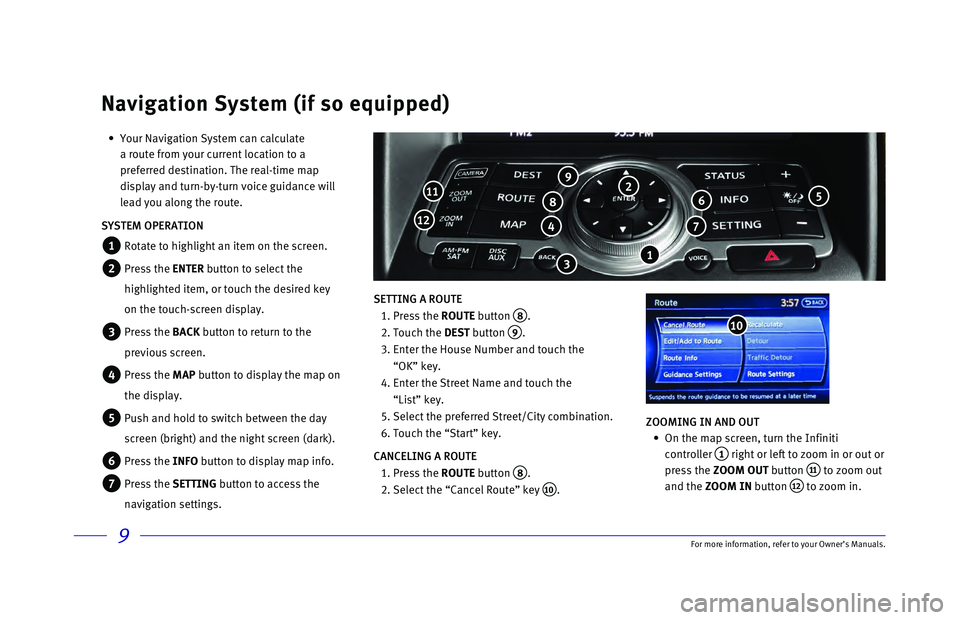
• Your Navigation System can calculate
a route from your current location to a
preferred destination. The real-time map
display and turn-by-turn voice guidance will
lead you along the route.
SYSTEM OPERATION
1 Rotate to highlight an item on the screen.
2 Press the ENTER button to select the
highlighted item, or touch the desired key
on the touch-screen display.
3 Press the BACK button to return to the
previous screen.
4 Press the MAP button to display the map on
the display.
5 Push and hold to switch between the day
screen (bright) and the night screen (dark).
6 Press the INFO button to display map info.
7 Press the SETTING button to access the
navigation settings. SETTING A ROUTE
1. Press the ROUTE
button
8.
2. Touch the DEST
button
9.
3. Enter the House Number and touch the
“OK” key.
4. Enter the Street Name and touch the
“List” key.
5. Select the preferred
Street/City combination.
6. Touch the “Start” key.
CANCELING A ROUTE
1. Press the ROUTE
button
8.
2. Select the “Cancel Route” key 10. ZOOMING IN AND OUT
•
On the map screen, turn the Infiniti
controller
1 right or left to zoom in or out or
press the ZOOM OUT button
11 to zoom out
and the ZOOM IN button
12 to zoom in.
Navigation System (if so equipped)
6
7 4
811
12
10
9
3
5 2
1
For more information, refer to your Owner
Page 13 of 20
\bor more informatio\nn, refer to your Ow\nner’s Manuals.10
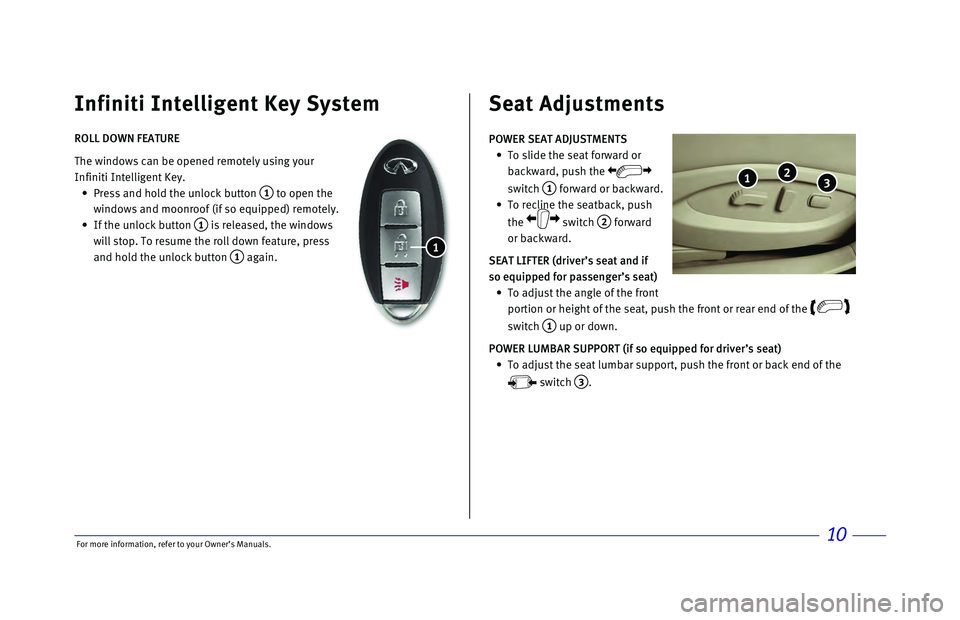
ROLL DOWN FEATURE
The windows \fan be o\npened remotely usin\ng your
Infiniti Intelligent\n Key.
Press and hold the \nunlo\fk button
1 to open the
windows and moonroof\n (if so equipped) \nremotely.
If the unlo\fk button\n
1 is released, the \nwindows
will stop. To resu\nme the roll down fe\nature, press
and hold the unlo\fk \nbutton
1 again.
Infiniti Intelligent Key System
1
POWER SEAT ADJUSTM\dENTS
To slide the seat \nforward or
ba\fkward, push the \n
swit\fh
1 forward or ba\fkwar\nd.
To re\fline the seat\nba\fk, push
the
swit\fh
2 forward
or ba\fkward.
SEAT LIFTER (d\five\f\bs\d seat and if
so equipped fo\f passen\dge\f\bs seat)
To adjust the angle\n of the front
portion or height o\nf the seat, push t\nhe front or rear en\nd of the
swit\fh 1 up or down.
POWER LUMBAR SUPPO\dRT (if so equipped fo\d\f d\five\f\bs seat)
To adjust the seat\n lumbar support, p\nush the front or ba\n\fk end of the
swit\fh
3.
Seat Adjustments
3 2 1
Page 14 of 20
11\bor more informatio\nn, refer to your Ow\nner’s Manuals.
3
Opening the Liftga\Tte Sun Visors
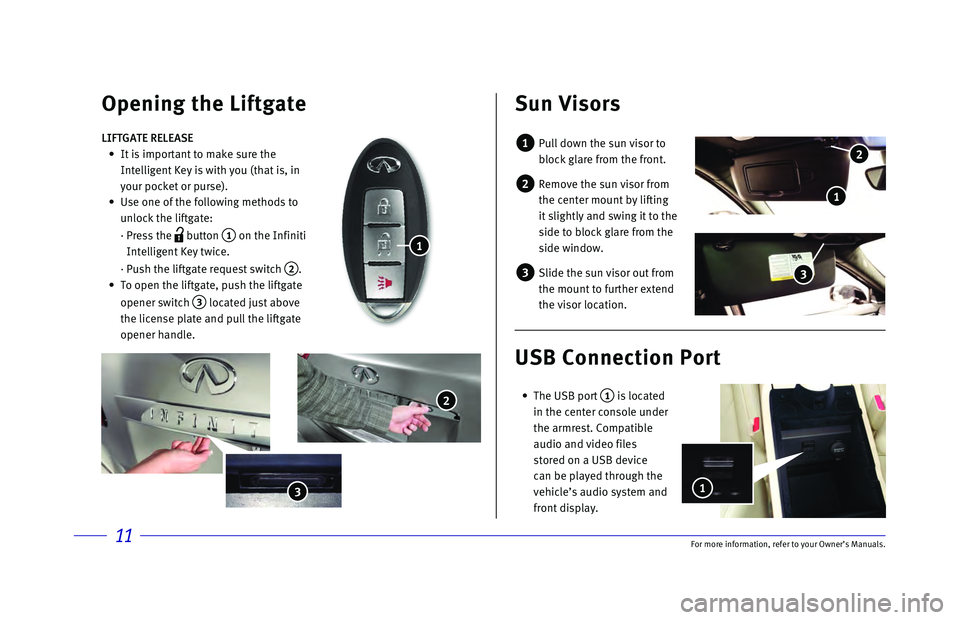
1 Pull down the sun v\nisor to
blo\fk glare from th\ne front.
2 Remove the sun viso\nr from
the \fenter mount by \nlifting
it slightly and swi\nng it to the
side to blo\fk glare\n from the
side window.
3 Slide the sun visor\n out from
the mount to furthe\nr extend
the visor lo\fation.\n
LIFTGATE RELEASE
It is important to \nmake sure the
Intelligent Key is \nwith you (that is,\n in
your po\fket or purs\ne).
Use one of the foll\nowing methods to
unlo\fk the liftgate:\n
· Press the
button
1 on the Infiniti
Intelligent Key twi\n\fe.
· Push the liftgate \nrequest swit\fh
2.
To open the liftgat\ne, push the liftga\nte
opener swit\fh
3 lo\fated just above\n
the li\fense plate a\nnd pull the liftgat\ne
opener handle.
1
2
3
USB Connection \fort\T
The USB port 1 is lo\fated
in the \fenter \fonsole\n under
the armrest. Compa\ntible
audio and video fil\nes
stored on a USB dev\ni\fe
\fan be played throu\ngh the
vehi\fle’s audio sys\ntem and
front display.
1
2
1
Page 15 of 20
12
6
7
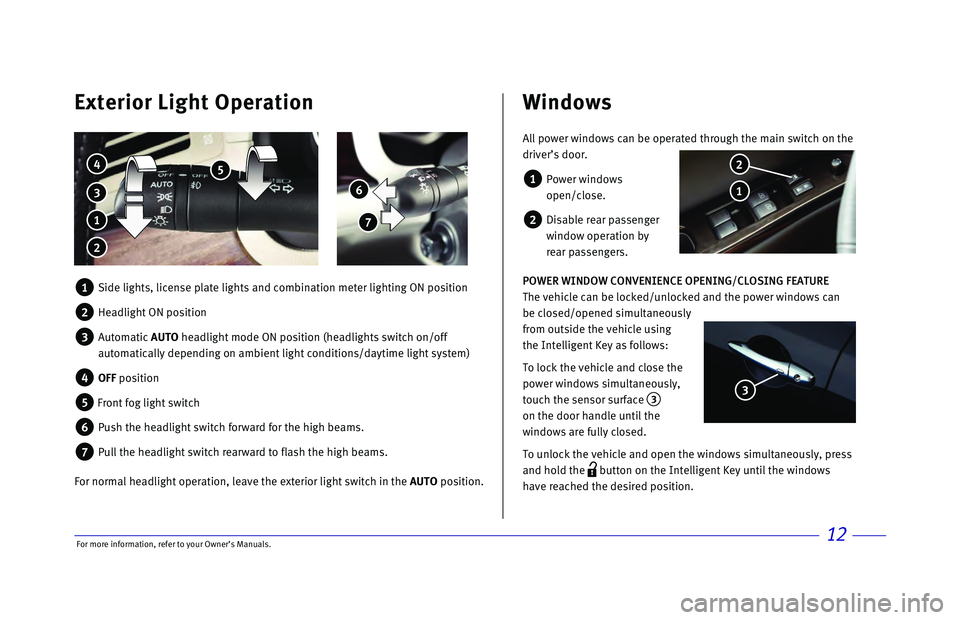
Exterior Light Operation Windows
3
4 5
1
2
All power windows can be operated through the main switch on the
driver’s door.
1 Power windows
open/close.
2 Disable rear passenger
window operation by
rear passengers.
POWER WINDOW CONVENIENCE OPENING/CLOSING FEATURE
The vehicle can be locked/unlocked and the power windows can
be closed/opened simultaneously
from outside the vehicle using
the Intelligent Key as follows:
To lock the vehicle and close the
power windows simultaneously,
touch the sensor surface
3
on the door handle until the
windows are fully closed.
To unlock the vehicle and open the windows simultaneously, press
and hold the
button on the Intelligent Key until the windows
have reached the desired position.
1
2
3
1 Side lights, license plate lights and combination meter lighting ON posi\
tion
2 Headlight ON position
3 Automatic AUTO headlight mode ON position (headlights switch on/off
automatically depending on ambient light conditions/daytime light system\
)
4 OFF position
5 Front fog light switch
6 Push the headlight switch forward for the high beams.
7 Pull the headlight switch rearward to flash the high beams.
For normal headlight operation, leave the exterior light switch in the AUTO position.
For more information, refer to your Owner