2017 INFINITI Q60 COUPE light
[x] Cancel search: lightPage 5 of 24

2
Cockpit Overview
1 Trip computer switches
2 Cruise control switches
3 Wiper and washer switch
4 Paddle shifters (if so equipped)
5 Combined turn signal/Headlight control switch
6 Vehicle information display control switches
7 Audio and Bluetooth® control switches
8 Instrument brightness control switches and Trip Reset switch (behind st\
eering wheel)
For more information, refer to your Owner
Page 7 of 24

4
Instrument Panel
1 Multi-function control touch-screen/RearView Monitor display/Around View\
® Monitor display (if so equipped)
2 Lower display menu buttons
3 Climate control panel
•
Heater and air conditioning (automatic)
•
Front/Rear window defroster
4 Audio controls
5 Seat heating (if so equipped)
6 Shift lever
7 Infiniti multi-function controller
8 Drive mode switch
9 Parking brake (behind steering wheel)
10 External light switches
11 Lower switch bank
•
Idle Stop/Start (ISS) OFF sw
itch (if so equipped)
•
Vehicle Dynamic Control (VDC) OFF Switch
•
Trunk release switch
For more information, refer to your Owner
Page 10 of 24
7
Fuel-filler Door
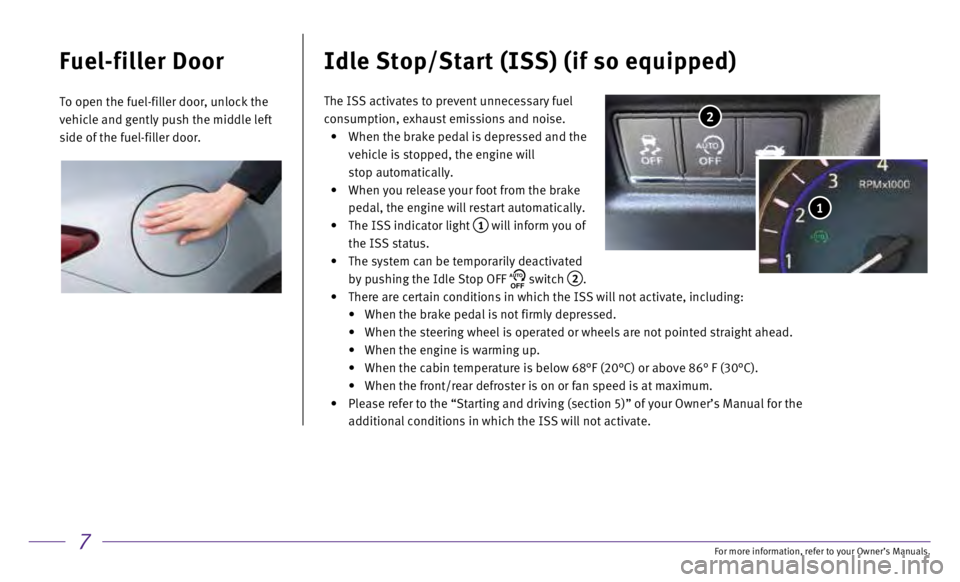
To open the fuel-filler door, unlock the
vehicle and gently push the middle left
side of the fuel-filler door.
Idle Stop/Start (ISS) (if so equipped)
2
1
The ISS activates to prevent unnecessary fuel
consumption, exhaust emissions and noise.
•
When the brake pedal is depressed and the
vehicle is stopped, the engine will
stop automatically.
•
When you release your foot from the brake
pedal, the engine will restart automatically.
•
The ISS indicator light 1 will inform you of
the ISS status.
•
The system can be temporarily deactivated
by pushing the Idle Stop OFF AUTOOFF switch 2.
•
There are certain conditions in which the ISS will not activate, includi\
ng:
•
When the brake pedal is not firmly depressed.
•
When the steering wheel is operated or wheels are not pointed straight a\
head.
•
When the engine is warming up.
•
When the cabin temperature is below 68°F (20°C) or above 86° \
F (30°C).
•
When the front/rear defroster is on or fan speed is at maximum.
•
Please refer to the “Starting and driving (section 5)” of your O\
wner’s Manual for the
additional conditions in which the ISS will not activate.
For more information, refer to your Owner
Page 12 of 24
9
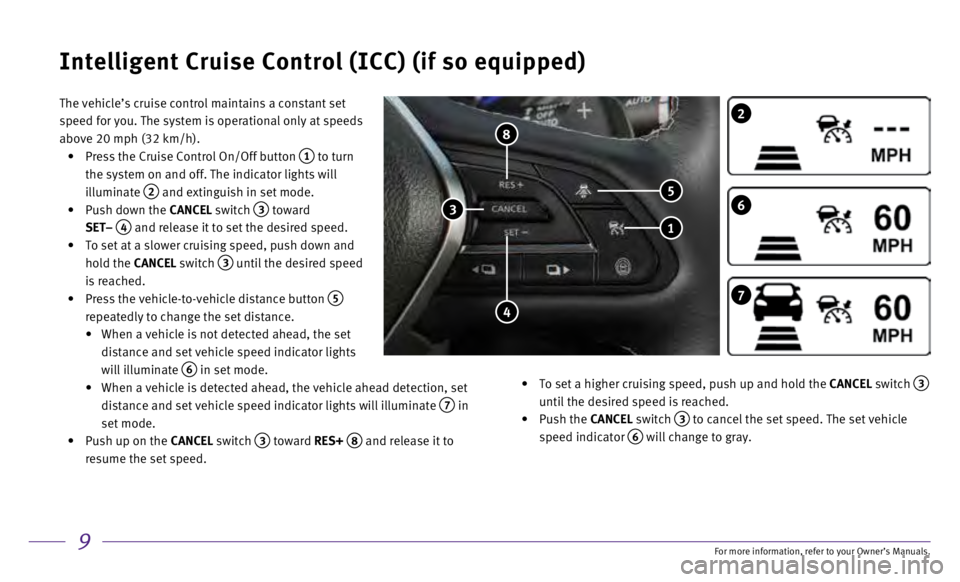
The vehicle’s cruise control maintains a constant set
speed for you. The system is operational only at speeds
above 20 mph (32 km/h).
•
Press the Cruise Control On/Off button 1 to turn
the system on and off. The indicator lights will
illuminate
2 and extinguish in set mode.
•
Push down the
CANCEL switch
3 toward
SET–
4 and release it to set the desired speed.
•
To set at a slower cruising speed, push down and
hold the
CANCEL switch
3 until the desired speed
is reached.
•
Press the vehicle-to-vehicle distance button 5
repeatedly to change the set distance.
•
When a vehicle is not detected ahead, the set
distance and set vehicle speed indicator lights
will illuminate
6 in set mode.
•
When a vehicle is detected ahead, the vehicle ahead detection, set
distance and set vehicle speed indicator lights will illuminate
7 in
set mode.
•
Push up on the
CANCEL switch
3 toward RES+ 8 and release it to
resume the set speed.
•
To set a higher cruising speed, push up and hold the
CANCEL switch
3 until the desired speed is reached.
•
Push the CANCEL switch
3 to cancel the set speed. The set vehicle
speed indicator
6 will change to gray.
Intelligent Cruise Control (ICC) (if so equipped)
7
2
6
1
4
5
8
3
For more information, refer to your Owner
Page 14 of 24
11
Lower Display Menu Buttons
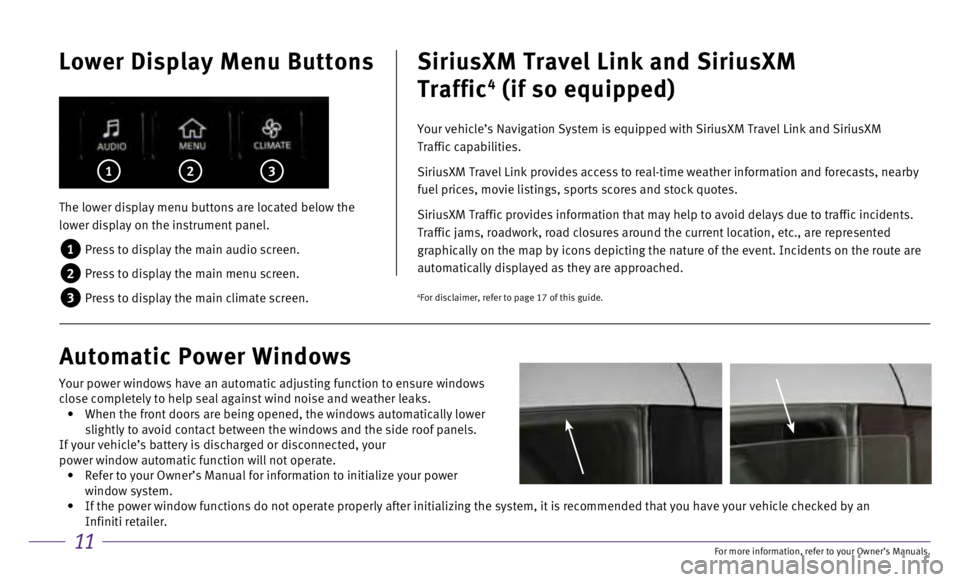
The lower display menu buttons are located below the
lower display on the instrument panel.
1 Press to display the main audio screen.
2 Press to display the main menu screen.
3 Press to display the main climate screen.
1 2 3
SiriusXM Travel Link and SiriusXM
Traffic
4 (if so equipped)
Your vehicle’s Navigation System is equipped with SiriusXM Travel Lin\
k and SiriusXM
Traffic capabilities.
SiriusXM Travel Link provides access to real-time weather information an\
d forecasts, nearby
fuel prices, movie listings, sports scores and stock quotes.
SiriusXM Traffic provides information that may help to avoid delays due \
to traffic incidents.
Traffic jams, roadwork, road closures around the current location, etc.,\
are represented
graphically on the map by icons depicting the nature of the event. Incid\
ents on the route are
automatically displayed as they are approached.
Automatic Power Windows
4For disclaimer, refer to page 17 of this guide.
Your power windows have an automatic adjusting function to ensure window\
s
close completely to help seal against wind noise and weather leaks.
• When the front doors are being opened, the windows automatically lower
slightly to avoid contact between the windows and the side roof panels.
If your vehicle’s battery is discharged or disconnected, your
power window automatic function will not operate.
• Refer to your Owner’s Manual for information to initialize your power\
window system.
• If the power window functions do not operate properly after initializing\
the system, it is recommended that you have your vehicle checked by an \
Infiniti retailer.
For more information, refer to your Owner
Page 15 of 24
12
• Automatic Collision
Notification
•
Emergency Calling
•
Enhanced Roadside
Assistance
•
Report Stolen Vehicle
•
Alarm Notification
•
Maintenance Alert
•
Vehicle Health Report
•
Scheduled Maintenance
Notification • Remote Door Lock/Unlock
•
Remote Light and Horn
•
Remote Engine Start/Stop
•
Maximum Speed Alert
•
Valet Alert
•
Curfew Alert
•
Destination
Send-to-Vehicle
•
Destination Assistance
•
Connected Search
1
Infiniti InTouch™ Services5 (if so equipped)
Infiniti InTouch ™ Services combine personalized convenience settings and personal
security features to compliment the Total Ownership Experience®. For more details on
Infiniti InTouch Services or to enroll your vehicle, please visit usa.infinitiintouch.com
or call 1-855-444-7244.
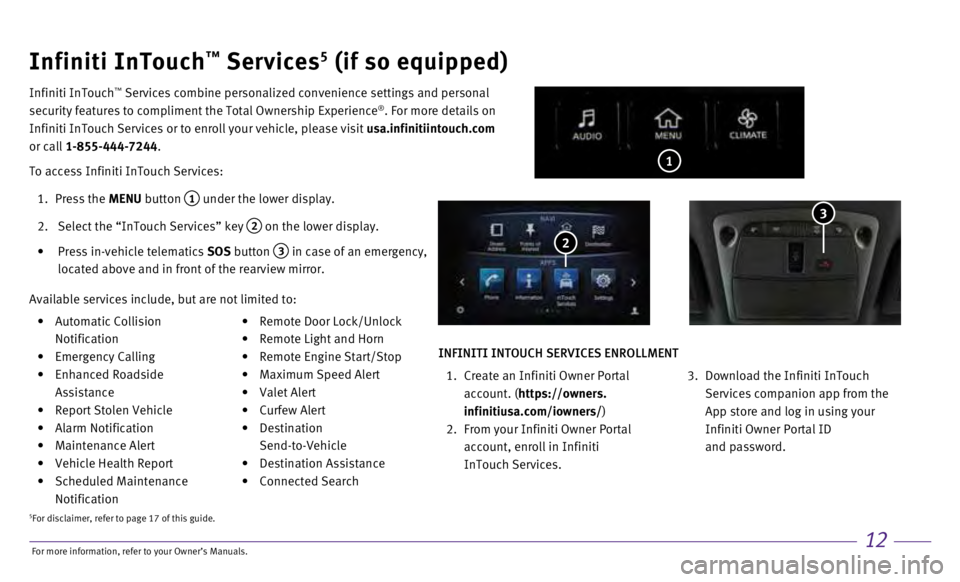
To access Infiniti InTouch Services:
1.
Press the
MENU button
1 under the lower display.
2.
Select the “InTouch Services” key 2 on the lower display.
•
Press in-vehicle telematics
SOS button
3 in case of an emergency,
located above and in front of the rearview mirror. 2
Available services include, but are not limited to:
3
INFINITI INTOUCH SERVICES ENROLLMENT
1.
Create an Infiniti Owner Portal
account. (
https://owners.
infinitiusa.com/iowners/)
2.
From your Infiniti Owner Portal
account, enroll in Infiniti
InTouch Services.
3.
Download the Infiniti InTouch
Services companion app from the
App store and log in using your
Infiniti Owner Portal ID
and password.
5For disclaimer, refer to page 17 of this guide.
For more information, refer to your Owner
Page 16 of 24
13
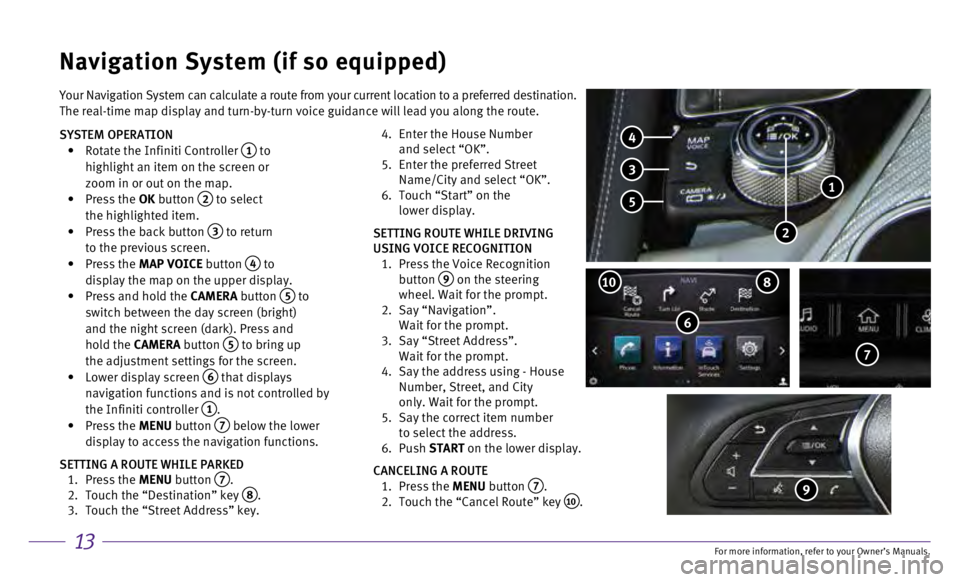
Your Navigation System can calculate a route from your current location \
to a preferred destination.
The real-time map display and turn-by-turn voice guidance will lead you \
along the route.
SYSTEM OPERATION
•
Rotate the Infiniti Controller 1 to
highlight an item on the screen or
zoom in or out on the map.
•
Press the OK button
2 to select
the highlighted item.
•
Press the back button 3 to return
to the previous screen.
•
Press the MAP VOICE button
4 to
display the map on the upper display.
•
Press and hold the
CAMERA button
5 to
switch between the day screen (bright)
and the night screen (dark). Press and
hold the CAMERA button
5 to bring up
the adjustment settings for the screen.
•
Lower display screen
6 that displays
navigation functions and is not controlled by
the Infiniti controller
1. •
Press the MENU button 7 below the lower
display to access the navigation functions.
SETTING A ROUTE WHILE PARKED
1.
Press the
MENU button
7. 2.
Touch the “Destination” key 8. 3.
Touch the “Street Address” key.
4.
Enter the House Number
and select “OK”.
5.
Enter the preferred Street
Name/City and select “OK”.
6.
Touch “Start” on the
lower display.
SETTING ROUTE WHILE DRIVING
USING VOICE RECOGNITION
1.
Press the Voice Recognition
button
9 on the steering
wheel. Wait for the prompt.
2.
Say “Navigation”.
Wait for the prompt.
3.
Say “Street Address”.
Wait for the prompt.
4.
Say the address using - House
Number, Street, and City
only. Wait for the prompt.
5.
Say the correct item number
to select the address.
6.
Push START on the lower display.
CANCELING A ROUTE
1.
Press the
MENU button
7. 2.
Touch the “Cancel Route” key 10.
Navigation System (if so equipped)
6
810
7
4
3
5
2
1
9
For more information, refer to your Owner
Page 17 of 24
14
HomeLink® Universal Transceiver6 (if so equipped)
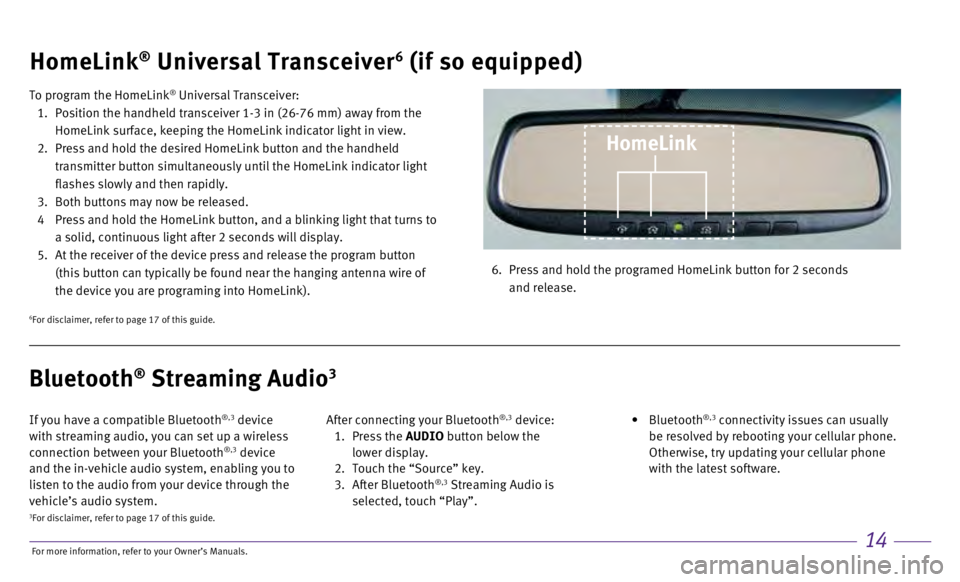
To program the HomeLink® Universal Transceiver:
1.
Position the handheld transceiver 1-3 in (26-76 mm) away from the
HomeLink surface, keeping the HomeLink indicator light in view.
2.
Press and hold the desired HomeLink button and the handheld
transmitter button simultaneously until the HomeLink indicator light
flashes slowly and then rapidly.
3.
Both buttons may now be released.
4
Press and hold the HomeLink button, and a blinking light that turns to
a solid, continuous light after 2 seconds will display.
5.
At the receiver of the device press and release the program button
(this button can typically be found near the hanging antenna wire of
the device you are programing into HomeLink). 6.
Press and hold the programed HomeLink button for 2 seconds
and release.
HomeLink
6For disclaimer, refer to page 17 of this guide.
If you have a compatible Bluetooth®,3 device
with streaming audio, you can set up a wireless
connection between your Bluetooth
®,3 device
and the in-vehicle audio system, enabling you to
listen to the audio from your device through the
vehicle’s audio system. After connecting your Bluetooth
®,3 device: 1.
Press the AUDIO button below the
lower display.
2.
Touch the “Source” key.
3.
After Bluetooth
®,3 Streaming Audio is
selected, touch “Play”.
•
Bluetooth
®,3 connectivity issues can usually
be resolved by rebooting your cellular phone.
Otherwise, try updating your cellular phone
with the latest software.
Bluetooth® Streaming Audio3
3For disclaimer, refer to page 17 of this guide.
For more information, refer to your Owner