2017 HYUNDAI TUCSON LIMITED Chapter 5
[x] Cancel search: Chapter 5Page 6 of 642
F6
Introduction
We want to help you get the greatest
possible driving pleasure from your
vehicle. Your Owner’s Manual can
assist you in many ways. To gain an
overview of the contents of your
Owner’s Manual, use the Table of
Contents in the front of the manual.The first page of each Chapter
includes a detailed Table of Contents
of the Topics in that Chapter.
To quickly locate information about
your vehicle, use the Index in the
back of the manual. It is an alphabet-
ical list of what is in this manual and
the page number where it can be
found.
For your convenience, we have
incorporated tabs on the right-hand
page edges. These tabs are coded
with the Chapter titles to assist you
with navigating through the manual.Your safety, and the safety of others,
is very important. This Owner’s
Manual provides you with many safe-
ty precautions and operating proce-
dures. This information alerts you to
potential hazards that may hurt you
or others, as well as damage to your
vehicle.
Safety messages found on vehicle
labels and in this manual describethese hazards and what to do to
avoid or reduce the risks.
Warnings and instructions contained
in this manual are for your safety.
Failure to follow safety warnings and
instructions can lead to serious injuryor death.
Throughout this manual DANGER,
WARNING, CAUTION, NOTICE and
the SAFETY ALERT SYMBOL willbe used.
This is the safety alert sym-bol. It is used to alert you to
potential physical injury haz-
ards. Obey all safety mes-
sages that follow this symbol
to avoid possible injury or
death. The safety alert sym-
bol precedes the signal words
DANGER, WARNING and
CAUTION.
HH OO WW TT OO UU SSEE TT HH IISS MM AANN UU AALL
DANGER indicates a hazardous
situation which, if not avoided,will result in death or serious
injury.
DANGER
WARNING indicates a hazardous
situation which, if not avoided,could result in death or serious
injury.
WARNING
SSAA FFEE TT YY MM EESSSSAA GG EESS
Page 28 of 642
Safety system of your vehicle
Important Safety Precautions ..............................2-2
Always Wear Your Seat Belt ..........................................2-2
Restrain All Children .........................................................2-2
Air Bag Hazards .................................................................2-2
Driver Distraction ..............................................................2-2
Control Your Speed ...........................................................2-3
Keep Your Vehicle in Safe Condition ............................2-3
Seats ........................................................................2-4
Safety Precautions ...........................................................2-5
Front Seats .........................................................................2-6
Rear Seats.........................................................................2-12
Head restraints ................................................................2-15
Seat warmers and air ventilation seats.....................2-19
Seat Belts ..............................................................2-23
Seat Belt Safety Precautions .......................................2-23
Seat Belt Warning Light ................................................2-24
Seat Belt Restraint System...........................................2-26
Additional Seat Belt Safety Precautions ...................2-33
Care of Seat Belts...........................................................2-36
Child Restraint System (CRS) .............................2-37
Children Always in the Rear .........................................2-37
Selecting a Child Restraint System (CRS) .................2-38
Installing a Child Restraint System (CRS)..................2-40
Air Bag -
Advanced Supplemental Restraint System.......2-48
Where Are the Air Bags? ..............................................2-50
How Does the Air Bag System Operate?..................2-53
What to Expect After an Air Bag Inflates ................2-58
Occupant Classification System (OCS).......................2-59
Why Didn't My Air Bag Go Off in a Collision? ........2-64
SRS Care ..........................................................................2-69
Additional Safety Precautions .....................................2-70
Air Bag Warning Labels .................................................2-71
This chapter provides you with important information about how to protect yourself and your passengers.
It explains how to properly use your seats and seat belts, and how your air bags work.
Additionally, this chapter explains how to properly restrain infants and children in your vehicle.
2
Page 60 of 642
2-33
Safety system of your vehicle
2
Both the driver's and front pas-senger's pre-tensioner seat
belts may be activated in certain
frontal or side collisions or
rollovers.
The pre-tensioners will not be activated if the seat belts are not
worn at the time of the collision.
When the pre-tensioner seat belts are activated, a loud noise
may be heard and fine dust,
which may appear to be smoke,
may be visible in the passenger
compartment. These are normaloperating conditions and are not
hazardous.
Although it is non-toxic, the fine dust may cause skin irritation
and should not be breathed for
prolonged periods. Wash all
exposed skin areas thoroughly
after an accident in which thepre-tensioner seat belts were
activated.
Additional Seat Belt Safety Precautions
Seat belt use during pregnancy
The seat belt should always be used
during pregnancy. The best way to
protect your unborn child is to protect
yourself by always wearing the seatbelt.
Pregnant women should always wear
a lap-shoulder seat belt. Place the
shoulder belt across your chest, rout-
ed between your breasts and away
from your neck. Place the shoulder
belt across the chest, routed away
from the neck. Place the lap belt below
the belt line so that it fits snugly and as
low as possible across the hips, notacross the abdomen.
Seat belt use and children
Infant and small children
All 50 states have child restraint laws
which require children to travel in
approved child restraint devices,
including booster seats. The age atwhich seat belts can be used instead
of child restraints differs among
states, so you should be aware of the
specific requirements in your state,
and where you are travelling. Infant
and child restraints must be properlyplaced and installed in a rear seat.
For more information refer to the
“Child Restraint Systems” section in
this chapter.
NOTICE
To reduce the risk of serious
injury or death to an unborn
child during an accident, preg-
nant women should NEVER
place the lap portion of the seat
belt above or over the area ofthe abdomen where the unborn
child is located.
WARNING
Page 61 of 642
2-34
Safety system of your vehicle
Small children are best protected
from injury in an accident when prop-
erly restrained in the rear seat by a
child restraint system that meets the
requirements of the Federal Motor
Vehicle Safety Standards. Before
buying any child restraint system,
make sure that it has a label certify-
ing that it meets Federal Motor
Vehicle Safety Standard 213. The
restraint must be appropriate for your
child’s height and weight. Check the
label on the child restraint for this
information. Refer to the “Child
Restraint Systems”section in this
chapter.Larger children
Children under age 13 and who are
too large for a booster seat must
always occupy the rear seat and use
the available lap/shoulder belts. Aseat belt should lie across the upper
thighs and be snug across the shoul-
der and chest to restrain the child
safely. Check belt fit periodically.
Children are afforded the most safe-
ty in the event of an accident when
they are restrained by a proper
restraint system and/or seat belts in
the rear seat. Always have the
LATCH system inspected by your
authorized HYUNDAI dealer after an
accident. An accident can damage
the LATCH system and may not
properly secure the child restraint.
If a larger child over age 13 must be seated in the front seat, the child
must be securely restrained by the
available lap/shoulder belt and theseat should be placed in the rear-most position.
ALWAYS properly restrain infants
and small children in a child
restraint appropriate for the
child’s height and weight.
To reduce the risk of serious
injury or death to a child and
other passengers, NEVER hold a
child in your lap or arms when
the vehicle is moving. The violent
forces created during an acci-
dent will tear the child from your
arms and throw the child against
the interior of the vehicle.WARNING
Page 72 of 642
2-45
Safety system of your vehicle
2
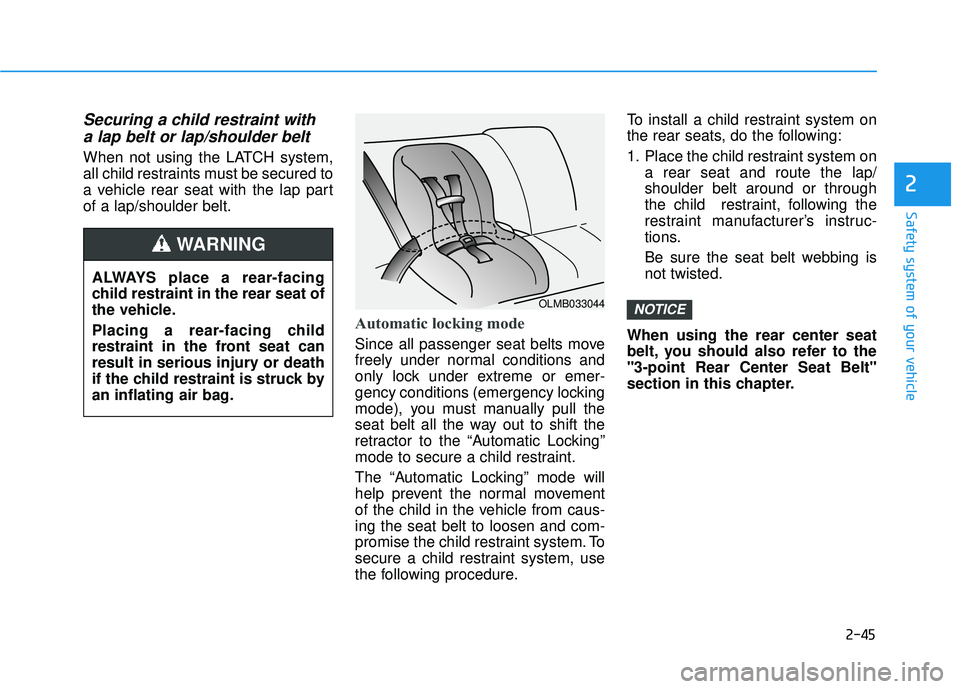
Securing a child restraint witha lap belt or lap/shoulder belt
When not using the LATCH system,
all child restraints must be secured to
a vehicle rear seat with the lap partof a lap/shoulder belt.
Automatic locking mode
Since all passenger seat belts move
freely under normal conditions and
only lock under extreme or emer-
gency conditions (emergency locking
mode), you must manually pull the
seat belt all the way out to shift the
retractor to the “Automatic Locking”
mode to secure a child restraint.
The “Automatic Locking” mode will
help prevent the normal movement
of the child in the vehicle from caus-ing the seat belt to loosen and com-
promise the child restraint system. To
secure a child restraint system, use
the following procedure. To install a child restraint system on
the rear seats, do the following:
1. Place the child restraint system on
a rear seat and route the lap/ shoulder belt around or through
the child restraint, following the
restraint manufacturer’s instruc-
tions.
Be sure the seat belt webbing is not twisted.
When using the rear center seat
belt, you should also refer to the"3-point Rear Center Seat Belt"
section in this chapter.
NOTICE
ALWAYS place a rear-facing
child restraint in the rear seat of
the vehicle.
Placing a rear-facing child
restraint in the front seat can
result in serious injury or death
if the child restraint is struck by
an inflating air bag.
WARNING
OLMB033044
Page 103 of 642
3-5
Convenient features of your vehicle
Unlocking Your Vehicle
To unlock your vehicle:
1. Press the Door Unlock button (2)on the remote key. The driver's
door will unlock. The hazard
warning lights will blink two times.
2. If you press the Door Unlock but- ton (2) again within four seconds,
then all the doors will unlock.
Information
After unlocking the doors, the doors
will automatically relock after 30 sec-
onds unless a door is opened.
Liftgate unlocking
To unlock the liftgate:
1. Press the Liftgate (tailgate) Unlockbutton (3) on the remote key for more than one second.
2. The hazard warning lights will blink two times.
Once the liftgate is opened and thenclosed, the liftgate will automatically
lock after 30 seconds.
Information
After unlocking the liftgate, the lift- gate will lock automatically.
The word "HOLD" is written on the button to inform you that you must
press and hold the button for more
than one second.
Panic button (if equipped)
Press the Panic button (4) for more
than one second. The horn sounds
and hazard warning lights flash for
about 30 seconds.
To cancel the panic mode, press any
button on the remote key.
Start-up
For more information, refer to the “Key
Ignition Switch” section in chapter 5.
To prevent damaging the remote
key:
• Keep the remote key away fromwater or any liquid and fire. If the
inside of the remote key getsdamp (due to drinks or mois-
ture), or is heated, internal cir-
cuit which may not be covered
under warranty.
Avoid dropping or throwing the remote key.
Protect the remote key from extreme temperatures.
NOTICE
i
i
3
Page 108 of 642
3-10
Convenient features of your vehicle
Panic button
Press the Panic button (4) and hold
for more than one second. The horn
sounds and hazard warning lights
blink for about 30 seconds. To cancel
the panic mode, press any button on
the Smart Key.
Start-up
You can start the engine without
inserting the key.
For more information, refer to the
"Engine Start/Stop Button" sec-
tion in chapter 5.To prevent damaging the smart key:
Keep the smart key in a cool, dry
place to avoid damage or mal-
function. Exposure to moisture
or high temperature may cause
the internal circuit of the smart
key to malfunction which may
not be covered under warranty.
Avoid dropping or throwing the smart key.
Protect the smart key from extreme temperatures.
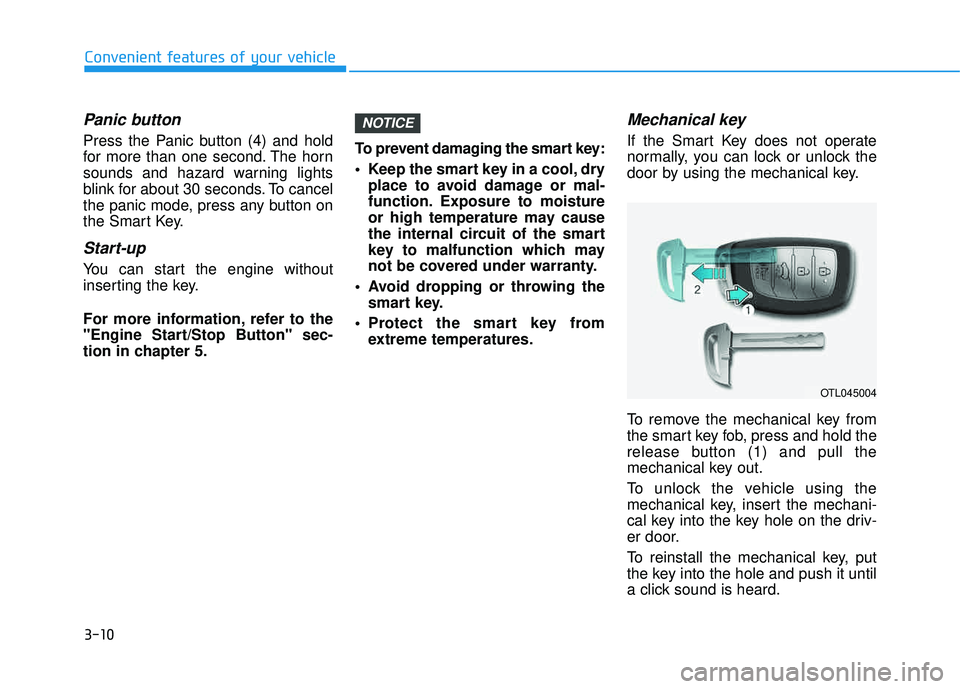
Mechanical key
If the Smart Key does not operate
normally, you can lock or unlock the
door by using the mechanical key.
To remove the mechanical key from
the smart key fob, press and hold the
release button (1) and pull the
mechanical key out.
To unlock the vehicle using the
mechanical key, insert the mechani-
cal key into the key hole on the driv-
er door.
To reinstall the mechanical key, put
the key into the hole and push it until
a click sound is heard.
NOTICE
OTL045004
Page 115 of 642
3-17
Convenient features of your vehicle
3
Auto Door Lock/Unlock Features
Impact sensing door unlocksystem
All doors will be automatically
unlocked when an impact causes the
air bags to deploy.
Speed sensing door lock system
All doors will be automatically locked
when vehicle speed exceeds 9 mph(15 km/h). All of the doors will be automatically
unlocked after the engine is turned off.
Shift lever auto door lock
All doors will be automatically locked
when shifting the shift lever out of P
(Park) with the engine running.
You can activate or deactivate the
Auto Door Lock/Unlock features fromthe User Settings Mode on the LCD
display.
For more information, refer to the
"LCD Display" section in this
chapter.
Always secure your vehicle.
Leaving your vehicle unlocked increases the potential risk to
you or others from someone
hiding in your vehicle.
To secure your vehicle, while
depressing the brake, move the
shift lever to the P (Park) posi-
tion, engage the parking brake,
and place the ignition switch in
the LOCK/OFF position, close
all windows, lock all doors, and
always take the key with you.WARNING
Opening a door when something
is approaching may cause dam-
age or injury. Be careful when
opening doors and watch for
vehicles, motorcycles, bicycles
or pedestrians approaching the
vehicle in the path of the door.
CAUTION