Page 148 of 642
3-50
Convenient features of your vehicle
Information
Make sure to refuel your vehicle
according to the "Fuel Requirements"
suggested in the Introduction chapter.
Do not spill fuel on the exteriorsurfaces of the vehicle. Any type of fuel spilled on painted sur-
faces may damage the paint.
If the fuel filler cap requires replacement, use only a genuine
HYUNDAI cap or the equivalent
specified for your vehicle. Anincorrect fuel filler cap canresult in a serious malfunctionof the fuel system or emission
control system.
NOTICE
i(Continued)
Once refueling has begun,
contact between your bare
hand and the vehicle shouldbe maintained until the filling
is complete.
Use only approved portable
plastic fuel containers designed
to carry and store gasoline.
When refueling, always move
the shift lever to the P (Park)
position, set the parking
brake, and place the ignition
switch to the LOCK/OFF posi-
tion. Sparks produced byelectrical components relatedto the engine can ignite fuel
vapors causing a fire.
Do not use matches or a lighter and do not smoke or
leave a lit cigarette in your
vehicle while at a gas station,
especially during refueling.
Do not over-fill or top-off your
vehicle tank, which can cause
gasoline spillage. (Continued)
(Continued)
If a fire breaks out during refu-
eling, leave the vicinity of the
vehicle, and immediately con-
tact the manager of the gasstation and then contact the
local fire department. Follow
any safety instructions they
provide.
If pressurized fuel sprays out,
it can cover your clothes or
skin and thus subject you to
the risk of fire and burns.
Always remove the fuel cap
carefully and slowly. If the cap
is venting fuel or if you hear a
hissing sound, wait until the
condition stops before com-
pletely removing the cap.
Always check that the fuel cap
is installed securely to pre-
vent fuel spillage in the eventof an accident.
Page 150 of 642
3-52
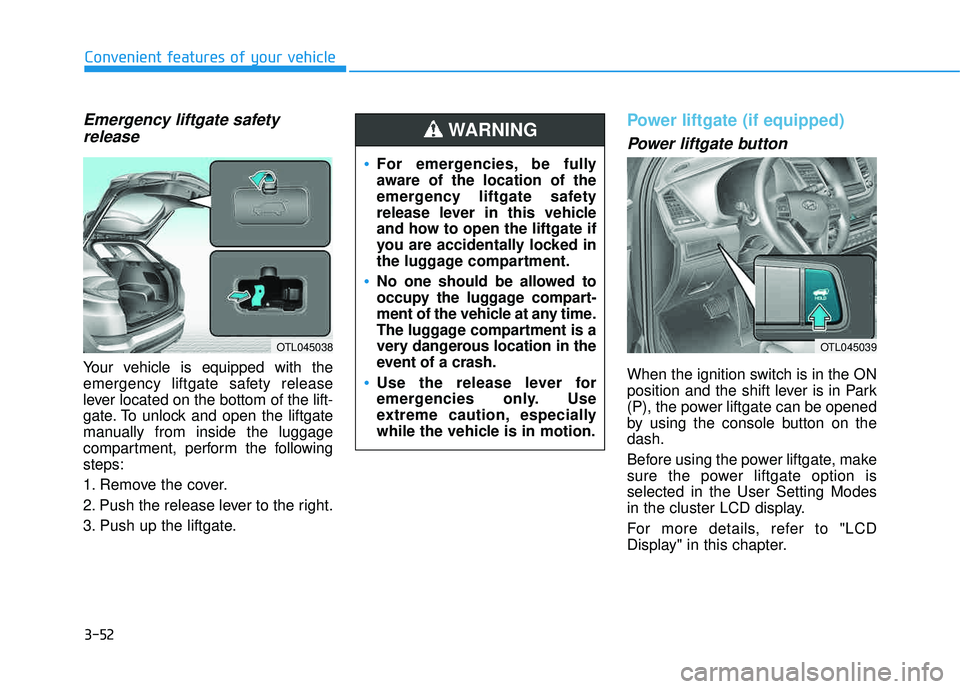
Emergency liftgate safetyrelease
Your vehicle is equipped with the
emergency liftgate safety release
lever located on the bottom of the lift-
gate. To unlock and open the liftgate
manually from inside the luggage
compartment, perform the followingsteps:
1. Remove the cover.
2. Push the release lever to the right.
3. Push up the liftgate.
Power liftgate (if equipped)
Power liftgate button
When the ignition switch is in the ON
position and the shift lever is in Park
(P), the power liftgate can be opened
by using the console button on thedash.
Before using the power liftgate, make
sure the power liftgate option isselected in the User Setting Modes
in the cluster LCD display.
For more details, refer to "LCD
Display" in this chapter.
Convenient features of your vehicle
OTL045038
For emergencies, be fully
aware of the location of the
emergency liftgate safety
release lever in this vehicle
and how to open the liftgate if
you are accidentally locked in
the luggage compartment.
No one should be allowed to
occupy the luggage compart-
ment of the vehicle at any time.
The luggage compartment is a
very dangerous location in the
event of a crash.
Use the release lever for
emergencies only. Use
extreme caution, especially
while the vehicle is in motion.
WARNING
OTL045039
Page 156 of 642
3-58
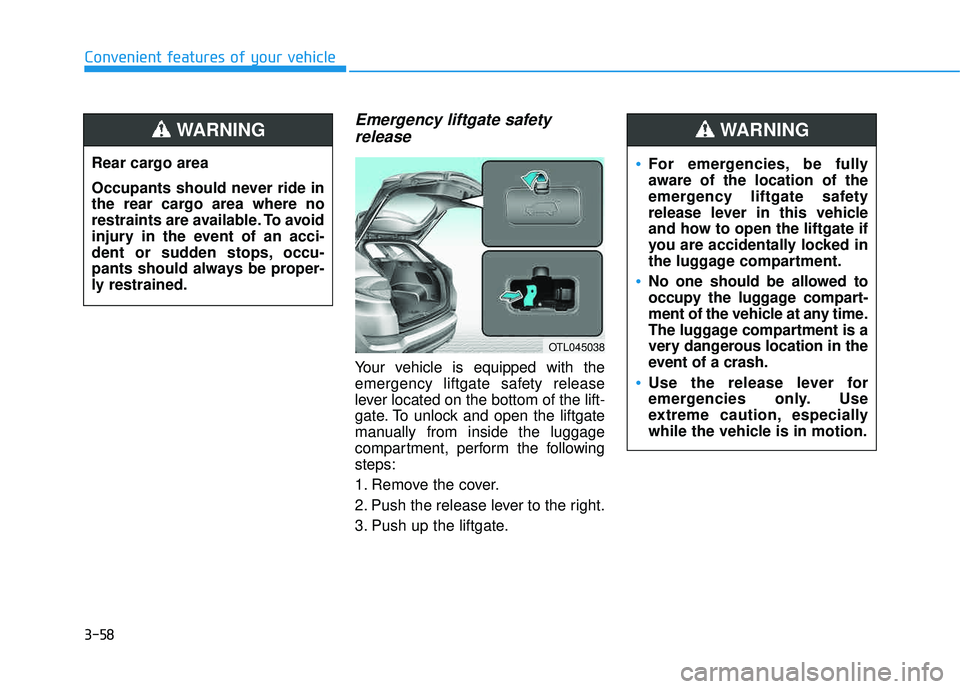
Emergency liftgate safetyrelease
Your vehicle is equipped with the
emergency liftgate safety release
lever located on the bottom of the lift-
gate. To unlock and open the liftgate
manually from inside the luggage
compartment, perform the followingsteps:
1. Remove the cover.
2. Push the release lever to the right.
3. Push up the liftgate.
Convenient features of your vehicle
Rear cargo area
Occupants should never ride in
the rear cargo area where no
restraints are available. To avoid
injury in the event of an acci-
dent or sudden stops, occu-
pants should always be proper-
ly restrained.
WARNING
OTL045038
For emergencies, be fully
aware of the location of the
emergency liftgate safety
release lever in this vehicle
and how to open the liftgate if
you are accidentally locked in
the luggage compartment.
No one should be allowed to
occupy the luggage compart-
ment of the vehicle at any time.
The luggage compartment is a
very dangerous location in the
event of a crash.
Use the release lever for
emergencies only. Use
extreme caution, especially
while the vehicle is in motion.
WARNING
Page 159 of 642
3-61
Convenient features of your vehicle
3. Automatic opening
After the hazard warning lights blink
and the chime sounds 2 times, the
power liftgate will open.
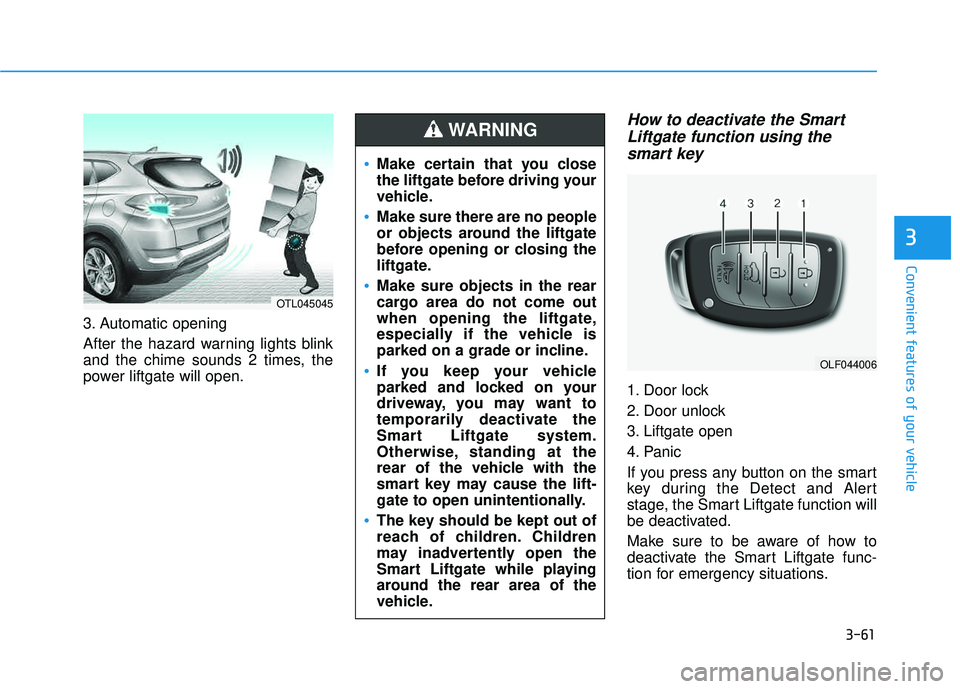
How to deactivate the SmartLiftgate function using thesmart key
1. Door lock
2. Door unlock
3. Liftgate open
4. Panic
If you press any button on the smart
key during the Detect and Alert
stage, the Smart Liftgate function will
be deactivated.
Make sure to be aware of how to
deactivate the Smart Liftgate func-
tion for emergency situations.
3
OLF044006
Make certain that you close
the liftgate before driving your
vehicle.
Make sure there are no people
or objects around the liftgate
before opening or closing the
liftgate.
Make sure objects in the rear
cargo area do not come out
when opening the liftgate,
especially if the vehicle is
parked on a grade or incline.
If you keep your vehicle
parked and locked on your
driveway, you may want to
temporarily deactivate the
Smart Liftgate system.
Otherwise, standing at the
rear of the vehicle with the
smart key may cause the lift-
gate to open unintentionally.
The key should be kept out of
reach of children. Children
may inadvertently open the
Smart Liftgate while playing
around the rear area of the
vehicle.
WARNING
OTL045045
Page 210 of 642
3-112
Convenient features of your vehicle
You can activate or deactivate the
Headlamp Delay function from theUser Settings Mode (Light) on the
LCD display.
For more information, refer to the
"LCD Display" section in this
chapter.If the driver gets out of the vehicle
through other doors (except dri-
ver’s door), the battery saver func-tion does not operate and the
headlamp delay function does not
turn off automatically. Therefore, It
causes the battery to be dis-
charged. In this case, make sure
to turn off the headlamp switch
before getting out of the vehicle.Daytime running light (DRL)
The Daytime Running Lights (DRL)
can make it easier for others to see
the front of your vehicle during the
day, especially after dawn and beforesunset.
The DRL will turn off when:
1. The light switch is not in the AUTO
position.
2. The parking brake is applied.
3. The engine is turned off.
NOTICE
Page 219 of 642
3-121
Convenient features of your vehicle
3
DDRRIIVV EERR AA SSSSIISS TT SS YY SSTT EEMM
Rear View Camera
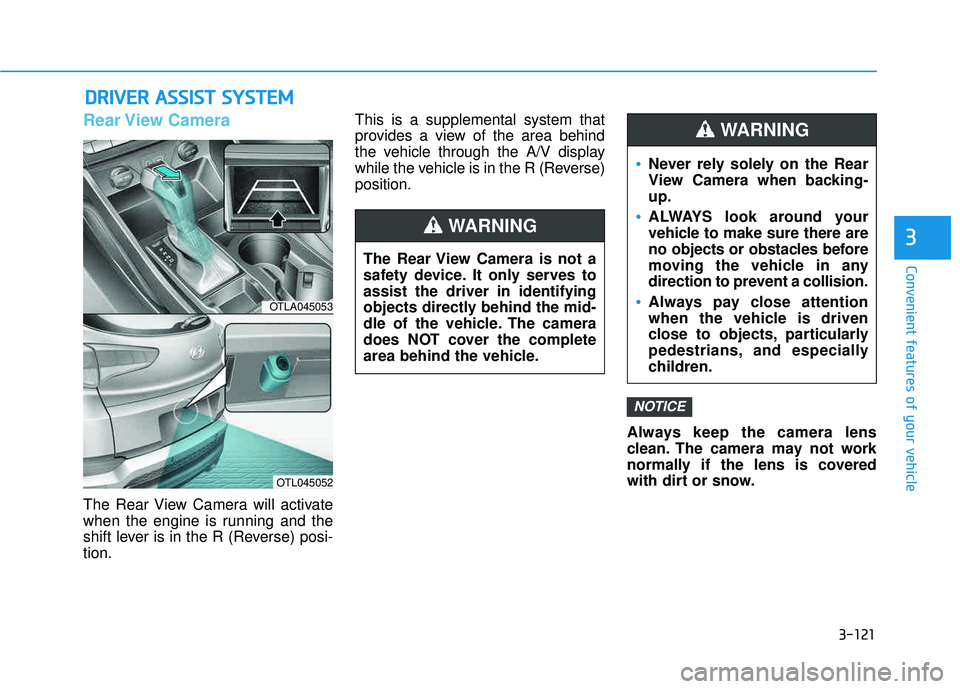
The Rear View Camera will activate
when the engine is running and the
shift lever is in the R (Reverse) posi-tion. This is a supplemental system that
provides a view of the area behind
the vehicle through the A/V display
while the vehicle is in the R (Reverse)position.
Always keep the camera lens
clean. The camera may not work
normally if the lens is covered
with dirt or snow.
NOTICE
OTLA045053
OTL045052
The Rear View Camera is not a
safety device. It only serves toassist the driver in identifying
objects directly behind the mid-
dle of the vehicle. The camera
does NOT cover the complete
area behind the vehicle.
WARNING
Never rely solely on the Rear
View Camera when backing-up.
ALWAYS look around your
vehicle to make sure there are
no objects or obstacles before
moving the vehicle in any
direction to prevent a collision.
Always pay close attention
when the vehicle is driven
close to objects, particularly
pedestrians, and especially
children.
WARNING
Page 220 of 642
3-122
Convenient features of your vehicle
Rear Parking Assist System (if equipped)
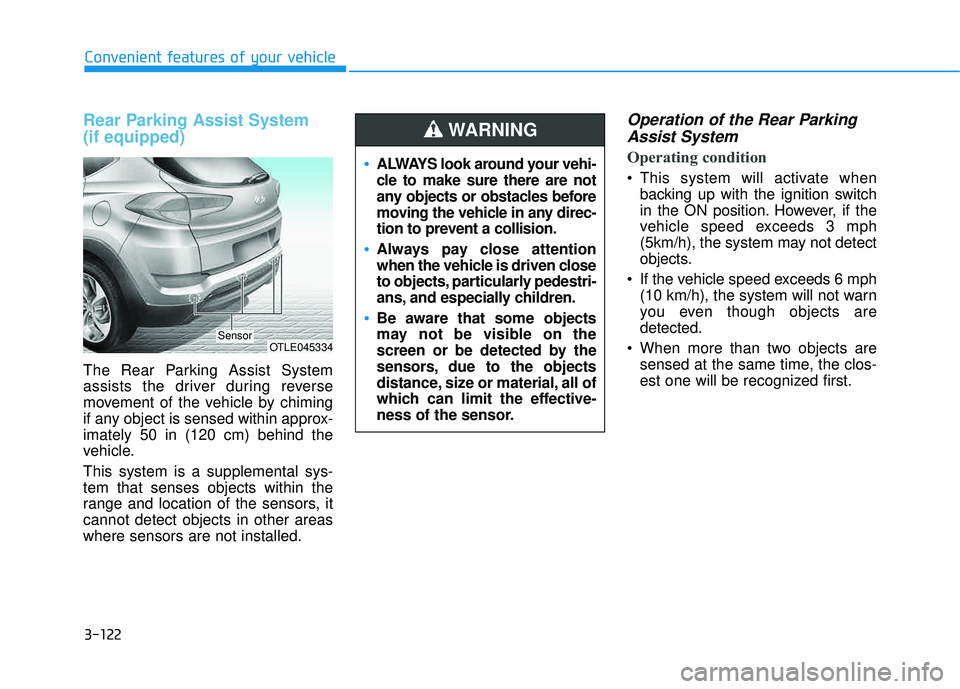
The Rear Parking Assist System
assists the driver during reverse
movement of the vehicle by chiming
if any object is sensed within approx-imately 50 in (120 cm) behind the
vehicle. This system is a supplemental sys- tem that senses objects within the
range and location of the sensors, itcannot detect objects in other areaswhere sensors are not installed.
Operation of the Rear ParkingAssist System
Operating condition
This system will activate when backing up with the ignition switch
in the ON position. However, if the
vehicle speed exceeds 3 mph
(5km/h), the system may not detect
objects.
If the vehicle speed exceeds 6 mph (10 km/h), the system will not warn
you even though objects aredetected.
When more than two objects are sensed at the same time, the clos-
est one will be recognized first.
OTLE045334Sensor
ALWAYS look around your vehi-
cle to make sure there are not
any objects or obstacles before
moving the vehicle in any direc-
tion to prevent a collision.
Always pay close attention
when the vehicle is driven close
to objects, particularly pedestri-
ans, and especially children.
Be aware that some objects
may not be visible on the
screen or be detected by the
sensors, due to the objects
distance, size or material, all of
which can limit the effective-
ness of the sensor.
WARNING
Page 247 of 642
3-149
Convenient features of your vehicle
3
WWIINN DDSSHH IIEE LLDD DD EEFFRR OO SSTT IINN GG AA NN DD DD EEFFOO GGGGIINN GG
For maximum windshield defrost-
ing, set the temperature control
knob to the highest temperature
setting and the fan control knob to
the highest fan speed. Select the
front defrost button on the climate
control display. After the engine
warm-up period, warm air will bedirected to the front windshield.
If warm air to the floor is desired while defrosting or defogging, set themode to the floor-defrost position.
Before driving, clear all snow and ice from the windshield, rear win-
dow, outside rear view mirrors, and
all side windows.
Clear all snow and ice from the hood and air inlet in the cowl grill to
improve heater and defroster effi-ciency and to reduce the probability
of fogging up the inside of the wind-shield.
If the engine temperature is still
cold after starting, then a brief
engine warm up period may be
required for the vented air flow tobecome warm or hot.Manual Climate Control System
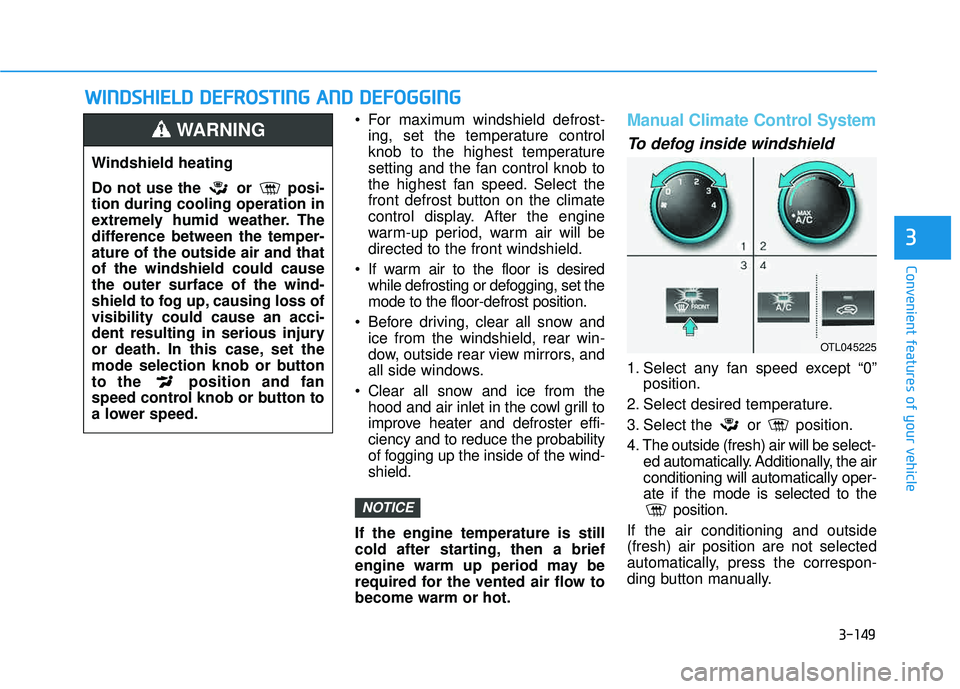
To defog inside windshield
1. Select any fan speed except “0” position.
2. Select desired temperature.
3. Select the or position.
4. The outside (fresh) air will be select- ed automatically. Additionally, the air conditioning will automatically oper-ate if the mode is selected to the position.
If the air conditioning and outside(fresh) air position are not selected
automatically, press the correspon-
ding button manually.
NOTICE
Windshield heating
Do not use the or posi- tion during cooling operation in
extremely humid weather. The
difference between the temper-ature of the outside air and thatof the windshield could causethe outer surface of the wind-
shield to fog up, causing loss ofvisibility could cause an acci-
dent resulting in serious injury
or death. In this case, set the
mode selection knob or button
to the position and fan
speed control knob or button to
a lower speed.
WARNING
OTL045225