Page 583 of 642
7-70
Maintenance
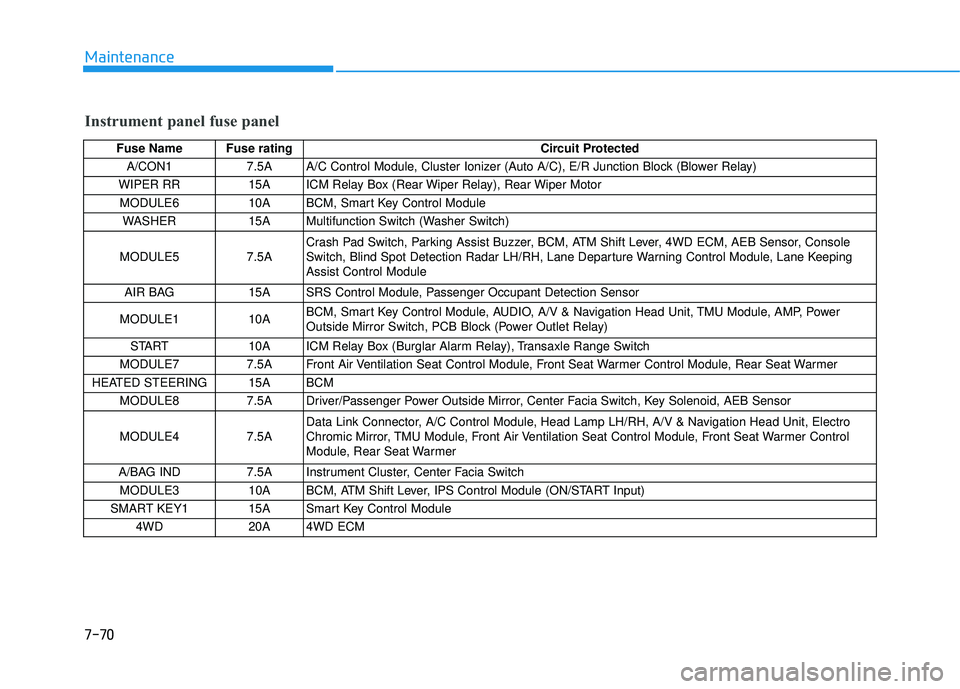
Instrument panel fuse panel
Fuse Name Fuse ratingCircuit Protected
A/CON1 7.5A A/C Control Module, Cluster Ionizer (Auto A/C), E/R Junction Block (Blower Relay)
WIPER RR 15A ICM Relay Box (Rear Wiper Relay), Rear Wiper Motor MODULE6 10A BCM, Smart Key Control Module WASHER 15A Multifunction Switch (Washer Switch)
MODULE5 7.5A Crash Pad Switch, Parking Assist Buzzer, BCM, ATM Shift Lever, 4WD ECM, AEB Sensor, Console
Switch, Blind Spot Detection Radar LH/RH, Lane Departure Warning Control Module, Lane KeepingAssist Control Module
AIR BAG 15A SRS Control Module, Passenger Occupant Detection Sensor
MODULE1 10A BCM, Smart Key Control Module, AUDIO, A/V & Navigation Head Unit, TMU Module, AMP, Power
Outside Mirror Switch, PCB Block (Power Outlet Relay)
START 10A ICM Relay Box (Burglar Alarm Relay), Transaxle Range Switch
MODULE7 7.5A Front Air Ventilation Seat Control Module, Front Seat Warmer Control Module, Rear Seat Warmer
HEATED STEERING 15A BCM MODULE8 7.5A Driver/Passenger Power Outside Mirror, Center Facia Switch, Key Solenoid, AEB Sensor MODULE4 7.5A Data Link Connector, A/C Control Module, Head Lamp LH/RH, A/V & Navigation Head Unit, Electro
Chromic Mirror, TMU Module, Front Air Ventilation Seat Control Module, Front Seat Warmer Control
Module, Rear Seat Warmer
A/BAG IND 7.5A Instrument Cluster, Center Facia Switch MODULE3 10A BCM, ATM Shift Lever, IPS Control Module (ON/START Input)
SMART KEY1 15A Smart Key Control Module 4WD 20A 4WD ECM
Page 584 of 642
7-71
7
Maintenance
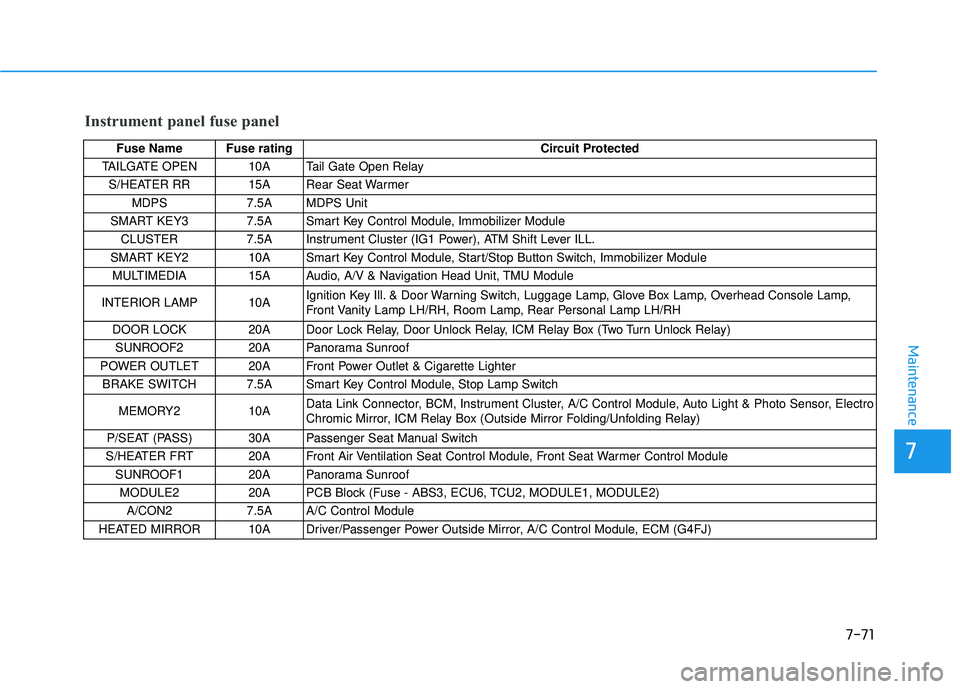
Instrument panel fuse panel
Fuse Name Fuse ratingCircuit Protected
TAILGATE OPEN 10A Tail Gate Open Relay
S/HEATER RR 15A Rear Seat Warmer MDPS 7.5A MDPS Unit
SMART KEY3 7.5A Smart Key Control Module, Immobilizer Module
CLUSTER 7.5A Instrument Cluster (IG1 Power), ATM Shift Lever ILL.
SMART KEY2 10A Smart Key Control Module, Start/Stop Button Switch, Immobilizer Module MULTIMEDIA 15A Audio, A/V & Navigation Head Unit, TMU Module
INTERIOR LAMP 10A Ignition Key Ill. & Door Warning Switch, Luggage Lamp, Glove Box Lamp, Overhead Console Lamp,
Front Vanity Lamp LH/RH, Room Lamp, Rear Personal Lamp LH/RH
DOOR LOCK 20A Door Lock Relay, Door Unlock Relay, ICM Relay Box (Two Turn Unlock Relay) SUNROOF2 20A Panorama Sunroof
POWER OUTLET 20A Front Power Outlet & Cigarette Lighter BRAKE SWITCH 7.5A Smart Key Control Module, Stop Lamp Switch
MEMORY2 10A Data Link Connector, BCM, Instrument Cluster, A/C Control Module, Auto Light & Photo Sensor, Electro
Chromic Mirror, ICM Relay Box (Outside Mirror Folding/Unfolding Relay)
P/SEAT (PASS) 30A Passenger Seat Manual Switch
S/HEATER FRT 20A Front Air Ventilation Seat Control Module, Front Seat Warmer Control Module
SUNROOF1 20A Panorama Sunroof
MODULE2 20A PCB Block (Fuse - ABS3, ECU6, TCU2, MODULE1, MODULE2) A/CON2 7.5A A/C Control Module
HEATED MIRROR 10A Driver/Passenger Power Outside Mirror, A/C Control Module, ECM (G4FJ)
Page 587 of 642
7-74
Maintenance
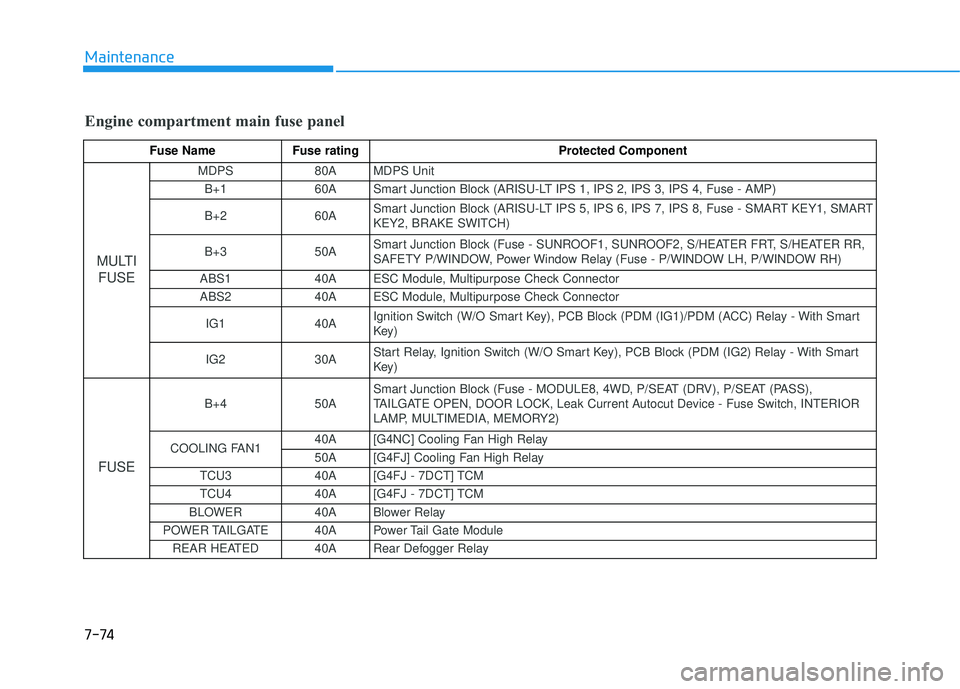
Engine compartment main fuse panel
Fuse Name Fuse rating Protected Component
MULTIFUSE
MDPS 80A MDPS Unit
B+1 60A Smart Junction Block (ARISU-LT IPS 1, IPS 2, IPS 3, IPS 4, Fuse - AMP) B+2 60A Smart Junction Block (ARISU-LT IPS 5, IPS 6, IPS 7, IPS 8, Fuse - SMART KEY1, SMART KEY2, BRAKE SWITCH)
B+3 50A Smart Junction Block (Fuse - SUNROOF1, SUNROOF2, S/HEATER FRT, S/HEATER RR,
SAFETY P/WINDOW, Power Window Relay (Fuse - P/WINDOW LH, P/WINDOW RH)
ABS1 40A ESC Module, Multipurpose Check Connector
ABS2 40A ESC Module, Multipurpose Check Connector
IG1 40A Ignition Switch (W/O Smart Key), PCB Block (PDM (IG1)/PDM (ACC) Relay - With Smart
Key)
IG2 30A Start Relay, Ignition Switch (W/O Smart Key), PCB Block (PDM (IG2) Relay - With Smart
Key)
FUSE
B+4 50A Smart Junction Block (Fuse - MODULE8, 4WD, P/SEAT (DRV), P/SEAT (PASS),
TAILGATE OPEN, DOOR LOCK, Leak Current Autocut Device - Fuse Switch, INTERIOR
LAMP, MULTIMEDIA, MEMORY2)
COOLING FAN1 40A [G4NC] Cooling Fan High Relay
50A [G4FJ] Cooling Fan High Relay
TCU3 40A [G4FJ - 7DCT] TCM
TCU4 40A [G4FJ - 7DCT] TCM
BLOWER 40A Blower Relay
POWER TAILGATE 40A Power Tail Gate Module REAR HEATED 40A Rear Defogger Relay
Page 588 of 642
![HYUNDAI TUCSON LIMITED 2017 Owners Manual 7-75
7
Maintenance
Engine compartment main fuse panel
Fuse Name Fuse ratingCircuit Protected
WIPER FRT1 25A Ignition Switch (W/O Smart Key), PDM (IG2) Relay (With Smart Key)
TCU1 15A [G4FJ] TCM HYUNDAI TUCSON LIMITED 2017 Owners Manual 7-75
7
Maintenance
Engine compartment main fuse panel
Fuse Name Fuse ratingCircuit Protected
WIPER FRT1 25A Ignition Switch (W/O Smart Key), PDM (IG2) Relay (With Smart Key)
TCU1 15A [G4FJ] TCM](/manual-img/35/56197/w960_56197-587.png)
7-75
7
Maintenance
Engine compartment main fuse panel
Fuse Name Fuse ratingCircuit Protected
WIPER FRT1 25A Ignition Switch (W/O Smart Key), PDM (IG2) Relay (With Smart Key)
TCU1 15A [G4FJ] TCM (7DCT)
WIPER FRT2 10A BCM ECU3 20A PCM (G4NC) / ECM (G4FJ)
HORN 15A Horn Relay
BATTERY
MANAGEMENT 10A Battery
Sensor
SENSOR2 10A [G4NC] Oil Control Valve #1/#2, Camshaft Position Sensor #1/#2, Purge Control Solenoid Valve,
Variable Intake Solenoid Valve, Canister Close Valve, Fuel Pump Relay
[G4FJ] Oil Control Valve #1/#2, Purge Control Solenoid Valve, Canister Close Valve, Fuel Pump Relay
SENSOR1 15A [G4NC] PCM, Oxygen Sensor (Up)/(Down) [G4FJ] ECM, Oxygen Sensor (Up)/(Down) ECU2 20A IGNITION COIL #1/#2/#3/#4, Condenser (G4NC)
ECU5 15A PCM (G4NC) / ECM (G4FJ)
ECU4 15A PCM (G4NC) / ECM (G4FJ)
SENSOR3 10A [G4NC] E/R Junction Block (Cooling Fan High Relay)
[G4FJ] Brake Vacuum Switch, RCV Control Solenoid Valve, E/R Junction Block (Cooling Fan High
Relay)
DEICER 15A E/R Junction Block (Front Deicer Relay)
FUEL PUMP1 20A Fuel Pump Relay
MODULE1 7.5A Adaptive Front Lighting Module
B/ALARM HORN 10A E/R Junction Block (B/Alarm Horn Relay) ABS3 10A ESC Module
Page 590 of 642
7-77
7
Maintenance
LLIIGG HH TT BB UU LLBB SS
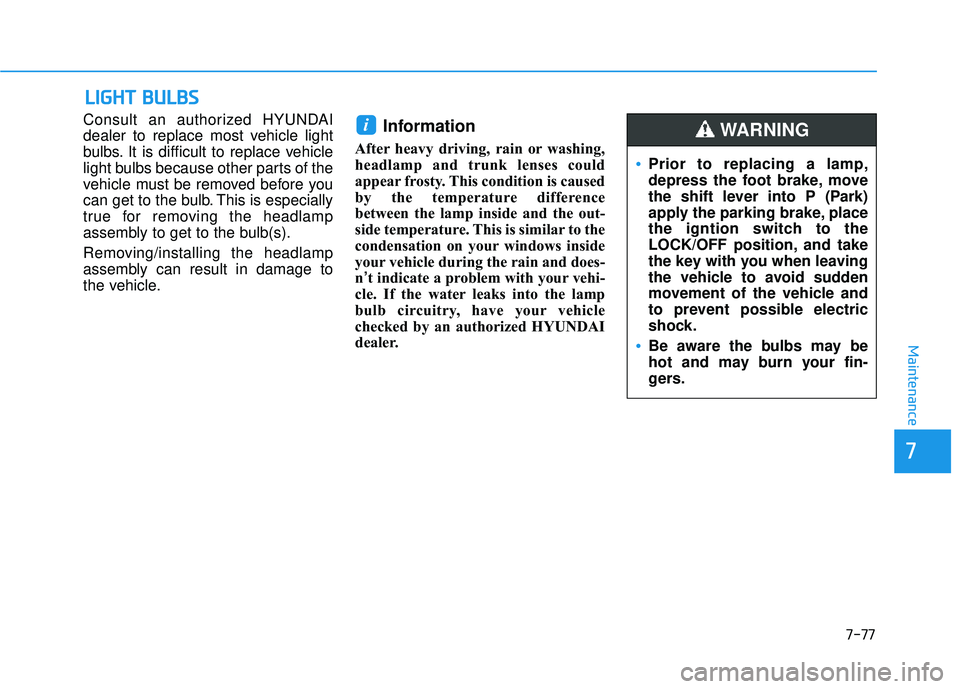
Consult an authorized HYUNDAI
dealer to replace most vehicle light
bulbs. It is difficult to replace vehicle
light bulbs because other parts of the
vehicle must be removed before you
can get to the bulb. This is especially
true for removing the headlamp
assembly to get to the bulb(s).
Removing/installing the headlamp
assembly can result in damage to
the vehicle.Information
After heavy driving, rain or washing,
headlamp and trunk lenses could
appear frosty. This condition is caused
by the temperature difference
between the lamp inside and the out-
side temperature. This is similar to the
condensation on your windows inside
your vehicle during the rain and does-
n’t indicate a problem with your vehi-
cle. If the water leaks into the lamp
bulb circuitry, have your vehicle
checked by an authorized HYUNDAI
dealer.
i
Prior to replacing a lamp,
depress the foot brake, move
the shift lever into P (Park)
apply the parking brake, place
the igntion switch to the
LOCK/OFF position, and take
the key with you when leaving
the vehicle to avoid sudden
movement of the vehicle and
to prevent possible electric
shock.
Be aware the bulbs may be
hot and may burn your fin-
gers.
WARNING
Page 592 of 642
7-79
7
Maintenance
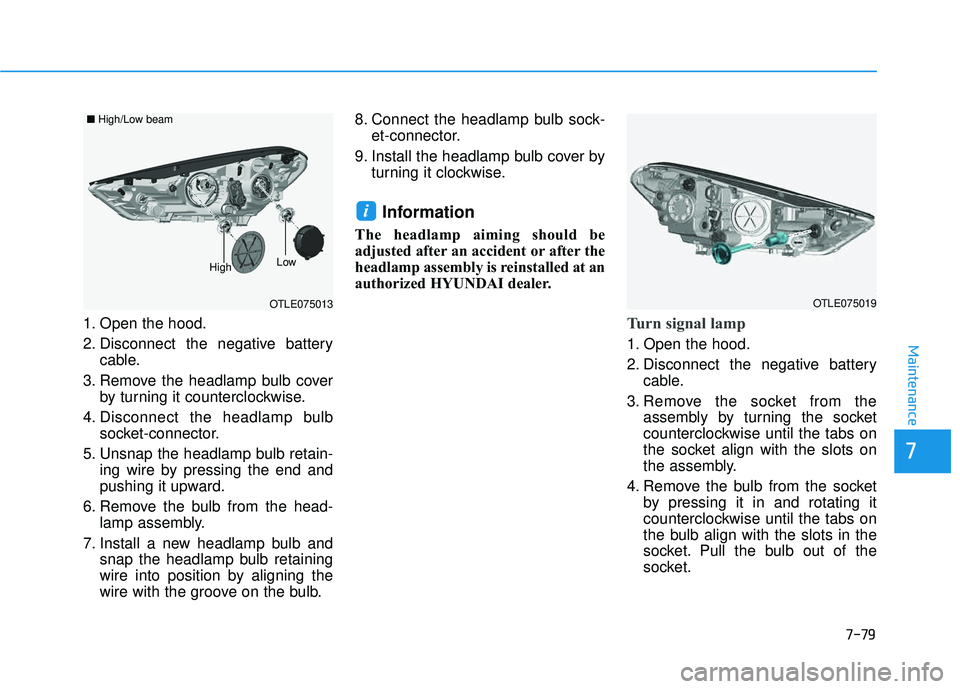
1. Open the hood.
2. Disconnect the negative batterycable.
3. Remove the headlamp bulb cover by turning it counterclockwise.
4. Disconnect the headlamp bulb socket-connector.
5. Unsnap the headlamp bulb retain- ing wire by pressing the end and
pushing it upward.
6. Remove the bulb from the head- lamp assembly.
7. Install a new headlamp bulb and snap the headlamp bulb retaining
wire into position by aligning the
wire with the groove on the bulb. 8. Connect the headlamp bulb sock-
et-connector.
9. Install the headlamp bulb cover by turning it clockwise.
Information
The headlamp aiming should be
adjusted after an accident or after the
headlamp assembly is reinstalled at an
authorized HYUNDAI dealer.
Turn signal lamp
1. Open the hood.
2. Disconnect the negative batterycable.
3. Remove the socket from the assembly by turning the socket
counterclockwise until the tabs on
the socket align with the slots on
the assembly.
4. Remove the bulb from the socket by pressing it in and rotating it
counterclockwise until the tabs on
the bulb align with the slots in the
socket. Pull the bulb out of the
socket.
i
OTLE075013
■High/Low beam
LowHigh
OTLE075019
Page 593 of 642
7-80
Maintenance
5. Install a new bulb by inserting itinto the socket and rotating it until
it locks into place.
6. Install the socket in the assembly by aligning the tabs on the socket
with the slots in the assembly.
7. Push the socket into the assembly and turn the socket clockwise.
Side marker lamp
1. Open the hood.
2. Disconnect the negative batterycable.
3. Remove the socket from the assembly by turning the socket
counterclockwise until the tabs on
the socket align with the slots on
the assembly.
4. Remove the bulb from the socket by pulling out the bulb.
5. Insert a new bulb.
Front fog lamp
1. Remove the front bumper under cover.
2. Reach your hand into the back of the front bumper.
3. Disconnect the power connector from the socket.
4. Remove the bulb-socket from the housing by turning the socket
counter clockwise until the tabs on
the socket align with the slots onthe housing.
OTLA075070OTL075068L
Page 596 of 642
7-83
7
Maintenance
Always handle them carefully, andavoid scratches and abrasions. If
the bulbs are lit, avoid contact with
liquids.
Never touch the glass with bare hands. Residual oil may cause the
bulb to overheat and burst when lit.
A bulb should be operated only when installed in a headlamp.
If a bulb becomes damaged or cracked, replace it immediatelyand carefully dispose of it. 1. Open the hood.
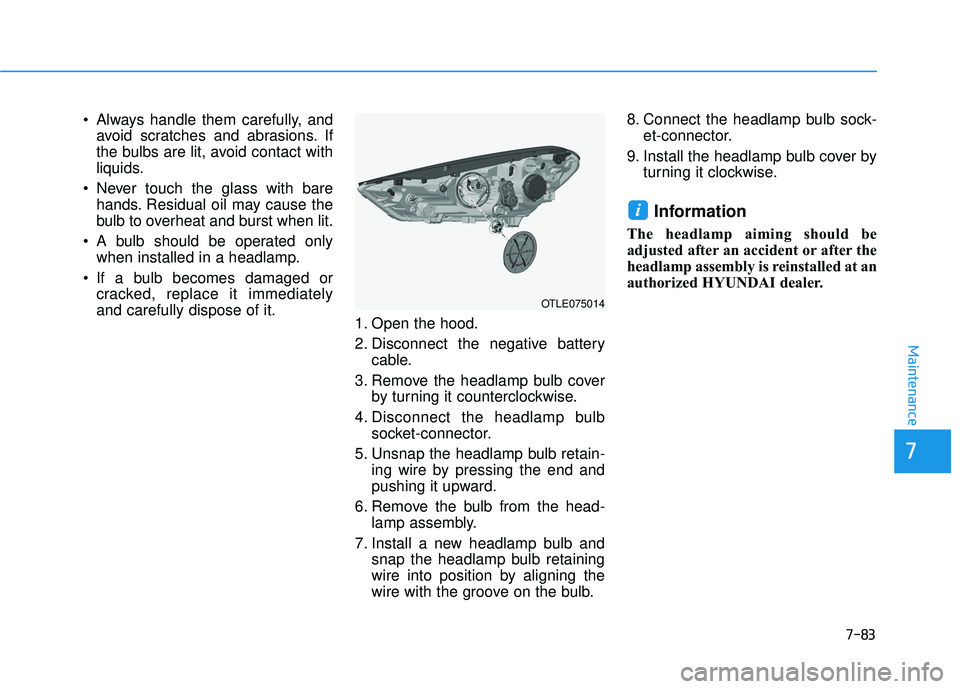
2. Disconnect the negative battery
cable.
3. Remove the headlamp bulb cover by turning it counterclockwise.
4. Disconnect the headlamp bulb socket-connector.
5. Unsnap the headlamp bulb retain- ing wire by pressing the end and
pushing it upward.
6. Remove the bulb from the head- lamp assembly.
7. Install a new headlamp bulb and snap the headlamp bulb retaining
wire into position by aligning the
wire with the groove on the bulb. 8. Connect the headlamp bulb sock-
et-connector.
9. Install the headlamp bulb cover by turning it clockwise.
Information
The headlamp aiming should be
adjusted after an accident or after the
headlamp assembly is reinstalled at an
authorized HYUNDAI dealer.
i
OTLE075014