Page 207 of 744

3-120
Convenient features of your vehicle
Turn signals and lane changesignals
To signal a turn, push down on the
lever for a left turn or up for a right
turn in position (A). To signal a lane
change, move the turn signal lever
slightly and hold it in position (B). The
lever will return to the OFF position
when released or when the turn is
completed.
If an indicator stays on and does not
flash or if it flashes abnormally, one of
the turn signal bulbs may be burned
out and will require replacement.
One touch turn signal function
To activate an One Touch Turn Signal
function, move the turn signal lever
slightly and then release it. The turn
signal indicators will blink 3, 5, or 7
times, depending on the User
Settings on the LCD display.
You can activate or deactivate the
One Touch Turn Signal function or
choose the number of blinking (3, 5,
or 7) from the User Settings Mode
(Light) on the LCD display.
For more information, refer to the
"LCD Display" section in this
chapter.
OLF044091N
Do not place any accessories,
stickers or tint the windshield.
Have the windshield glass
replaced from an authorized
dealer.
Do not remove or impact relat-
ed parts of the Smart High
Beam system.
Be careful that water doesn’t
get into the Smart High Beam
unit.
Do not place objects on the
dashboard that reflects light
such as mirrors, white paper,
etc. The system may malfunc-
tion if sunlight is reflected.
At times, the Smart High
Beam system may not work
properly, always check the
road conditions for your safe-
ty. When the system does not
operate normally, manually
change between the high
beam and low beam.
WARNING
Page 214 of 744
3-127
Convenient features of your vehicle
3
Glove box lamp
The glove box lamp comes on when
the glove box is opened.
If the glove box is not closed, the
lamp will turn off after 20 minutes.
To prevent possible battery dis-
charge, securely close the glove
box after use.
Vanity mirror lamp
Opening the lid of the vanity mirror will
automatically turn on the mirror light.
To prevent unnecessary charging
system drain, close the vanity mir-
ror cover after using the mirror.
NOTICE
NOTICE
OLF044258OLF044257
Page 222 of 744

3-135
Convenient features of your vehicle
3
D
DE
EF
FR
R O
O S
ST
T E
ER
R
To prevent damage to the conduc-
tors bonded to the inside surface
of the rear window, never use
sharp instruments or window
cleaners containing abrasives to
clean the window.
If you want to defrost and defog
the front windshield, refer to the
"Windshield Defrosting and
Defogging" section in this chapter.
Rear Window Defroster
The defroster heats the window to
remove frost, fog and thin ice from
the interior and exterior of the rear
window, while engine is running.
To activate the rear window
defroster, press the rear window
defroster button located in the center
facia switch panel. The indicator on
the rear window defroster button illu-
minates when the defroster is ON.
To turn off the defroster, press the rear window defroster button again.
Information
• If there is heavy accumulation ofsnow on the rear window, brush it off
before operating the rear defroster.
• The rear window defroster automat- ically turns off after approximately
20 minutes or when engine Start/Stop
button is in the OFF position.
Outside rearview mirror defroster
If your vehicle is equipped with the
outside rearview mirror defrosters,
they will operate at the same time you
turn on the rear window defroster.
iNOTICE
OLFP045580N
Page 237 of 744

3-150
Convenient features of your vehicle
W
WI
IN
N D
DS
SH
H I
IE
E L
LD
D
D
D E
EF
FR
R O
O S
ST
T I
IN
N G
G
A
A N
N D
D
D
D E
EF
FO
O G
GG
GI
IN
N G
G
For maximum windshield defrost-
ing, set the temperature control
knob to the highest temperature
setting and the fan control knob to
the highest fan speed. Select the
front defrost button on the climate
control display. After the engine
warm-up period, warm air will be
directed to the front windshield.
If warm air to the floor is desired while defrosting or defogging, set the
mode to the floor-defrost position.
Before driving, clear all snow and ice from the windshield, rear win-
dow, outside rear view mirrors, and
all side windows.
Clear all snow and ice from the hood and air inlet in the cowl grill to
improve heater and defroster effi-
ciency and to reduce the probability
of fogging up the inside of the wind-
shield.
To reduce tendency of the glass fogging and also to improve visibil-
ity, keep the interior surface of the
windshield clean by wiping it with a
clean cloth and glass cleaner. If the engine temperature is still
cold after starting, then a brief
engine warm up period may be
required for the vented air flow to
become warm or hot.NOTICE
Windshield heating
Do not use the or posi-
tion during cooling operation in
extremely humid weather. The
difference between the temper-
ature of the outside air and that
of the windshield could cause
the outer surface of the wind-
shield to fog up, causing loss of
visibility could cause an acci-
dent resulting in serious injury
or death. In this case, set the
mode selection knob or button
to the position and fan
speed control knob or button to
a lower speed.
WARNING
Page 242 of 744

3-155
Convenient features of your vehicle
3
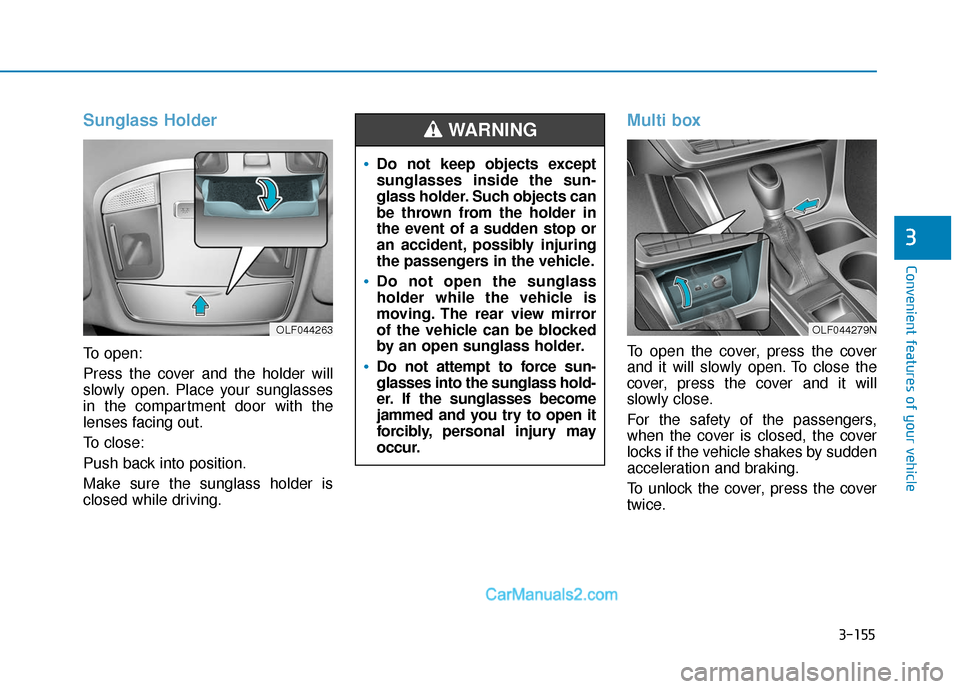
Sunglass Holder
To open:
Press the cover and the holder will
slowly open. Place your sunglasses
in the compartment door with the
lenses facing out.
To close:
Push back into position.
Make sure the sunglass holder is
closed while driving.
Multi box
To open the cover, press the cover
and it will slowly open. To close the
cover, press the cover and it will
slowly close.
For the safety of the passengers,
when the cover is closed, the cover
locks if the vehicle shakes by sudden
acceleration and braking.
To unlock the cover, press the cover
twice.
OLF044263
Do not keep objects except
sunglasses inside the sun-
glass holder. Such objects can
be thrown from the holder in
the event of a sudden stop or
an accident, possibly injuring
the passengers in the vehicle.
Do not open the sunglass
holder while the vehicle is
moving. The rear view mirror
of the vehicle can be blocked
by an open sunglass holder.
Do not attempt to force sun-
glasses into the sunglass hold-
er. If the sunglasses become
jammed and you try to open it
forcibly, personal injury may
occur.
WARNING
OLF044279N
Page 244 of 744

3-157
Convenient features of your vehicle
3
Sunvisor
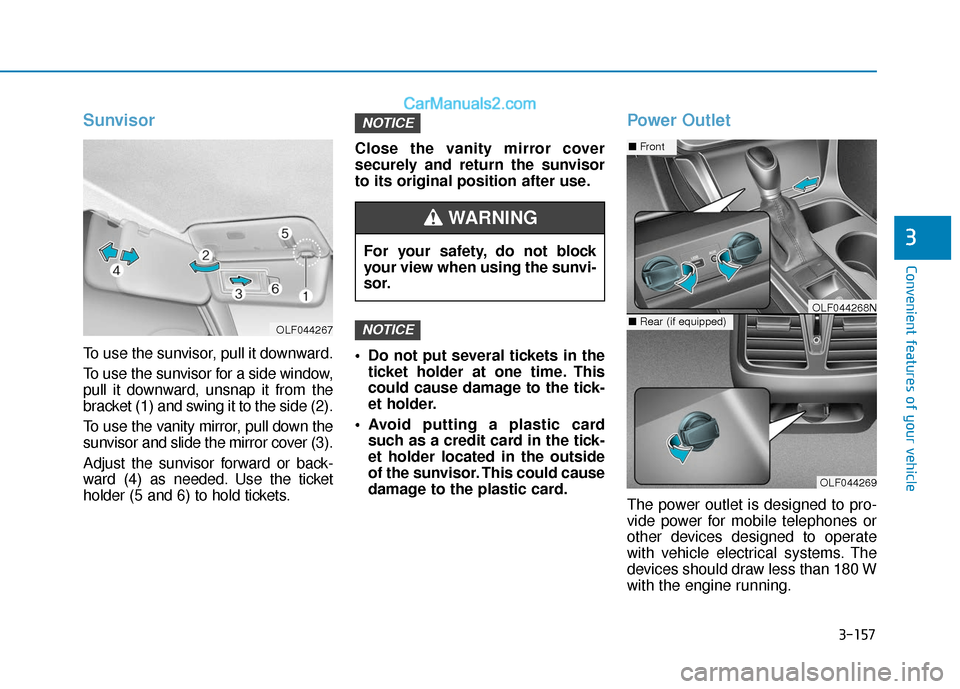
To use the sunvisor, pull it downward.
To use the sunvisor for a side window,
pull it downward, unsnap it from the
bracket (1) and swing it to the side (2).
To use the vanity mirror, pull down the
sunvisor and slide the mirror cover (3).
Adjust the sunvisor forward or back-
ward (4) as needed. Use the ticket
holder (5 and 6) to hold tickets.Close the vanity mirror cover
securely and return the sunvisor
to its original position after use.
Do not put several tickets in the
ticket holder at one time. This
could cause damage to the tick-
et holder.
Avoid putting a plastic card such as a credit card in the tick-
et holder located in the outside
of the sunvisor. This could cause
damage to the plastic card.
Power Outlet
The power outlet is designed to pro-
vide power for mobile telephones or
other devices designed to operate
with vehicle electrical systems. The
devices should draw less than 180 W
with the engine running.
NOTICE
NOTICE
OLF044267
For your safety, do not block
your view when using the sunvi-
sor.
WARNING
OLF044269
■ Front
■Rear (if equipped)OLF044268N
Page 356 of 744

4-107
Multimedia System
4
Using the Room Mirror Key
Selecting the room mirror key will
allow you to make service required
inquiries, POI info searches, and
emergency rescues by connecting to
the Blue Link
®Center.
Such features can be used only after
subscribing to the Blue Link
®service.
➀ (Blue Link
®Center)
Makes requests for Blue Link
®serv-
ice related inquiries and consulta-
tions.
A call is connected to the Blue Link
®
service center employee.
Re-pressing the key will end the call.
This feature does not operate when
you are on a Bluetooth
®phone call. ➁
(Blue Link
®for POI)
®for Voice command
Starts Blue Link
®voice command.
Voice receiving voice guidance,
shortly press the button to convert to
voice command mode. Press and
hold the button to end voice com-
mand.
1. Navigate to
“Navigate to” voice command is used
to request the download of route
data for a new destination, saved
destinations, daily routes and previ-
ous destinations.
2. Save Destination
“Save Destination” VR command is
used to assign a voice tag to the last
downloaded destination and store it
in a destination directory.
Information
The Turn by Turn (TBT) feature sup-
ports the store of ten (10) destinations
in the TBT destinations directory.
3. Route Preview
“Route Preview” VR command allows
the user to preview the route instruc-
tions (upcoming maneuver instruc-
tions) at any time during the route
guidance.
4. Destinations List
“Destinations List” VR command
allows the user to preview and delete
the stored destinations with their
associated voice tags in the Turn by
Turn destinations directory.
5. Voice Guidance
“Voice Guidance” VR command allows
the user to mute/unmute the Turn by
Turn(TBT) direction announcements.
i
Page 444 of 744

4-195
Multimedia System
4
Using the Room Mirror Key
Selecting the room mirror key will
allow you to make service required
inquiries, POI info searches, and
emergency rescues by connecting to
the Blue Link
®Center.
Such features can be used only after
subscribing to the Blue Link
®service.
➀ (Blue Link
®Center)
Makes requests for Blue Link
®serv-
ice related inquiries and consulta-
tions.
A call is connected to the Blue Link
®
service center employee.
Re-pressing the key will end the call.
This feature does not operate when
you are on a Bluetooth
®phone call. ➁
(Blue Link
®for POI)
®for Voice command
Starts Blue Link
®voice command.
Voice receiving voice guidance,
shortly press the button to convert to
voice command mode. Press and
hold the button to end voice com-
mand.
1. Navigate to
"Navigate to" voice command is used
to request the download of route
data for a new destination, saved
destinations, daily routes and previ-
ous destinations.
2. Save Destination
"Save Destination" VR command is
used to assign a voice tag to the last
downloaded destination and store it
in a destination directory.
Information
The Turn by Turn (TBT) feature sup-
ports the store of ten (10) destinations
in the TBT destinations directory.
3. Route Preview
"Route Preview" VR command
allows the user to preview the route
instructions (upcoming maneuver
instructions) at any time during the
route guidance.
4. Destinations List
"Destinations List" VR command
allows the user to preview and delete
the stored destinations with their
associated voice tags in the Turn by
Turn destinations directory.
5. Voice Guidance
"Voice Guidance" VR command
allows the user to mute/unmute the
Turn by Turn (TBT) direction
announcements.
i