Page 180 of 563

3-95
Convenient features of your vehicle
3
Average Fuel Economy (2)
The average fuel economy is calcu-lated by the total driving distance
and fuel consumption since the last
average fuel economy reset.
- Fuel economy range:0.0 ~ 99.9 MPG or L/100km or
km/L
The average fuel economy can be reset both manually and automati-
cally.
Manual reset
To clear the average fuel economy
manually, press the OK button on the
steering wheel for more than 1 sec-
ond when the average fuel economy
is displayed.
For more information on the OK
button, refer to the "LCD Display
Control" in this chapter.
Automatic reset
To make the average fuel economy
be reset automatically whenever refu-
eling, select the "Auto Reset" mode in
User Setting menu of the LCD display
(Refer to "LCD Display").
Under "Auto Reset" mode, the aver-
age fuel economy will be cleared to
zero (---) when the vehicle speed
exceeds 1 km/h after refueling more
than 1.6 gallons (6 liters).
Information
The average fuel economy is not dis-
played for more accurate calculation
if the vehicle does not drive more than
0.19 miles (300 meters) since the igni-
tion switch or the Engine Start/Stop
button is turned to ON.
Instant Fuel Economy (3)
This mode displays the instant fuel
economy during the last few seconds
when the vehicle speed is more than
6.2 MPH (10 km/h).
- Fuel economy range: 0 ~ 50 MPG or 0 ~ 30 L/100km
i
Page 183 of 563

3-98
Convenient features of your vehicle
Parking Brake & BrakeFluid Warning Light
This warning light illuminates:
Once you set the ignition switch or
the Engine Start/Stop button to the
ON position.
- It illuminates for approximately 3seconds.
- It remains on if the parking brake is applied.
When the parking brake is applied.
When the brake fluid level in the reservoir is low.
- If the warning light illuminateswith the parking brake released, it
indicates the brake fluid level in
reservoir is low.
If the brake fluid level in the reser-
voir is low:
1. Drive carefully to the nearest safe location and stop your vehicle.
2. With the engine stopped, check the brake fluid level immediately and
add fluid as required (For more
information, refer to "Brake
Fluid" in chapter 7) . Then check all
brake components for fluid leaks. If
any leak on the brake system is still
found, the warning light remains on,
or the brakes do not operate prop-
erly, do not drive the vehicle. In this
case, have your vehicle inspected
by an authorized HYUNDAI dealer.
Dual-diagonal braking system
Your vehicle is equipped with dual-
diagonal braking systems. This
means you still have braking on two
wheels even if one of the dual sys-
tems should fail.
With only one of the dual systems
working, more than normal pedal
travel and greater pedal pressure are
required to stop the vehicle.
Also, the vehicle will not stop in as
short a distance with only a portion
of the brake system working.
If the brakes fail while you are driv-
ing, shift to a lower gear for addition-
al engine braking and stop the vehi-
cle as soon as it is safe to do so.
Page 217 of 563
3-132
Convenient features of your vehicle
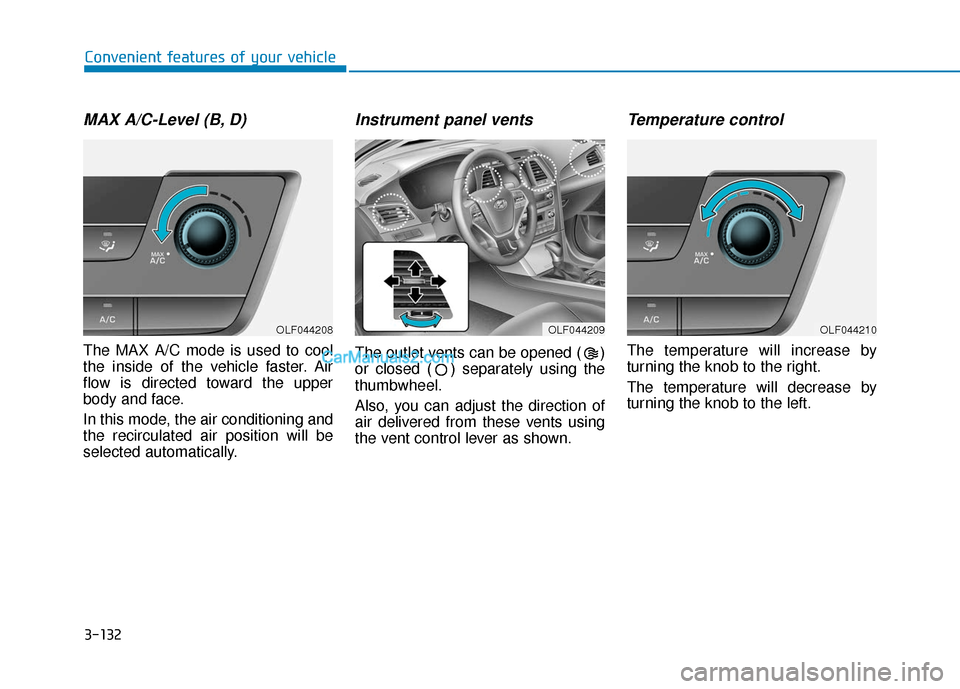
MAX A/C-Level (B, D)
The MAX A/C mode is used to cool
the inside of the vehicle faster. Air
flow is directed toward the upper
body and face.
In this mode, the air conditioning and
the recirculated air position will be
selected automatically.
Instrument panel vents
The outlet vents can be opened ( )
or closed ( ) separately using the
thumbwheel.
Also, you can adjust the direction of
air delivered from these vents using
the vent control lever as shown.
Temperature control
The temperature will increase by
turning the knob to the right.
The temperature will decrease by
turning the knob to the left.
OLF044208OLF044209OLF044210
Page 229 of 563
3-144
Convenient features of your vehicle
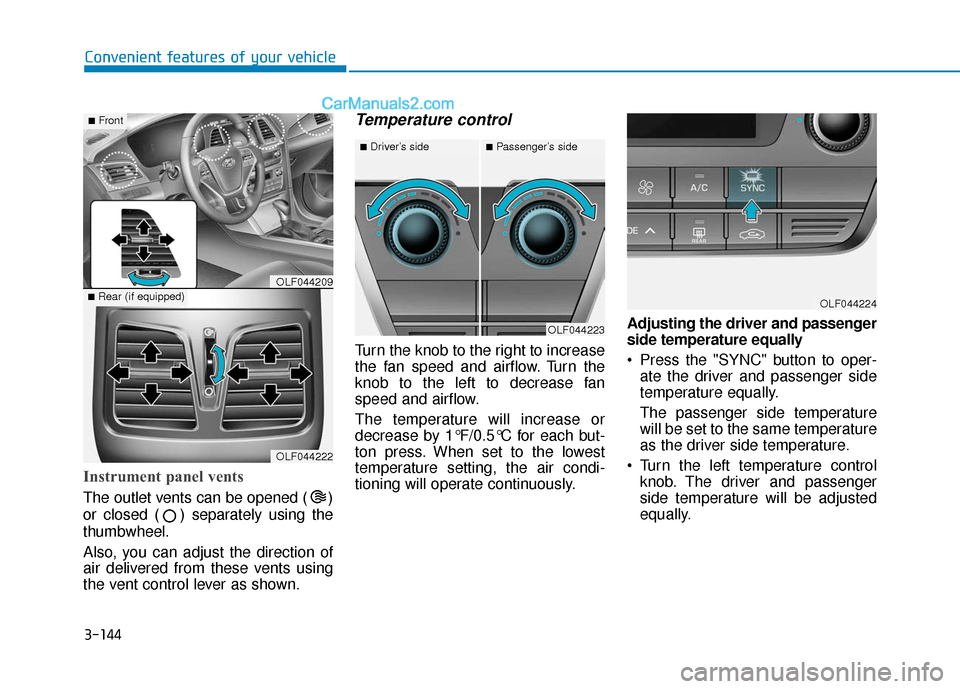
Instrument panel vents
The outlet vents can be opened ( )
or closed ( ) separately using the
thumbwheel.
Also, you can adjust the direction of
air delivered from these vents using
the vent control lever as shown.
Temperature control
Turn the knob to the right to increase
the fan speed and airflow. Turn the
knob to the left to decrease fan
speed and airflow.
The temperature will increase or
decrease by 1°F/0.5°C for each but-
ton press. When set to the lowest
temperature setting, the air condi-
tioning will operate continuously.Adjusting the driver and passenger
side temperature equally
Press the "SYNC" button to oper-
ate the driver and passenger side
temperature equally.
The passenger side temperature
will be set to the same temperature
as the driver side temperature.
Turn the left temperature control knob. The driver and passenger
side temperature will be adjusted
equally.
OLF044222
■Rear (if equipped)OLF044209
■Front
OLF044223
■Driver’s side■Passenger’s side
OLF044224
Page 249 of 563
Multimedia System
Multimedia System.................................................4-2
AUX, USB and iPod®Port ...............................................4-2
Antenna ........................................................................\
.......4-2
Steering Wheel Audio Control........................................4-3
Audio / Video / Navigation System (AVN) ..................4-4
Bluetooth®Wireless Technology Hands-Free ...........4-4
How Vehicle Audio Works ...............................................4-5
Features of Your Vehicle.................................................4-7
System Controllers and Functions
-3.8 Inch Mono TFT ............................................4-17
Audio Head Unit ..............................................................4-17
Setup ........................................................................\
..........4-19
Radio : FM, AM, SiriusXM .............................................4-22
SiriusXM, XM
TMRADIO ...................................................4-25
Basic Method of Use : Audio CD /
MP3 CD / USB / iPod
®/ My Music ...........................4-27
Bluetooth®Wireless Technology Audio ....................4-33
Bluetooth®Wireless Technology ................................4-35
Voice Recognition ...........................................................4-46
Ending Voice Recognition .............................................4-47
Rear View Camera ..........................................................4-54
Blue Link
®........................................................................\
.4-54
Declaration of conformity ............................................4-59
4
Page 251 of 563
4-3
Multimedia System
Do not clean the inside of therear window glass with a cleaner
or scraper to remove foreign
deposits as this may cause dam-
age to the antenna elements.
Avoid adding metallic coatings such as Ni, Cd, and so on. These
can degrade the receiving AM
and FM broadcast signals.
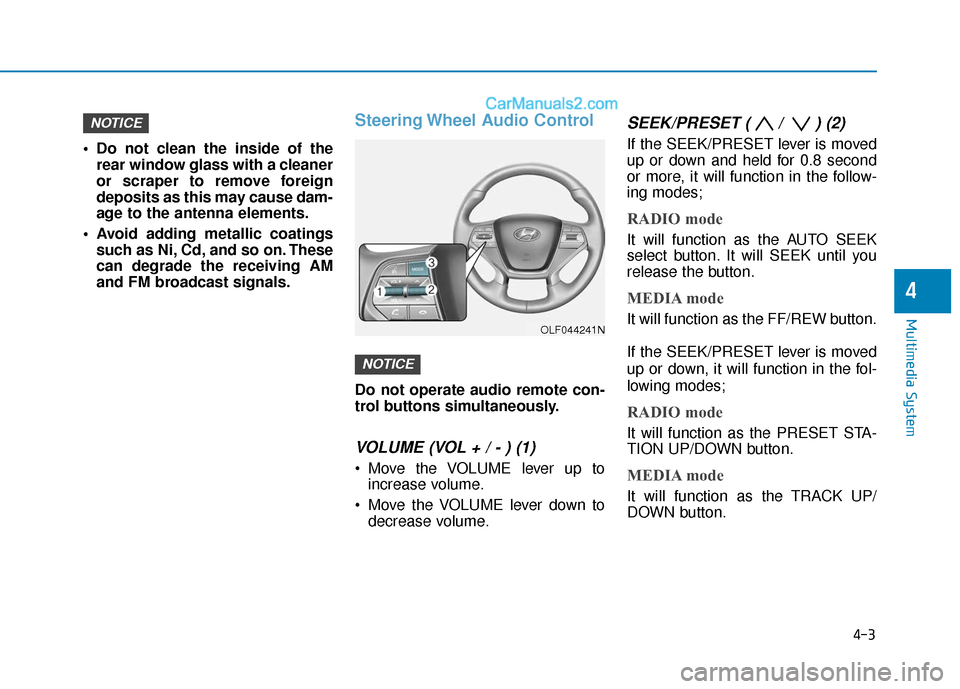
Steering Wheel Audio Control
Do not operate audio remote con-
trol buttons simultaneously.
VOLUME (VOL + / - ) (1)
Move the VOLUME lever up toincrease volume.
Move the VOLUME lever down to decrease volume.
SEEK/PRESET ( / ) (2)
If the SEEK/PRESET lever is moved
up or down and held for 0.8 second
or more, it will function in the follow-
ing modes;
RADIO mode
It will function as the AUTO SEEK
select button. It will SEEK until you
release the button.
MEDIA mode
It will function as the FF/REW button.
If the SEEK/PRESET lever is moved
up or down, it will function in the fol-
lowing modes;
RADIO mode
It will function as the PRESET STA-
TION UP/DOWN button.
MEDIA mode
It will function as the TRACK UP/
DOWN button.
NOTICE
NOTICE
4
OLF044241N
Page 282 of 563
4-34
Multimedia System
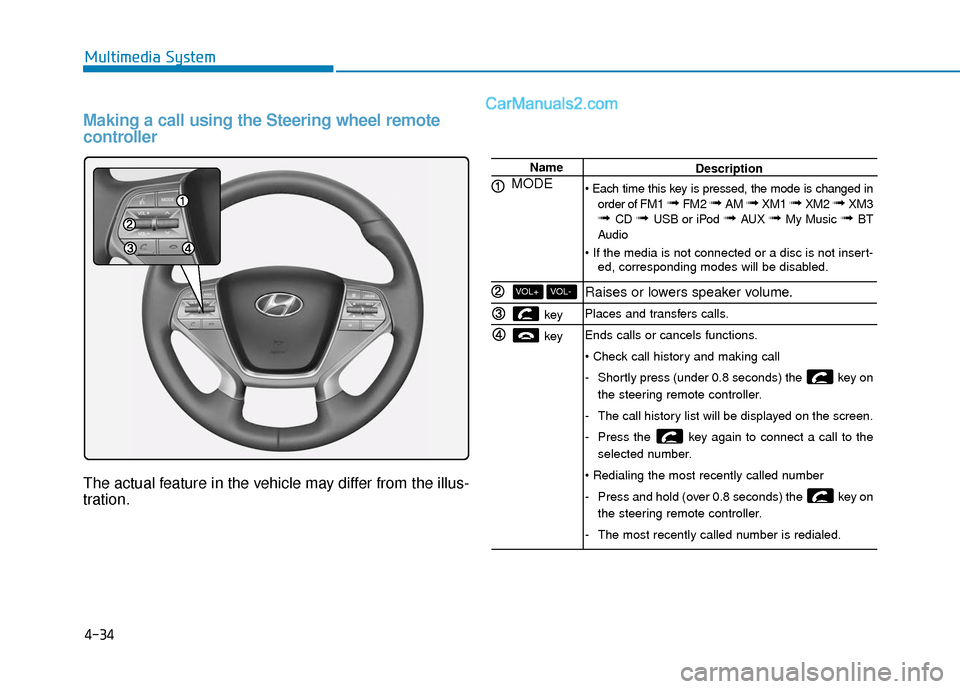
Making a call using the Steering wheel remote
controller
The actual feature in the vehicle may differ from the illus-
tration.
Name
MODE
key
key
VOL-VOL+
Description
order of FM1
➟ FM2 ➟ AM ➟ XM1 ➟ XM2 ➟ XM3➟ CD ➟ USB or iPod ➟ AUX ➟ My Music ➟ BT
Audio
ed, corresponding modes will be disabled.
Raises or lowers speaker volume.
Places and transfers calls.
Ends calls or cancels functions.
-Shortly press (under 0.8 seconds) the key on
the steering remote controller.
- The call history list will be displayed on the screen.
- Press the key again to connect a call to the
selected number.
- Press and hold (over 0.8 seconds) the key on
the steering remote controller.
- The most recently called number is redialed.
Page 284 of 563
4-36
Multimedia System
Pairing key / key
on the Steering Remote
Controller
When No Devices have beenPaired
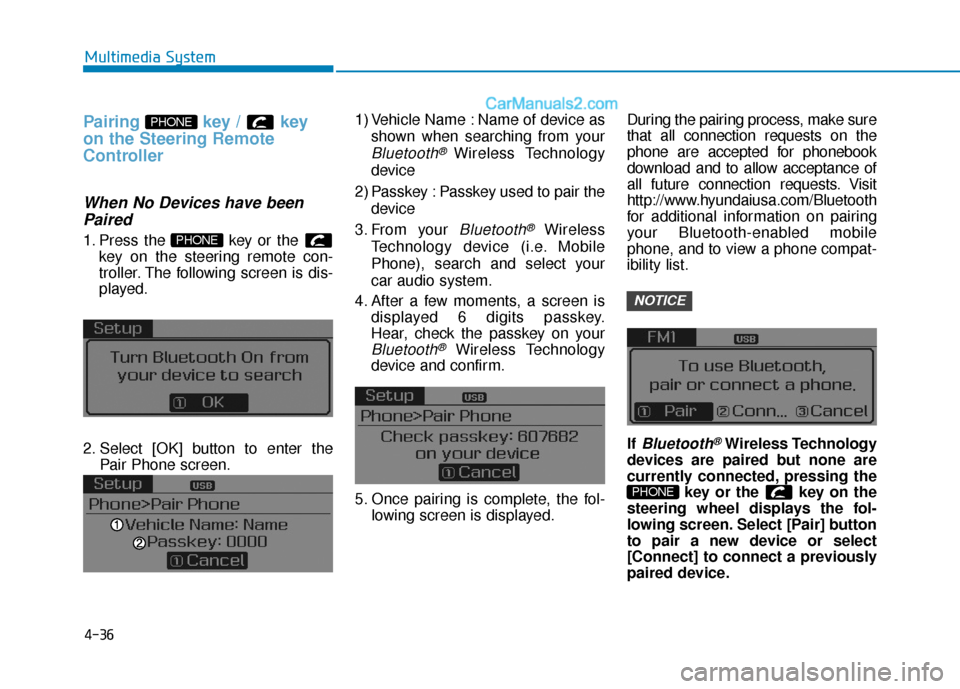
1. Press the key or the
key on the steering remote con-
troller. The following screen is dis-
played.
2. Select [OK] button to enter the Pair Phone screen. 1) Vehicle Name : Name of device as
shown when searching from your
Bluetooth® Wireless Technology
device
2) Passkey : Passkey used to pair the device
3. From your
Bluetooth®Wireless
Technology device (i.e. Mobile
Phone), search and select your
car audio system.
4. After a few moments, a screen is displayed 6 digits passkey.
Hear, check the passkey on your
Bluetooth®Wireless Technology
device and confirm.
5. Once pairing is complete, the fol- lowing screen is displayed. During the pairing process, make sure
that all connection requests on the
phone are accepted for phonebook
download and to allow acceptance of
all future connection requests. Visit
http://www.hyundaiusa.com/Bluetooth
for additional information on pairing
your Bluetooth-enabled mobile
phone, and to view a phone compat-
ibility list.
If
Bluetooth®Wireless Technology
devices are paired but none are
currently connected, pressing the key or the key on the
steering wheel displays the fol-
lowing screen. Select [Pair] button
to pair a new device or select
[Connect] to connect a previously
paired device.
PHONE
NOTICE
PHONE
PHONE