Page 113 of 563
3-28
Convenient features of your vehicle
Compass function
The Compass can be turned ON and
OFF and will remember the last state
when the ignition is cycled. To turn
the display feature ON/OFF:
1. Press and release the buttonwithin 1 second to turn the display
feature OFF.
2. Press and release the button again within 1 second to turn the
display back ON.
Additional options can be set with
press and hold sequences of the
button and are detailed below.
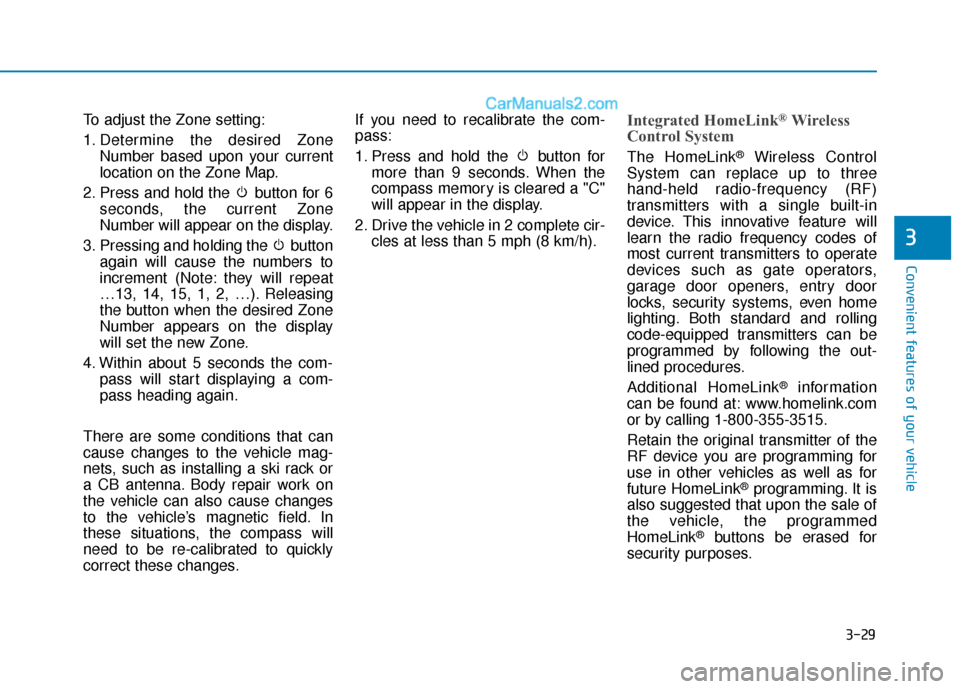
There is a difference between mag-
netic north and true north. To com-
pensate for this difference you will
need to adjust the Zone setting based
on where you live.
B520C05NF
Page 114 of 563

3-29
Convenient features of your vehicle
3
To adjust the Zone setting:
1. Determine the desired ZoneNumber based upon your current
location on the Zone Map.
2. Press and hold the button for 6 seconds, the current Zone
Number will appear on the display.
3. Pressing and holding the button again will cause the numbers to
increment (Note: they will repeat
…13, 14, 15, 1, 2, …). Releasing
the button when the desired Zone
Number appears on the display
will set the new Zone.
4. Within about 5 seconds the com- pass will start displaying a com-
pass heading again.
There are some conditions that can
cause changes to the vehicle mag-
nets, such as installing a ski rack or
a CB antenna. Body repair work on
the vehicle can also cause changes
to the vehicle’s magnetic field. In
these situations, the compass will
need to be re-calibrated to quickly
correct these changes. If you need to recalibrate the com-
pass:
1. Press and hold the button for
more than 9 seconds. When the
compass memory is cleared a "C"
will appear in the display.
2. Drive the vehicle in 2 complete cir- cles at less than 5 mph (8 km/h).Integrated HomeLink®Wireless
Control System
The HomeLink®Wireless Control
System can replace up to three
hand-held radio-frequency (RF)
transmitters with a single built-in
device. This innovative feature will
learn the radio frequency codes of
most current transmitters to operate
devices such as gate operators,
garage door openers, entry door
locks, security systems, even home
lighting. Both standard and rolling
code-equipped transmitters can be
programmed by following the out-
lined procedures.
Additional HomeLink
®information
can be found at: www.homelink.com
or by calling 1-800-355-3515.
Retain the original transmitter of the
RF device you are programming for
use in other vehicles as well as for
future HomeLink
®programming. It is
also suggested that upon the sale of
the vehicle, the programmed
HomeLink
®buttons be erased for
security purposes.
Page 118 of 563

3-33
Convenient features of your vehicle
3
Erasing HomeLink®buttons
Individual buttons cannot be erased.
However, to erase all three pro-
grammed buttons:
1. Press and hold the two outerHomeLink
®buttons until the indi-
cator light begins to flash after 10
seconds.
2. Release both buttons. Do not hold for longer than 20 seconds.
The Integrated HomeLink
®Wireless
Control System is now in the training
(learn) mode and can be pro-
grammed at any time following the
appropriate steps in the
Programming chapters above.
NVS
®is a registered trademark and
Z-Nav™ is a trademark of the Gentex
Corporation, Zeeland, Michigan.
HomeLink
®is a registered trademark
owned by Johnson Controls,
Incorporated, Milwaukee, Wisconsin.
FCC ID: NZLTLMHL4
IC: 4112A-TLMHL4
Information
This device complies with Part 15 of
the FCC Rules.
Operation is subject to the following
three conditions:
1. This device may not cause harmful interference, and
2. This device must accept any inter- ference received, including interfer-
ence that may cause undesired
operation.
3. The transceiver has been tested and complies with FCC and Industry
Canada rules. Changes or modifica-
tions not expressly approved by the
party responsible for compliance
could void the user’s authority to
operate the device.
Electric chromic mirror (ECM)with compass and HomeLink®
system (for Canada)
Your vehicle may be equipped with a
Gentex Automatic-Dimming Mirror
with a Z-Nav™ Electronic Compass
Display and an Integrated HomeLink
®
Wireless Control System.
During nighttime driving, this feature
will automatically detect and reduce
rearview mirror glare while the com-
pass indicates the direction the vehi-
cle is pointed. The HomeLink
®
Universal Transceiver allows you to
activate your garage door(s), electric
gate, home lighting, etc.
i
Page 119 of 563

3-34
Convenient features of your vehicle
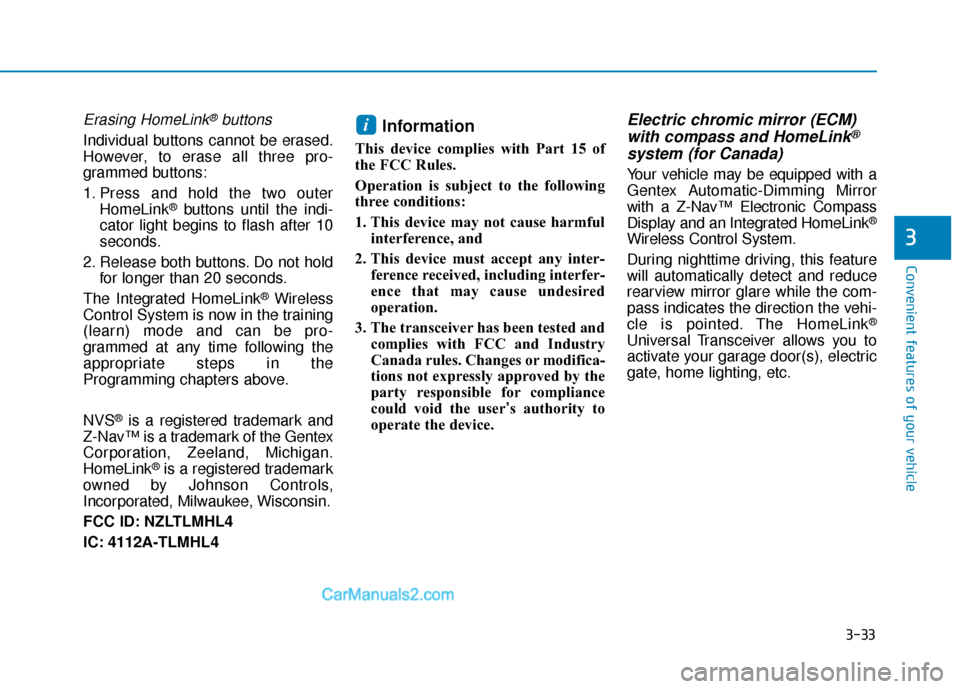
(1) Channel 1 button
(2) Channel 2 button
(3) Status indicator LED
(4) Channel 3 button
(5) Rear light sensor
(6) Dimming ON/OFF button
(7) Compass control button
(8) Compass display
Automatic-Dimming Night Vision
Safety™ (NVS®) Mirror
(if equipped)
The NVS®Mirror automatically
reduces glare by monitoring light lev-
els in the front and the rear of the
vehicle. Any object that obstructs
either light sensor will degrade the
automatic dimming control feature.
For more information regarding
NVS
®mirrors and other applica-
tions, please refer to the Gentex
website:
www.gentex.com The auto-dimming function can be
controlled by pressing the ON/OFF
button:
1. Pressing the button turns the auto-
dimming function OFF which is
indicated by the green Status
Indicator LED turning off.
2. Pressing the button again turns the auto-dimming function ON
which is indicated by the green
Status Indicator LED turning on.
The mirror defaults to the ON posi-
tion each time the vehicle is started.
Z-Nav™ Compass Display
The NVS™ Mirror in your vehicle is
also equipped with a Z-Nav™
Compass that shows the vehicle
Compass heading in the Display
Window using the 8 basic cardinal
headings (N, NE, E, SE, etc.).
OLF044476N
Page 120 of 563
3-35
Convenient features of your vehicle
3
Compass function
The Compass can be turned ON and
OFF and will remember the last state
when the ignition is cycled. To turn
the display feature ON/OFF:
1. Press and release the button toturn the display feature OFF.
2. Press and release the button again to turn the display back ON.
Additional options can be set with
press and hold sequences of the but-
ton and are detailed below.
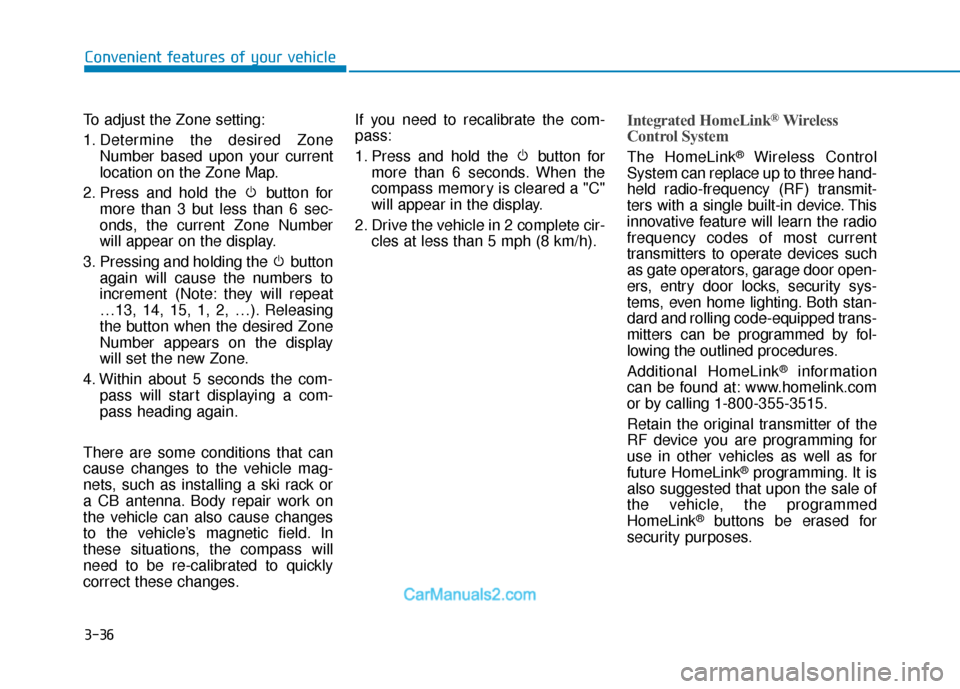
There is a difference between mag-
netic north and true north. To com-
pensate for this difference you will
need to adjust the Zone setting
based on where you live.
B520C05NF
Page 121 of 563

3-36
Convenient features of your vehicle
To adjust the Zone setting:
1. Determine the desired Zone Number based upon your current
location on the Zone Map.
2. Press and hold the button for more than 3 but less than 6 sec-
onds, the current Zone Number
will appear on the display.
3. Pressing and holding the button again will cause the numbers to
increment (Note: they will repeat
…13, 14, 15, 1, 2, …). Releasing
the button when the desired Zone
Number appears on the display
will set the new Zone.
4. Within about 5 seconds the com- pass will start displaying a com-
pass heading again.
There are some conditions that can
cause changes to the vehicle mag-
nets, such as installing a ski rack or
a CB antenna. Body repair work on
the vehicle can also cause changes
to the vehicle’s magnetic field. In
these situations, the compass will
need to be re-calibrated to quickly
correct these changes. If you need to recalibrate the com-
pass:
1. Press and hold the button for
more than 6 seconds. When the
compass memory is cleared a "C"
will appear in the display.
2. Drive the vehicle in 2 complete cir- cles at less than 5 mph (8 km/h).
Integrated HomeLink®Wireless
Control System
The HomeLink®Wireless Control
System can replace up to three hand-
held radio-frequency (RF) transmit-
ters with a single built-in device. This
innovative feature will learn the radio
frequency codes of most current
transmitters to operate devices such
as gate operators, garage door open-
ers, entry door locks, security sys-
tems, even home lighting. Both stan-
dard and rolling code-equipped trans-
mitters can be programmed by fol-
lowing the outlined procedures.
Additional HomeLink
®information
can be found at: www.homelink.com
or by calling 1-800-355-3515.
Retain the original transmitter of the
RF device you are programming for
use in other vehicles as well as for
future HomeLink
®programming. It is
also suggested that upon the sale of
the vehicle, the programmed
HomeLink
®buttons be erased for
security purposes.
Page 145 of 563

3-60
Convenient features of your vehicle
Smart Trunk (if equipped)
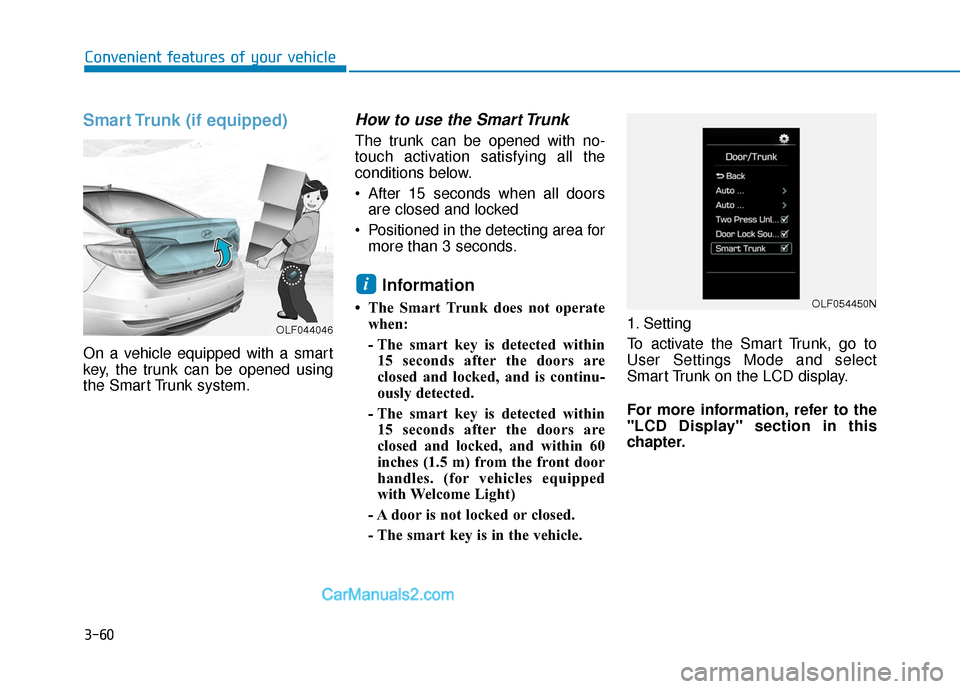
On a vehicle equipped with a smart
key, the trunk can be opened using
the Smart Trunk system.
How to use the Smart Trunk
The trunk can be opened with no-
touch activation satisfying all the
conditions below.
After 15 seconds when all doorsare closed and locked
Positioned in the detecting area for more than 3 seconds.
Information
• The Smart Trunk does not operatewhen:
- The smart key is detected within15 seconds after the doors are
closed and locked, and is continu-
ously detected.
- The smart key is detected within 15 seconds after the doors are
closed and locked, and within 60
inches (1.5 m) from the front door
handles. (for vehicles equipped
with Welcome Light)
- A door is not locked or closed.
- The smart key is in the vehicle. 1. Setting
To activate the Smart Trunk, go to
User Settings Mode and select
Smart Trunk on the LCD display.
For more information, refer to the
"LCD Display" section in this
chapter.
i
OLF044046
OLF054450N
Page 152 of 563
3-67
Convenient features of your vehicle
3
I
IN
N S
ST
T R
R U
U M
M E
EN
N T
T
C
C L
LU
U S
ST
T E
ER
R
1. Tachometer
2. Speedometer
3. Engine coolant temperature gauge
4. Fuel gauge
5. Warning and indicator lights
6. LCD display (including Trip computer)
OLF044100N/OLF046101N
■ ■
Type A
The actual cluster in the vehicle may dif-
fer from the illustration.
■ ■Type B