Page 452 of 562
6-27
What to do in an emergency
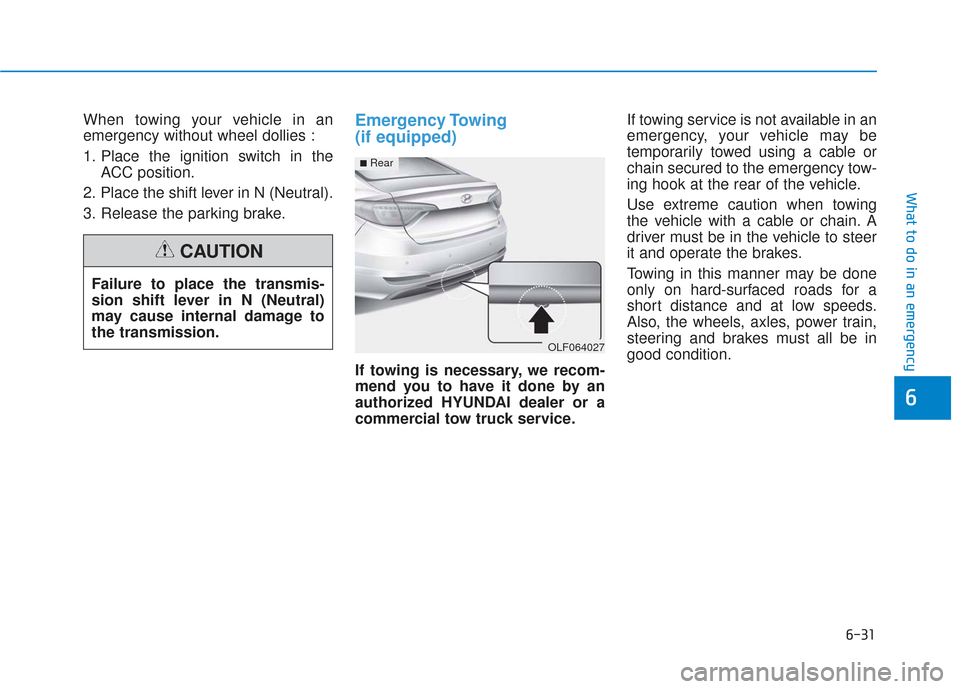
5. Insert the sealant bottle into thehousing (4) of the compressor so
that the bottle is upright.
6. Ensure that the compressor is switched off, position 0. 7. Plug the compressor power cord
(3) into the vehicle power outlet.
8. With the ignition switch in the ON position, switch on the compres-
sor and let it run for approximately
5~7 minutes to fill the sealant up
to proper pressure. (refer to the
Tire and Wheels, chapter 8). The
inflation pressure of the tire after
filling is unimportant and will be
checked/corrected later.
Be careful not to overinflate the
tire and stay away from the tire
when filling it.
6
OLMF064105OLF064019N
Securely install the sealant fill-
ing hose to the valve. If not,
sealant may flow backward,
possibly clogging the filling
hose.
CAUTION
OHY015012
Page 456 of 562

6-31
What to do in an emergency
6
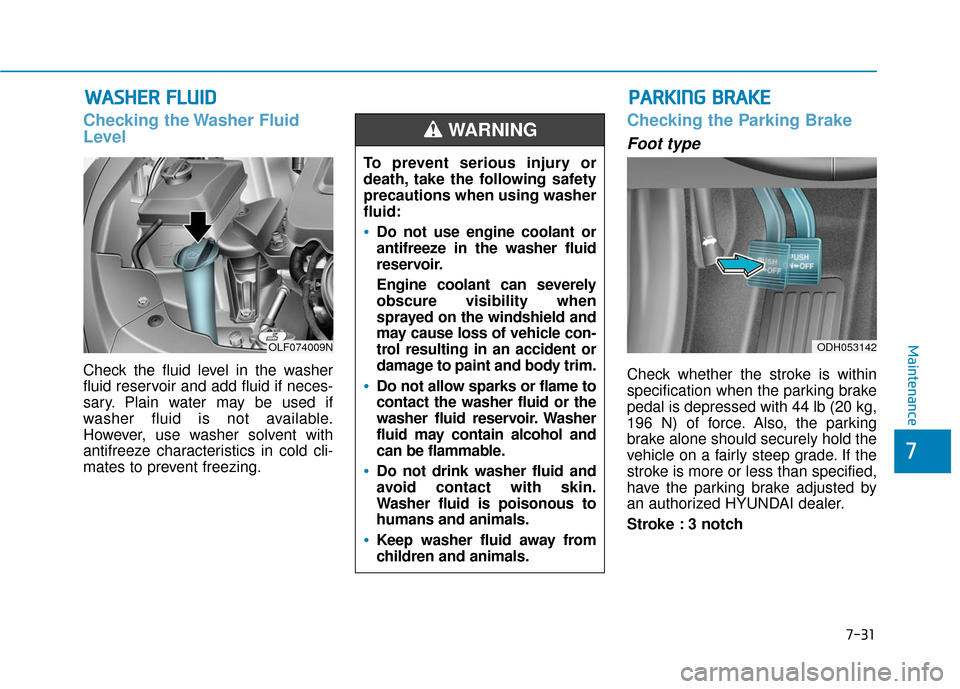
When towing your vehicle in an
emergency without wheel dollies :
1. Place the ignition switch in theACC position.
2. Place the shift lever in N (Neutral).
3. Release the parking brake.Emergency Towing
(if equipped)
If towing is necessary, we recom-
mend you to have it done by an
authorized HYUNDAI dealer or a
commercial tow truck service. If towing service is not available in an
emergency, your vehicle may be
temporarily towed using a cable or
chain secured to the emergency tow-
ing hook at the rear of the vehicle.
Use extreme caution when towing
the vehicle with a cable or chain. A
driver must be in the vehicle to steer
it and operate the brakes.
Towing in this manner may be done
only on hard-surfaced roads for a
short distance and at low speeds.
Also, the wheels, axles, power train,
steering and brakes must all be in
good condition.
Failure to place the transmis-
sion shift lever in N (Neutral)
may cause internal damage to
the transmission.
CAUTION
OLF064027
■Rear
Page 457 of 562

6-32
What to do in an emergency
Always follow these emergency tow-
ing precautions:
Place the ignition switch in the ACC position so the steering
wheel is not locked.
Place the shift lever in N (Neutral).
Release the parking brake.
Depress the brake pedal with more force than normal since you will
have reduced braking perform-
ance.
More steering effort will be required because the power steer-
ing system will be disabled.
Use a vehicle heavier than your own to tow your vehicle.
The drivers of both vehicles should communicate with each other fre-
quently.
Before emergency towing, check that the hook is not broken or dam-
aged.
Fasten the towing cable or chain securely to the hook.
Do not jerk the hook. Apply steady and even force. Use a towing cable or chain less
than 16 feet (5 m) long. Attach a
white or red cloth (about 12 inches
(30 cm) wide) in the middle of the
cable or chain for easy visibility.
Drive carefully so the towing cable or chain remains tight during tow-
ing.
Before towing, check the automat- ic transmission for fluid leaks under
your vehicle. If the automatic trans-
mission fluid is leaking, flatbed
equipment or a towing dolly must
be used.
ODH063025
To avoid damage to your vehicle
and vehicle components when
towing:
Always pull straight ahead
when using the towing hooks.
Do not pull from the side or at
a vertical angle.
Do not use the towing hooks
to pull a vehicle out of mud,
sand or other conditions from
which the vehicle cannot be
driven out under its own
power.
Limit the vehicle speed to 10
mph (15 km/h) and drive less
than 1 mile (1.5 km) when tow-
ing to avoid serious damage
to the automatic transmis-
sion.
CAUTION
Page 488 of 562

7-31
7
Maintenance
W
WA
AS
SH
H E
ER
R
F
F L
LU
U I
ID
D
Checking the Washer Fluid
Level
Check the fluid level in the washer
fluid reservoir and add fluid if neces-
sary. Plain water may be used if
washer fluid is not available.
However, use washer solvent with
antifreeze characteristics in cold cli-
mates to prevent freezing.
Checking the Parking Brake
Foot type
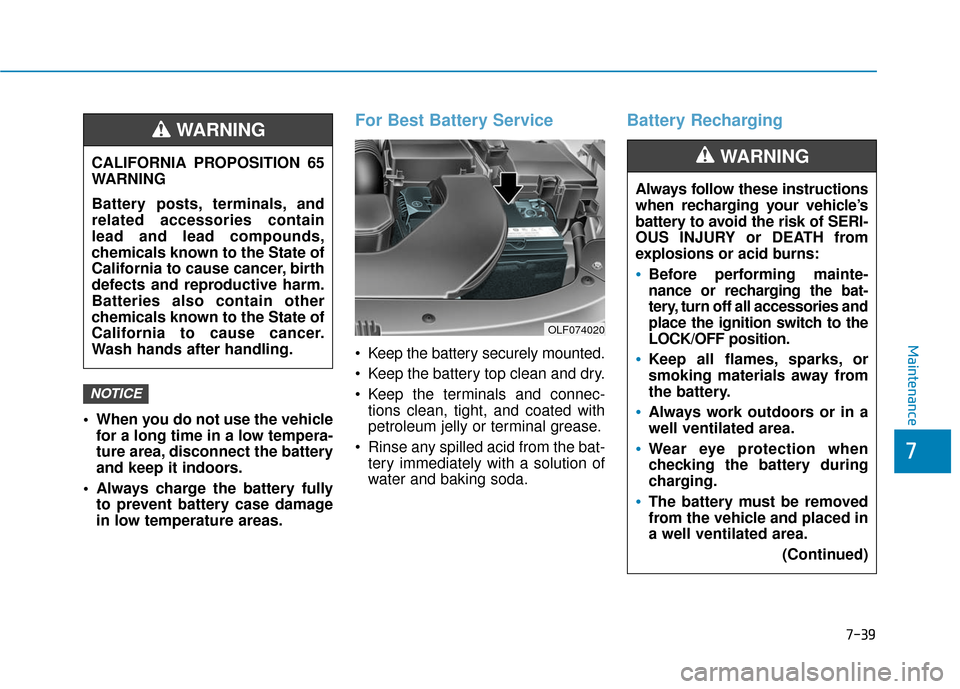
Check whether the stroke is within
specification when the parking brake
pedal is depressed with 44 lb (20 kg,
196 N) of force. Also, the parking
brake alone should securely hold the
vehicle on a fairly steep grade. If the
stroke is more or less than specified,
have the parking brake adjusted by
an authorized HYUNDAI dealer.
Stroke : 3 notch
OLF074009NODH053142
P
P A
A R
RK
K I
IN
N G
G
B
B R
RA
A K
KE
E
To prevent serious injury or
death, take the following safety
precautions when using washer
fluid:
Do not use engine coolant or
antifreeze in the washer fluid
reservoir.
Engine coolant can severely
obscure visibility when
sprayed on the windshield and
may cause loss of vehicle con-
trol resulting in an accident or
damage to paint and body trim.
Do not allow sparks or flame to
contact the washer fluid or the
washer fluid reservoir. Washer
fluid may contain alcohol and
can be flammable.
Do not drink washer fluid and
avoid contact with skin.
Washer fluid is poisonous to
humans and animals.
Keep washer fluid away from
children and animals.
WARNING
Page 496 of 562

7-39
7
Maintenance
When you do not use the vehiclefor a long time in a low tempera-
ture area, disconnect the battery
and keep it indoors.
Always charge the battery fully to prevent battery case damage
in low temperature areas.
For Best Battery Service
Keep the battery securely mounted.
Keep the battery top clean and dry.
Keep the terminals and connec-tions clean, tight, and coated with
petroleum jelly or terminal grease.
Rinse any spilled acid from the bat- tery immediately with a solution of
water and baking soda.
Battery Recharging
NOTICE
CALIFORNIA PROPOSITION 65
WARNING
Battery posts, terminals, and
related accessories contain
lead and lead compounds,
chemicals known to the State of
California to cause cancer, birth
defects and reproductive harm.
Batteries also contain other
chemicals known to the State of
California to cause cancer.
Wash hands after handling.
WARNING
OLF074020
Always follow these instructions
when recharging your vehicle’s
battery to avoid the risk of SERI-
OUS INJURY or DEATH from
explosions or acid burns:
Before performing mainte-
nance or recharging the bat-
tery, turn off all accessories and
place the ignition switch to the
LOCK/OFF position.
Keep all flames, sparks, or
smoking materials away from
the battery.
Always work outdoors or in a
well ventilated area.
Wear eye protection when
checking the battery during
charging.
The battery must be removed
from the vehicle and placed in
a well ventilated area.
(Continued)
WARNING
Page 524 of 562
7-67
7
Maintenance
Engine compartment main fuse panel
Fuse Name Fuse rating Protected Component
FUSE
3 E-CVVT20A[G4KJ/G4KH] PCM
2 E-CVVT20A[G4KJ/G4KH] PCM
DEICER20ARelay 5 (Deicer Relay)
H/LAMP HI20A[With HID] Relay 5 (Head Lamp High Relay)
1 VACUUM PUMP20A[G4KH/G4FJ] Vacuum Pump
1 E-CVVT40A[G4KJ/G4KH] Relay 9 (E-CVVT Relay)
4 B+40ASmart Junction Block (Leak Current Autocut Device Fuse - F15/F21/F22,
Fuse - F5/F6/F7/F12)
A/CON10AA/C Control Module
HEATED MIRROR10AECM (G4FJ), A/C Control Module, Drover/Passenger Power Outside Mirror
2 VACUUM PUMP10A[G4KH/G4FJ] Vacuum Pump
3 ECU10APCM/ECM
1 POWER OUTLET20ACigarette Lighter
FUEL PUMP20AFuel Pump Relay
HORN20AHorn Relay, ICM Relay Box (Burglar Alarm Horn Relay)
WIPER30AFront Wiper (Low) Relay, Front Wiper (High) Relay
2 TCU15ATransaxle Range Switch, TCM (G4FJ-DCT)
3 ABS10AESC Module, MDPS Unit
2 POWER OUTLET20ARear Power Outlet
Page 525 of 562
7-68
Maintenance
Engine compartment main fuse panel
Fuse Name Fuse rating Protected Component
FUSE
B/UP LAMP10ATransaxle Range Switch, PCM (G4KJ/G4KH-A/T), TCM (G4FJ-DCT), Audio,
Electro Chromic Mirror, Rear Combination Lamp (IN) LH/RH
1 SENSOR15AOxygen Sensor (Up/Down)
2 SENSOR15A
Purge Control Solenoid Valve, Canister Close Valve, RCV Control Solenoid Valve,
Fuel Pump Relay, E/R Junction Block (RLY. 12 - Cooling Fan 2 Relay),
[G4KJ/G4KH] Variable Intake Solenoid Valve, Oil Control Valve (Exhaust),
[G4FJ] Oil Control Valve #1/#2 (Intake/Exhaust)
1 ECU10APCM/ECM
1 TCU10APCM (G4KJ/G4KH-A/T), TCM (G4FJ-DCT)
1 ECU10APCM/ECM
IGN COIL20AIgnition Coil #1/#2/#3/#4, Condenser (G4FJ)
INJECTOR15A-
AMS10ABattery Sensor
Page 537 of 562
7-80
Maintenance
License Plate Light Bulb
Replacement
1. Loosen the lens retaining screwswith a philips head screwdriver.
2. Remove the lens.
3. Remove the bulb by pulling it straight out.
4. Install a new bulb.
5. Reinstall the lens securely with the lens retaining screws.
Interior Light Bulb
Replacement
Map lamp and Room lamp
If the LED lamp does not operate,
have the vehicle checked by an
authorized HYUNDAI dealer.
OLF074066
OLF074080N
OLF076080N
OLF074068
■Map lamp - with sunroof
■Room lamp - with sunroof