Page 152 of 562

3-55
Convenient features of your vehicle
3
Periodically remove any dirt thatmay accumulate on the sunroof
guide rail or between the sun-
roof and roof panel.
Do not try to open the sunroof when the temperature is below
freezing or when the sunroof is
covered with snow or ice, the
motor could be damaged.
Information
After the vehicle is washed or in a
rainstorm, be sure to wipe off any
water that is on the sunroof before
operating it.
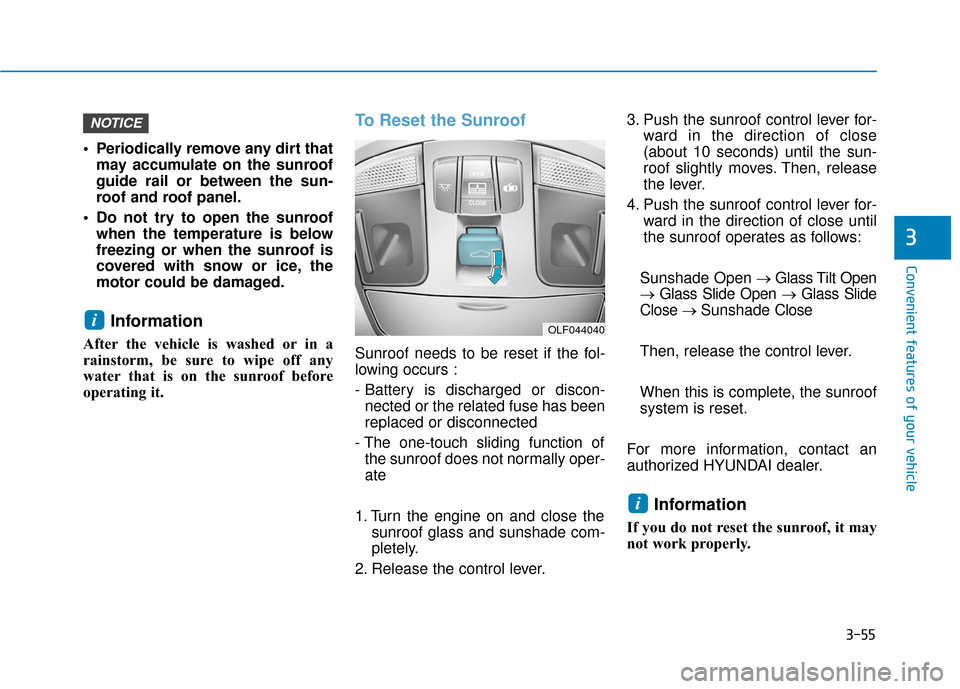
To Reset the Sunroof
Sunroof needs to be reset if the fol-
lowing occurs :
- Battery is discharged or discon-nected or the related fuse has been
replaced or disconnected
- The one-touch sliding function of the sunroof does not normally oper-
ate
1. Turn the engine on and close the sunroof glass and sunshade com-
pletely.
2. Release the control lever. 3. Push the sunroof control lever for-
ward in the direction of close
(about 10 seconds) until the sun-
roof slightly moves. Then, release
the lever.
4. Push the sunroof control lever for- ward in the direction of close until
the sunroof operates as follows:
Sunshade Open → Glass Tilt Open
→ Glass Slide Open → Glass Slide
Close → Sunshade Close
Then, release the control lever.
When this is complete, the sunroof
system is reset.
For more information, contact an
authorized HYUNDAI dealer.
Information
If you do not reset the sunroof, it may
not work properly.
i
i
NOTICE
OLF044040
Page 176 of 562
3-79
Convenient features of your vehicle
3
Service in OFF
If the service interval is not set,
"Service in OFF" message is dis-
played.
Information
If any of the following conditions
occurs, the mileage and days may be
incorrect.
- The battery cable is disconnected.
- The fuse switch is turned off.
- The battery is discharged.
Warning Message
If one of followings occurs, warning
messages will be displayed on the
information mode for several seconds.
- Malfunction of below systems
(TPMS)
system (AEB)
i
OLF044457N/OLF044456N
■ Type A, C ■Type B, D
Page 186 of 562
3-89
Convenient features of your vehicle
3
Check BRAKE SWITCH fuse
This warning message illuminatesif the brake switch fuse is discon-
nected.
It means that you should replace the fuse with a new one. If that is
not possible, you can start the
engine by pressing the Engine
Start/Stop button for 10 seconds in
the ACC position.
Turn on "FUSE SWITCH"
This warning message illuminatesif the fuse switch under the steer-
ing wheel is OFF.
It means that you should turn the fuse switch on.
For more information, refer to
"Fuses" in chapter 7.
Low Tire Pressure
This warning message illuminates if
the tire pressure is low with the igni-
tion switch or the Engine/Start Button
in ON position.
For more information, refer to
"Tire Pressure Monitoring System
(TPMS)" in chapter 6.
OLF044132LOLF044148LOLF044146L
Page 256 of 562

3-159
Convenient features of your vehicle
3
To prevent damage to the Power
Outlets :
Use the power outlet only whenthe engine is running and
remove the accessory plug after
use. Using the accessory plug
for prolonged periods of time
with the engine off could cause
the battery to discharge.
Only use 12V electric acces- sories which are less than 180
W(Watt) in electric capacity.
Adjust the air-conditioner or heater to the lowest operating
level when using the power outlet.
Close the cover when not in use.
Some electronic devices can cause electronic interference
when plugged into a vehicle’s
power outlet. These devices may
cause excessive audio static
and malfunctions in other elec-
tronic systems or devices used
in your vehicle.
(Continued)(Continued)
Push the plug in as far as it will
go. If good contact is not made,
the plug may overheat and the
fuse may open.
Plug in battery equipped electri- cal/electronic devices with
reverse current protection. The
current from the battery may
flow into the vehicle’s electri-
cal/electronic system and cause
system malfunction.
NOTICE
Avoid electrical shocks. Do not
place your fingers or foreign
objects (pin, etc.) into a power
outlet or touch the power outlet
with a wet hand.
WARNING
Page 257 of 562

3-160
Convenient features of your vehicle
Clock
With Audio system
Whenever the battery terminals or
related fuses are disconnected, you
must reset the time.
To set the time:The ignition switch must be in the
ACC position or the ON position.
• H (Hour, 1)
Each time you press the "H" button,
the clock will change backward by
one hour. Pressing and holding the
"H" button will change the clock
backward continuously.
Release the button at the desired time.
• M (Minute, 2)
Each time you press the "M" button ,
the clock will change backward by
one minute. Pressing and holding the
"M" button will change the clock
backward continuously.
Release the button at the desired time.
• Display conversion
To change the 12 hour format to the
24 hour format, press the "H" and
"M" button simultaneously for more
than 4 seconds.
For example, if the "H" and "M" but-
ton is pressed when the time is 10:15
p.m., the display will change to 22:15
With Navigation system
You can set the clock by using the
Navigation system.
Do not adjust the clock while
driving, you may lose your
steering control and cause an
accident that results in severe
personal injury or death.
WARNING
OLF044237
OLF044238
Page 333 of 562

5-13
Driving your vehicle
5
To prevent damage to the vehicle:
If the engine stalls while you arein motion, do not attempt to
move the shift lever to the P
(Park) position.
If traffic and road conditions
permit, you may put the shift
lever in the N (Neutral) position
while the vehicle is still moving
and press the Engine Start/Stop
button in an attempt to restart
the engine.
Do not push or tow your vehicle to start the engine. To prevent damage to the vehicle:
When the stop lamp fuse is blown,
you can’t start the engine normal-
ly. Replace the fuse with a new
one. If you are not able to replace
the fuse, you can start the engine
by pressing and holding the
Engine Start/Stop button for 10 sec-
onds with the Engine Start/Stop
button in the ACC position.
Do not press the Engine Start/Stop
button for more than 10 seconds
except when the stop
lamp fuse is
blown.
For your safety always depress
the brake pedal before starting the
engine.
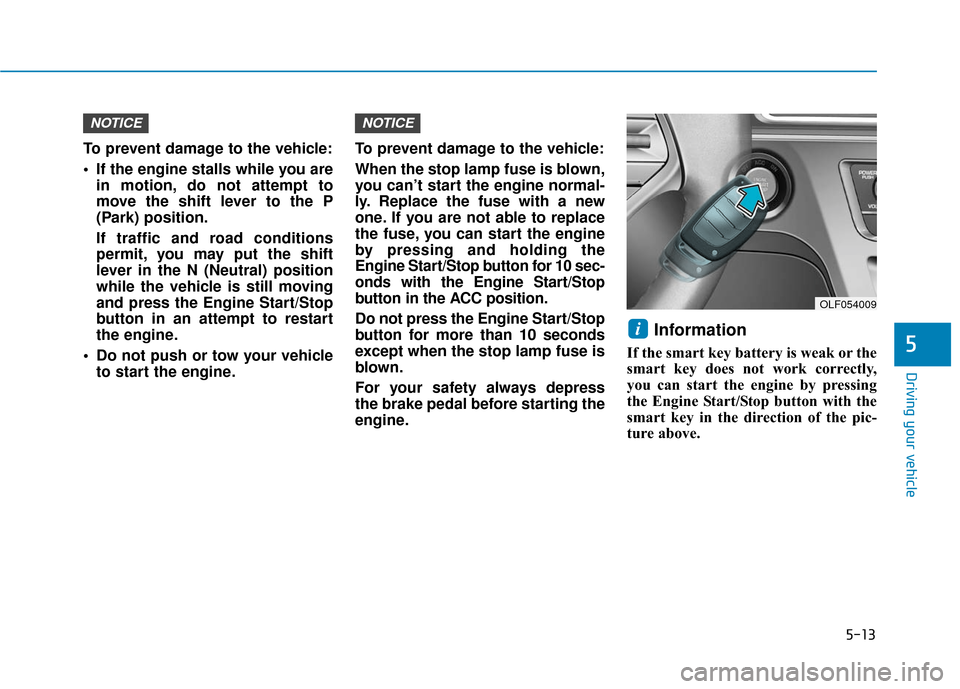
Information
If the smart key battery is weak or the
smart key does not work correctly,
you can start the engine by pressing
the Engine Start/Stop button with the
smart key in the direction of the pic-
ture above.
i
NOTICENOTICE
OLF054009
Page 459 of 562

7
Wiper Blades.........................................................7-36
Blade Inspection ..............................................................7-36
Blade Replacement .........................................................7-36
Battery...................................................................7-38
For Best Battery Service ..............................................7-39
Battery Recharging ........................................................7-39
Reset features .................................................................7-40
Tires and Wheels .................................................7-41
Tire Care ........................................................................\
....7-41
Recommended Cold Tire Inflation Pressures ...........7-42
Check Tire Inflation Pressure ......................................7-43
Tire Rotation...................................................................\
..7-44
Wheel Alignment and Tire Balance ............................7-45
Tire Replacement ............................................................7-45
Wheel Replacement ........................................................7-46
Tire Traction .....................................................................7-4\
6
Tire Maintenance ............................................................7-47
Tire Sidewall Labeling ....................................................7-47
Tire Terminology and Definitions................................7-51
All Season Tires ...............................................................7-54
Summer Tires ...................................................................7-54
Snow Tires ........................................................................\
7-54
Radial-Ply Tires ...............................................................7-55
Low Aspect Ratio Tires..................................................7-55
Fuses ......................................................................7-\
57
Instrument Panel Fuse Replacement..........................7-58
Engine Compartment Panel Fuse Replacement.......7-59
Fuse/Relay Panel Description ......................................7-61
Light Bulbs ............................................................7-69
Headlamp, Position Lamp, Turn Signal Lamp and
Side Marker Light Bulb Replacement ........................7-70
Side Repeater Lamp Replacement ..............................7-75
Rear Combination Light Bulb Replacement ..............7-76
High Mounted Stop Lamp .............................................7-79
License Plate Light Bulb Replacement ......................7-80
Interior Light Bulb Replacement .................................7-80
Appearance Care..................................................7-82
Exterior Care ....................................................................7-82\
Interior Care .....................................................................7-8\
7
Emission Control System ....................................7-89
Crankcase Emission Control System ..........................7-89
Evaporative Emission Control System Including
Onboard Refueling Vapor Recovery (ORVR)............7-89
Exhaust Emission Control System ..............................7-90
California Perchlorate Notice.............................7-93
Page 460 of 562
7-3
7
Maintenance
E
EN
N G
GI
IN
N E
E
C
C O
O M
M P
PA
A R
RT
TM
M E
EN
N T
T
1. Engine oil filler cap
2. Engine oil dipstick
3. Brake fluid reservoir
4. Positive battery terminal
5. Negative battery terminal
6. Fuse box
7. Air cleaner
8. Radiator cap
9. Engine coolant reservoir
10. Windshield washer fluid reservoir
The actual engine compartment in the vehi-
cle may differ from the illustration.
■ ■1.6 T-GDI
OLF014009N