2017 Hyundai Sonata Hybrid child lock
[x] Cancel search: child lockPage 72 of 562

2-43
Safety system of your vehicle
2
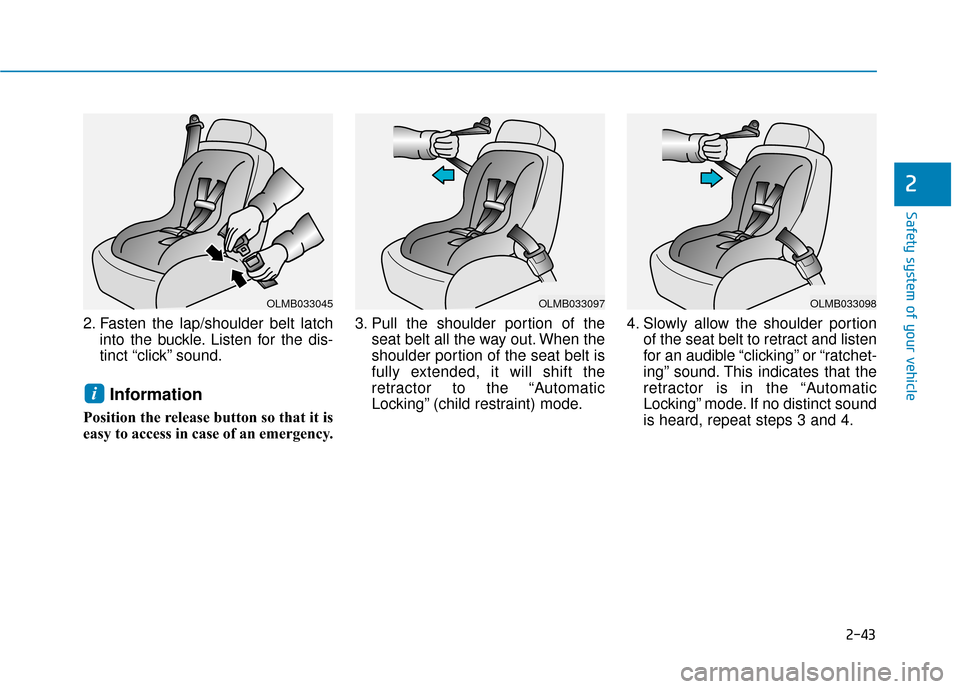
2. Fasten the lap/shoulder belt latchinto the buckle. Listen for the dis-
tinct “click” sound.
Information
Position the release button so that it is
easy to access in case of an emergency. 3. Pull the shoulder portion of the
seat belt all the way out. When the
shoulder portion of the seat belt is
fully extended, it will shift the
retractor to the “Automatic
Locking” (child restraint) mode. 4. Slowly allow the shoulder portion
of the seat belt to retract and listen
for an audible “clicking” or “ratchet-
ing” sound. This indicates that the
retractor is in the “Automatic
Locking” mode. If no distinct sound
is heard, repeat steps 3 and 4.
i
OLMB033045OLMB033097OLMB033098
Page 73 of 562

2-44
Safety system of your vehicle
5. Remove as much slack from the belt as possible by pushing down
on the child restraint system while
feeding the shoulder belt back into
the retractor.
6. Push and pull on the child restraint system to confirm that the seat
belt is holding it firmly in place. If it
is not, release the seat belt and
repeat steps 2 through 6.
7. Double check that the retractor is in the “Automatic Locking” mode
by attempting to pull more of the
seat belt out of the retractor. If you
cannot, the retractor is in the
“Automatic Locking” mode.
If your CRS manufacturer instructs or
recommends you to use a tether
anchor with the lap/shoulder belt,
refer to the previous pages for more
information. When the seat belt is allowed to
retract to its fully stowed position,
the retractor will automatically
switch from the “Automatic
Locking” mode to the emergency
lock mode for normal adult usage.
To remove the child restraint, press
the release button on the buckle and
then pull the lap/shoulder belt out of
the restraint and allow the seat belt
to retract fully.
NOTICE
If the retractor is not in the
“Automatic Locking” mode, the
child restraint can move when
your vehicle turns or stops sud-
denly. A child can be seriously
injured or killed if the child
restraint is not properly anchored
in the car, including manually
pulling the seat belt all the way
out to shift the rectractor to the
“Automatic Locking” mode.
WARNING
Page 82 of 562

2-53
Safety system of your vehicle
2
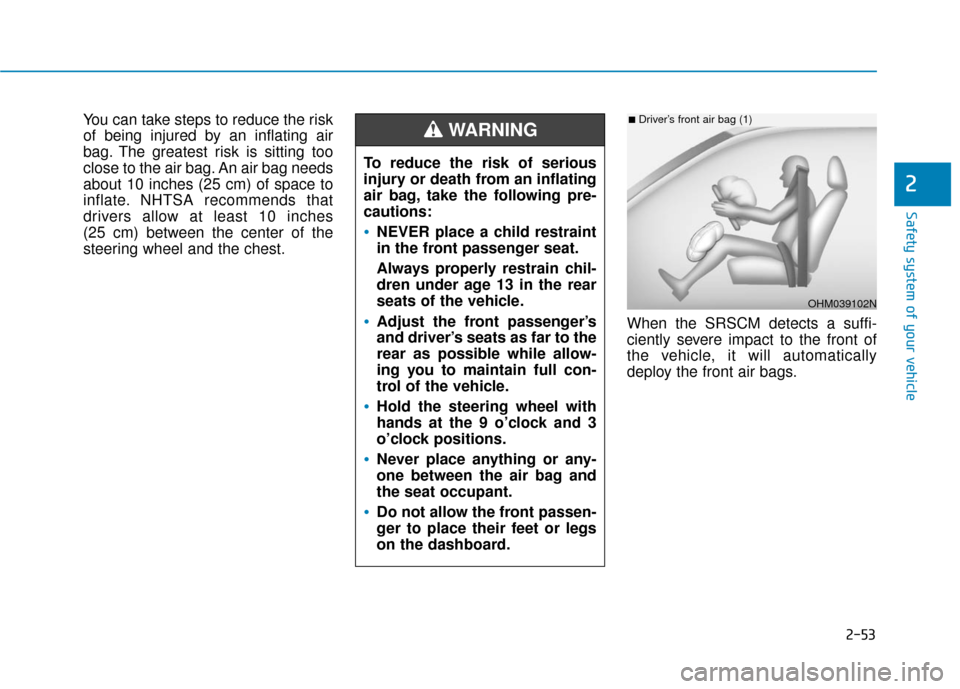
You can take steps to reduce the risk
of being injured by an inflating air
bag. The greatest risk is sitting too
close to the air bag. An air bag needs
about 10 inches (25 cm) of space to
inflate. NHTSA recommends that
drivers allow at least 10 inches
(25 cm) between the center of the
steering wheel and the chest.When the SRSCM detects a suffi-
ciently severe impact to the front of
the vehicle, it will automatically
deploy the front air bags.
OHM039102N
■Driver’s front air bag (1)
To reduce the risk of serious
injury or death from an inflating
air bag, take the following pre-
cautions:
NEVER place a child restraint
in the front passenger seat.
Always properly restrain chil-
dren under age 13 in the rear
seats of the vehicle.
Adjust the front passenger’s
and driver’s seats as far to the
rear as possible while allow-
ing you to maintain full con-
trol of the vehicle.
Hold the steering wheel with
hands at the 9 o’clock and 3
o’clock positions.
Never place anything or any-
one between the air bag and
the seat occupant.
Do not allow the front passen-
ger to place their feet or legs
on the dashboard.
WARNING
Page 98 of 562

Convenient features of your vehicle
Accessing your vehicle .........................................3-4
Remote Key........................................................................\
.3-4
Smart Key ........................................................................\
....3-8
Immobilizer System .........................................................3-12
Door locks .............................................................3-14
Outside the Vehicle.........................................................3-14
Inside the Vehicle ............................................................3-15
Auto Door Lock/Unlock Features ...............................3-17
Child-Protector Rear Door locks ................................3-18
Theft-alarm system.............................................3-19
Driver position memory system .........................3-20
Storing Positions into Memory ....................................3-20
Easy Access Function ....................................................3-21
Steering wheel......................................................3-22
Electric Power Steering (EPS) .....................................3-22
Tilt Steering / Telescope Steering ..............................3-23
Heated Steering Wheel ..................................................3-23
Horn ........................................................................\
............3-24
Mirrors ...................................................................3-25
Inside Rearview Mirror ..................................................3-25
Side view Mirrors ............................................................3-40
Reverse Parking Aid Function......................................3-43
Windows ................................................................3-44
Power Windows ...............................................................3-45
Sunroof..................................................................3-48
Sunroof opening and closing .......................................3-48
Sliding the sunroof .........................................................3-48
Tilting the sunroof ..........................................................3-49
Sunshade ........................................................................\
...3-50
Resetting the sunroof ....................................................3-50
Panoramic sunroof ..............................................3-52
Sunshade ........................................................................\
...3-52
Sliding the Sunroof .........................................................3-53
Tilting the Sunroof .........................................................3-53
Closing the Sunroof........................................................3-54
To Reset the Sunroof.....................................................3-55
Exterior features .................................................3-56
Hood ........................................................................\
...........3-56
Trunk ........................................................................\
..........3-57
Smart Trunk ......................................................................3-\
60
Fuel Filler Door ................................................................3-63
Instrument cluster................................................3-67
Instrument Cluster Control............................................3-69
LCD Display Control ........................................................3-70
3
Page 101 of 562

3-4
Convenient features of your vehicle
Remote Key (if equipped)
Your HYUNDAI uses a remote key,
which you can use to lock or unlock
a door (and trunk) and even start the
engine.
1. Door Lock
2. Door Unlock
3. Trunk Unlock
4. Panic
Locking
To lock :
1. Close all doors, engine hood andtrunk.
2. Press the Door Lock button (1) on the remote key.
3. The hazard warning lights will blink and the chime will sound
once if the lock button is pressed
once more within four seconds.
4. Make sure the doors are locked by checking the position of the door
lock button inside the vehicle.
Information
After locking the doors, if you press
the Door Lock button again within
four seconds, the hazard warning
lights will blink and the horn will
sound one time to confirm that the
doors are locked.
i
A AC
CC
CE
E S
SS
SI
IN
N G
G
Y
Y O
O U
UR
R
V
V E
EH
H I
IC
C L
LE
E
OHG040006
Do not leave the keys in your
vehicle with unsupervised chil-
dren. Unattended children
could place the key in the igni-
tion switch and may operate
power windows or other con-
trols, or even make the vehicle
move, which could result in
serious injury or death.
WARNING
Page 105 of 562

3-8
Convenient features of your vehicle
Smart Key (if equipped)
Your HYUNDAI uses a Smart Key,
which you can use to lock or unlock
a door (and trunk) and even start the
engine.
1. Door Lock
2. Door Unlock
3. Trunk Unlock
4. Panic
Locking
To lock :
1. Close all doors, engine hood andtrunk.
2. Either press the door handle but- ton or press the Door Lock button
(1) on the smart key.
3. The hazard warning lights will blink and the chime will sound once.
4. Make sure the doors are locked by checking the position of the door
lock button inside the vehicle.
Information
The door handle button will only
operate when the smart key is within
28~40 inches (0.7~1 m) from the out-
side door handle.
Even though you press the outside
door handle button, the doors will not
lock and the chime will sound for
three seconds if any of the following
occur:
The Smart Key is in the vehicle.
The Engine Start/Stop button is inACC or ON position.
Any door except the trunk is open.
i
OLF044002NOLF044003/Q
Do not leave the Smart Key in
your vehicle with unsupervised
children. Unattended children
could press the Engine Start/
Stop button and may operate
power windows or other con-
trols, or even make the vehicle
move, which could result in
serious injury or death.
WARNING
Page 113 of 562

3-16
Convenient features of your vehicle
If the inner door handle of the dri- ver's (or front passenger's) door is
pulled when the door lock button is
in the lock position, the button is
unlocked and door opens.
Front doors cannot be locked if the key is in the ignition switch and any
front door is open.
Doors cannot be locked if the smart key is in the vehicle and any
door is open.
Information
If a power door lock ever fails to func-
tion while you are in the vehicle try
one or more of the following tech-
niques to exit:
• Operate the door unlock featurerepeatedly (both electronic and
manual) while simultaneously
pulling on the door handle.
• Operate the other door locks and handles, front and rear.
• Lower a front window and use the mechanical key to unlock the door
from outside.
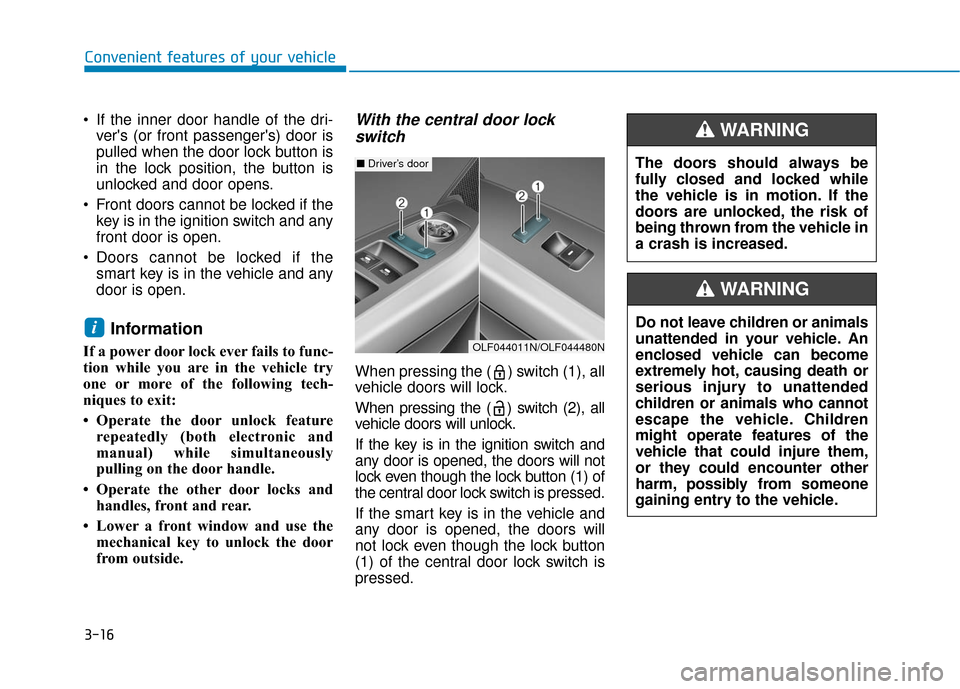
With the central door lockswitch
When pressing the ( ) switch (1), all
vehicle doors will lock.
When pressing the ( ) switch (2), all
vehicle doors will unlock.
If the key is in the ignition switch and
any door is opened, the doors will not
lock even though the lock button (1) of
the central door lock switch is pressed.
If the smart key is in the vehicle and
any door is opened, the doors will
not lock even though the lock button
(1) of the central door lock switch is
pressed.
i
The doors should always be
fully closed and locked while
the vehicle is in motion. If the
doors are unlocked, the risk of
being thrown from the vehicle in
a crash is increased.
WARNING
Do not leave children or animals
unattended in your vehicle. An
enclosed vehicle can become
extremely hot, causing death or
serious injury to unattended
children or animals who cannot
escape the vehicle. Children
might operate features of the
vehicle that could injure them,
or they could encounter other
harm, possibly from someone
gaining entry to the vehicle.
WARNING
■ Driver’s door
OLF044011N/OLF044480N
Page 115 of 562

3-18
Convenient features of your vehicle
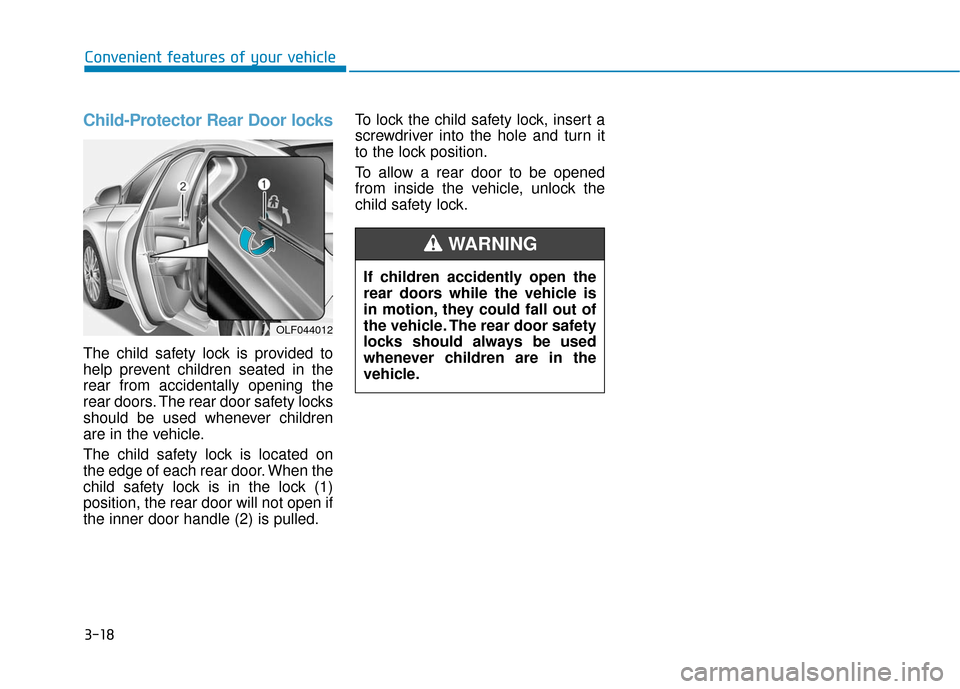
Child-Protector Rear Door locks
The child safety lock is provided to
help prevent children seated in the
rear from accidentally opening the
rear doors. The rear door safety locks
should be used whenever children
are in the vehicle.
The child safety lock is located on
the edge of each rear door. When the
child safety lock is in the lock (1)
position, the rear door will not open if
the inner door handle (2) is pulled.To lock the child safety lock, insert a
screwdriver into the hole and turn it
to the lock position.
To allow a rear door to be opened
from inside the vehicle, unlock the
child safety lock.
If children accidently open the
rear doors while the vehicle is
in motion, they could fall out of
the vehicle. The rear door safety
locks should always be used
whenever children are in the
vehicle.
WARNING
OLF044012