Page 143 of 614

Features of your vehicle
46
4
Opening the fuel filler door
The fuel filler door must be opened
from inside the vehicle by pulling the
fuel filler door opener lever located
on the driver’s door.
✽ ✽
NOTICE
If the fuel filler door will not open
because ice has formed around it,
tap lightly or push on the door to
break the ice and release the door.
Do not pry on the door. If necessary,
spray around the door with an
approved de-icer fluid (do not use
radiator anti-freeze) or move the
vehicle to a warm place and allow
the ice to melt.
1. Stop the engine.
2. Pull the fuel filler door opener lever,
then the fuel filler door will pop up.
3. Pull the fuel filler door (1) out to fully open.
4. To remove the cap, turn the fuel tank cap (2) counterclockwise.
5. Refuel as needed.
Closing the fuel filler door
1. To install the cap, turn it clockwise until it clicks one time. This indi-
cates that the cap is securely tight-
ened.
2. Close the fuel filler door and push it in lightly making sure that it is
securely closed.
FUEL FILLER DOOR
ODM042025
ODM044026
Page 286 of 614
4189
Features of your vehicle
(7) DISP
Turns the monitor display on/off.
(8) CLOCK
Displays the time/date/day. (9)
SCAN
Radio mode : Previews all receiv- able broadcasts for 5 seconds
each.
Media (CD/USB/My Music) m odes
: Previews each song (file) for 10 seconds each.
(10) SETUP
Changes to Setup mode.
(11) TUNE knob
Radio mode : Turn to change broadcast frequencies.
Media (CD/USB/iPod®/My Music)
modes : Turn to search tracks/chan-
nels/files.
(12) CAT/FOLDER
SiriusXM Radio : Category Search.
MP3 CD/USB mode : Search Folder. (13)
DISC-IN LED
LED that indicates whether a disc is inserted.
Page 332 of 614
![Hyundai Santa Fe Sport 2017 Owners Manual 4235
Features of your vehicle
Setup Mode
Press the [SETUP]button to display
the Setup screen.
You can select and control options
related to [Display], [Sound],
[Clock/Calendar], [Phone] and
[System].](/manual-img/35/16751/w960_16751-331.png "Hyundai Santa Fe Sport 2017 Owners Manual 4235
Features of your vehicle
Setup Mode
Press the [SETUP]button to display
the Setup screen.
You can select and control options
related to [Display], [Sound],
[Clock/Calendar], [Phone] and
[System].")
4235
Features of your vehicle
Setup Mode
Press the [SETUP]button to display
the Setup screen.
You can select and control options
related to [Display], [Sound],
[Clock/Calendar], [Phone] and
[System].
With the Display Button
Press the [SETUP] button
�Select
[Display].
You can select and control options
related to [Brightness], [Mode Pop
up] and [Media Display].
Adjusting the Brightness
Use the [Left/Right] buttons to adjust
the screen brightness or set the
Brightness on Automatic, Day or
Night mode.
Press the [Default] button to reset.
Automatic : Adjusts the brightness automatically.
Day : Always maintains the bright- ness on high.
Night : Always maintains the bright- ness on low. Mode Pop-up
This feature is used to display the
Mode Pop-up screen when entering
radio and media modes.
When this feature is turned on,
pressing the [RADIO]
or [MEDIA]
button will display the Mode Pop-up
screen.
✽ ✽ NOTICE
The media Mode Pop-up screen can
be displayed only when two or more
media modes have been connected.
Page 335 of 614
Features of your vehicle
238
4
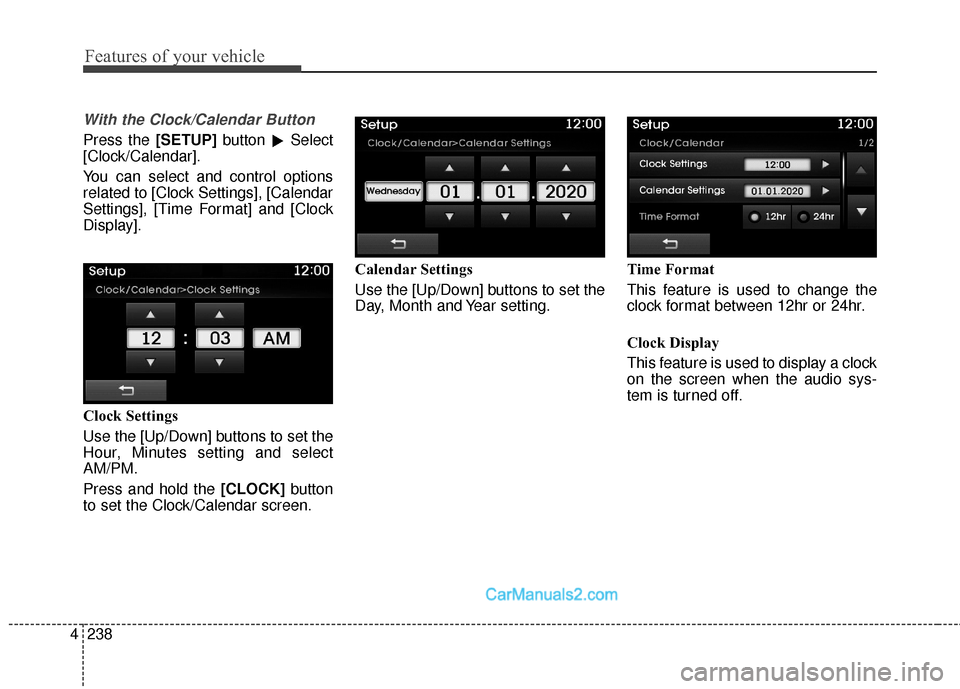
With the Clock/Calendar Button
Press the [SETUP] button
�Select
[Clock/Calendar].
You can select and control options
related to [Clock Settings], [Calendar
Settings], [Time Format] and [Clock
Display].
Clock Settings
Use the [Up/Down] buttons to set the
Hour, Minutes setting and select
AM/PM.
Press and hold the [CLOCK] button
to set the Clock/Calendar screen. Calendar Settings
Use the [Up/Down] buttons to set the
Day, Month and Year setting.
Time Format
This feature is used to change the
clock format between 12hr or 24hr.
Clock Display
This feature is used to display a clock
on the screen when the audio sys-
tem is turned off.
Page 485 of 614
What to do in an emergency
16
6
Removing and storing the
spare tire
Your spare tire is stored underneath
your vehicle, directly below the cargo
area.
To remove the spare tire:
1. Open the liftgate (tailgate).
2. Remove the cover with coin or flat-
head screwdriver. 3. Connect the socket and wheel lug
nut wrench.
4. Loosen the bolt enough to lower the spare tire.
Turn the wrench counterclockwise until the spare tire reaches the
ground.
(Continued)
Do not start or run the engine while the vehicle is on the
jack.
Do not allow anyone to remain in the vehicle while it is on the
jack.
Make sure any children pres- ent are in a secure place away
from the road and from the
vehicle to be raised with the
jack.
OANNDR2005
ODM062005
Page 486 of 614
617
What to do in an emergency
5. After the spare tire reaches theground, continue to turn the
wrench counterclockwise, and
draw the spare tire outside. Never
rotate the wrench excessively, oth-
erwise the spare tire carrier may
be damaged.
6. Remove the retainer (1) from the center of the spare tire To store the spare tire:
1. Lay the tire on the ground with the
valve stem facing up.
2. Place the wheel under the vehicle and install the retainer (1) through
the wheel center.
3. Turn the wrench clockwise until it clicks.
ODM062006ODM062007
WARNING - Storing the
spare tire
Ensure the spare tire retainer is
properly aligned with the center
of the spare tire to prevent the
spare tire from “rattling”.
Otherwise, it may cause the
spare tire to fall off the carrier
and lead to an accident.
Page 488 of 614
619
What to do in an emergency
6. Loosen the wheel lug nuts coun-terclockwise one turn each, but do
not remove any nut until the tire
has been raised off the ground. 7. Place the jack at the front or rear
jacking position closest to the tire
you are changing. Place the jack
at the designated locations under
the frame. 8. Insert the jack handle into the jack
and turn it clockwise, raising the
vehicle until the tire just clears the
ground. This measurement is
approximately 1.2 in (30 mm).
Before removing the wheel lug
nuts, make sure the vehicle is sta-
ble and that there is no chance for
movement or slippage.
WARNING - Jack location
To reduce the possibility of
injury, be sure to use only the
jack provided with the vehicle
and in the correct jack position;
never use any other part of the
vehicle for jack support.
ODM062008OAN067009NODM062010
Page 489 of 614

What to do in an emergency
20
6
9. Loosen the wheel nuts and
remove them with your fingers.
Slide the wheel off the studs and
lay it flat so it cannot roll away. To
put the wheel on the hub, pick up
the spare tire, line up the holes
with the studs and slide the wheel
onto them. If this is difficult, tip the
wheel slightly and get the top hole
in the wheel lined up with the top
stud. Then jiggle the wheel back
and forth until the wheel can be
slid over the other studs. 10. To reinstall the wheel, hold it on
the studs, put the wheel nuts on
the studs and tighten them finger
tight. The nuts should be installed
with their tapered small diameter
ends directed inward. Jiggle the
tire to be sure it is completely
seated, then tighten the nuts as
much as possible with your fin-
gers again.
11. Lower the car to the ground by turning the wheel nut wrench
counterclockwise.
WARNING
Wheels may have sharp edges.
Handle them carefully to avoid
possible severe injury. Before
putting the wheel into place, be
sure that there is nothing on the
hub or wheel (such as mud, tar,
gravel, etc.) that prevents the
wheel from fitting solidly
against the hub.
If there is, remove it. If there is
not good contact on the mount-
ing surface between the wheel
and hub, the wheel nuts could
come loose and cause the loss
of a wheel. Loss of a wheel may
result in loss of control of the
vehicle. This may cause serious
injury or death.
 DISP
Turns the monitor display on/off.
(8) CLOCK
Displays the time/date/day. (9)
SCAN
Radio mode : Previews all receiv- able broadcasts for 5 seconds
each.
Medi")