Page 154 of 569
451
Features of your vehicle
Sunroof open warning
(if equipped)
If the driver removes the ignition key
(smart key: turns off the engine)
when the sunroof is not fully closed.
The warning chime will sound for a
few seconds and a message
"Sunroof Open" will appear on the
LCD display.
Close the sunroof securely when
leaving your vehicle.
Sunshade
To open the sunshade
Press the sunshade open button (1).
WARNING
Never adjust the sunroof orsunshade while driving. This
could result in loss of control
and an accident that may
cause death, serious injury, or
property damage.
If you would like to carry items on the roof using a
cross bar, do not operate the
sunroof.
When carrying cargo on the roof, do not load heavy items
above the sunroof or glass
roof.
Do not allow children to oper- ate the sunroof.
CAUTION
Do not extend any luggage outside the sunroof while driving.
ODM042029
ODM0466033L/ODM046634L
■ Type A■Type B
Page 157 of 569
Features of your vehicle
54
4
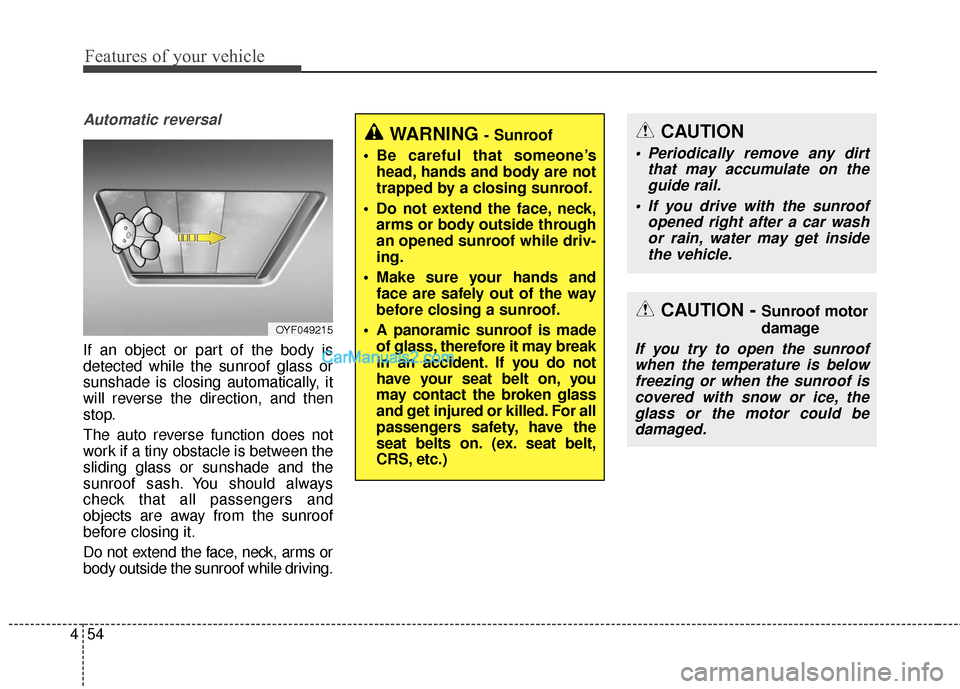
Automatic reversal
If an object or part of the body is
detected while the sunroof glass or
sunshade is closing automatically, it
will reverse the direction, and then
stop.
The auto reverse function does not
work if a tiny obstacle is between the
sliding glass or sunshade and the
sunroof sash. You should always
check that all passengers and
objects are away from the sunroof
before closing it.
Do not extend the face, neck, arms or
body outside the sunroof while driving.
OYF049215
WARNING - Sunroof
Be careful that someone’s head, hands and body are not
trapped by a closing sunroof.
Do not extend the face, neck, arms or body outside through
an opened sunroof while driv-
ing.
Make sure your hands and face are safely out of the way
before closing a sunroof.
A panoramic sunroof is made of glass, therefore it may break
in an accident. If you do not
have your seat belt on, you
may contact the broken glass
and get injured or killed. For all
passengers safety, have the
seat belts on. (ex. seat belt,
CRS, etc.)
CAUTION - Sunroof motor
damage
If you try to open the sunroofwhen the temperature is belowfreezing or when the sunroof iscovered with snow or ice, theglass or the motor could bedamaged.
CAUTION
Periodically remove any dirt that may accumulate on theguide rail.
If you drive with the sunroof opened right after a car washor rain, water may get insidethe vehicle.
Page 159 of 569
Features of your vehicle
56
4
Electric power steering (EPS)
The power steering uses a motor to
assist you in steering the vehicle. If
the engine is off or if the power steer-
ing system becomes inoperative, the
vehicle may still be steered, but it will
require increased steering effort.
The motor driven power steering is
controlled by a power steering con-
trol unit which senses the steering
wheel torque and vehicle speed to
command the motor.
The steering becomes heavier as
the vehicle’s speed increases and
becomes lighter as the vehicle’s
speed decreases for optimum steer-
ing control.
Should you notice any change in the
effort required to steer during normal
vehicle operation, have the power
steering checked by an authorized
HYUNDAI dealer.
✽ ✽
NOTICE
The following symptoms may occur
during normal vehicle operation:
• The EPS warning light does not
illuminate.
• The steering gets heavy immedi- ately after turning the ignition
switch on. This happens as the sys-
tem performs the EPS system
diagnostics. When the diagnostics
is completed, the steering wheel
will return to its normal condition.
• A click noise may be heard from the EPS relay after the ignition
switch is turned to the ON or
LOCK (OFF) position.
• A motor noise may be heard when the vehicle is at a stop or at a low
driving speed.
• If the Electric Power Steering System does not operate normally,
the warning light will illuminate on
the instrument cluster. The steer-
ing wheel may become difficult to
control or operate abnormally.
Take your vehicle to an authorized
HYUNDAI dealer and have the
vehicle checked as soon as possible. (Continued)
STEERING WHEEL
CAUTION
If the Electric Power Steering
System does not operate nor-mally, the warning light willilluminate on the instrumentcluster. The steering wheelmay become difficult to con-trol or operate abnormally.Take your vehicle to anauthorized HYUNDAI dealerand have the vehicle checkedas soon as possible.
When you operate the steer- ing wheel in low temperature,abnormal noise could occur. Iftemperature rises, the noisewill disappear. This is a normalcondition.
Page 160 of 569
457
Features of your vehicle
(Continued)
• Some noises may be heard whenoperating the steering in low tem-
peratures. When the temperature
rises, the noise will disappear. This
is a normal condition.
• The steering effort may become heavy when the charging system
warning light comes on.Tilt & telescopic steering
A tilt steering wheel allows you to
adjust the steering wheel before you
drive. You can also raise it to give
your legs more room when you exit
and enter the vehicle (if equipped).
The steering wheel should be posi-
tioned so that it is comfortable for
you to drive, while permitting you to
see the instrument panel warning
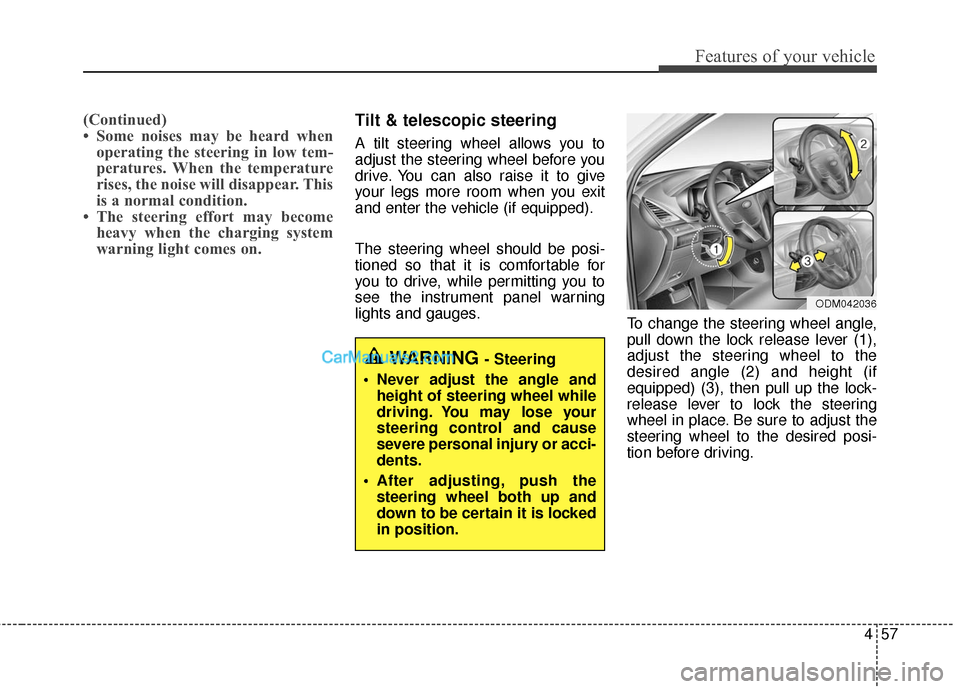
lights and gauges. To change the steering wheel angle,
pull down the lock release lever (1),
adjust the steering wheel to the
desired angle (2) and height (if
equipped) (3), then pull up the lock-
release lever to lock the steering
wheel in place. Be sure to adjust the
steering wheel to the desired posi-
tion before driving.
WARNING - Steering
Never adjust the angle and height of steering wheel while
driving. You may lose your
steering control and cause
severe personal injury or acci-
dents.
After adjusting, push the steering wheel both up and
down to be certain it is locked
in position.
ODM042036
Page 166 of 569
463
Features of your vehicle
To adjust the Zone setting:
1. Determine the desired ZoneNumber based upon your current
location on the Zone Map.
2. Press and hold the button for 6 seconds, the current Zone
Number will appear on the display.
3. Pressing and holding the button again will cause the numbers to
increment (Note: they will repeat
…13, 14, 15, 1, 2, …). Releasing
the button when the desired Zone
Number appears on the display
will set the new Zone.
4. Within about 5 seconds the com- pass will start displaying a com-
pass heading again.
There are some conditions that can
cause changes to the vehicle mag-
nets, such as installing a ski rack or
a CB antenna. Body repair work on
the vehicle can also cause changes
to the vehicle's magnetic field. In
these situations, the compass will
need to be re-calibrated to quickly
correct for these changes. To re-cali-
brate the compass: 1. Press and hold the button for
more than 9 seconds. When the
compass memory is cleared a "C"
will appear in the display.
2. To calibrate the compass, drive the vehicle in 2 complete circles at
less than 5 mph (8 km/h). Integrated HomeLink®Wireless
Control System
The HomeLink
®Wireless Control
System provides a convenient way to
replace up to three hand-held radio-
frequency (RF) transmitters with a
single built-in device. This innovative
feature will learn the radio frequency
codes of most current transmitters to
operate devices such as gate opera-
tors, garage door openers, entry
door locks, security systems, even
home lighting. Both standard and
rolling code-equipped transmitters
can be programmed by following the
outlined procedures. Additional
HomeLink
®information can be found
at: www.homelink.com or by calling
1-800-355-3515.
Page 174 of 569
471
Features of your vehicle
Blind spot mirror (if equipped)
The Blind Spot Mirror (BSM) is a
supplemental mirror that minimizes
the driver's blind spot zone by
expanding the field of view on the
rear side of the vehicle. The blind
spot mirror is equipped on the dri-
ver's left side view mirror.
WARNING
Always check the road condi-tion while driving for unex-
pected situations even
though the vehicle is
equipped with a blind spot
mirror.
The blind spot mirror is a device made for convenience.
Do not solely rely on the mir-
ror but always pay attention to
traffic around you.
OFS053068
OFS043249
CAUTION
Do not clean the mirror withharsh abrasives, fuel or otherpetroleum based cleaning prod-ucts.
Page 179 of 569
Features of your vehicle
76
4
Outside Temperature Gauge
This gauge indicates the current out-
side air temperatures by 1°F (1°C).
- Temperature range : -40°F ~ 140°F
(-40°C ~ 60°C)
The outside temperature on the dis-
play may not change immediately
like a general thermometer to pre-
vent the driver from being distracted.
The temperature unit (from °F to °C
or from °C to °F) can be changed by
using the "User Settings" mode of
the LCD display.
Transaxle Shift Indicator
Automatic Transaxle Shift Indicator
This indicator displays which auto-
matic transaxle shift lever is select-
ed.
Reverse : R
Neutral : N
Manual Shift mode : 1, 2, 3, 4, 5, 6
Shift indicator pop-up (if equipped)
The pop-up displays the current gear
position selected for 2 seconds
(P/R/N/D).
OTLA045130/OTLA045131
■
Type A ■Type B
ODM046615/ODM046614
■
Type A
■Type B
OTL045134/ONC046099
■Type A ■Type B
Page 185 of 569
Features of your vehicle
82
4
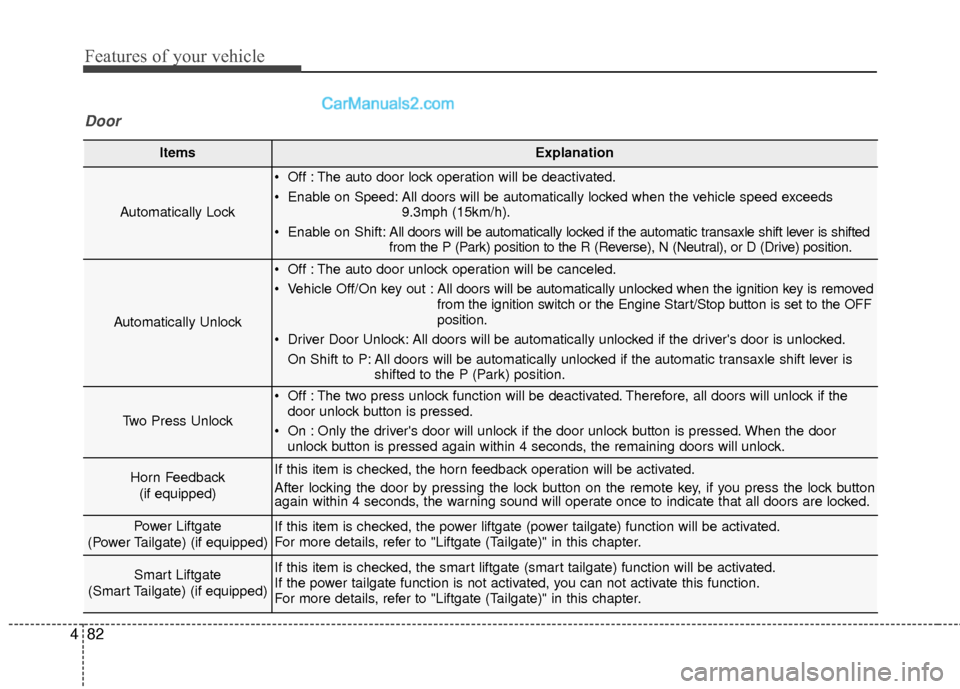
ItemsExplanation
Automatically Lock
Off : The auto door lock operation will be deactivated.
Enable on Speed: All doors will be automatically locked when the vehicle speed exceeds
9.3mph (15km/h).
Enable on Shift: All doors will be automatically locked if the automatic transaxle shift lever is shifted
from the P (Park) position to the R (Reverse), N (Neutral), or D (Drive) position.
Automatically Unlock
Off : The auto door unlock operation will be canceled.
Vehicle Off/On key out : All doors will be automatically unlocked when the ignition key is removed
from the ignition switch or the Engine Start/Stop button is set to the OFF
position.
Driver Door Unlock: All doors will be automatically unlocked if the driver's door is unlocked. On Shift to P: All doors will be automatically unlocked if the automatic transaxle shift lever is shifted to the P (Park) position.
Two Press Unlock
Off : The two press unlock function will be deactivated. Therefore, all doors will unlock if thedoor unlock button is pressed.
On : Only the driver's door will unlock if the door unlock button is pressed. When the door unlock button is pressed again within 4 seconds, the remaining doors will unlock.
Horn Feedback
(if equipped)If this item is checked, the horn feedback operation will be activated.
After locking the door by pressing the lock button on the remote key, if you press the lock button
again within 4 seconds, the warning sound will operate once to indicate that all doors are locked.
Power Liftgate
(Power Tailgate) (if equipped)If this item is checked, the power liftgate (power tailgate) function will be activated.
For more details, refer to "Liftgate (Tailgate)" in this chapter.
Smart Liftgate
(Smart Tailgate) (if equipped)If this item is checked, the smart liftgate (smart tailgate) function will be activated.
If the power tailgate function is not activated, you can not activate this function.
For more details, refer to "Liftgate (Tailgate)" in this chapter.
Door