Page 424 of 569
What to do in an emergency
46
IF THE ENGINE WILL NOT START
If engine doesn't turn over or
turns over slowly
1. If your vehicle has an automatictransaxle, be sure the shift lever is
in N (Neutral) or P (Park) and the
emergency brake is set.
2. Check the battery connections to be sure they are clean and tight.
3. Turn on the interior light. If the light dims or goes out when you oper-
ate the starter, the battery is dis-
charged.
4. Do not push or pull the vehicle to start it. See instructions for "Jump
starting".
If engine turns over normally
but does not start
1. Check fuel level.
2. With the ignition switch in the LOCKposition, check all connectors at
ignition coils and spark plugs.
Reconnect any that may be discon-
nected or loose.
3. If the engine still does not start, call an authorized HYUNDAI dealer or
seek other qualified assistance.
WARNING
If the engine will not start, do
not push or pull the vehicle to
start it. This could result in a
collision or cause other dam-
age. In addition, push or pull
starting may cause the catalytic
converter to be overloaded and
create a fire hazard.
Page 425 of 569
65
What to do in an emergency
EMERGENCY STARTING
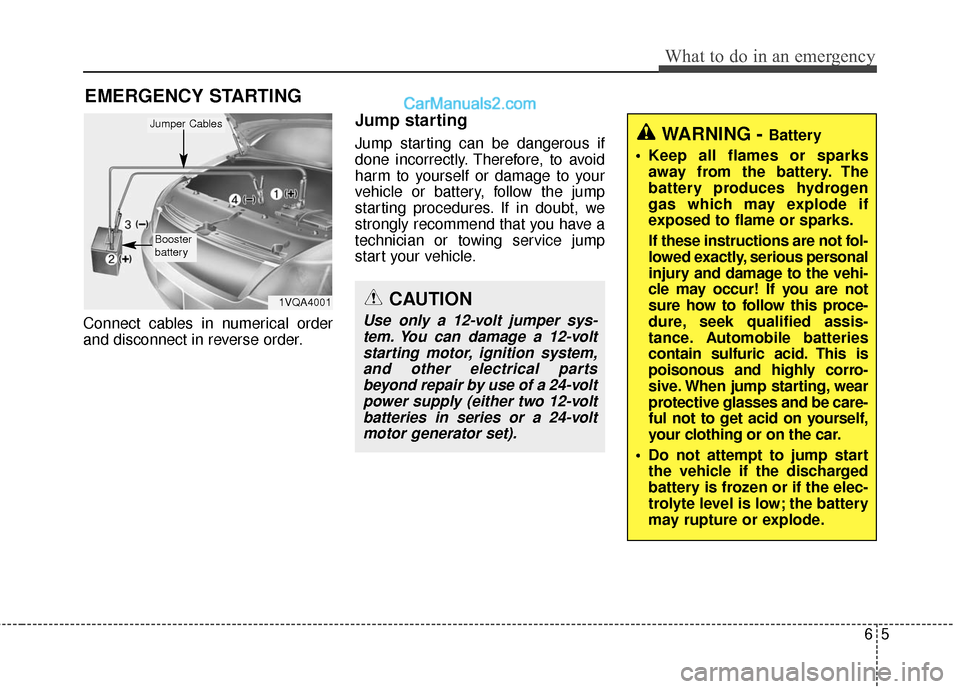
Connect cables in numerical order
and disconnect in reverse order.
Jump starting
Jump starting can be dangerous if
done incorrectly. Therefore, to avoid
harm to yourself or damage to your
vehicle or battery, follow the jump
starting procedures. If in doubt, we
strongly recommend that you have a
technician or towing service jump
start your vehicle.
CAUTION
Use only a 12-volt jumper sys-tem. You can damage a 12-voltstarting motor, ignition system,and other electrical partsbeyond repair by use of a 24-voltpower supply (either two 12-voltbatteries in series or a 24-voltmotor generator set).
WARNING - Battery
• Keep all flames or sparks away from the battery. The
battery produces hydrogen
gas which may explode if
exposed to flame or sparks.
If these instructions are not fol-
lowed exactly, serious personal
injury and damage to the vehi-
cle may occur! If you are not
sure how to follow this proce-
dure, seek qualified assis-
tance. Automobile batteries
contain sulfuric acid. This is
poisonous and highly corro-
sive. When jump starting, wear
protective glasses and be care-
ful not to get acid on yourself,
your clothing or on the car.
Do not attempt to jump start the vehicle if the discharged
battery is frozen or if the elec-
trolyte level is low; the battery
may rupture or explode.
1VQA4001
Jumper Cables
Booster
battery
Page 426 of 569
What to do in an emergency
66
Jump starting procedure
✽
✽NOTICE
If the battery is discharged, the
engine can be started using a battery
of another vehicle and two jumper
cables. Only use jumper cables with
fully insulated clamp handles.
To prevent personal injury or dam-
age to both vehicles, adhere strictly
to the following procedure.
1.Make sure the booster battery is
12-volt and that its negative termi-
nal is grounded.
2.If the booster battery is in another vehicle, do not allow the vehicles to
touch.
3.Turn off all unnecessary electrical loads. 4.Connect the jumper cables in the
exact sequence shown in the illus-
tration. First connect one end of a
jumper cable to the positive termi-
nal of the discharged battery (1),
then connect the other end to the
positive terminal on the booster
battery (2). Proceed to connect
one end of the other jumper cable
to the negative terminal of the
booster battery (3), then the other
end to a solid, stationary, metallic
point (for example, the engine lift-
ing bracket) away from the battery
(4). Do not connect it to or near any
part that moves when the engine is
cranked.
Make sure that there is no contact
between the bodywork of the two
vehicles; otherwise, there is the
danger of short circuits.
Do not allow the jumper cables to
contact anything except the correct
battery terminals or the correct
ground. Do not lean over the bat-
tery when making connections. 5.Start the engine of the vehicle with
the booster battery and let it run at
2,000 rpm, then start the engine of
the vehicle with the discharged
battery. If the first starting attempt
is not successful, wait a few min-
utes before making another
attempt in order to allow the dis-
charged battery to recharge.
To charge the discharged battery
enough, it is recommended to let the
engine at idle or to drive the vehicle
for a certain period of time.
If the cause of your battery discharg- ing is not apparent, you should haveyour vehicle checked by an author-ized HYUNDAI dealer.
CAUTION - Battery cables
Do not connect the jumper cablefrom the negative terminal of thebooster battery to the negativeterminal of the discharged bat-tery. This can cause the dis-charged battery to overheat andcrack, releasing battery acid.
Page 449 of 569
Maintenance
Engine compartment . . . . . . . . . . . . . . . . . . . . . . . . 7-3
Maintenance services . . . . . . . . . . . . . . . . . . . . . . . . 7-4
• Owner's responsibility . . . . . . . . . . . . . . . . . . . . . . . . . 7-4
. . . . . . . . . . . . . . . . . 7-5
Owner maintenance . . . . . . . . . . . . . . . . . . . . . . . . . 7-6
Scheduled maintenance service. . . . . . . . . . . . . . . . 7-8
Explanation of scheduled maintenance items . . . 7-26
Engine oil. . . . . . . . . . . . . . . . . . . . . . . . . . . . . . . . . 7-30
. . . . . . . . . . . . . . . . . . . 7-30
. . . . . . . . . . . . . . . 7-31
Engine coolant . . . . . . . . . . . . . . . . . . . . . . . . . . . . 7-32
. . . . . . . . . . . . . . . . . . . . . 7-32
. . . . . . . . . . . . . . . . . . . . . . . . . 7-34
Brake fluid . . . . . . . . . . . . . . . . . . . . . . . . . . . . . . . 7-35
. . . . . . . . . . . . . . . . . . 7-35
Washer fluid . . . . . . . . . . . . . . . . . . . . . . . . . . . . . . 7-37
. . . . . . . . . . . . . . . . . 7-37
Parking brake . . . . . . . . . . . . . . . . . . . . . . . . . . . . . 7-37
Air cleaner. . . . . . . . . . . . . . . . . . . . . . . . . . . . . . . . 7-38
. . . . . . . . . . . . . . . . . . . . . . . . . . . . 7-38
Climate control air filter . . . . . . . . . . . . . . . . . . . . 7-40
. . . . . . . . . . . . . . . . . . . . . . . . . . . . . . 7-40
. . . . . . . . . . . . . . . . . . . . . . . . . . . . 7-40
Wiper blades . . . . . . . . . . . . . . . . . . . . . . . . . . . . . . 7-42
. . . . . . . . . . . . . . . . . . . . . . . . . . . . . . 7-42
. . . . . . . . . . . . . . . . . . . . . . . . . . . . 7-42
Battery . . . . . . . . . . . . . . . . . . . . . . . . . . . . . . . . . . . 7-\
45
. . . . . . . . . . . . . . . . . . . . . . . 7-45
. . . . . . . . . . . . . . . . . . . . . . . . . . . 7-46
. . . . . . . . . . . . . . . . . . . . . . . . . . . . . . . . . . 7-47\
Tires and wheels . . . . . . . . . . . . . . . . . . . . . . . . . . . 7-48
. . . . . . . . . . . . . . . . . . . . . . . . . . . . . . . . . . . . \
7-48
. . . . . . . 7-48
. . . . . . . . . . . . . . . . . . . . . . . . . . . . . . . . . 7-50
. . . . . . . . . . . . . . . 7-51
. . . . . . . . . . . . . . . . . . . . . . . . . . . . . 7-52
. . . . . . . . . . . . . . . . . . . . . . . . . . . 7-53
. . . . . . . . . . . . . . . . . . . . . . . . . . . . . . . . . 7-53
. . . . . . . . . . . . . . . . . . . . . . . . . . . . . 7-54
. . . . . . . . . . . . . . . . . . . . . . . . . 7-54
. . . . . . . . . . . . . . . . 7-58
. . . . . . . . . . . . . . . . . . . . . . . . . . . . . . . 7-60
. . . . . . . . . . . . . . . . . . . . . . . . . . . . . . . . 7-60
. . . . . . . . . . . . . . . . . . . . . . . . . . . . . . . . . . . 7-\
61
7
Page 451 of 569
73
Maintenance
ENGINE COMPARTMENT
1. Engine coolant reservoir
2. Engine oil filler cap
3. Brake fluid reservoir
4. Air cleaner
5. Fuse box
6. Negative battery terminal
7. Positive battery terminal
8. Radiator cap
9. Engine oil dipstick
10. Windshield washer fluid reservoir
ONC077013RU
■
■Gasoline Engine (LAMBDA 3.3) - GDI
❈The actual engine room in the vehicle may differ from the illustration.
Page 455 of 569
77
Maintenance
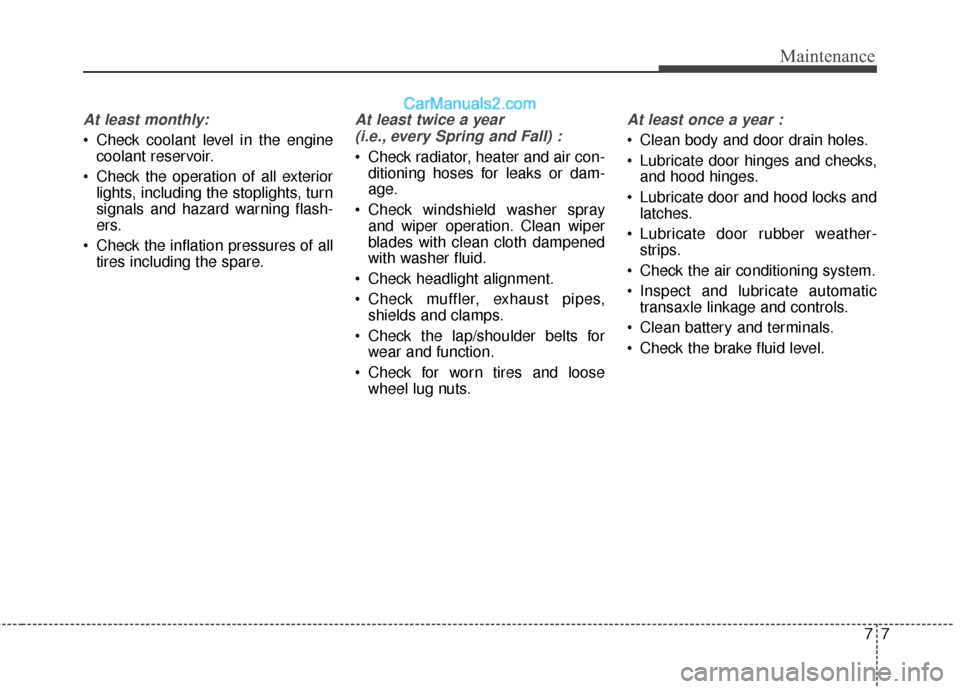
At least monthly:
Check coolant level in the enginecoolant reservoir.
Check the operation of all exterior lights, including the stoplights, turn
signals and hazard warning flash-
ers.
Check the inflation pressures of all tires including the spare.
At least twice a year
(i.e., every Spring and Fall) :
Check radiator, heater and air con- ditioning hoses for leaks or dam-
age.
Check windshield washer spray and wiper operation. Clean wiper
blades with clean cloth dampened
with washer fluid.
Check headlight alignment.
Check muffler, exhaust pipes, shields and clamps.
Check the lap/shoulder belts for wear and function.
Check for worn tires and loose wheel lug nuts.
At least once a year :
Clean body and door drain holes.
Lubricate door hinges and checks,and hood hinges.
Lubricate door and hood locks and latches.
Lubricate door rubber weather- strips.
Check the air conditioning system.
Inspect and lubricate automatic transaxle linkage and controls.
Clean battery and terminals.
Check the brake fluid level.
Page 458 of 569
Maintenance
10
7
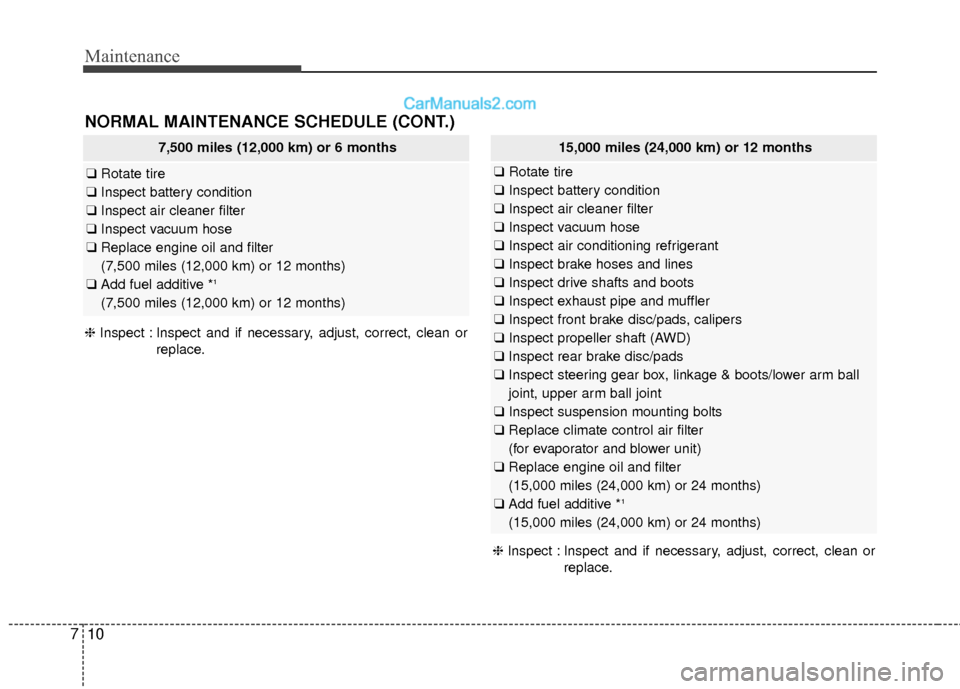
7,500 miles (12,000 km) or 6 months
❑ Rotate tire
❑ Inspect battery condition
❑ Inspect air cleaner filter
❑ Inspect vacuum hose
❑ Replace engine oil and filter
(7,500 miles (12,000 km) or 12 months)
❑ Add fuel additive *
1
(7,500 miles (12,000 km) or 12 months)
15,000 miles (24,000 km) or 12 months
❑ Rotate tire
❑ Inspect battery condition
❑ Inspect air cleaner filter
❑ Inspect vacuum hose
❑ Inspect air conditioning refrigerant
❑ Inspect brake hoses and lines
❑ Inspect drive shafts and boots
❑ Inspect exhaust pipe and muffler
❑ Inspect front brake disc/pads, calipers
❑ Inspect propeller shaft (AWD)
❑ Inspect rear brake disc/pads
❑ Inspect steering gear box, linkage & boots/lower arm ball
joint, upper arm ball joint
❑ Inspect suspension mounting bolts
❑ Replace climate control air filter
(for evaporator and blower unit)
❑ Replace engine oil and filter
(15,000 miles (24,000 km) or 24 months)
❑ Add fuel additive *
1
(15,000 miles (24,000 km) or 24 months)
❈ Inspect : Inspect and if necessary, adjust, correct, clean or
replace.
NORMAL MAINTENANCE SCHEDULE (CONT.)
❈Inspect : Inspect and if necessary, adjust, correct, clean or
replace.
Page 459 of 569
711
Maintenance
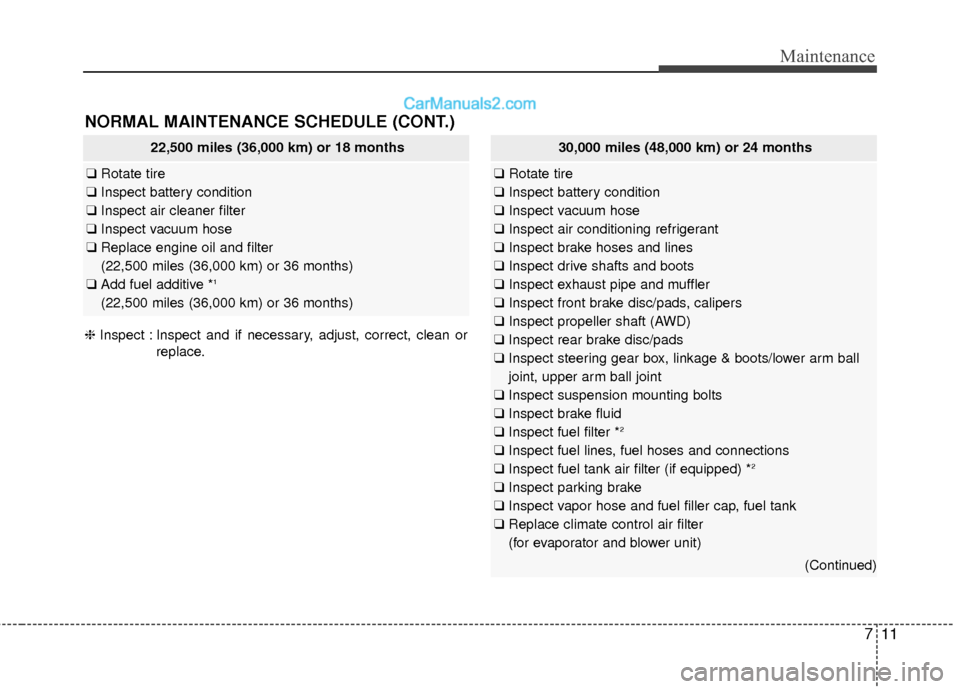
NORMAL MAINTENANCE SCHEDULE (CONT.)
22,500 miles (36,000 km) or 18 months
❑Rotate tire
❑ Inspect battery condition
❑ Inspect air cleaner filter
❑ Inspect vacuum hose
❑ Replace engine oil and filter
(22,500 miles (36,000 km) or 36 months)
❑ Add fuel additive *
1
(22,500 miles (36,000 km) or 36 months)
❈ Inspect : Inspect and if necessary, adjust, correct, clean or
replace.
30,000 miles (48,000 km) or 24 months
❑Rotate tire
❑ Inspect battery condition
❑ Inspect vacuum hose
❑ Inspect air conditioning refrigerant
❑ Inspect brake hoses and lines
❑ Inspect drive shafts and boots
❑ Inspect exhaust pipe and muffler
❑ Inspect front brake disc/pads, calipers
❑ Inspect propeller shaft (AWD)
❑ Inspect rear brake disc/pads
❑ Inspect steering gear box, linkage & boots/lower arm ball
joint, upper arm ball joint
❑ Inspect suspension mounting bolts
❑ Inspect brake fluid
❑ Inspect fuel filter *
2
❑Inspect fuel lines, fuel hoses and connections
❑ Inspect fuel tank air filter (if equipped) *2
❑Inspect parking brake
❑ Inspect vapor hose and fuel filler cap, fuel tank
❑ Replace climate control air filter
(for evaporator and blower unit)
(Continued)