2017 HYUNDAI IX20 run flat
[x] Cancel search: run flatPage 305 of 456
69
What to do in an emergency
IF YOU HAVE A FLAT TIRE (WITH SPARE TIRE, IF EQUIPPED)
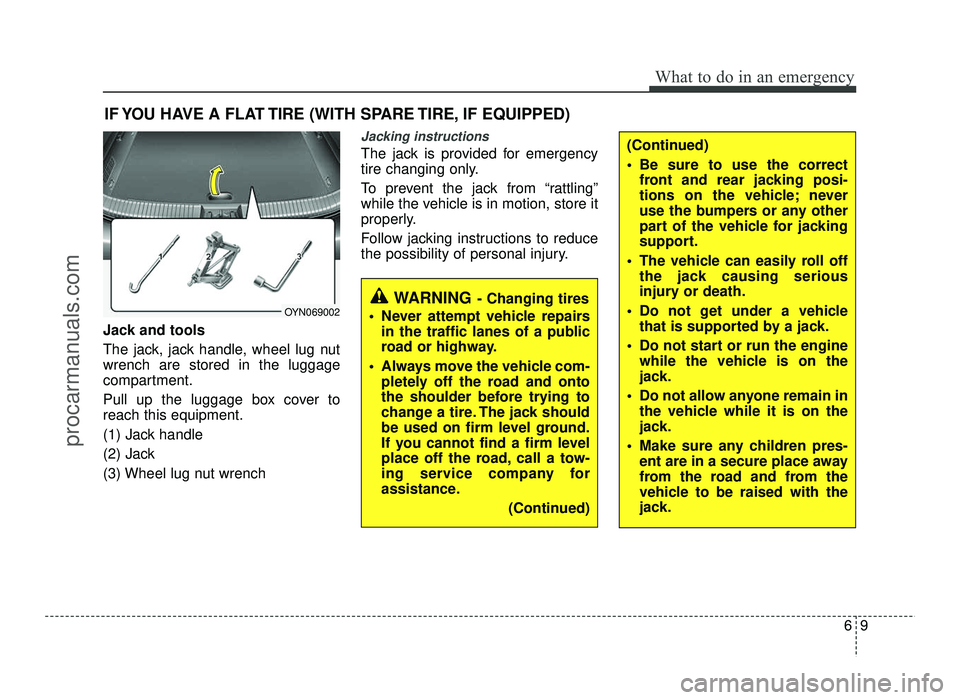
Jack and tools
The jack, jack handle, wheel lug nut wrench are stored in the luggage
compartment.
Pull up the luggage box cover to reach this equipment.
(1) Jack handle
(2) Jack
(3) Wheel lug nut wrench
Jacking instructions
The jack is provided for emergency
tire changing only.
To prevent the jack from “rattling”
while the vehicle is in motion, store it
properly.
Follow jacking instructions to reduce
the possibility of personal injury.
WARNING - Changing tires
Never attempt vehicle repairs in the traffic lanes of a public
road or highway.
Always move the vehicle com- pletely off the road and onto
the shoulder before trying to
change a tire. The jack should
be used on firm level ground.
If you cannot find a firm level
place off the road, call a tow-
ing service company for
assistance.
(Continued)OYN069002
(Continued)
Be sure to use the correctfront and rear jacking posi-
tions on the vehicle; never
use the bumpers or any other
part of the vehicle for jacking
support.
The vehicle can easily roll off the jack causing serious
injury or death.
Do not get under a vehicle that is supported by a jack.
Do not start or run the engine while the vehicle is on the
jack.
Do not allow anyone remain in the vehicle while it is on the
jack.
Make sure any children pres- ent are in a secure place away
from the road and from the
vehicle to be raised with the
jack.
procarmanuals.com
Page 315 of 456

619
What to do in an emergency
It is possible that some tires, espe- cially with larger punctures or dam-
age to the sidewall, cannot be sealed
completely.
Air pressure loss in the tire may
adversely affect tire performance.
For this reason, you should avoid
abrupt steering or other driving
maneuvers, especially if the vehicle
is heavily loaded or if a trailer is in
use.
The Tire Mobility Kit is not designed
or intended as a permanent tire
repair method and is to be used for
one tire only.
This instruction shows you step by
step how to temporarily seal the
puncture simply and reliably.
Read the section "Notes on the safe
use of the Tire Mobility Kit".Notes on the safe use of the TireMobility Kit
Park your car at the side of the
road so that you can work with the
Tire Mobility Kit away from moving
traffic.
To be sure your vehicle will not move, even when you're on fairly
level ground, always set your park-
ing brake.
Only use the Tire Mobility Kit for sealing/inflation passenger car
tires. Only punctured areas locatedwithin the tread region of the tirecan be sealed using the tire mobil-ity kit.
Do not use on motorcycles, bicy- cles or any other type of tires.
When the tire and wheel are dam- aged, do not use Tire Mobility Kit
for your safety.
Use of the Tire Mobility Kit may not be effective for tire damage larger
than approximately 0.24 in (6 mm).
We recommend that you contact
an authorized HYUNDAI dealer. Do not use the Tire Mobility Kit if a
tire is severely damaged by driving
run flat or with insufficient air pres-
sure.
Do not remove any foreign objects such as nails or screws that have
penetrated the tire.
Provided the car is outdoors, leave the engine running. Otherwise
operating the compressor may
eventually drain the car battery.
Never leave the Tire Mobility Kit unattended while it is being used.
Do not leave the compressor run- ning for more than 10 min. at a time
or it may overheat.
Do not use the Tire Mobility Kit if the ambient temperature is below -22°F (-30°C).
procarmanuals.com
Page 317 of 456
621
What to do in an emergency
Using the Tire Mobility Kit
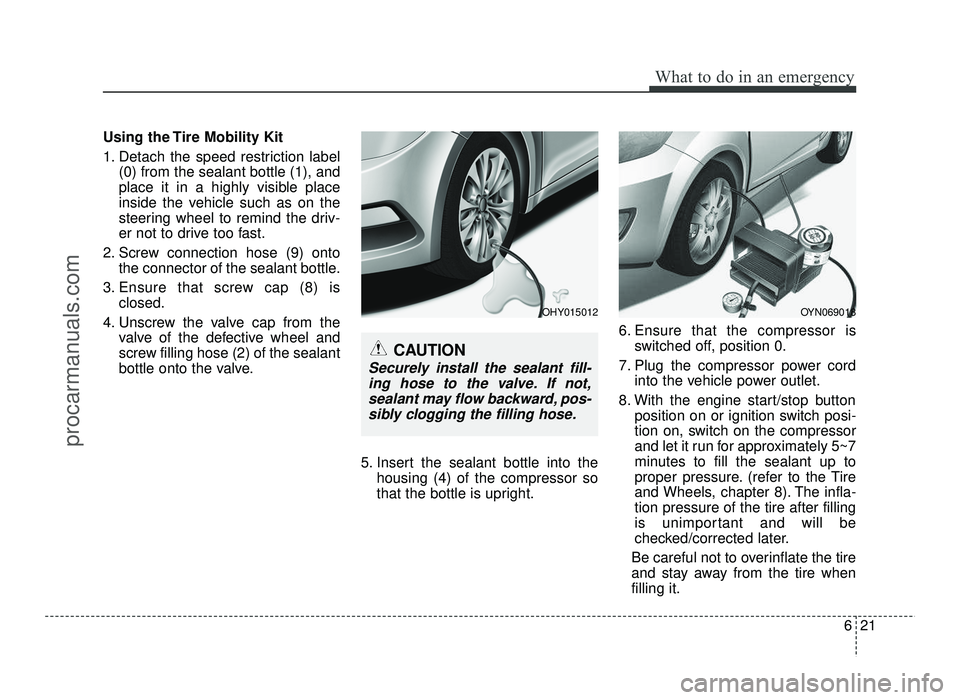
1. Detach the speed restriction label(0) from the sealant bottle (1), and
place it in a highly visible place
inside the vehicle such as on the
steering wheel to remind the driv-
er not to drive too fast.
2. Screw connection hose (9) onto the connector of the sealant bottle.
3. Ensure that screw cap (8) is closed.
4. Unscrew the valve cap from the valve of the defective wheel and
screw filling hose (2) of the sealant
bottle onto the valve.
5. Insert the sealant bottle into thehousing (4) of the compressor so
that the bottle is upright. 6. Ensure that the compressor is
switched off, position 0.
7. Plug the compressor power cord into the vehicle power outlet.
8. With the engine start/stop button position on or ignition switch posi-
tion on, switch on the compressor
and let it run for approximately 5~7
minutes to fill the sealant up to
proper pressure. (refer to the Tire
and Wheels, chapter 8). The infla-tion pressure of the tire after filling
is unimportant and will be
checked/corrected later.
Be careful not to overinflate the tire
and stay away from the tire whenfilling it.
OYN069018OHY015012
CAUTION
Securely install the sealant fill- ing hose to the valve. If not,sealant may flow backward, pos-sibly clogging the filling hose.
procarmanuals.com
Page 318 of 456

What to do in an emergency
22
6
9. Switch off the compressor.
10. Detach the hoses from the
sealant bottle connector and
from the tire valve.
Return the Tire Mobility Kit to its stor-
age location in the vehicle. Distributing the sealant
11. Immediately drive approximately
4~6miles (7~10km or, about
10min) to evenly distribute the
sealant in the tire.
Do not exceed a speed of 50 mph
(80 km/h). If possible, do not fall
below a speed of 12 mph (20 km/h).
While driving, if you experience any
unusual vibration, ride disturbance or
noise, reduce your speed and drive
with caution until you can safely pulloff of the side of the road.
Call for road side service or towing.
When you use the Tire Mobility Kit, the tire pressure sensors and wheel
may be damaged by sealant, removethe sealant stained with tire pressuresensors and wheel and inspect in
authorized dealer. Checking the tire inflation pres- sure
1.After driving approximately 4
~6miles(7~10km or about 10min),
stop at a safety location.
2.Connect connection hose (9) of the compressor directly to the tire
valve.
3.Plug the compressor power cord into the vehicle power outlet.
4.Adjust the tire inflation pressure to the recommended tire inflation.
With the ignition switched on, pro-
ceed as follows.
- To increase the inflation pres-sure : Switch on the compressor,
position I. To check the current
inflation pressure setting, briefly
switch off the compressor.
CAUTION - Tire pressure
Do not attempt to drive your
vehicle if the tire pressure isbelow 29 PSI(200kpa). Thiscould result in an accident due to sudden tire failure.
WARNING - Carbon
monoxide
Do not leave your vehicle run-
ning in a poorly ventilated area
for extended periods of time.
Carbon monoxide poisoning
and suffocation can occur.
procarmanuals.com
Page 319 of 456

623
What to do in an emergency
✽✽NOTICE
The pressure gauge may show high-
er than actual reading when the
compressor is running. To get an
accurate tire pressure, the compres-
sor needs to be turned off.
- To reduce the inflation pres- sure: Loosen the screw cap (8)
on the compressor hose.
CAUTION - Tire pressure
sensor
We recommend that you use the
sealant of Tire Mobility Kit froman authorized HYUNDAI dealer.
The sealant on the tire pressuresensor and wheel should be removed when you replace thetire with a new one and inspectthe tire pressure sensors inauthorized dealer.
procarmanuals.com
Page 320 of 456
What to do in an emergency
24
6
IF YOU HAVE A FLAT TIRE (WITH TIREMOBILITYKIT, IF EQUIPPED) (TYPE B)
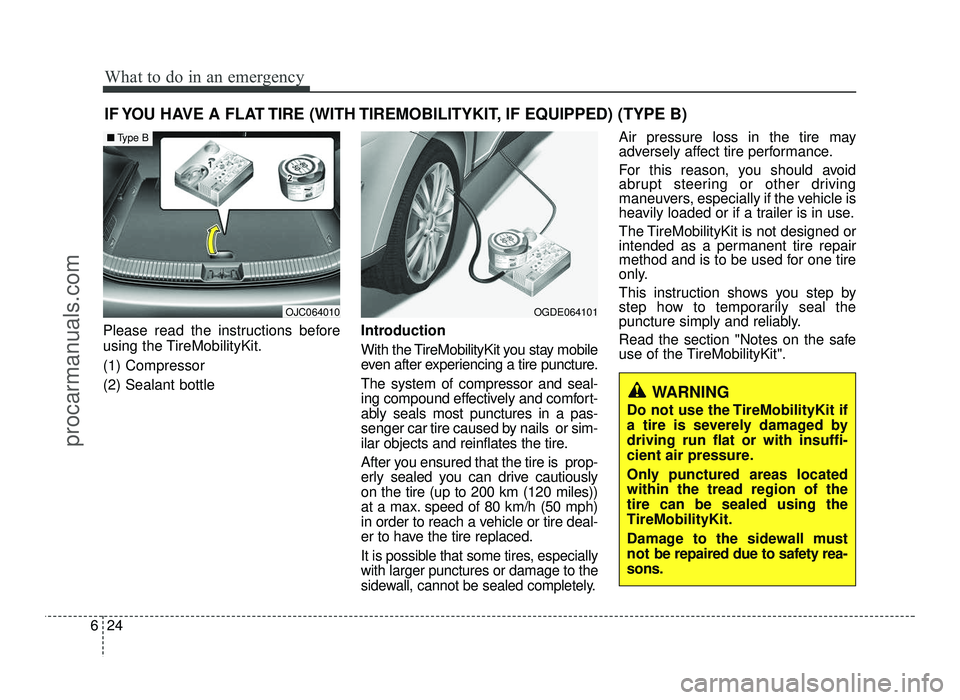
Please read the instructions before
using the TireMobilityKit. (1) Compressor(2) Sealant bottle Introduction
With the TireMobilityKit you stay mobile
even after experiencing a tire puncture. The system of compressor and seal-
ing compound effectively and comfort-
ably seals most punctures in a pas-
senger car tire caused by nails or sim-
ilar objects and reinflates the tire.
After you ensured that the tire is prop-
erly sealed you can drive cautiouslyon the tire (up to 200 km (120 miles))
at a max. speed of 80 km/h (50 mph)
in order to reach a vehicle or tire deal-
er to have the tire replaced.
It is possible that some tires, especiallywith larger punctures or damage to the
sidewall, cannot be sealed completely.
Air pressure loss in the tire may
adversely affect tire performance.
For this reason, you should avoid
abrupt steering or other driving
maneuvers, especially if the vehicle is
heavily loaded or if a trailer is in use.
The TireMobilityKit is not designed or
intended as a permanent tire repair
method and is to be used for one tire
only.
This instruction shows you step by
step how to temporarily seal the
puncture simply and reliably.
Read the section "Notes on the safe
use of the TireMobilityKit".
OGDE064101
WARNING
Do not use the TireMobilityKit if
a tire is severely damaged bydriving run flat or with insuffi-
cient air pressure.
Only punctured areas located within the tread region of thetire can be sealed using theTireMobilityKit.
Damage to the sidewall must
not be repaired due to safety rea-sons.
OJC064010
■ Type B
procarmanuals.com
Page 322 of 456
What to do in an emergency
26
6
Using the TireMobilityKit
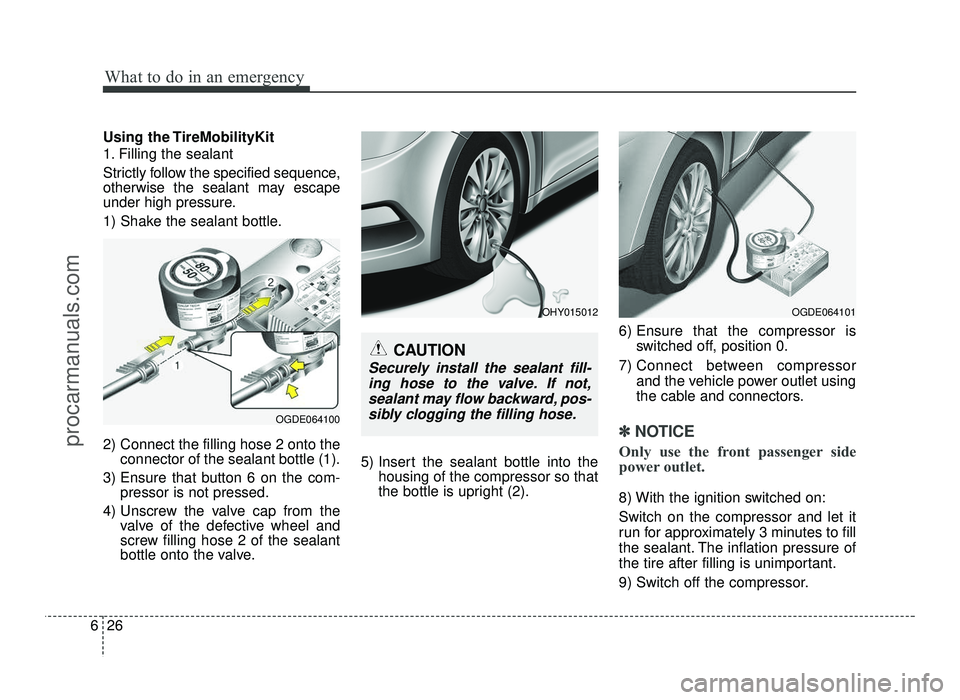
1. Filling the sealant
Strictly follow the specified sequence,
otherwise the sealant may escape
under high pressure.
1) Shake the sealant bottle.
2) Connect the filling hose 2 onto the
connector of the sealant bottle (1).
3) Ensure that button 6 on the com- pressor is not pressed.
4) Unscrew the valve cap from the valve of the defective wheel and
screw filling hose 2 of the sealant
bottle onto the valve. 5) Insert the sealant bottle into the
housing of the compressor so that
the bottle is upright (2). 6) Ensure that the compressor is
switched off, position 0.
7) Connect between compressor and the vehicle power outlet using
the cable and connectors.
✽✽NOTICE
Only use the front passenger side
power outlet.
8) With the ignition switched on: Switch on the compressor and let it
run for approximately 3 minutes to fill
the sealant. The inflation pressure of
the tire after filling is unimportant.
9) Switch off the compressor.
OGDE064101
OGDE064100
OHY015012
CAUTION
Securely install the sealant fill- ing hose to the valve. If not,sealant may flow backward, pos-sibly clogging the filling hose.
procarmanuals.com
Page 323 of 456
627
What to do in an emergency
10) Detach the hose from the sealant bottle connector and
from the tire valve.
Return the TireMobilityKit to its stor-
age location in the vehicle.
Distributing the sealant
Immediately drive approximately 3 km
(2 miles) to evenly distribute the
sealant in the tire. Producing the tire inflation pres- sure
1) After driving approximately 3 km (2
miles), stop at a suitable location.
2) Connect the filling hose 2 of the compressor (clip mounted side) directly and then connect the fillinghose 2 (opposite side) to the tire
valve.
3) Connect between compressor and the vehicle power outlet using the
cable and connectors.
4) Adjust the tire inflation pressure to 220 kPa (32 psi). With the ignition
switched on, proceed as follows.
- To increase the inflation pres- sure: Switch on the compressor,
position I. To check the current
inflation pressure setting, briefly
switch off the compressor. - To reduce the inflation pres-
sure: Press the button 8 on the
compressor.
WARNING
Do not let the compressor run for
more than 10 minutes, otherwise
the device will overheat and may
be damaged.
CAUTION
Do not exceed a speed of 80 km/h (50 mph). If possible, do not fall below a speed of 20 km/h (12 mph).
While driving, if you experience
any unusual vibration, ride dis- turbance or noise, reduce yourspeed and drive with cautionuntil you can safely pull off of the side of the road.
(Continued)
(Continued)Call for road side service or tow-ing.
CAUTION
If the inflation pressure is not
maintained, drive the vehicle asecond time, refer to Distributingthe sealant. Then repeat steps 1to 4.
Use of the TireMobilityKit maybe ineffectual for tire damagelarger than approximately 4 mm(0.16 in).
We recommend that you contactthe nearest HYUNDAI A/S center,or a workshop that works accord-ing to HYUNDAI repair proce-dures with correspondingly trained personnel if the tire can-not be made roadworthy with theTireMobilityKit.
WARNING
Carbon monoxide poisoning
and suffocation is possible if the
engine is left running in a poorly
ventilated or unventilated loca-
tion (such as inside a building).
procarmanuals.com