2017 HYUNDAI IX20 tow
[x] Cancel search: towPage 311 of 456
615
What to do in an emergency
When using a compact spare tire,
observe the following precautions:
Under no circumstances shouldyou exceed 80 km/h (50 mph); a higher speed could damage the
tire.
Ensure that you drive slowly enough to avoid all hazards. Anyroad hazard, such as a pothole or
debris, could seriously damage the
compact spare.
Any continuous road use of this tire could result in tire failure, loss of
vehicle control, and possible per-
sonal injury.
Do not exceed the vehicle’s maxi- mum load rating or the load-carry-
ing capacity shown on the sidewall
of the compact spare tire.
Avoid driving over obstacles. The compact spare tire diameter issmaller than the diameter of a con-
ventional tire and reduces the
ground clearance approximately25 mm (1 inch), which could result
in damage to the vehicle.
Do not take this vehicle through an automatic car wash while the com-pact spare tire is installed. Do not use tire chains on the com-
pact spare tire. Because of the
smaller size, a tire chain will not fit
properly. This could damage the
vehicle and result in loss of thechain.
The compact spare tire should not be installed on the front axle if the
vehicle must be driven in snow or
on ice.
Do not use the compact spare tire on any other vehicle because thistire has been designed especially
for your vehicle.
The compact spare tire’s tread life is shorter than a regular tire.
Inspect your compact spare tire
regularly and replace worn com-
pact spare tires with the same sizeand design, mounted on the samewheel.
The compact spare tire should not be used on any other wheels, nor
should standard tires, snow tires,
wheel covers or trim rings be used
with the compact spare wheel. Ifsuch use is attempted, damage tothese items or other car compo-
nents may occur. Do not use more than one compact
spare tire at a time.
Do not tow a trailer while the com- pact spare tire is installed.
procarmanuals.com
Page 318 of 456

What to do in an emergency
22
6
9. Switch off the compressor.
10. Detach the hoses from the
sealant bottle connector and
from the tire valve.
Return the Tire Mobility Kit to its stor-
age location in the vehicle. Distributing the sealant
11. Immediately drive approximately
4~6miles (7~10km or, about
10min) to evenly distribute the
sealant in the tire.
Do not exceed a speed of 50 mph
(80 km/h). If possible, do not fall
below a speed of 12 mph (20 km/h).
While driving, if you experience any
unusual vibration, ride disturbance or
noise, reduce your speed and drive
with caution until you can safely pulloff of the side of the road.
Call for road side service or towing.
When you use the Tire Mobility Kit, the tire pressure sensors and wheel
may be damaged by sealant, removethe sealant stained with tire pressuresensors and wheel and inspect in
authorized dealer. Checking the tire inflation pres- sure
1.After driving approximately 4
~6miles(7~10km or about 10min),
stop at a safety location.
2.Connect connection hose (9) of the compressor directly to the tire
valve.
3.Plug the compressor power cord into the vehicle power outlet.
4.Adjust the tire inflation pressure to the recommended tire inflation.
With the ignition switched on, pro-
ceed as follows.
- To increase the inflation pres-sure : Switch on the compressor,
position I. To check the current
inflation pressure setting, briefly
switch off the compressor.
CAUTION - Tire pressure
Do not attempt to drive your
vehicle if the tire pressure isbelow 29 PSI(200kpa). Thiscould result in an accident due to sudden tire failure.
WARNING - Carbon
monoxide
Do not leave your vehicle run-
ning in a poorly ventilated area
for extended periods of time.
Carbon monoxide poisoning
and suffocation can occur.
procarmanuals.com
Page 323 of 456
627
What to do in an emergency
10) Detach the hose from the sealant bottle connector and
from the tire valve.
Return the TireMobilityKit to its stor-
age location in the vehicle.
Distributing the sealant
Immediately drive approximately 3 km
(2 miles) to evenly distribute the
sealant in the tire. Producing the tire inflation pres- sure
1) After driving approximately 3 km (2
miles), stop at a suitable location.
2) Connect the filling hose 2 of the compressor (clip mounted side) directly and then connect the fillinghose 2 (opposite side) to the tire
valve.
3) Connect between compressor and the vehicle power outlet using the
cable and connectors.
4) Adjust the tire inflation pressure to 220 kPa (32 psi). With the ignition
switched on, proceed as follows.
- To increase the inflation pres- sure: Switch on the compressor,
position I. To check the current
inflation pressure setting, briefly
switch off the compressor. - To reduce the inflation pres-
sure: Press the button 8 on the
compressor.
WARNING
Do not let the compressor run for
more than 10 minutes, otherwise
the device will overheat and may
be damaged.
CAUTION
Do not exceed a speed of 80 km/h (50 mph). If possible, do not fall below a speed of 20 km/h (12 mph).
While driving, if you experience
any unusual vibration, ride dis- turbance or noise, reduce yourspeed and drive with cautionuntil you can safely pull off of the side of the road.
(Continued)
(Continued)Call for road side service or tow-ing.
CAUTION
If the inflation pressure is not
maintained, drive the vehicle asecond time, refer to Distributingthe sealant. Then repeat steps 1to 4.
Use of the TireMobilityKit maybe ineffectual for tire damagelarger than approximately 4 mm(0.16 in).
We recommend that you contactthe nearest HYUNDAI A/S center,or a workshop that works accord-ing to HYUNDAI repair proce-dures with correspondingly trained personnel if the tire can-not be made roadworthy with theTireMobilityKit.
WARNING
Carbon monoxide poisoning
and suffocation is possible if the
engine is left running in a poorly
ventilated or unventilated loca-
tion (such as inside a building).
procarmanuals.com
Page 324 of 456
What to do in an emergency
28
6
Notes on the safe use of the TireMobilityKit
• Park your car at the side of the
road so that you can work with the
TireMobilityKit away from moving
traffic. Place your warning triangle
in a prominent place to make pass-
ing vehicles aware of your location.
To be sure your vehicle won't move, even when you're on fairly
level ground, always set your park-
ing brake.
Only use the TireMobilityKit for sealing/inflation passenger car
tires. Do not use on motorcycles,
bicycles or any other type of tires.
Do not remove any foreign objects- such as nails or screws -that have
penetrated the tire.
Before using the TireMobilityKit, read the precautionary advice
printed on the sealant bottle! Provided the car is outdoors, leave
the engine running. Otherwise
operating the compressor may
eventually drain the car battery.
Never leave the TireMobilityKit unattended while it is being used.
Do not leave the compressor run- ning for more than 10 min. at a time
or it may overheat.
Do not use the TireMobilityKit if the ambient temperature is below -30°C(-22°F).
Do not use the sealing compound after its expiration date which can
be found on the label of the bottle.
Keep away from children. ❈
Sealing compound and spare
parts can be obtained and
replaced at an authorized vehicle
or tire dealer. Empty sealing com-
pound bottles may be disposed of
at home. Liquid residue from thesealing compound should be dis-
posed of by your vehicle or tiredealer or in accordance with local
waste disposal regulations.
WARNING
The tire inflation pressure must
be at least 200 kPa (29 psi). If it is
not, do not continue driving. Call
for road side service or towing.
procarmanuals.com
Page 327 of 456
631
What to do in an emergency
TPMS (Tire Pressure Monitoring System)malfunction indicator
The TPMS malfunction indicator will
illuminate after it blinks for approxi-
mately one minute when there is a
problem with the Tire Pressure
Monitoring System. If the system is
able to correctly detect an under infla-
tion warning at the same time as sys-
tem failure then it will illuminate the
TPMS malfunction indicator.
We recommend that the system be
checked by an authorized HYUNDAI
dealer.
WARNING - Low pressure
damage
Significantly low tire pressure
makes the vehicle unstable and
can contribute to loss of vehicle
control and increased brakingdistances.
Continued driving on low pres- sure tires can cause the tires to
overheat and fail.CAUTION
The TPMS malfunction indica- tor may be illuminated if thevehicle is moving around elec- tric power supply cables orradios transmitter such as atpolice stations, governmentand public offices, broadcast- ing stations, military installa-tions, airports, or transmittingtowers, etc. This can interferewith normal operation of the Tire Pressure MonitoringSystem (TPMS).
The TPMS malfunction indica- tor may illuminate if snowchains or some separatelypurchased devices such asnotebook computers, mobile charger, remote starter, navi-gation etc. are used in thevehicle. This can interfere withnormal operation of the Tire Pressure Monitoring System(TPMS).
procarmanuals.com
Page 332 of 456

What to do in an emergency
36
6
TPMS (Tire Pressure Monitoring System)malfunction indicator
The TPMS malfunction indicator will
illuminate after it blinks for approxi-
mately one minute when there is a
problem with the Tire Pressure
Monitoring System. If the system is
able to correctly detect an underinfla-
tion warning at the same time as sys-
tem failure then the TPMS malfunc-tion indicator remains illuminated
after blinking for approximately 1
minute and the low tire pressure posi-
tion telltale will illuminate e.g. if Front
Left sensor fails, the TPMS malfunc-tion indicator remains illuminated
after blinking for approximately 1
minute, but if the Front Right, RearLeft, or Rear Right tire is under-inflat-
ed, the low tire pressure position tell-
tales may illuminate together with the
TPMS malfunction indicator.
We recommend that the system be
checked by an authorized HYUNDAI
dealer.
WARNING - Low pressure
damage
Significantly low tire pressure
makes the vehicle unstable and
can contribute to loss of vehicle
control and increased brakingdistances.
Continued driving on low pres- sure tires can cause the tires to
overheat and fail.CAUTION
The TPMS malfunction indica- tor may blink for approximate-ly 1 minute and then remaincontinuously illuminated if thevehicle is moving around elec-tric power supply cables or radios transmitter such as atpolice stations, governmentand public offices, broadcast-ing stations, military installa-tions, airports, or transmitting towers, etc. This can interferewith normal operation of theTire Pressure MonitoringSystem (TPMS).
The TPMS malfunction indica- tor may blink for approximate-ly 1 minute and then remaincontinuously illuminated ifsnow chains are used or someseparate electronic devices such as notebook computer,mobile charger, remote starteror navigation etc., are used inthe vehicle. This can interferewith normal operation of the Tire Pressure MonitoringSystem (TPMS).
procarmanuals.com
Page 335 of 456
639
What to do in an emergency
TOWING
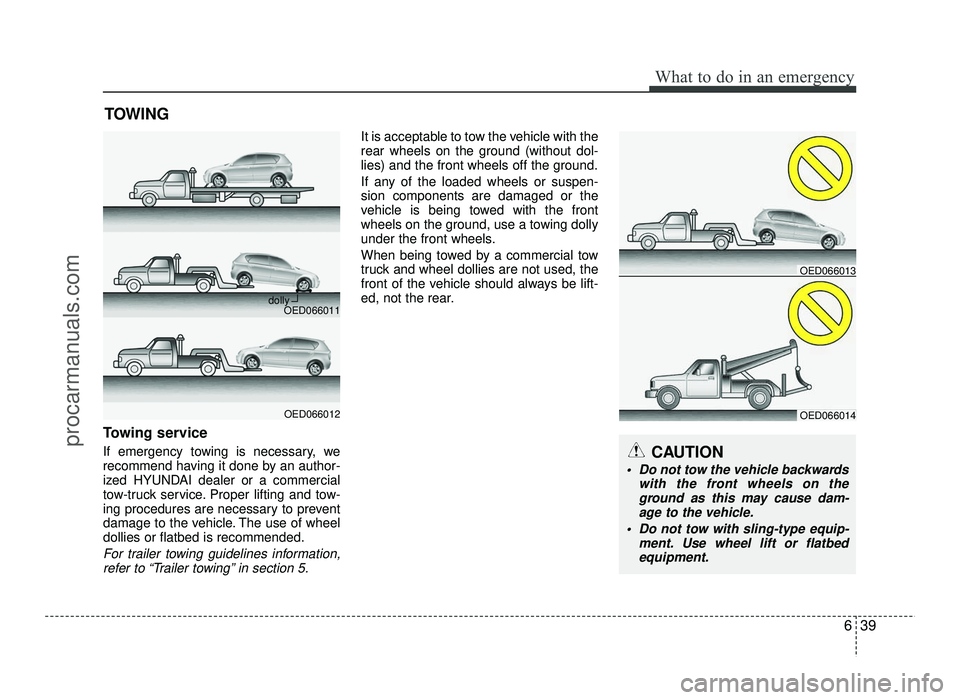
Towing service
If emergency towing is necessary, we
recommend having it done by an author-
ized HYUNDAI dealer or a commercial
tow-truck service. Proper lifting and tow-
ing procedures are necessary to prevent
damage to the vehicle. The use of wheeldollies or flatbed is recommended.
For trailer towing guidelines information, refer to “Trailer towing” in section 5.
It is acceptable to tow the vehicle with the
rear wheels on the ground (without dol-
lies) and the front wheels off the ground.
If any of the loaded wheels or suspen- sion components are damaged or the
vehicle is being towed with the front
wheels on the ground, use a towing dolly
under the front wheels.
When being towed by a commercial tow
truck and wheel dollies are not used, the
front of the vehicle should always be lift-
ed, not the rear.
CAUTION
Do not tow the vehicle backwards
with the front wheels on theground as this may cause dam-
age to the vehicle.
Do not tow with sling-type equip- ment. Use wheel lift or flatbed
equipment.
OED066011
OED066012
dolly
OED066014
OED066013
procarmanuals.com
Page 336 of 456
When towing your vehicle in an emer- gency without wheel dollies :
1. Set the ignition switch in the ACC posi-tion.
2. Place the transaxle shift lever in N (Neutral).
3. Release the parking brake.
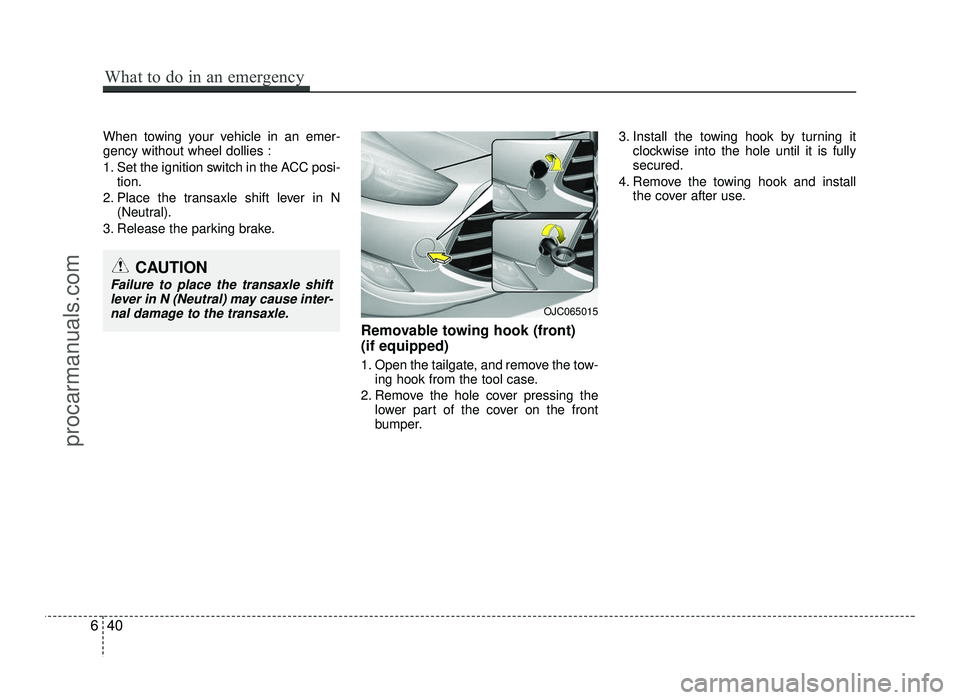
Removable towing hook (front) (if equipped)
1. Open the tailgate, and remove the tow-ing hook from the tool case.
2. Remove the hole cover pressing the lower part of the cover on the front
bumper. 3. Install the towing hook by turning it
clockwise into the hole until it is fullysecured.
4. Remove the towing hook and install the cover after use.
CAUTION
Failure to place the transaxle shift
lever in N (Neutral) may cause inter-
nal damage to the transaxle.
OJC065015
640
What to do in an emergency
procarmanuals.com