2017 HYUNDAI IX20 instrument panel
[x] Cancel search: instrument panelPage 151 of 456
473
Features of your vehicle
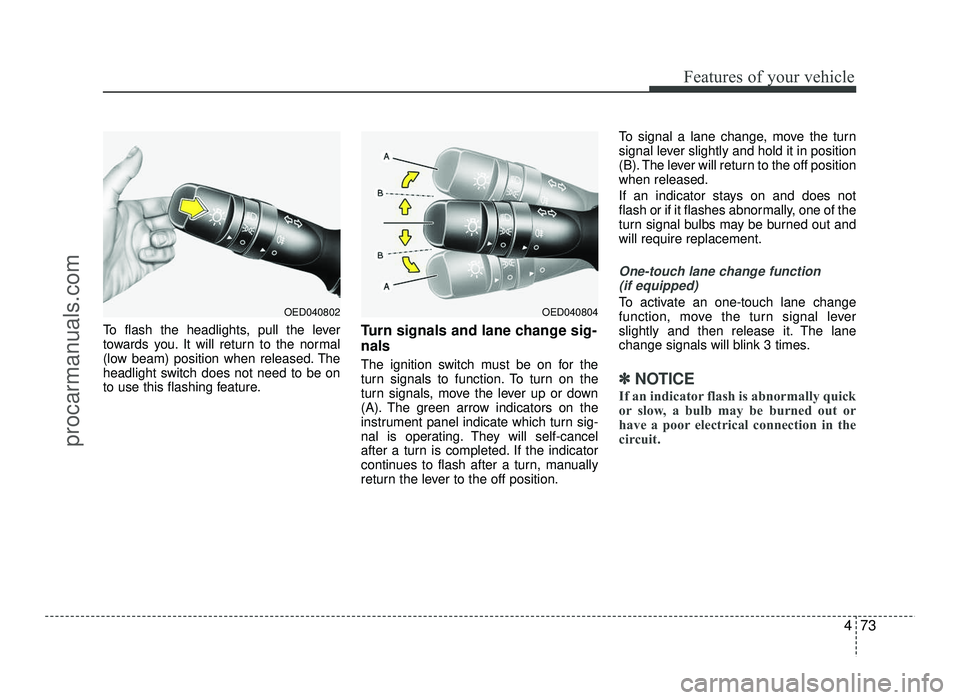
To flash the headlights, pull the lever
towards you. It will return to the normal
(low beam) position when released. The
headlight switch does not need to be on
to use this flashing feature.Turn signals and lane change sig- nals
The ignition switch must be on for the
turn signals to function. To turn on the
turn signals, move the lever up or down
(A). The green arrow indicators on the
instrument panel indicate which turn sig-
nal is operating. They will self-cancel
after a turn is completed. If the indicator
continues to flash after a turn, manually
return the lever to the off position.To signal a lane change, move the turn
signal lever slightly and hold it in position
(B). The lever will return to the off positionwhen released.
If an indicator stays on and does not
flash or if it flashes abnormally, one of the
turn signal bulbs may be burned out andwill require replacement.
One-touch lane change function
(if equipped)
To activate an one-touch lane change
function, move the turn signal lever
slightly and then release it. The lane
change signals will blink 3 times.
✽✽ NOTICE
If an indicator flash is abnormally quick
or slow, a bulb may be burned out or
have a poor electrical connection in the
circuit.
OED040804OED040802
procarmanuals.com
Page 159 of 456
481
Features of your vehicle
✽✽NOTICE
If you want to defrost and defog the
front windshield, refer to “Windshield
defrosting and defogging” in this sec-
tion.
Rear window defroster
The defroster heats the window to
remove frost, fog and thin ice from the
interior and exterior of the rear window,
while engine is running.
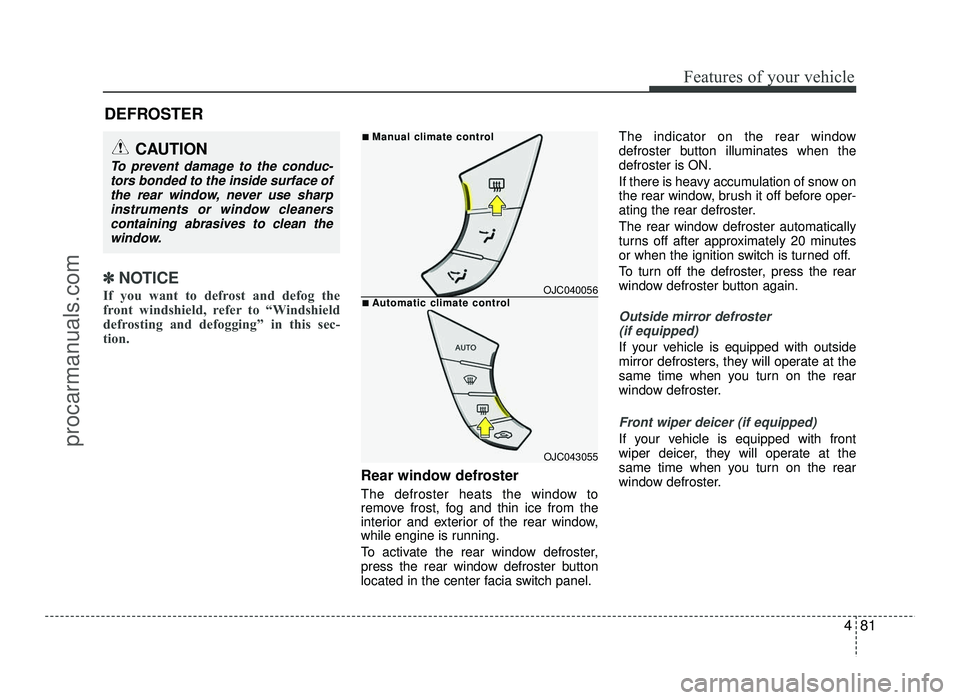
To activate the rear window defroster,
press the rear window defroster button
located in the center facia switch panel. The indicator on the rear window
defroster button illuminates when thedefroster is ON.
If there is heavy accumulation of snow on
the rear window, brush it off before oper-
ating the rear defroster.
The rear window defroster automatically
turns off after approximately 20 minutes
or when the ignition switch is turned off.
To turn off the defroster, press the rear
window defroster button again.
Outside mirror defroster
(if equipped)
If your vehicle is equipped with outside
mirror defrosters, they will operate at the
same time when you turn on the rear
window defroster.
Front wiper deicer (if equipped)
If your vehicle is equipped with front
wiper deicer, they will operate at the
same time when you turn on the rear
window defroster.
DEFROSTER
CAUTION
To prevent damage to the conduc-
tors bonded to the inside surface ofthe rear window, never use sharp
instruments or window cleanerscontaining abrasives to clean thewindow.
OJC040056
OJC043055
■
ManManual cual climate contrlimate controlol
■AAutomatic cutomatic climate contrlimate controlol
procarmanuals.com
Page 162 of 456
Features of your vehicle
84
4
Mode selection
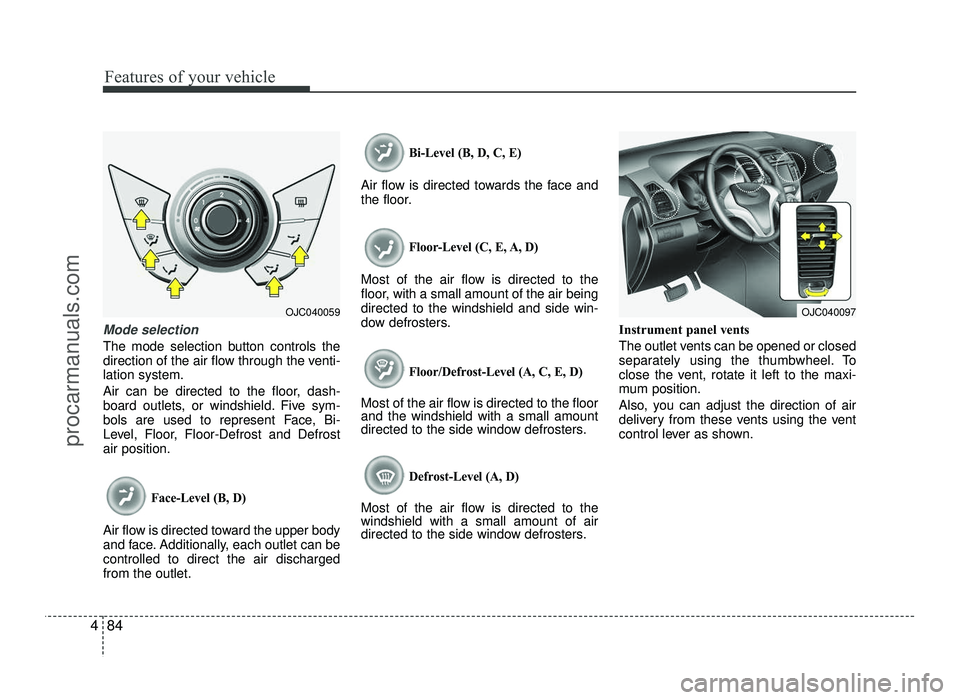
The mode selection button controls the
direction of the air flow through the venti-lation system.
Air can be directed to the floor, dash-
board outlets, or windshield. Five sym-
bols are used to represent Face, Bi-
Level, Floor, Floor-Defrost and Defrostair position.
Face-Level (B, D)
Air flow is directed toward the upper body
and face. Additionally, each outlet can becontrolled to direct the air dischargedfrom the outlet.
Bi-Level (B, D, C, E)
Air flow is directed towards the face and
the floor.
Floor-Level (C, E, A, D)
Most of the air flow is directed to the
floor, with a small amount of the air beingdirected to the windshield and side win-
dow defrosters.
Floor/Defrost-Level (A, C, E, D)
Most of the air flow is directed to the floor and the windshield with a small amount
directed to the side window defrosters.
Defrost-Level (A, D)
Most of the air flow is directed to thewindshield with a small amount of air
directed to the side window defrosters. Instrument panel vents
The outlet vents can be opened or closed
separately using the thumbwheel. To
close the vent, rotate it left to the maxi-
mum position.
Also, you can adjust the direction of air
delivery from these vents using the vent
control lever as shown.
OJC040059OJC040097
procarmanuals.com
Page 170 of 456

Features of your vehicle
92
4
Automatic heating and air condi- tioning
1. Press the AUTO button.
The modes, fan speeds, air intake and air-conditioning will be controlled auto-
matically according to the temperaturesetting. 2. Turn the temperature control knob to
set the desired temperature.
:
✽✽ NOTICE
To turn the automatic operation off, select any button of the following:
- Mode selection button
- Front windshield defrost button (Press the button one more time to
deselect the front windshield
defroster function. The ‘AUTO’ sign
will illuminate on the information
display once again.)
- Fan speed control button
The selected function will be con-
trolled manually while other functions
operate automatically.
For your convenience and to improve the effectiveness of the climate con-
trol, use the AUTO button and set the
temperature to 23°C (73°F). ✽
✽
NOTICE
Never place anything over the sensor
located on the instrument panel to
ensure better control of the heating and
cooling system.
OJC043066OJC040070OJC040067
procarmanuals.com
Page 172 of 456
Features of your vehicle
94
4
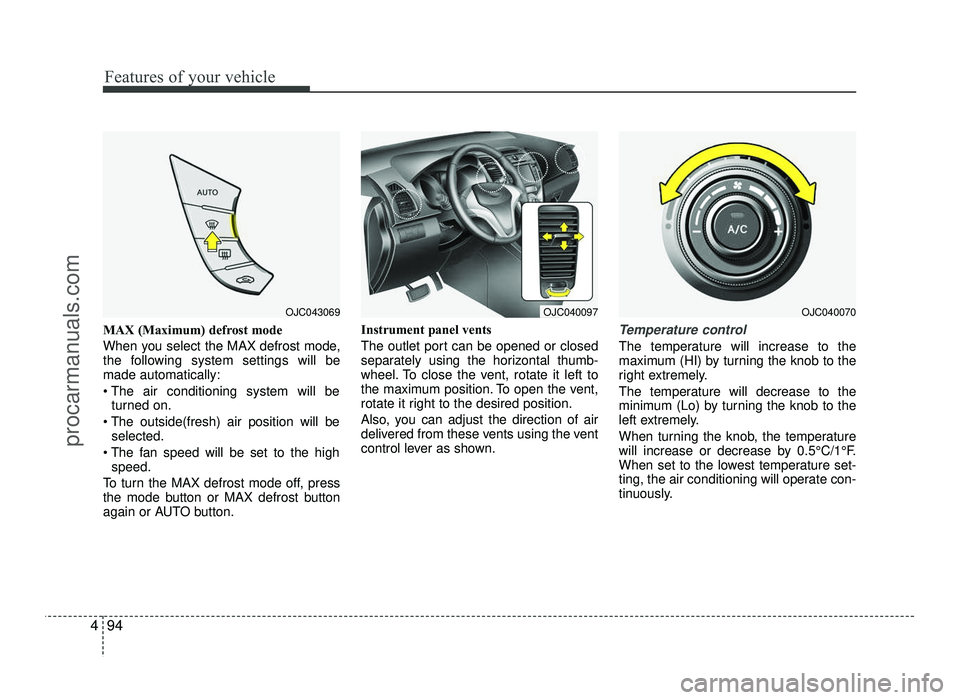
MAX (Maximum) defrost mode
When you select the MAX defrost mode,
the following system settings will bemade automatically:
turned on.
selected.
speed.
To turn the MAX defrost mode off, press
the mode button or MAX defrost button
again or AUTO button. Instrument panel vents
The outlet port can be opened or closed
separately using the horizontal thumb-
wheel. To close the vent, rotate it left to
the maximum position. To open the vent,
rotate it right to the desired position.
Also, you can adjust the direction of air
delivered from these vents using the vent
control lever as shown.Temperature control
The temperature will increase to the
maximum (HI) by turning the knob to the
right extremely.
The temperature will decrease to the
minimum (Lo) by turning the knob to the
left extremely.
When turning the knob, the temperature
will increase or decrease by 0.5°C/1°F.
When set to the lowest temperature set-
ting, the air conditioning will operate con-
tinuously.
OJC040097OJC043069OJC040070
procarmanuals.com
Page 291 of 456
Driving your vehicle
60
5
Following distance
Stay at least twice as far behind the vehi-
cle ahead as you would when driving
your vehicle without a trailer. This can
help you avoid situations that require
heavy braking and sudden turns.
Passing
You’ll need more passing distance up
ahead when you’re towing a trailer. And,
because of the increased vehicle length,
you’ll need to go much farther beyond the
passed vehicle before you can return to
your lane.
Backing up
Hold the bottom of the steering wheel
with one hand. Then, to move the trailer
to the left, just move your hand to the left.
To move the trailer to the right, move your
hand to the right. Always back up slowly
and, if possible, have someone guide
you.
Making turns
When you’re turning with a trailer, make
wider turns than normal. Do this so your
trailer won’t strike soft shoulders, curbs,
road signs, trees, or other objects. Avoid
jerky or sudden maneuvers. Signal well
in advance.
Turn signals when towing a trailer
When you tow a trailer, your vehicle has
to have a different turn signal flasher and
extra wiring. The green arrows on your
instrument panel will flash whenever you
signal a turn or lane change. Properly
connected, the trailer lights will also flash
to alert other drivers you’re about to turn,
change lanes, or stop.
When towing a trailer, the green arrows
on your instrument panel will flash for
turns even if the bulbs on the trailer are
burned out. Thus, you may think drivers
behind you are seeing your signals
when, in fact, they are not. It’s important
to check occasionally to be sure the trail-
er bulbs are still working. You must also
check the lights every time you discon-
nect and then reconnect the wires.
Do not connect a trailer lighting system
directly to your vehicle’s lighting system.
Use only an approved trailer wiring har-
ness.
We recommend that you contact an
authorized HYUNDAI dealer to assist
you in installing the wiring harness.
Driving on grades
Reduce speed and shift to a lower gear
before you start down a long or steep
downgrade. If you don’t shift down, you
might have to use your brakes so much
that they would get hot and no longer
operate efficiently.
On a long uphill grade, shift down and
reduce your speed to around 70 km/h (45mph) to reduce the possibility of engine
and transaxle overheating.
If your trailer weighs more than the max-
imum trailer weight without trailer brakes
and you have an automatic transaxle,
you should drive in D (Drive) when tow-
ing a trailer.
Operating your vehicle in D (Drive) when
towing a trailer will minimize heat build up
and extend the life of your transaxle.
WARNING
Failure to use an approved trailer wiring harness could result in dam-
age to the vehicle electrical system
and/or personal injury.
procarmanuals.com
Page 403 of 456
Maintenance
64
7
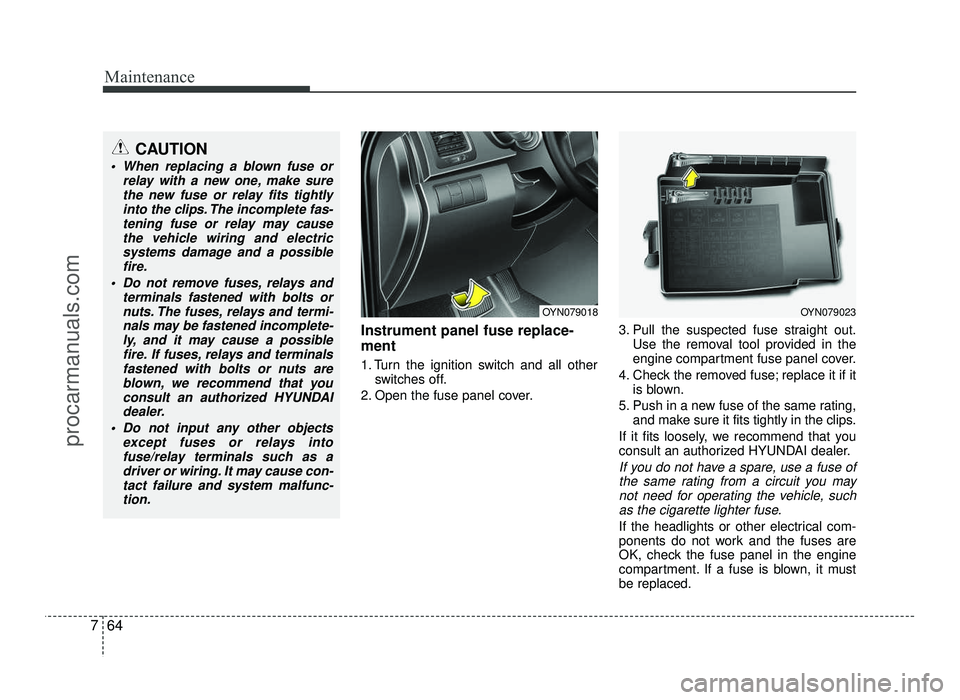
Instrument panel fuse replace- ment
1. Turn the ignition switch and all other
switches off.
2. Open the fuse panel cover. 3. Pull the suspected fuse straight out.
Use the removal tool provided in the
engine compartment fuse panel cover.
4. Check the removed fuse; replace it if it is blown.
5. Push in a new fuse of the same rating, and make sure it fits tightly in the clips.
If it fits loosely, we recommend that you
consult an authorized HYUNDAI dealer.
If you do not have a spare, use a fuse of the same rating from a circuit you may not need for operating the vehicle, suchas the cigarette lighter fuse.
If the headlights or other electrical com-
ponents do not work and the fuses are
OK, check the fuse panel in the engine
compartment. If a fuse is blown, it mustbe replaced.
OYN079023OYN079018
CAUTION
When replacing a blown fuse or
relay with a new one, make surethe new fuse or relay fits tightly
into the clips. The incomplete fas-tening fuse or relay may causethe vehicle wiring and electric
systems damage and a possiblefire.
Do not remove fuses, relays and terminals fastened with bolts ornuts. The fuses, relays and termi-
nals may be fastened incomplete- ly, and it may cause a possible
fire. If fuses, relays and terminals fastened with bolts or nuts are
blown, we recommend that youconsult an authorized HYUNDAI
dealer.
Do not input any other objects except fuses or relays into
fuse/relay terminals such as adriver or wiring. It may cause con-
tact failure and system malfunc-tion.
procarmanuals.com
Page 448 of 456
I3
Index
Capacities (Lubricants) ·····················································8-6
Care
Exterior care ······························································7-84
Interior care ·······························································7-89
Tire care·····································································7-52
Cargo weight ···································································5-65
Center console storage ··················································4-102
Central door lock/unlock switch ·····································4-14
Changing tires ·································································6-10
Chains Tire chains ·································································5-54
Checking tire inflation pressure ······································7-54
Child restraint system ·····················································3-28 Tether anchor system·················································3-33
ISOFIX system ·························································3-34
Child-protector rear door lock ·······································4-16
Cigarette lighter ····························································4-105
Climate control system (Automatic) ·····························4-91 Air conditioning ·······················································4-97
Automatic heating and air conditioning ···················4-92
Climate control air filter ·································4-98, 7-43
Manual heating and air conditioning ·······················4-93
Climate control system (Manual) ··································4-82 Air conditioning ·······················································4-87
Climate control air filter ··········································4-89
Heating and air conditioning ·····································4-83 Clock (Digital) ······························································4-104
Clothes hanger ······························································4-109
Combined instrument, see instrument cluster ················4-40
Cool box········································································4-102
Coolant ···········································································7-35
Cooling fluid, see engine coolant ··································7-35
Crankcase emission control system ·······························7-92
Cruise control system ····················································5-38
Cup holder ···································································4-106
Curtain air bag ·······························································3-53
Dashboard, see instrument cluster ·································4-40
Dashboard illumination, see instrument
panel illumination ·······················································4-41
Daytime running light ·····················································4-74
Defogging (Windshield) ················································4-99
Defroster ·········································································4-81 Outside mirror defroster ············································4-81
Rear window defroster ··············································4-81
Winshield deicer ························································4-81
Defrosting (Windshield) ················································4-99
Digital clock ·································································4-104
Dimensions ······································································8-2
Displays, see instrument cluster ····································4-40
Display illumination, see instrument panel illumination ·······················································4-41
C
D
procarmanuals.com