Page 464 of 582
6-23
What to do in an emergency
6
When towing your vehicle in an emergency without wheel dollies:
1. While depressing the brake pedalshift to the N (Neutral) position
and turn the vehicle off. The
POWER button will be in the ACCposition.
2. Release the parking brake.
Failure to shift to N (Neutral) may
cause internal damage to the vehi-
cle.Removable towing hook
1. Open the tailgate and remove the towing hook from the tool case. The tool case is placed under the
luggage tray.
2. Remove the hole cover pressingthe lower part of the cover on the
bumper.
3. Install the towing hook by turning it clockwise into the hole until it isfully secured.
4. Remove the towing hook and install the cover after use.
NOTICE
OAEE066010
OAEE066011
OAE066028
■Front
■Rear
Page 484 of 582

7-18
Maintenance
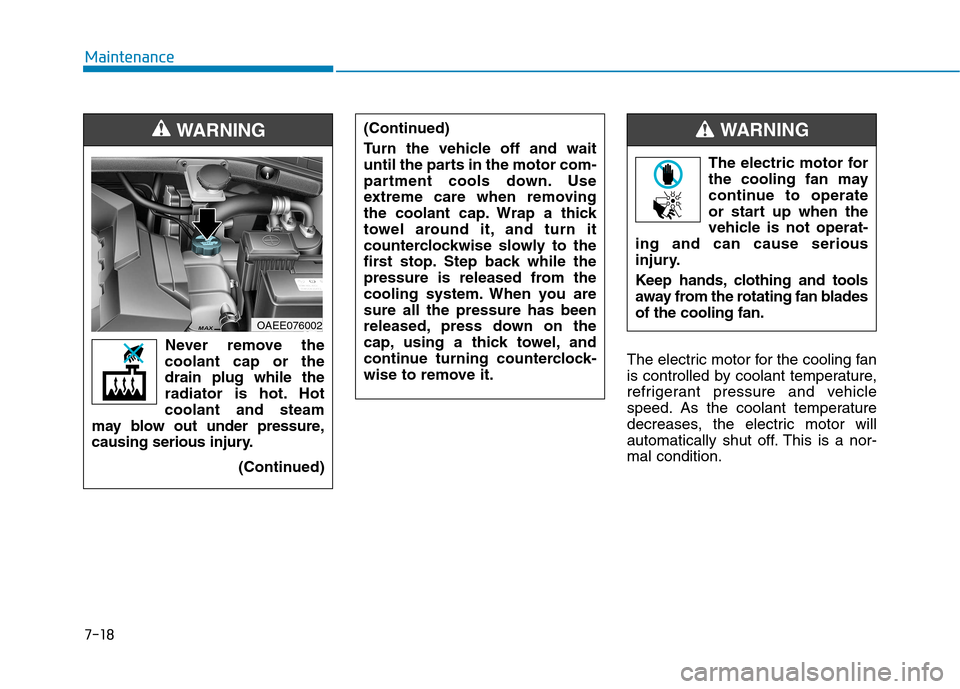
The electric motor for the cooling fan
is controlled by coolant temperature,
refrigerant pressure and vehicle
speed. As the coolant temperature
decreases, the electric motor will
automatically shut off. This is a nor-mal condition.
Never remove the
coolant cap or thedrain plug while the
radiator is hot. Hotcoolant and steam
may blow out under pressure,
causing serious injury.
(Continued)
WARNING
OAEE076002 The electric motor for
the cooling fan may
continue to operate
or start up when the
vehicle is not operat-
ing and can cause serious
injury.
Keep hands, clothing and tools
away from the rotating fan bladesof the cooling fan.
WARNING (Continued)
Turn the vehicle off and wait
until the parts in the motor com-
partment cools down. Use
extreme care when removing
the coolant cap. Wrap a thick
towel around it, and turn it
counterclockwise slowly to the
first stop. Step back while the
pressure is released from the
cooling system. When you aresure all the pressure has been
released, press down on the
cap, using a thick towel, and
continue turning counterclock-
wise to remove it.
Page 496 of 582
7-30
Maintenance
By jump starting
After a jump start from a good bat-
tery, drive the vehicle for 20-30 min-
utes before it is shutoff. The vehicle
may not restart if you shut it off
before the battery had a chance to
adequately recharge. See “Jump
Starting” in chapter 6 for more infor-
mation on jump starting procedures.Information An inappropriately disposedbattery can be harmful to
the environment and human
health.
Dispose the battery according to your
local law(s) or regulation.
Reset features
Some items need to be reset after
the battery has been discharged or
the battery has been disconnected.
See chapter 3 for:
Power Windows
Trip Computer
Climate Control System
Clock
Audio System
Sunroof
Driver Position Memory System
i
Page 510 of 582
7-44
Maintenance
Fuse switch
Always, place the fuse switch to the ON position.
If you move the switch to the OFF position, some items such as the
audio system and digital clock must
be reset and the smart key may not
work properly.Information
If the fuse switch is OFF, “Turn on
FUSE SWITCH” message will appear.
Always place the fuse switch in the ON position while driving the
vehicle.
Do not move the transportation fuse switch repeatedly. The fuse
switch may be damaged.
Motor compartment panel fuse replacement
1. Turn the vehicle off.
2. Turn all other switches OFF.
3. Remove the fuse panel cover by pressing the tap and pulling up.
NOTICE
i
OAEE076033
OAEE076045L
■Blade type fuse
■Cartridge type fuseOAEE076011OLFH044149L
Page 525 of 582

7-59
7
Maintenance
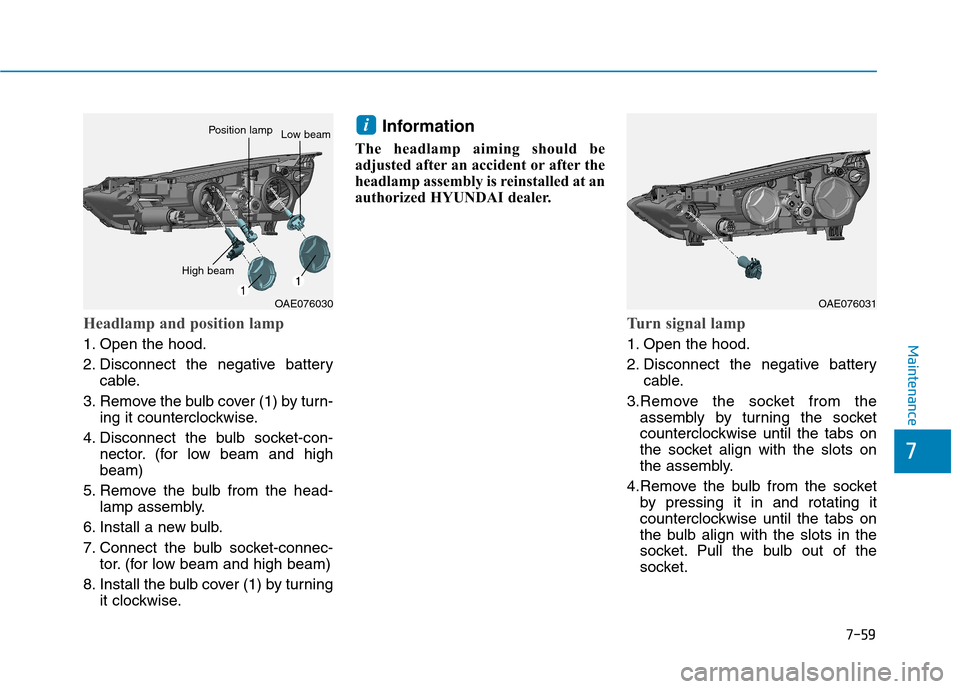
Headlamp and position lamp
1. Open the hood.
2. Disconnect the negative batterycable.
3. Remove the bulb cover (1) by turn- ing it counterclockwise.
4. Disconnect the bulb socket-con- nector. (for low beam and high beam)
5. Remove the bulb from the head- lamp assembly.
6. Install a new bulb.
7. Connect the bulb socket-connec- tor. (for low beam and high beam)
8. Install the bulb cover (1) by turning it clockwise. Information
The headlamp aiming should be
adjusted after an accident or after the
headlamp assembly is reinstalled at an
authorized HYUNDAI dealer.
Turn signal lamp
1. Open the hood.
2. Disconnect the negative battery cable.
3.Remove the socket from the assembly by turning the socket
counterclockwise until the tabs on
the socket align with the slots on
the assembly.
4.Remove the bulb from the socket by pressing it in and rotating it
counterclockwise until the tabs on
the bulb align with the slots in the
socket. Pull the bulb out of the
socket.
i
OAE076030
High beam
Position lampLow beam
OAE076031
Page 526 of 582
7-60
Maintenance
5.Insert a new bulb by inserting it intothe socket and rotating it until it
locks into place.
6.Install the socket in the assembly by aligning the tabs on the socket
with the slots in the assembly.
7.Push the socket into the assembly and turn the socket clockwise.Type B
(1) Headlamp (Low) (2) Headlamp (High)
(3) Position/Turn signal lamp
Headlamp (Low) and Position/Turn sig-
nal lamp
If the light bulb does not operate,
have the vehicle checked by an
authorized HYUNDAI dealer.
OAEE076021•Handle halogen bulbs with
care. Halogen bulbs contain
pressurized gas that will pro-
duce flying pieces of glassthat could cause injuries if
broken.
Wear eye protection when
changing a bulb. Allow the
bulb to cool down before han-dling it.
WARNING
OAE076052
Page 527 of 582

7-61
7
Maintenance
• Always handle them carefully, andavoid scratches and abrasions. If
the bulbs are lit, avoid contact with
liquids.
Never touch the glass with bare hands. Residual oil may cause the
bulb to overheat and burst when lit.
A bulb should be operated only when installed in a headlamp.
If a bulb becomes damaged or cracked, replace it immediatelyand carefully dispose of it.
Information
The headlamp aiming should be
adjusted after an accident or after the
headlamp assembly is reinstalled at an
authorized HYUNDAI dealer. Information
Traffic Change (For Europe)
The low beam light distribution is
asymmetric. If you go abroad to a
country with opposite traffic direc-
tion, this asymmetric part will dazzle
oncoming car driver. To prevent daz-
zle, ECE regulation demand several
technical solutions (ex. automatic
change system, adhesive sheet, down
aiming). This headlamps are designed
not to dazzle opposite drivers. So, you
need not change your headlamps in a
country with opposite traffic direc-
tion.
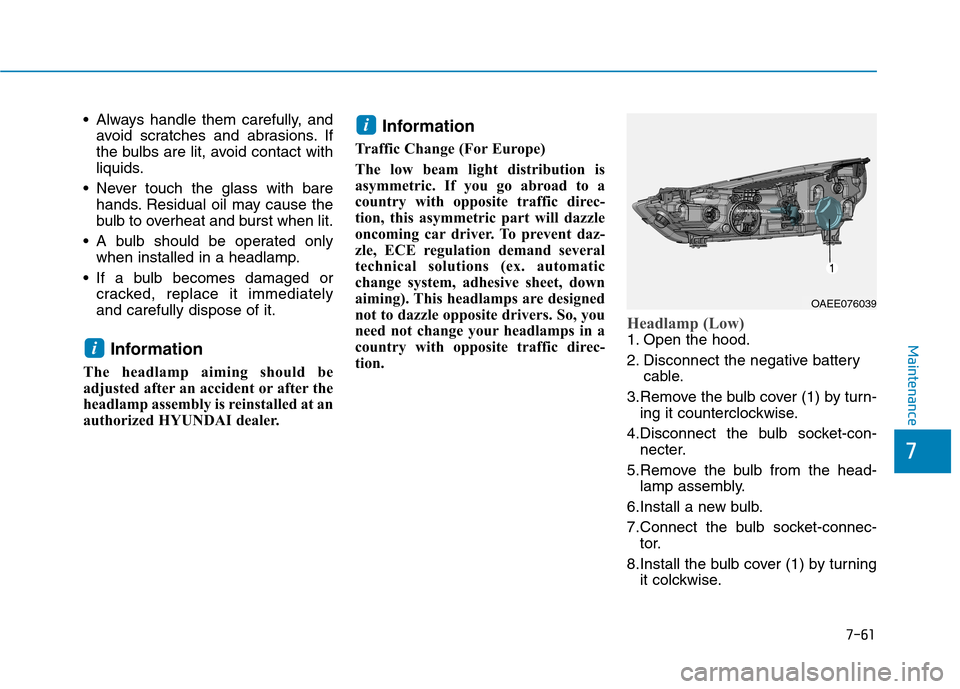
Headlamp (Low)
1. Open the hood.
2. Disconnect the negative battery cable.
3.Remove the bulb cover (1) by turn- ing it counterclockwise.
4.Disconnect the bulb socket-con- necter.
5.Remove the bulb from the head- lamp assembly.
6.Install a new bulb.
7.Connect the bulb socket-connec- tor.
8.Install the bulb cover (1) by turning it colckwise.
i
i
OAEE076039
Page 528 of 582
7-62
Maintenance
Headlamp aiming (For Europe)
Headlamp aiming
1. Inflate the tires to the specifiedpressure and remove any loads
from the vehicle except the driver,
spare tire, and tools.
2. The vehicle should be placed on a flat floor.
3. Draw vertical lines (Vertical lines passing through respective head
lamp centers) and a horizontal line
(Horizontal line passing throughcenter of head lamps) on thescreen. 4. With the headlamp and battery in
normal condition, aim the head-
lamps so the brightest portion falls
on the horizontal and vertical
lines.
5. To aim the low beam left or right, turn the driver clockwise or coun-
terclockwise. To aim the low beam
up or down, turn the driver clock-
wise or counterclockwise.
To aim the high beam up or down,turn the driver clockwise or coun-
terclockwise.
A B
B
A
OAE076056L/OAEE076049L
■ Without headlight leveling device
OAE076057L/OAEE076050L
■With headlight leveling device