2017 HYUNDAI I30 change wheel
[x] Cancel search: change wheelPage 438 of 659

5-134
Driving your vehicle
To temporarily accelerate withthe Smart Cruise Control on
If you want to speed up temporarily
when the Smart Cruise Control is on,
depress the accelerator pedal.
Increased speed will not interfere
with Smart Cruise Control operation
or change the set speed.
To return to the set speed, take your
foot off the accelerator pedal.
If you push the toggle switch down
(SET-) at increased speed, the cruis-
ing speed will be set again pedal.
Information
Be careful when accelerating tem-
porarily, because the speed is not con-
trolled automatically at this time even
if there is a vehicle in front of you.
Smart Cruise Control will betemporarily canceled when:
Cancelled manually
Depressing the brake pedal.
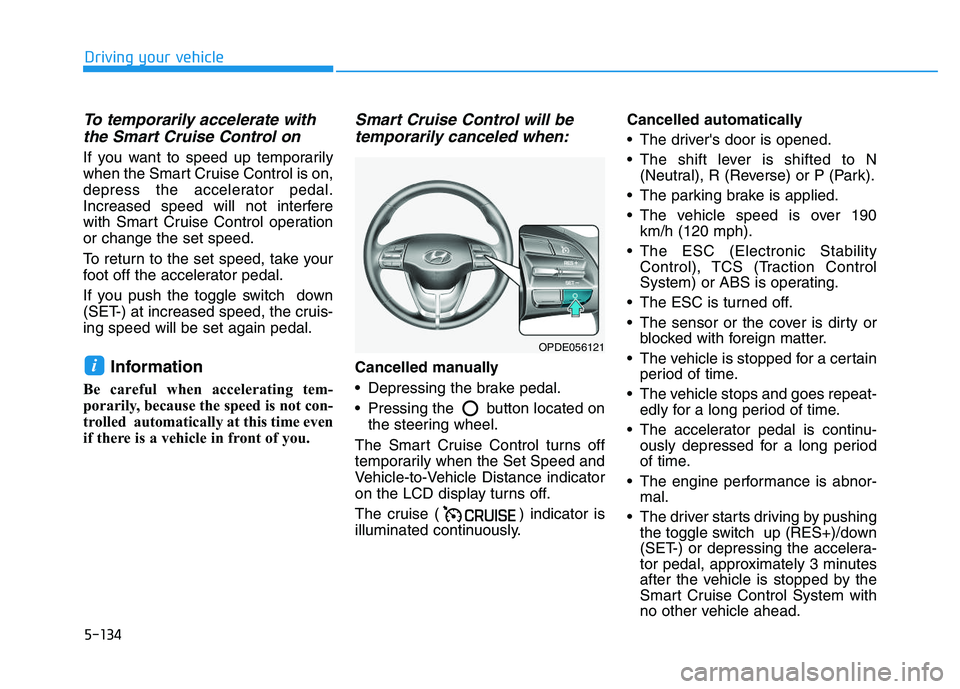
Pressing the button located on
the steering wheel.
The Smart Cruise Control turns off
temporarily when the Set Speed and
Vehicle-to-Vehicle Distance indicator
on the LCD display turns off.
The cruise ( ) indicator is
illuminated continuously. Cancelled automatically
The driver's door is opened.
The shift lever is shifted to N
(Neutral), R (Reverse) or P (Park).
The parking brake is applied.
The vehicle speed is over 190 km/h (120 mph).
The ESC (Electronic Stability Control), TCS (Traction Control
System) or ABS is operating.
The ESC is turned off.
The sensor or the cover is dirty or blocked with foreign matter.
The vehicle is stopped for a certain period of time.
The vehicle stops and goes repeat- edly for a long period of time.
The accelerator pedal is continu- ously depressed for a long period
of time.
The engine performance is abnor- mal.
The driver starts driving by pushing the toggle switch up (RES+)/down
(SET-) or depressing the accelera-
tor pedal, approximately 3 minutes
after the vehicle is stopped by the
Smart Cruise Control System with
no other vehicle ahead.i
OPDE056121
Page 451 of 659

5-147
Driving your vehicle
5
Hazardous driving conditions
When hazardous driving elements
are encountered such as water,
snow, ice, mud and sand, take the
bellow suggestions:
Drive cautiously and keep a longerbraking distance.
Avoid abrupt braking or steering.
When your vehicle is stuck in snow, mud, or sand, use the second
gear. Accelerate slowly to avoid
unnecessary wheel spinning.
Put sand, rock salt, tire chains or other non-slip materials under the
wheels to provide additional trac-
tion while being stuck in ice, snow,
or mud.
Rocking the vehicle
If it is necessary to rock the vehicle
to free it from snow, sand, or mud,
first turn the steering wheel right and
left to clear the area around your
front wheels. Then, shift back and
forth between R (Reverse) and a for-
ward gear.
Try to avoid spinning the wheels, and
do not race the engine.
To prevent transmission wear, wait
until the wheels stop spinning before
shifting gears. Release the accelera-
tor pedal while shifting, and press
lightly on the accelerator pedal while
the transmission is in gear. Slowly
spinning the wheels in forward and
reverse directions causes a rocking
motion that may free the vehicle.
S
S P
P E
E C
C I
I A
A L
L
D
D R
R I
I V
V I
I N
N G
G
C
C O
O N
N D
D I
I T
T I
I O
O N
N S
S
Downshifting with an automatic
transmission while driving on
slippery surfaces can cause an
accident. The sudden change in
tire speed could cause the tires
to skid. Be careful when down-
shifting on slippery surfaces.
WARNING
If the vehicle is stuck and
excessive wheel spin occurs,
the temperature in the tires can
increase very quickly. If the tires
become damaged, a tire blow
out or tire explosion can occur.
This condition is dangerous -
you and others may be injured.
Do not attempt this procedure if
people or objects are anywhere
near the vehicle.
If you attempt to free the vehi-
cle, the vehicle can overheat
quickly, possibly causing an
engine compartment fire or
other damage. Try to avoid spin-
ning the wheels as much as
possible to prevent overheating
of either the tires or the engine.
DO NOT allow the vehicle to
spin the wheels above 56 km/h
(35 mph).
WARNING
Page 466 of 659

5-162
Driving your vehicle
Backing up
Hold the bottom of the steering
wheel with one hand. Then, to move
the trailer to the left, move your hand
to the left. To move the trailer to the
right, move your hand to the right.
Always back up slowly and, if possi-
ble, have someone guide you.
Making turns
When you’re turning with a trailer,
make wider turns than normal. Do this
so your trailer won’t strike soft shoul-
ders, curbs, road signs, trees, or other
objects. Avoid jerky or sudden
maneuvers. Signal well in advance.
Turn signals
When you tow a trailer, your vehicle
has to have a different turn signal
flasher and extra wiring. The green
arrows on your instrument panel will
flash whenever you signal a turn or
lane change. Properly connected,
the trailer lights will also flash to alert
other drivers you’re about to turn,
change lanes, or stop.
When towing a trailer, the green
arrows on your instrument panel will
flash for turns even if the bulbs on
the trailer are burned out. Thus, you
may think drivers behind you are
seeing your signals when, in fact,
they are not. It’s important to check
occasionally to be sure the trailer
bulbs are still working. You must also
check the lights every time you dis-
connect and then reconnect the
wires.Do not connect a trailer lighting
system directly to your vehi-
cle’s lighting system. Use an
approved trailer wiring harness.
Failure to do so could result in
damage to the vehicle electrical
system and/or personal injury.
Consult an authorized HYUNDAI
dealer for assistance.WARNING
Page 487 of 659

6-17
What to do in an emergency
6
Follow these steps to change your
vehicle’s tire:
1. Park on a level, firm surface.
2. Move the shift lever into P (Park,for automatic transmission/dual
clutch transmission vehicle) or neu-
tral (for manual transmission vehi-
cle), apply the parking brake, and
place the ignition switch in the
LOCK/OFF position.
3. Press the hazard warning flasher button.
4. Remove the wheel lug nut wrench, jack, jack handle, and spare tire
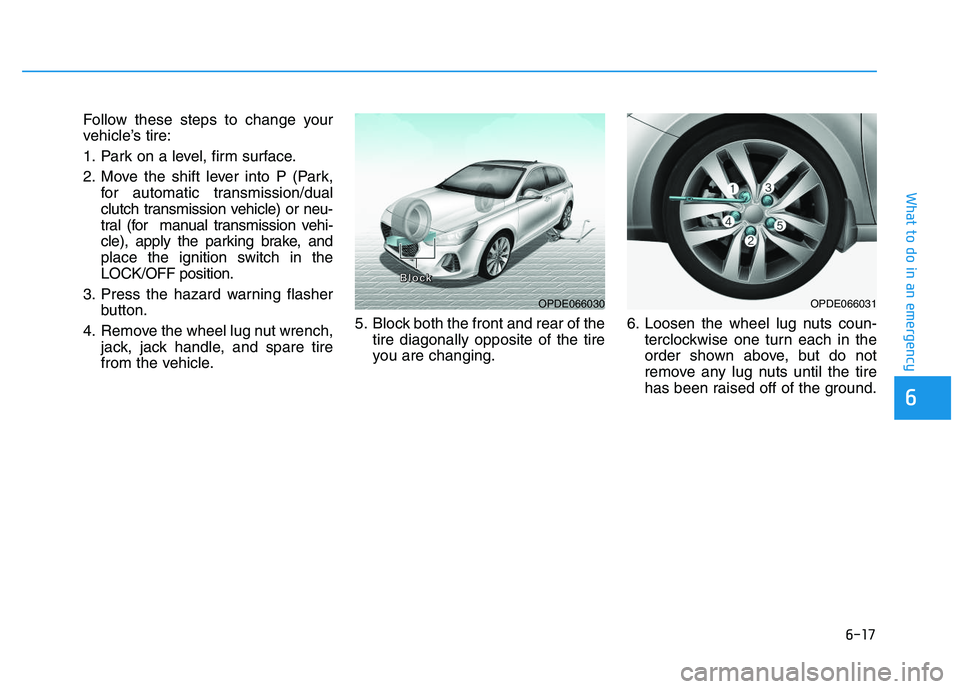
from the vehicle. 5. Block both the front and rear of the
tire diagonally opposite of the tire
you are changing. 6. Loosen the wheel lug nuts coun-
terclockwise one turn each in the
order shown above, but do not
remove any lug nuts until the tire
has been raised off of the ground.
OPDE066030
B
B
B
B
l
l
l
l
o
o
o
o
c
c
c
c
k
k
k
k
OPDE066031
Page 489 of 659

6-19
What to do in an emergency
6
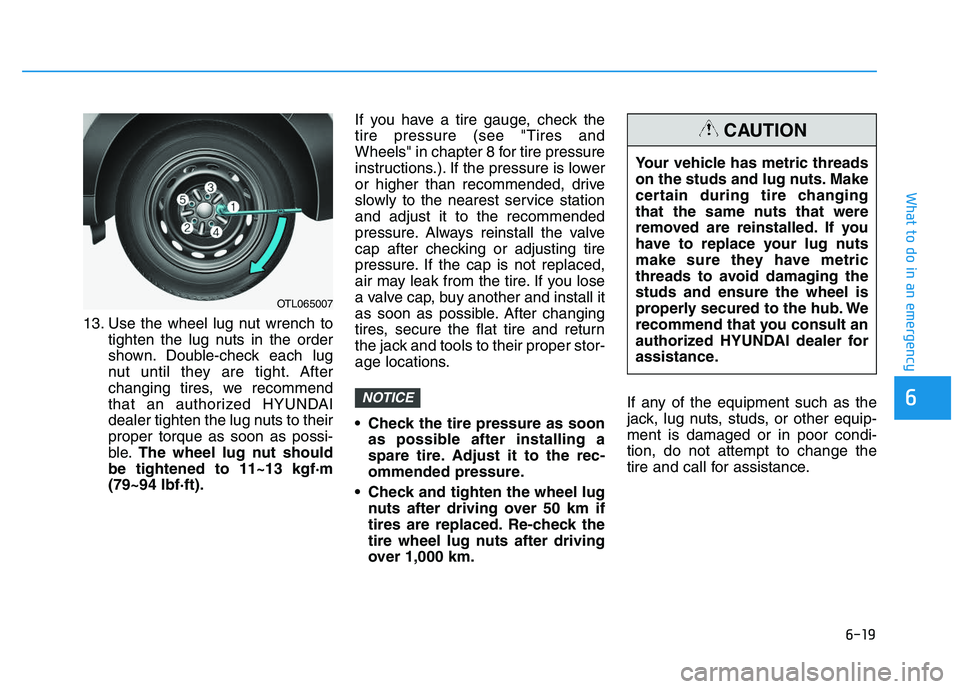
13. Use the wheel lug nut wrench totighten the lug nuts in the order
shown. Double-check each lug
nut until they are tight. After
changing tires, we recommend
that an authorized HYUNDAI
dealer tighten the lug nuts to their
proper torque as soon as possi-
ble. The wheel lug nut should
be tightened to 11~13 kgf·m
(79~94 lbf·ft). If you have a tire gauge, check the
tire pressure (see "Tires and
Wheels" in chapter 8 for tire pressure
instructions.). If the pressure is lower
or higher than recommended, drive
slowly to the nearest service station
and adjust it to the recommended
pressure. Always reinstall the valve
cap after checking or adjusting tire
pressure. If the cap is not replaced,
air may leak from the tire. If you lose
a valve cap, buy another and install it
as soon as possible. After changing
tires, secure the flat tire and return
the jack and tools to their proper stor-
age locations.
Check the tire pressure as soon
as possible after installing a
spare tire. Adjust it to the rec-
ommended pressure.
Check and tighten the wheel lug nuts after driving over 50 km if
tires are replaced. Re-check the
tire wheel lug nuts after driving
over 1,000 km. If any of the equipment such as the
jack, lug nuts, studs, or other equip-
ment is damaged or in poor condi-
tion, do not attempt to change the
tire and call for assistance.
NOTICE
OTL065007
Your vehicle has metric threads
on the studs and lug nuts. Make
certain during tire changing
that the same nuts that were
removed are reinstalled. If you
have to replace your lug nuts
make sure they have metric
threads to avoid damaging the
studs and ensure the wheel is
properly secured to the hub. We
recommend that you consult an
authorized HYUNDAI dealer for
assistance.
CAUTION
Page 521 of 659

7-8
Maintenance
Owner maintenance schedule
When you stop for fuel:
Check the engine oil level.
Check coolant level in the enginecoolant reservoir.
Check the windshield washer fluid level.
Check for low or under-inflated tires.
While operating your vehicle:
Note any changes in the sound of the exhaust or any smell of exhaust
fumes in the vehicle.
Check for vibrations in the steering wheel. Notice if there is any
increased steering effort or loose-
ness in the steering wheel, or
change in its straight-ahead position.
Notice if your vehicle constantly turns slightly or “pulls” to one side when
traveling on smooth, level road.
When stopping, listen and check for unusual sounds, pulling to one side,
increased brake pedal travel or
“hard-to-push” brake pedal.
If any slipping or changes in the operation of your transaxle occurs,
check the transaxle fluid level.
Check the automatic transmission/ dual clutch transmission P (Park)
function.
Check the parking brake.
Check for fluid leaks under your vehicle (water dripping from the air
conditioning system during or after
use is normal).
Be careful when checking your
engine coolant level when the
engine is hot. This may result in
coolant being blown out of the
opening and cause serious
burns and other injuries.
WARNING
Diesel Engine
Never manipulate or modify the
injection system while running
the diesel engine or within 30
seconds after turning OFF the
diesel engine. The high-pressure
pump, high-pressure pipes, rail,
and injectors are still subject to
the high pressure right after
stopping the diesel engine.
When the fuel leakage vents out,
it may cause serious body injury.
Any people, who are implement-
ed with the artificial cardiac
pacemaker, should remain away
from the ECU or the wiring har-
ness by at least 30 cm, while run-
ning the diesel engine. The high
currents of the electric engine
control system produce a con-
siderable amount of magnetic
fields.
WARNING