Page 89 of 659

3-87
Convenient features of your vehicle
3
(Continued)
When there is a similar
shaped lamp with the front
vehicle’s lamps.
When it is hard to see
because of fog, heavy rain or
snow.
When the headlamp is not
repaired or replaced at an
authorized dealer.
When headlamp aiming is not
properly adjusted.
When driving on a narrow
winding road or rough road.
When driving downhill or
uphill.
When only part of the vehicle
in front is visible on a cross-
road or on a corner.
When there is a traffic light,
reflecting sign, flashing sign
or mirror.
When the road conditions are
bad such as being wet or cov-
ered with snow.(Continued)
(Continued)
When the front vehicle’s head-
lamps are off but the fog
lamps on.
When a vehicle suddenly
appears from a around a cor-
ner.
When the vehicle is tilted from
a flat tyre or being towed.
When the LDWS (Lane Departure
Warning System) or LKAS (Lane
Keeping Assist System) warning
light illuminates. (if equipped)
Do not place any accessories,
stickers or tint the windshield.
Have the windshield glass
replaced by an authorised
dealer.
Do not remove or impact relat-
ed parts of the Smart High
Beam system.
Be careful that water doesn’t
get into the Smart High Beam
unit.
Do not place objects on the
instrument panel that reflect
light such as mirrors, white
paper, etc. The system may
malfunction if sunlight is
reflected.
At times, the Smart High
Beam system may not work
properly, always check the
road conditions for your safe-
ty. When the system does not
operate normally, manually
change between the high
beam and low beam.
WARNING
Page 101 of 659

3-99
Convenient features of your vehicle
3
Windshield washers
In the O position, pull the lever gently
toward you to spray washer fluid on
the windshield and to run the wipers
1-3 cycles. The spray and wiper oper-
ation will continue until you release
the lever.
If the washer does not work, you may
need to add washer fluid to the wash-
er fluid reservoir.When the outside temperature is
below freezing, ALWAYS warm the
windshield using the defroster to
prevent the washer fluid from
freezing on the windshield and
obscuring your vision which
could result in an accident and
serious injury or death.
WARNING
To prevent possible damage
to the washer pump, do not
operate the washer when the
fluid reservoir is empty.
To prevent possible damage
to the wipers or windshield,
do not operate the wipers
when the windshield is dry.
To prevent damage to the
wiper arms and other compo-
nents, do not attempt to move
the wipers manually.
To prevent possible damage
to the wipers and washer sys-
tem, use anti-freezing washer
fluids in the winter season or
cold weather.
CAUTION
OPDE046062
Page 115 of 659

3-113
Convenient features of your vehicle
3
Defrost-Level (A, D)
Most of the air flow is directed to the
windshield.
Face-Level (B, D, F)
Air flow is directed toward the upper
body and face. Additionally, each
outlet can be controlled to direct the
air discharged from the outlet.
Floor-Level (A, C, D, E, F)
Most of the air flow is directed to the
floor.
Also you may select 2~3 modes at
the same time.
- face ( ) + floor ( ) mode
- face ( ) + defrost ( ) mode
- floor ( ) + defrost ( ) mode
- face ( ) + floor ( ) + defrost ( ) mode
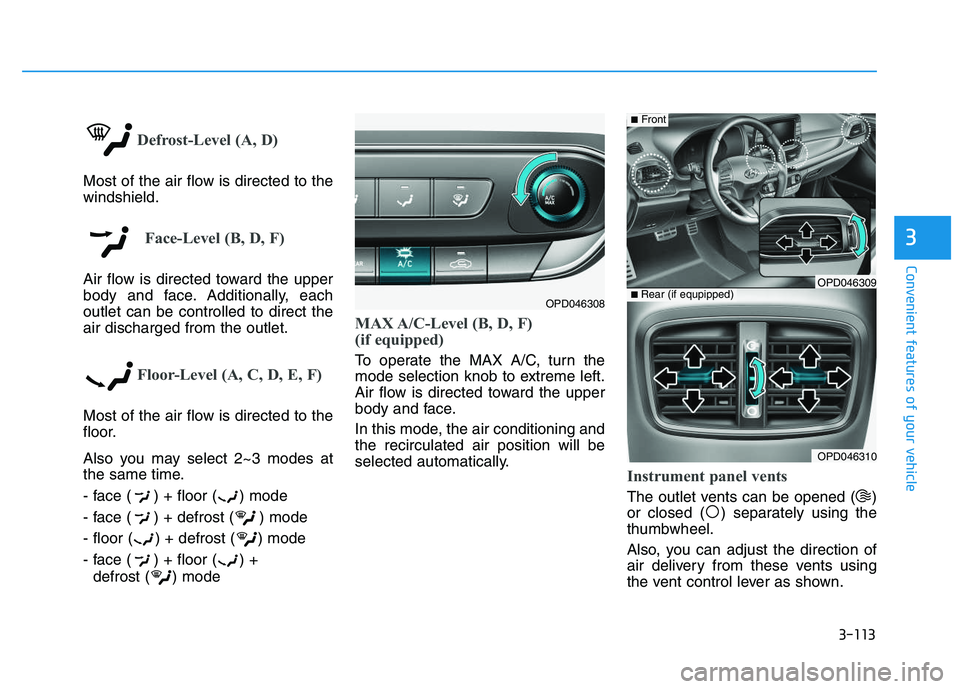
MAX A/C-Level (B, D, F)
(if equipped)
To operate the MAX A/C, turn the
mode selection knob to extreme left.
Air flow is directed toward the upper
body and face.
In this mode, the air conditioning and
the recirculated air position will be
selected automatically.
Instrument panel vents
The outlet vents can be opened ( )
or closed ( ) separately using the
thumbwheel.
Also, you can adjust the direction of
air delivery from these vents using
the vent control lever as shown.
OPD046308
OPD046310
■ Rear (if equpipped)
■Front
OPD046309
Page 126 of 659
3-124
Convenient features of your vehicle
Mode selection
Defrost-Level (A, D)
Most of the air flow is directed to the
windshield.
Face-Level (B, D, F)
Air flow is directed toward the upper
body and face. Additionally, each
outlet can be controlled to direct the
air discharged from the outlet.
Floor-Level (A, C, D, E, F)
Most of the air flow is directed to the
floor.
Also you may select 2~3 modes at
the same time.
- face ( ) + floor ( ) mode
- face ( ) + defrost ( ) mode
- floor ( ) + defrost ( ) mode
- face ( ) + floor ( ) + defrost( ) mode
(if equipped)
(if equipped)
OPDE046307/OPDE046317
The mode selection button controls the direction of the air flow through the
ventilation system.
Page 138 of 659

3-136
Convenient features of your vehicle
Auto defogging system
(only for automatic climate
control system, if equipped)
Auto defogging reduces the possibil-
ity of fogging up the inside of the
windshield by automatically sensing
the moisture of inside the windshield.
The auto defogging system operates
when the heater or air conditioning is
on.
Information
The auto defogging system may not
operate normally, when the outside
temperature is below -10 °C.When the Auto Defogging
System operates, the indi-
cator will illuminate.
If higher level of moisture are sensed
in the vehicle, the Auto Defogging
System will operate in the following
order:
Step 1 : Outside air position
Step 2 : Operating the air conditioning
Step 3 : Blowing air toward the wind- shield
Step 4 : Increasing air flow toward the windshield
If the air conditioning is off or recircu-
lated air position is manually selected
while Auto Defogging System is ON,
the Auto Defogging System Indicator
will blink 3 times to signal that the
manual operation has been canceled.
To cancel or reset the Auto Defogging
System
Press the front windshield defroster
button for 3 seconds when the igni-
tion switch is in the ON position.
When the Auto Defogging System is
canceled, ADS OFF symbol will blink
3 times and the ADS OFF will be dis-
played on the climate control infor-
mation screen.
When the Auto Defogging System is
reset, ADS OFF symbol will blink 6
times without a signal.
Information
• When the air conditioning is turned on by Auto defogging system, if you
try to turn off the air conditioning, the
indicator will blink 3 times and the air
conditioning will not turn off.
• For efficiency, do not select recircu- lated air position while Auto defog-
ging system is operating.
Do not remove the sensor cover
located on the upper end of the
windshield glass.
Damage to system parts could
occur and may not be covered by
your vehicle warranty.
NOTICE
i
i
Page 151 of 659

3-149
Convenient features of your vehicle
Mounting bracket for roof car-
rier (if equipped)
To install or remove a roof carrier,
you can use the mounting bracket
and cover on the roof.
When you install a roof carrier, use
the following procedure.
1. Insert a slim tool(coin or flat bladedriver) into the slot and slide the
cover toward the arrow on the
cover. 2. Rotate the cover half way and
insert the cover on the roof hole as
the illustration.
3. After using the roof carrier, install the cover back on the roof in the
reverse order.
Information
If the vehicle is equipped with a sun-
roof, be sure not to position cargo onto
the roof in such a way that it could
interfere with sunroof operation.
When carrying cargo on theroof, take the necessary precau-
tions to make sure the cargo
does not damage the roof of the
vehicle.
When carrying large objects on the roof, make sure they do not
exceed the overall roof length or
width.
NOTICE
i
E
E X
X T
T E
E R
R I
I O
O R
R
F
F E
E A
A T
T U
U R
R E
E S
S
3
OPDE046425
OPDE046426
Page 158 of 659

3-8
Convenient features of your vehicle
Start-up
You can start the engine without
inserting the key.For detailed infor-
mation refer to the Engine
Start/Stop button in chapter 5.
To prevent damaging the smart
key:
Keep the smart key away from water or any liquid and fire. If the
inside of the smart key gets
damp (due to drinks or moisture),
or is heated, internal circuit may
malfunction, excluding the car
from the warranty.
Avoid dropping or throwing the smart key.
Protect the smart key from extreme temperatures.
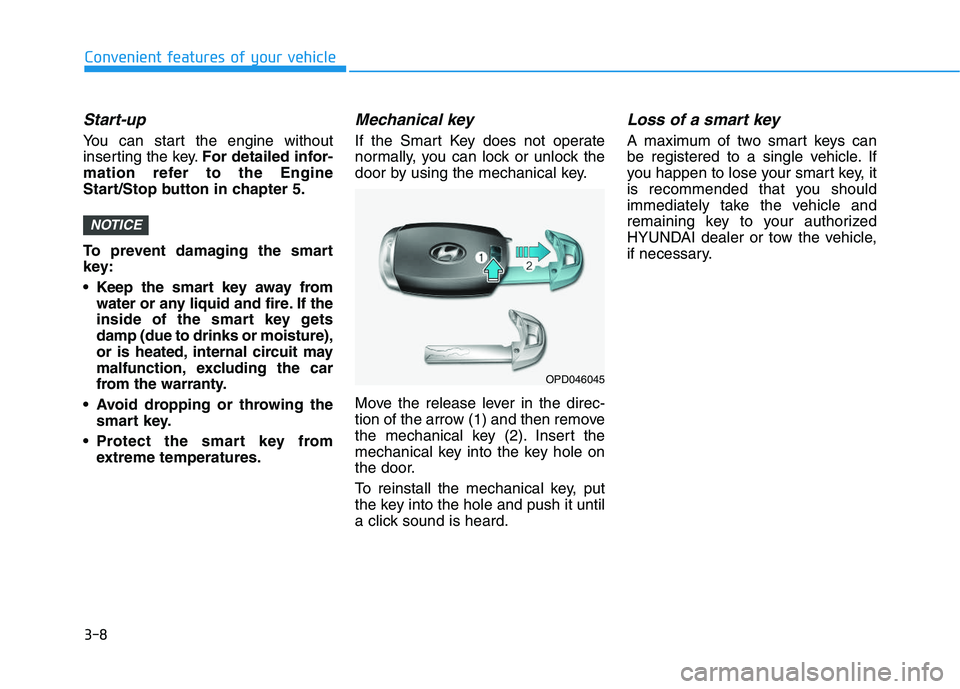
Mechanical key
If the Smart Key does not operate
normally, you can lock or unlock the
door by using the mechanical key.
Move the release lever in the direc-
tion of the arrow (1) and then remove
the mechanical key (2). Insert the
mechanical key into the key hole on
the door.
To reinstall the mechanical key, put
the key into the hole and push it until
a click sound is heard.
Loss of a smart key
A maximum of two smart keys can
be registered to a single vehicle. If
you happen to lose your smart key, it
is recommended that you should
immediately take the vehicle and
remaining key to your authorized
HYUNDAI dealer or tow the vehicle,
if necessary.
NOTICE
OPD046045
Page 161 of 659

3-11
Convenient features of your vehicle
3
Operating door locks from
outside the vehicle
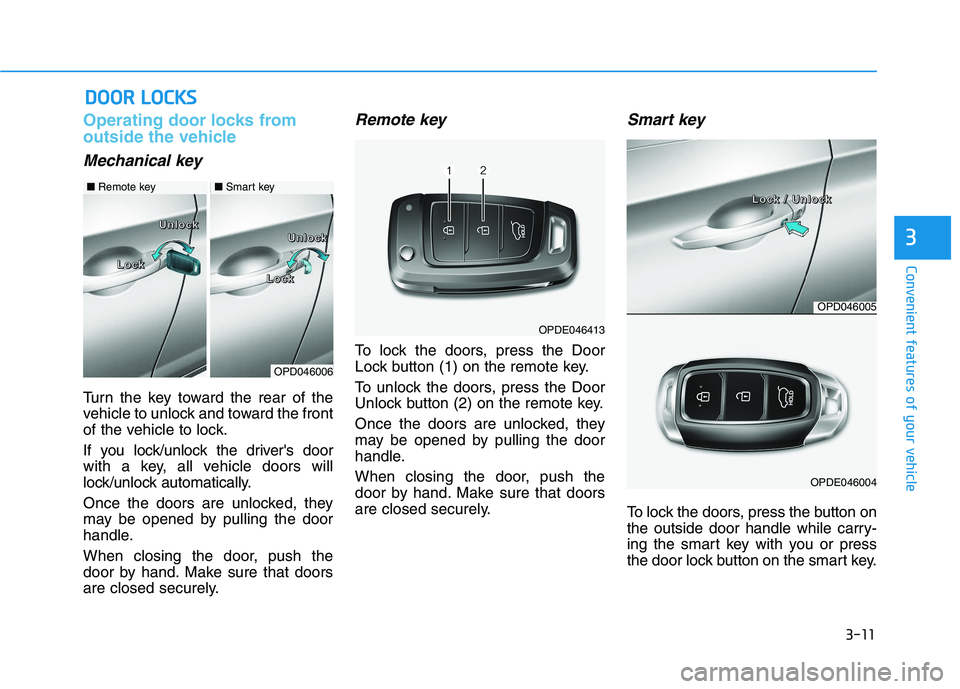
Mechanical key
Turn the key toward the rear of the
vehicle to unlock and toward the front
of the vehicle to lock.
If you lock/unlock the driver's door
with a key, all vehicle doors will
lock/unlock automatically.
Once the doors are unlocked, they
may be opened by pulling the door
handle.
When closing the door, push the
door by hand. Make sure that doors
are closed securely.
Remote key
To lock the doors, press the Door
Lock button (1) on the remote key.
To unlock the doors, press the Door
Unlock button (2) on the remote key.
Once the doors are unlocked, they
may be opened by pulling the door
handle.
When closing the door, push the
door by hand. Make sure that doors
are closed securely.
Smart key
To lock the doors, press the button on
the outside door handle while carry-
ing the smart key with you or press
the door lock button on the smart key.
D
D O
O O
O R
R
L
L O
O C
C K
K S
S
OPDE046413
OPD046006
L
L
L
L
o
o
o
o
c
c
c
c
k
k
k
k
L
L
L
L
o
o
o
o
c
c
c
c
k
k
k
k
U
U
U
U
n
n
n
n
l
l
l
l
o
o
o
o
c
c
c
c
k
k
k
k
U
U
U
U
n
n
n
n
l
l
l
l
o
o
o
o
c
c
c
c
k
k
k
k
■ Remote key■Smart key
OPD046005
OPDE046004
L
L
L
L
o
o
o
o
c
c
c
c
k
k
k
k
/
/
/
/
U
U
U
U
n
n
n
n
l
l
l
l
o
o
o
o
c
c
c
c
k
k
k
k