2017 HYUNDAI ELANTRA SE ECU
[x] Cancel search: ECUPage 304 of 586

4-52
Multimedia System
Voice Command List
Common Commands
These commands can be used in most operations.
(However a few commands may not be available during certain operations)
CommandFunction
More HelpProvides guidance on commands that can be used
anywhere in the system.
HelpProvides guidance on commands that can be used
within the current mode.
Call
Ex) Call “John Smith”
Call
on MobileCalls
“Mobile” in Contacts.
Ex) Call “John Smith” on Mobile
Call
in OfficeCalls
“Office” in Contacts.
Ex) Call “John Smith” in Office
Call
at HomeCalls
“Home” in Contacts
Ex) Call “John Smith” at Home
Call
on OtherCalls
“Other” in Contacts
Ex) Call “John Smith” on Other
PhoneProvides guidance on Phone related commands.
After saying this command, say “Favorites”,“Call
History”, “Contacts” or ”Dial Number” execute cor-
responding functions.
FavoritesDisplays the Favorite screen.
CommandFunction
Call HistoryDisplays the Call History screen.
ContactsDisplays the Contacts screen. After saying this
command, say the name of a contact saved in the
Contacts to automatically connect the call.
Dial NumberDisplays the Dial number screen. After saying this
command, you can say the number that you want
to call.
RedialConnects the last dialed call number.
TutorialProvides guidance on how to use voice recognition
and Bluetooth®connections
Radio
When listening to the radio, displays the nextradio screen. (FM1➟FM2➟AM➟ XM1➟ XM2➟
XM3)
When listening to a different mode, displays the most recently played radio screen.
When currently listening to the FM radio, main- tains the current state.
When listening to a different mode, displays the most recently played FM screen.
FM1(FM One)Displays the FM1 screen.
FM2(FM Two)Displays the FM2 screen.
AMDisplays the AM screen.
Page 324 of 586
5-4
Driving your vehicle
Before Entering the Vehicle
• Be sure all windows, outside mir-ror(s), and outside lights are clean
and unobstructed.
Remove frost, snow, or ice.
Visually check the tires for uneven wear and damage.
Check under the vehicle for any sign of leaks.
Be sure there are no obstacles behind you if you intend to back up.
Before Starting
Make sure the hood, the trunk, andthe doors are securely closed and
locked.
Adjust the position of the seat and steering wheel.
Adjust the inside and outside rearview mirrors.
Verify all the lights work.
Fasten your seatbelt. Check that all passengers have fastened their
seatbelts.
Check the gauges and indicators in the instrument panel and the mes-
sages on the instrument display
when the ignition switch is in the
ON position.
Check that any items you are car- rying are stored properly or fas-
tened down securely.
CALIFORNIA PROPOSITION 65
WARNING
Engine exhaust and a wide vari-
ety of automobile components
including components found in
the interior furnishings in a
vehicle, contain or emit harmful
chemicals known to the State of
California to cause cancer and
birth defects and reproductive
harm. In addition, certain fluids
contained in vehicles and cer-
tain products of components
contain or emit chemicals
known to the State of California
to cause cancer and birth
defects or other reproductive
harm.WARNING
B B
E
EF
FO
O R
RE
E
D
D R
RI
IV
V I
IN
N G
G
Page 343 of 586
5-23
Driving your vehicle
5
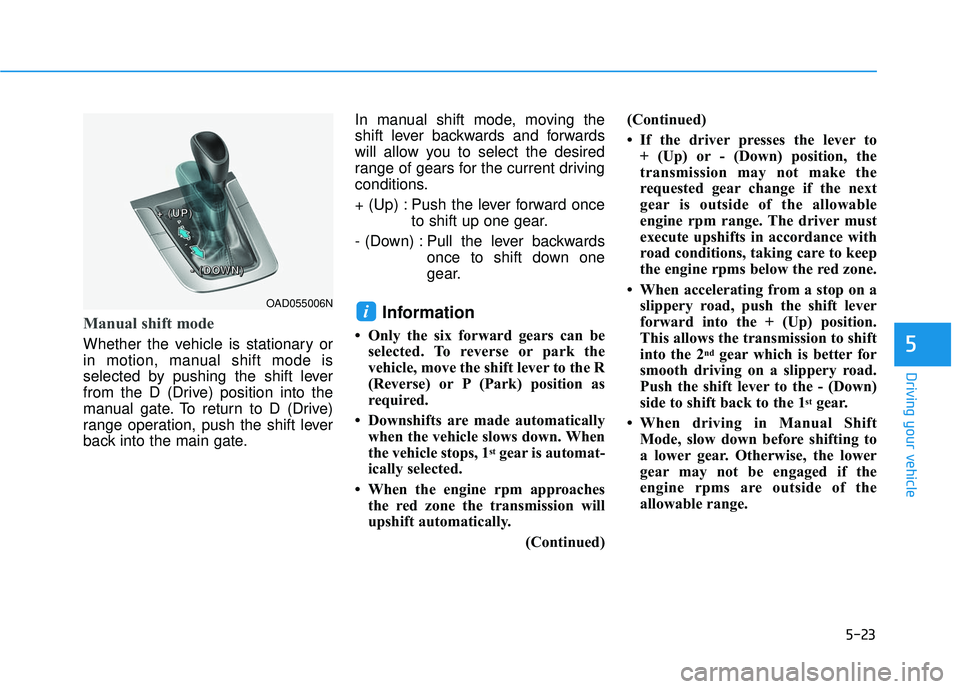
Manual shift mode
Whether the vehicle is stationary or
in motion, manual shift mode is
selected by pushing the shift lever
from the D (Drive) position into the
manual gate. To return to D (Drive)
range operation, push the shift lever
back into the main gate.In manual shift mode, moving the
shift lever backwards and forwards
will allow you to select the desired
range of gears for the current driving
conditions.
+ (Up) : Push the lever forward once
to shift up one gear.
- (Down) : Pull the lever backwards once to shift down one
gear.
Information
• Only the six forward gears can beselected. To reverse or park the
vehicle, move the shift lever to the R
(Reverse) or P (Park) position as
required.
• Downshifts are made automatically when the vehicle slows down. When
the vehicle stops, 1
stgear is automat-
ically selected.
• When the engine rpm approaches the red zone the transmission will
upshift automatically.
(Continued)(Continued)
• If the driver presses the lever to
+ (Up) or - (Down) position, the
transmission may not make the
requested gear change if the next
gear is outside of the allowable
engine rpm range. The driver must
execute upshifts in accordance with
road conditions, taking care to keep
the engine rpms below the red zone.
• When accelerating from a stop on a slippery road, push the shift lever
forward into the + (Up) position.
This allows the transmission to shift
into the 2
ndgear which is better for
smooth driving on a slippery road.
Push the shift lever to the - (Down)
side to shift back to the 1
stgear.
• When driving in Manual Shift Mode, slow down before shifting to
a lower gear. Otherwise, the lower
gear may not be engaged if the
engine rpms are outside of the
allowable range.
iOAD055006N
+
+
+
+
(
(
(
(
U
U
U
U
P
P
P
P
)
)
)
)
-
-
-
-
(
(
(
(
D
D
D
D
O
O
O
O
W
W
W
W
N
N
N
N
)
)
)
)
Page 425 of 586
5-105
Driving your vehicle
5
Overloading your vehicle may
cause damage. Repairs would not
be covered by your warranty. Do
not overload your vehicle.We do not recommend using this
vehicle for trailer towing.
NOTICE
T T
R
R A
A I
IL
L E
E R
R
T
T O
O W
W I
IN
N G
G
If you carry items inside your
vehicle (e.g., suitcases, tools,
packages, or anything else),
they are moving as fast as the
vehicle. If you have to stop or
turn quickly, or if there is a
crash, the items will keep going
and can cause an injury if they
strike the driver or a passenger.
Put items in the cargo area of
your vehicle. Try to spread the
weight evenly.
Do not stack items, like suit-
cases, inside the vehicle
above the tops of the seats.
Do not leave an unsecured
child restraint in your vehicle.
When you carry something
inside the vehicle, secure it.
WARNING
Page 444 of 586
6-19
What to do in an emergency
6
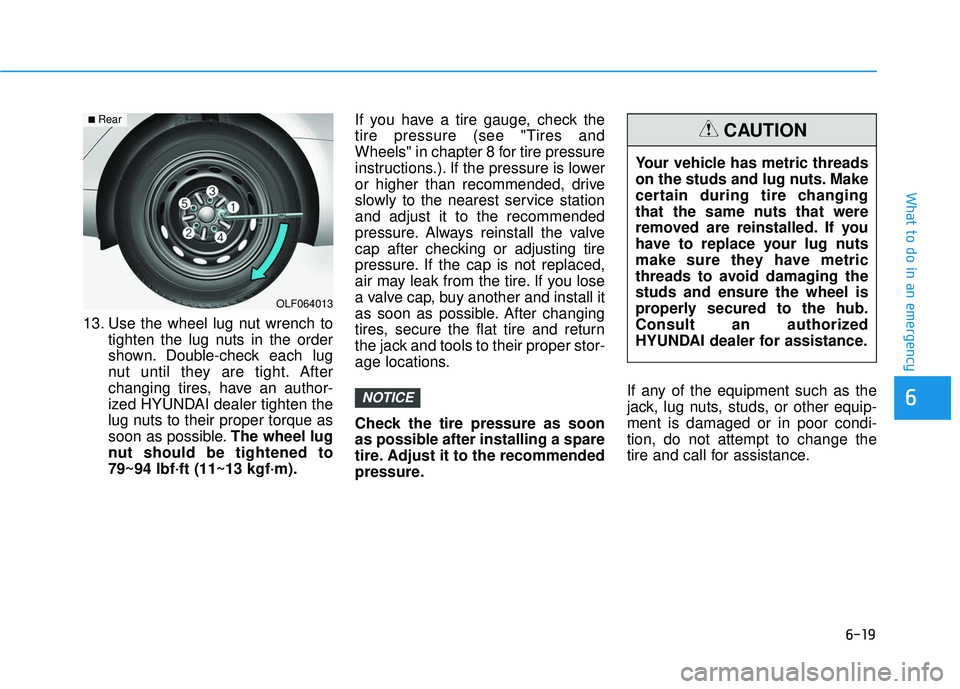
13. Use the wheel lug nut wrench totighten the lug nuts in the order
shown. Double-check each lug
nut until they are tight. After
changing tires, have an author-
ized HYUNDAI dealer tighten the
lug nuts to their proper torque as
soon as possible. The wheel lug
nut should be tightened to
79~94 lbf·ft (11~13 kgf·m). If you have a tire gauge, check the
tire pressure (see "Tires and
Wheels" in chapter 8 for tire pressure
instructions.). If the pressure is lower
or higher than recommended, drive
slowly to the nearest service station
and adjust it to the recommended
pressure. Always reinstall the valve
cap after checking or adjusting tire
pressure. If the cap is not replaced,
air may leak from the tire. If you lose
a valve cap, buy another and install it
as soon as possible. After changing
tires, secure the flat tire and return
the jack and tools to their proper stor-
age locations.
Check the tire pressure as soon
as possible after installing a spare
tire. Adjust it to the recommended
pressure.
If any of the equipment such as the
jack, lug nuts, studs, or other equip-
ment is damaged or in poor condi-
tion, do not attempt to change the
tire and call for assistance.
NOTICE
OLF064013
■Rear
Your vehicle has metric threads
on the studs and lug nuts. Make
certain during tire changing
that the same nuts that were
removed are reinstalled. If you
have to replace your lug nuts
make sure they have metric
threads to avoid damaging the
studs and ensure the wheel is
properly secured to the hub.
Consult an authorized
HYUNDAI dealer for assistance.
CAUTION
Page 453 of 586
6-28
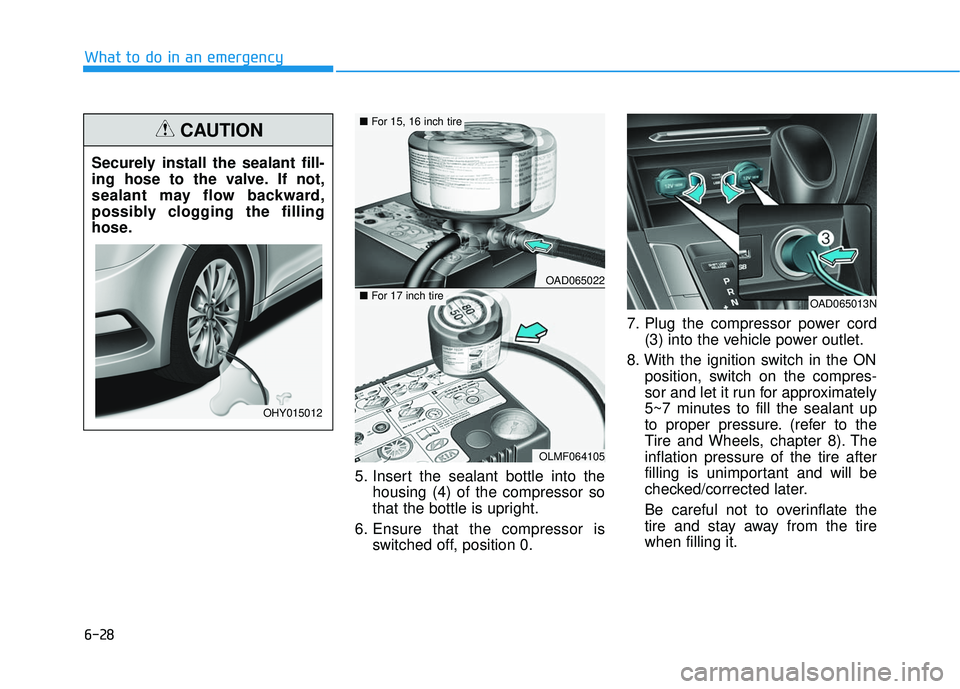
What to do in an emergency5. Insert the sealant bottle into thehousing (4) of the compressor so
that the bottle is upright.
6. Ensure that the compressor is switched off, position 0. 7. Plug the compressor power cord
(3) into the vehicle power outlet.
8. With the ignition switch in the ON position, switch on the compres-
sor and let it run for approximately
5~7 minutes to fill the sealant up
to proper pressure. (refer to the
Tire and Wheels, chapter 8). The
inflation pressure of the tire after
filling is unimportant and will be
checked/corrected later.
Be careful not to overinflate the
tire and stay away from the tire
when filling it.
Securely install the sealant fill-
ing hose to the valve. If not,
sealant may flow backward,
possibly clogging the filling
hose.
CAUTION
OHY015012
OAD065022
OLMF064105
■
For 15, 16 inch tire
■For 17 inch tireOAD065013N
Page 458 of 586
6-33
What to do in an emergency
6
When towing your vehicle in an
emergency without wheel dollies:
1.Place the ignition switch in theACC position.
2.Place the shift lever in N (Neutral).
3.Release the parking brake.
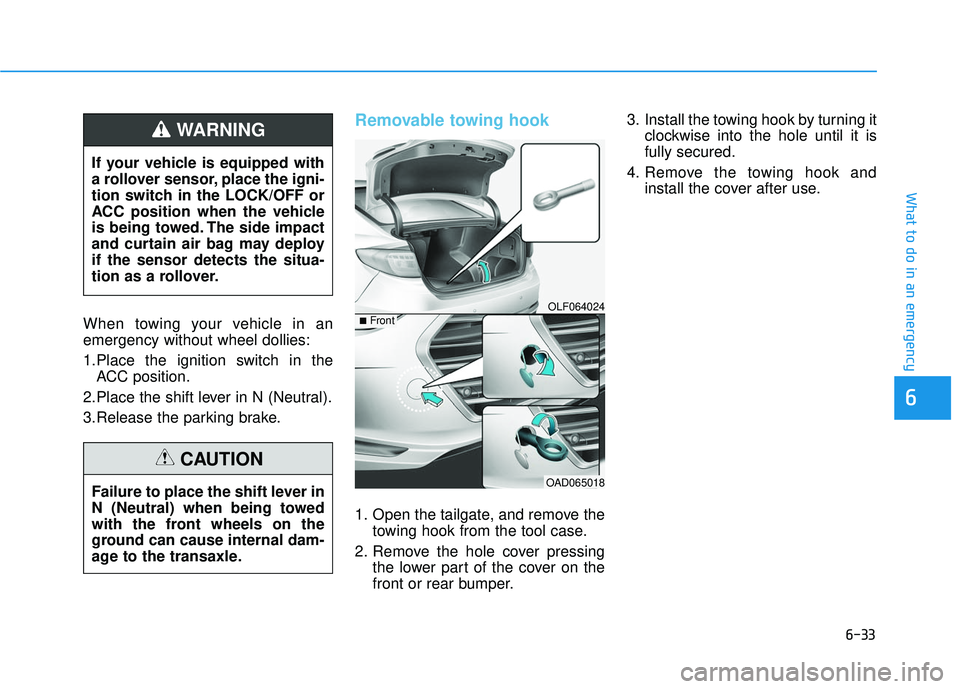
Removable towing hook
1. Open the tailgate, and remove the towing hook from the tool case.
2. Remove the hole cover pressing the lower part of the cover on the
front or rear bumper. 3. Install the towing hook by turning it
clockwise into the hole until it is
fully secured.
4. Remove the towing hook and install the cover after use.
If your vehicle is equipped with
a rollover sensor, place the igni-
tion switch in the LOCK/OFF or
ACC position when the vehicle
is being towed. The side impact
and curtain air bag may deploy
if the sensor detects the situa-
tion as a rollover.
WARNING
Failure to place the shift lever in
N (Neutral) when being towed
with the front wheels on the
ground can cause internal dam-
age to the transaxle.
CAUTION
OLF064024
OAD065018
■Front
Page 459 of 586
6-34
What to do in an emergency
Emergency towing
If towing is necessary, we recom-
mend you have it done by an author-
ized HYUNDAI dealer or a commer-
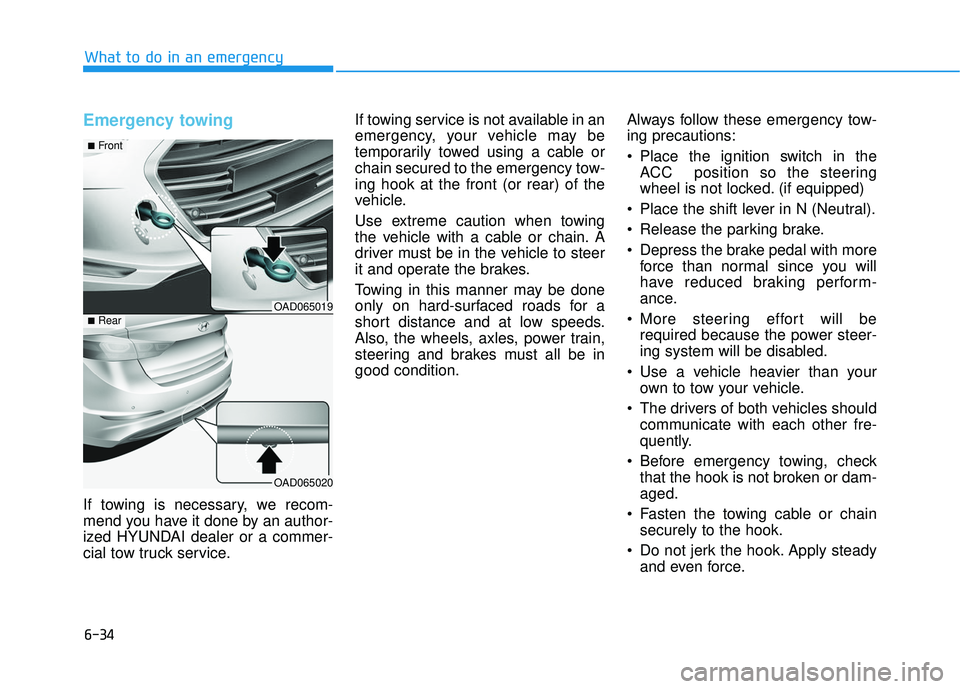
cial tow truck service.If towing service is not available in an
emergency, your vehicle may be
temporarily towed using a cable or
chain secured to the emergency tow-
ing hook at the front (or rear) of the
vehicle.
Use extreme caution when towing
the vehicle with a cable or chain. A
driver must be in the vehicle to steer
it and operate the brakes.
Towing in this manner may be done
only on hard-surfaced roads for a
short distance and at low speeds.
Also, the wheels, axles, power train,
steering and brakes must all be in
good condition.
Always follow these emergency tow-
ing precautions:
Place the ignition switch in the
ACC position so the steering
wheel is not locked. (if equipped)
Place the shift lever in N (Neutral).
Release the parking brake.
Depress the brake pedal with more force than normal since you will
have reduced braking perform-
ance.
More steering effort will be required because the power steer-
ing system will be disabled.
Use a vehicle heavier than your own to tow your vehicle.
The drivers of both vehicles should communicate with each other fre-
quently.
Before emergency towing, check that the hook is not broken or dam-
aged.
Fasten the towing cable or chain securely to the hook.
Do not jerk the hook. Apply steady and even force.
OAD065019
OAD065020
■Front
■Rear