Page 331 of 637
4-74
Multimedia System
Radio Mode
(Type B-5, Type B-6)
Radio Mode Display Controls
(1) Mode Display
Displays currently operating mode.
(2) Frequency
Displays the current frequency.
(3) Preset
Displays current preset number [1] ~
[6].
(4) Preset Display
Displays preset buttons.
(5) Auto store
Automatically saves frequencies with
superior reception to Preset buttons.
With the Radio Mode Button
Pressing the [RADIO]button will
change the operating mode in order
of FM1
➟FM2 ➟AM.If [Mode Pop-up] is turned on within
[SETUP]�[Display], then pressing
the [RADIO]button will display the
Radio Mode Pop-up screen.
Turn the TUNEknob to move the
focus. Press the knob to select.
SEEK
Press the [SEEK TRACK]button to
play the previous/next frequency.
TUNE
Turn the TUNEknob to select the
desired frequency.
Selecting /Saving Presets
Press the [Preset] button to display
the broadcast information for the fre-
quency saved to each button.
Page 332 of 637
![Hyundai Elantra 2017 Owners Manual 4-75
Multimedia System
4
Press the [1] ~ [6] buttons to play the
desired preset.
While listening to a frequency you
want to save as a preset, press and
hold one of the [1] ~ [6] preset but-
tons to sa](/manual-img/35/14543/w960_14543-331.png "Hyundai Elantra 2017 Owners Manual 4-75
Multimedia System
4
Press the [1] ~ [6] buttons to play the
desired preset.
While listening to a frequency you
want to save as a preset, press and
hold one of the [1] ~ [6] preset but-
tons to sa")
4-75
Multimedia System
4
Press the [1] ~ [6] buttons to play the
desired preset.
While listening to a frequency you
want to save as a preset, press and
hold one of the [1] ~ [6] preset but-
tons to save the current frequency to
the selected preset.
Auto Store
Press the [Auto store] button to auto-
matically save receivable frequen-
cies to Preset buttons.
Scan
Press the [SCAN]button to preview
frequencies with superior reception
for 5 seconds each.
Press and hold the [SCAN]button to
preview presets for 5 seconds each.
Once scan is complete, the previous
frequency will be restored.
While Scan is operating, pressing
the [SCAN]button will cancel the
scan operation.
Media Mode
Media Mode Screen
Pressing the [MEDIA]buttonwill
change the operating mode in order
of CD ➟ USB(iPod
®) ➟ AUX ➟ My
Music ➟BT Audio.
If [Pop-up Mode] / [Mode Pop-up] is
turned on within [SETUP]�
[Display], then pressing the [MEDIA]
buttonwill display the Media Pop-up
Mode screen.
Turn the TUNEknob to move the
focus. Press the knob to select.
The media mode pop up screen can
be displayed only when there are two
or more media modes turned on.
Mode Display on the Status Bar
When a Bluetooth®Wireless
Technology, iPod®, USB or AUX
device is connected or a CD is
inserted, the corresponding mode
icon will be displayed.
IconTitle
Bluetooth®Wireless Technology
CD
iPod®
USB
AUX
Page 360 of 637
4-103
Multimedia System
4
Setup Mode
(Type B-1, Type B-2,Type B-3,
Type B-4)
Press the [SETUP]button to display
the Setup screen.
You can select and control options
related to [Display], [Sound], [Clock/
Day], [Phone] and [System].
With the Display Button
Press the [SETUP]button
�Select
[Display]
You can select and control options
related to [Brightness], [Pop-up
Mode], [Scroll text] and [Song Info].
Adjusting the Brightness
Use the [Left/Right] buttons to adjust
the screen brightness or set the
Brightness on Automatic, Day or
Night mode.
Press the [Default] button to reset.
• Automatic : Adjusts the brightness
automatically.
• Day : Always maintains the bright-
ness on high.
• Night : Always maintains the bright-
ness on low.
Page 362 of 637
4-105
Multimedia System
4
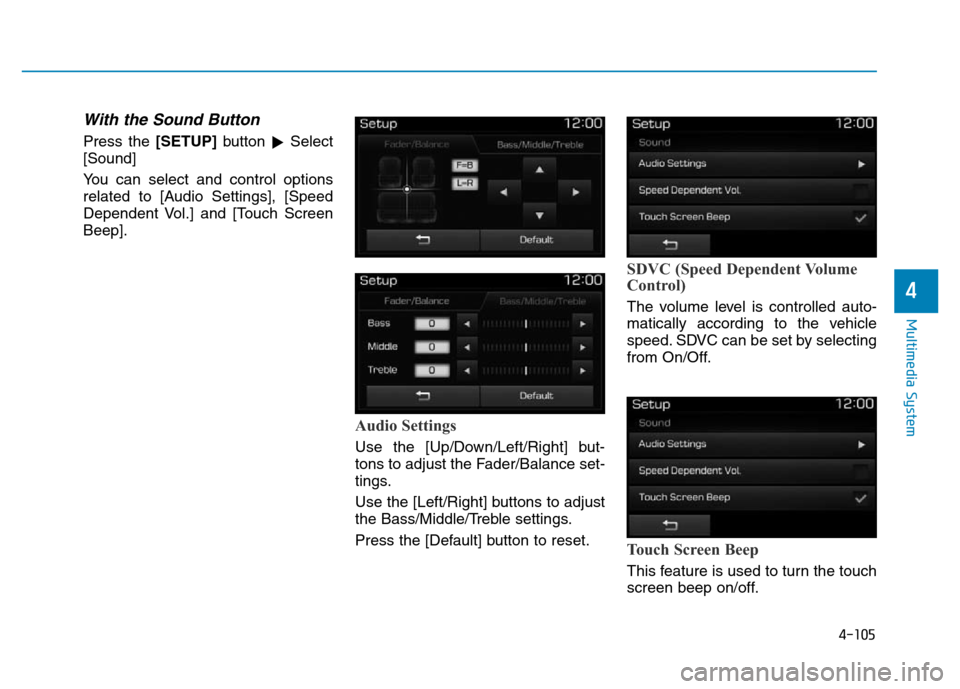
With the Sound Button
Press the [SETUP]button
�Select
[Sound]
You can select and control options
related to [Audio Settings], [Speed
Dependent Vol.] and [Touch Screen
Beep].
Audio Settings
Use the [Up/Down/Left/Right] but-
tons to adjust the Fader/Balance set-
tings.
Use the [Left/Right] buttons to adjust
the Bass/Middle/Treble settings.
Press the [Default] button to reset.
SDVC (Speed Dependent Volume
Control)
The volume level is controlled auto-
matically according to the vehicle
speed. SDVC can be set by selecting
from On/Off.
Touch Screen Beep
This feature is used to turn the touch
screen beep on/off.
Page 367 of 637
4-110
Multimedia System
Setup Mode
(Type B-5, Type B-6)
Press the [SETUP]button to display
the Setup screen.
You can select and control options
related to [Display], [Sound],
[Clock/Calendar], [Phone] and
[System].
With the Display Button
Press the [SETUP]button
�Select
[Display]
You can select and control options
related to [Brightness], [Mode Pop
up], [Text Scroll] and [Media Display].
Adjusting the Brightness
Use the [Left/Right] buttons to adjust
the screen brightness or set the
Brightness on Automatic, Day or
Night mode.
Press the [Default] button to reset.
• Automatic : Adjusts the brightness
automatically.
• Day : Always maintains the bright-
ness on high.
• Night : Always maintains the bright-
ness on low.
Page 369 of 637
4-112
Multimedia System
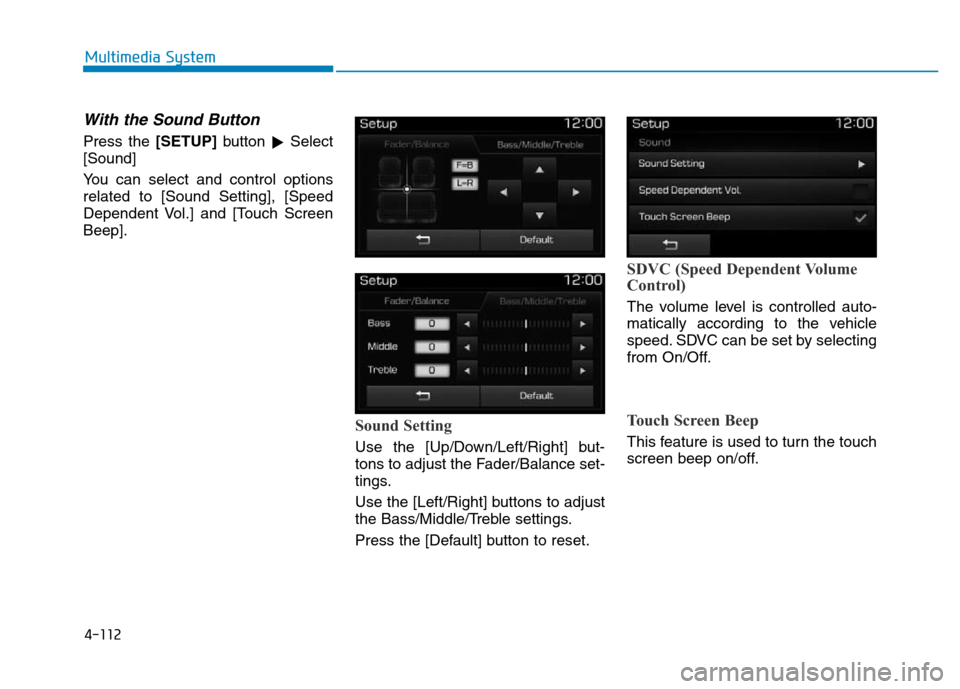
With the Sound Button
Press the [SETUP]button
�Select
[Sound]
You can select and control options
related to [Sound Setting], [Speed
Dependent Vol.] and [Touch Screen
Beep].
Sound Setting
Use the [Up/Down/Left/Right] but-
tons to adjust the Fader/Balance set-
tings.
Use the [Left/Right] buttons to adjust
the Bass/Middle/Treble settings.
Press the [Default] button to reset.
SDVC (Speed Dependent Volume
Control)
The volume level is controlled auto-
matically according to the vehicle
speed. SDVC can be set by selecting
from On/Off.
Touch Screen Beep
This feature is used to turn the touch
screen beep on/off.
Page 446 of 637

The drive mode may be selected
according to the drivers preference
or road condition.
The system resets to be in the NOR-")
5-60
Driving your vehicle
DRIVE MODE INTEGRATED CONTROL SYSTEM (IF EQUIPPED)
The drive mode may be selected
according to the driver's preference
or road condition.
The system resets to be in the NOR-
MAL mode (except if it is in ECO
mode), when the engine is restarted.
Information
If there is a problem with the instru-
ment cluster, the drive mode will be in
NORMAL mode and may not change
to ECO mode or SPORT mode.
The mode changes, as below,
whenever the DRIVE MODE button
is pressed.
When NORMAL mode is selected,
it is not displayed on the instrument
cluster.
ECO mode
When the Drive Mode is
set to ECO mode, the
engine and transmission
control logic are changed
to maximize fuel efficiency.
• When the ECO mode is selected
by pressing the DRIVE MODE but-
ton, the ECO indicator (green
color) will illuminate.
• If the vehicle is set to ECO mode,
when the engine is turned OFF
and restarted the Drive Mode set-
ting will remain in ECO mode.
Information
Fuel efficiency depends on the driver's
driving habit and road condition.
i
i
ECO
NORMAL SPORT
OAD055016R
■Left-hand drive
■Right-hand driveOAD055016
Page 462 of 637

5-76
Driving your vehicle
• Pressing the CANCEL / O button
located on the steering wheel.
• Pressing the CRUISE / button.
Both the CRUISE indicator and the
SET indicator will turn OFF.
• Moving the shift lever into N
(Neutral). (for automatic transmis-
sion/dual clutch transmission)
• Decreasing the vehicle speed
lower than the speed by 20 km/h
(12 mph).
• Decreasing the vehicle speed to
less than approximately 30 km/h
(20 mph).
• The ESC (Electronic Stability
Control) is operating.
• Downshifting to 2
ndgear when in
Manual Shift mode.
Information
Each of the above actions will cancel
Cruise Control operation (the SET
indicator light in the instrument clus-
ter will go off), but only pressing the
CRUISE button will turn the system
off. If you wish to resume Cruise
Control operation, push the toggle
switch up (RES+) located on your
steering wheel. You will return to your
previously preset speed, unless the sys-
tem was turned off using the CRUISE
button.
To resume preset Cruising
speed
Push the toggle switch (1) up
(RES+). If the vehicle speed is over
30 km/h (20 mph), the vehicle will
resume the preset speed.
i
OAD055021L
■Type A
■Type BOAD055021

Radio Mode Display Controls
(1) Mode Display
Displays currently operating mode.
(2) Frequency
Displays the current frequency.
(3) Preset
Display")
![Hyundai Elantra 2017 Owners Manual 4-103
Multimedia System
4
Setup Mode
(Type B-1, Type B-2,Type B-3,
Type B-4)
Press the [SETUP]button to display
the Setup screen.
You can select and control options
related to [Display], [Sound], [Clo](/manual-img/35/14543/w960_14543-359.png "Hyundai Elantra 2017 Owners Manual 4-103
Multimedia System
4
Setup Mode
(Type B-1, Type B-2,Type B-3,
Type B-4)
Press the [SETUP]button to display
the Setup screen.
You can select and control options
related to [Display], [Sound], [Clo")
![Hyundai Elantra 2017 Owners Manual 4-110
Multimedia System
Setup Mode
(Type B-5, Type B-6)
Press the [SETUP]button to display
the Setup screen.
You can select and control options
related to [Display], [Sound],
[Clock/Calendar], [Phone]](/manual-img/35/14543/w960_14543-366.png "Hyundai Elantra 2017 Owners Manual 4-110
Multimedia System
Setup Mode
(Type B-5, Type B-6)
Press the [SETUP]button to display
the Setup screen.
You can select and control options
related to [Display], [Sound],
[Clock/Calendar], [Phone]")