2017 Hyundai Elantra brake change
[x] Cancel search: brake changePage 419 of 637

5-33
Driving your vehicle
• When rapidly accelerating from a
lower vehicle speed, the engine
rpm may increase dramatically as
a result of clutch slip as the dual
clutch transmission selects the cor-
rect gear. This is a normal condi-
tion.
• When accelerating from a stop on
an incline, press the accelerator
smoothly and gradually to avoid
any shudder feeling or jerkiness.
• When traveling at a lower vehicle
speed, if you release the accelera-
tor pedal quickly, you may feel
engine braking before the trans-
mission changes gears. This
engine braking feeling is similar to
operating a manual transmission at
low speed.• When driving downhill, you may
wish to move the gear shift lever to
Manual Shift mode and downshift
to a lower gear in order to control
your speed without using the brake
pedal excessively.
• When you turn the engine on and
off, you may hear clicking sounds
as the system goes through a self
test. This is a normal sound for the
dual clutch transmission.
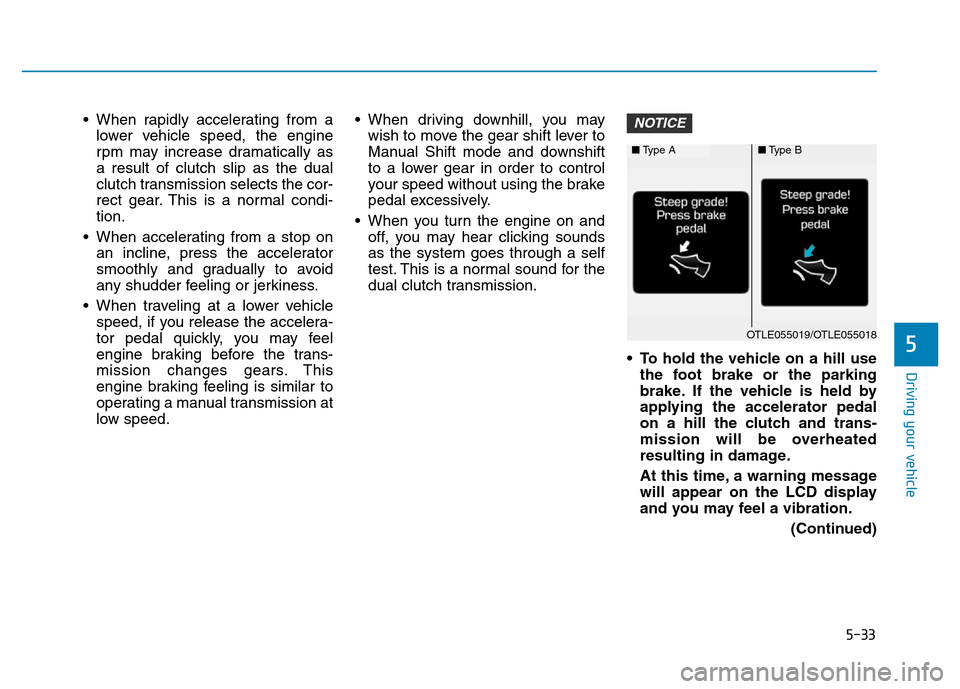
• To hold the vehicle on a hill use
the foot brake or the parking
brake. If the vehicle is held by
applying the accelerator pedal
on a hill the clutch and trans-
mission will be overheated
resulting in damage.
At this time, a warning message
will appear on the LCD display
and you may feel a vibration.
(Continued)NOTICE
5
■Type A■Type B
OTLE055019/OTLE055018
Page 423 of 637

5-37
Driving your vehicle
Information
• Only the seven forward gears can be
selected. To reverse or park the
vehicle, move the shift lever to the R
(Reverse) or P (Park) position as
required.
• Downshifts are made automatically
when the vehicle slows down. When
the vehicle stops, 1
stgear is automat-
ically selected.
• When the engine rpm approaches
the red zone the transmission will
upshift automatically.
• If the driver presses the lever to
+ (Up) or - (Down) position, the
transmission may not make the
requested gear change if the next
gear is outside of the allowable
engine rpm range. The driver must
execute upshifts in accordance with
road conditions, taking care to keep
the engine rpms below the red zone.
(Continued)(Continued)
• When driving on a slippery road,
push the shift lever forward into the
+ (Up) position. This causes the
transmission to shift into the 2
nd
gear which is better for smooth driv-
ing on a slippery road. Push the shift
lever to the - (Down) side to shift
back to the 1
stgear.
• When driving in manual shift mode,
slow down before shifting to a lower
gear. Otherwise, the lower gear may
not be engaged if the engine rpms
are outside of the allowable range.
Shift-lock system
For your safety, the dual clutch trans-
mission has a shift-lock system
which prevents shifting the transmis-
sion from P (Park) into R (Reverse)
unless the brake pedal is depressed.
To shift the transmission from P
(Park) into R (Reverse):
1. Depress and hold the brake pedal.
2. Start the engine or place the igni-
tion switch in the ON position.
3. Move the shift lever.
Shift-lock release
If the shift lever cannot be moved
from the P (Park) position into R
(Reverse) position with the brake
pedal depressed, continue depress-
ing the brake, and then do the follow-
ing:
i
5
Page 425 of 637

5-39
Driving your vehicle
Parking
Always come to a complete stop and
continue to depress the brake pedal.
Move the shift lever into the P (Park)
position, apply the parking brake,
and place the ignition switch in the
LOCK/OFF position. Take the Key
with you when exiting the vehicle.
Good driving practices
• Never move the shift lever from P
(Park) or N (Neutral) to any other
position with the accelerator pedal
depressed.
• Never move the shift lever into P
(Park) when the vehicle is in
motion.
Be sure the vehicle is completely
stopped before you attempt to shift
into R (Reverse) or D (Drive).
• Do not move the shift lever to N
(Neutral) when driving. Doing so
may result in an accident because
of a loss of engine braking and the
transmission could be damaged.
• Do not drive with your foot resting
on the brake pedal. Even light, but
consistent pedal pressure can
result in the brakes overheating,
brake wear and possibly even
brake failure.
• Always apply the parking brake
when leaving the vehicle. Do not
depend on placing the transmis-
sion in P (Park) to keep the vehicle
from moving.• Exercise extreme caution when
driving on a slippery surface. Be
especially careful when braking,
accelerating or shifting gears. On a
slippery surface, an abrupt change
in vehicle speed can cause the
drive wheels to lose traction and
may cause loss of vehicle control
resulting in an accident
• Optimum vehicle performance and
economy is obtained by smoothly
depressing and releasing the
accelerator.
5
When you stay in the vehicle
with the engine running, be
careful not to depress the accel-
erator pedal for a long period of
time. The engine or exhaust
system may overheat and start
a fire.
The exhaust gas and the
exhaust system are very hot.
Keep away from the exhaust
system components.
Do not stop or park over flam-
mable materials, such as dry
grass, paper or leaves. They
may ignite and cause a fire.
WARNING
Page 428 of 637

5-42
Driving your vehicle
Disc brakes wear indicator
When your brake pads are worn and
new pads are required, you will hear
a high pitched warning sound from
your front or rear brakes. You may
hear this sound come and go or it
may occur whenever you depress
the brake pedal.
Note that some driving conditions or
climates may cause a brake squeal
when you first apply (or lightly apply)
the brakes. This is normal and does
not indicate a problem with your
brakes.
To avoid costly brake repairs, do
not continue to drive with worn
brake pads.
Information
Always replace brake pads as com-
plete front or rear axle sets.
Rear drum brakes
(if equipped)
Your rear drum brakes do not have
wear indicators. Therefore, have the
rear brake linings inspected if you
hear a rear brake rubbing noise. Also
have your rear brakes inspected
each time you change or rotate your
tires and when you have the front
brakes replaced.
Parking brake
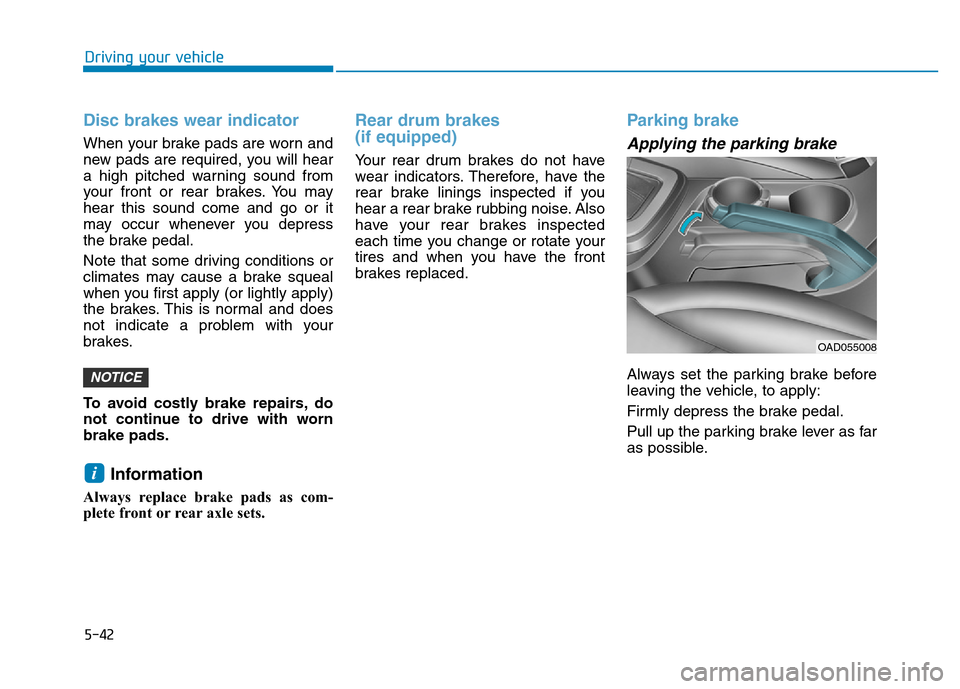
Applying the parking brake
Always set the parking brake before
leaving the vehicle, to apply:
Firmly depress the brake pedal.
Pull up the parking brake lever as far
as possible.
i
NOTICE
OAD055008
Page 431 of 637

5-45
Driving your vehicle
5
Anti-lock Brake System (ABS)
ABS is an electronic braking system
that helps prevent a braking skid.
ABS allows the driver to steer and
brake at the same time.
Using ABS
To obtain the maximum benefit from
your ABS in an emergency situation,
do not attempt to modulate your
brake pressure and do not try to
pump your brakes. Depress your
brake pedal as hard as possible.
When you apply your brakes under
conditions which may lock the
wheels, you may hear sounds from
the brakes, or feel a corresponding
sensation in the brake pedal. This is
normal and it means your ABS is
active.
ABS does not reduce the time or dis-
tance it takes to stop the vehicle.
Always maintain a safe distance from
the vehicle in front of you.
ABS will not prevent a skid that
results from sudden changes in
direction, such as trying to take a
corner too fast or making a sudden
lane change. Always drive at a safe
speed for the road and weather con-
ditions. (Continued)•On roads where the road sur-
face is pitted or has different
surface height.
•Tire chains are installed on
your vehicle.
The safety features of an ABS
or ESC equipped vehicle should
not be tested by high speed
driving or cornering. This could
endanger the safety of yourself
or others.An Anti-Lock Braking System
(ABS) or an Electronic Stability
Control (ESC) system will not
prevent accidents due to
improper or dangerous driving
maneuvers. Even though vehi-
cle control is improved during
emergency braking, always
maintain a safe distance
between you and objects ahead
of you. Vehicle speeds should
always be reduced during
extreme road conditions. The
braking distance for cars
equipped with ABS or ESC may
be longer than for those without
these systems in the following
road conditions.
Drive your vehicle at reduced
speeds during the following
conditions:
•Rough, gravel or snow-cov-
ered roads.
(Continued)
WARNING
Page 479 of 637

5-93
Driving your vehicle
5
Making turns
When you're turning with a trailer,
make wider turns than normal. Do
this so your trailer won't strike soft
shoulders, curbs, road signs, trees,
or other objects. Avoid jerky or sud-
den maneuvers. Signal well in
advance.
Turn signals
When you tow a trailer, your vehicle
has to have a different turn signal
flasher and extra wiring. The green
arrows on your instrument panel will
flash whenever you signal a turn or
lane change. Properly connected,
the trailer lights will also flash to alert
other drivers you're about to turn,
change lanes, or stop.When towing a trailer, the green
arrows on your instrument panel will
flash for turns even if the bulbs on
the trailer are burned out. Thus, you
may think drivers behind you are
seeing your signals when, in fact,
they are not. It's important to check
occasionally to be sure the trailer
bulbs are still working. You must also
check the lights every time you dis-
connect and then reconnect the
wires.
Driving on hills
Reduce speed and shift to a lower
gear before you start down a long or
steep downgrade. If you don't shift
down, you might have to use your
brakes so much that they would get
overheated and may not operate effi-
ciently.
On a long uphill grade, shift down
and reduce your speed to around 70
km/h (45 mph) to reduce the possi-
bility of engine and transmission
overheating.
If your trailer weighs more than the
maximum trailer weight without trail-
er brakes and you have an automat-
ic transmission, you should drive in D
(Drive) when towing a trailer.
Operating your vehicle in D (Drive)
when towing a trailer will minimize
heat build-up and extend the life of
your transmission. Do not connect a trailer lighting
system directly to your vehi-
cle's lighting system. Use an
approved trailer wiring harness.
Failure to do so could result in
damage to the vehicle electrical
system and/or personal injury.
Consult an authorized HYUNDAI
dealer for assistance.
WARNING
Page 480 of 637

5-94
Driving your vehicle
To prevent engine and/or transmis-
sion (transmission) overheating:
• When towing a trailer on steep
grades (in excess of 6%) pay
close attention to the engine
coolant temperature gauge to
ensure the engine does not
overheat. If the needle of the
coolant temperature gauge
moves towards “130 or H(Hot)” ,
pull over and stop as soon as it
is safe to do so, and allow the
engine to idle until it cools
down. You may proceed once the
engine has cooled sufficiently.
• When towing a trailer, your vehi-
cle speed may be much slower
than the general flow of traffic,
especially when climbing an
uphill grade. Use the right hand
lane when towing a trailer on an
uphill grade. Choose your vehi-
cle speed according to the max-
imum posted speed limit for
vehicles with trailers, the steep-
ness of the grade, and your trail-
er weight.
(Continued)(Continued)
• For vehicles equipped with the
dual clutch transmission, some
extra precaution should be
taken when towing a trailer. Due
to the added load on the trans-
mission when towing a trailer,
the clutches may get hot if the
vehicle experiences excessive
upshifting and downshifting.
Under certain conditions, such
as repeated stop-and-go launch-
es on steep grades, the trans-
mission clutches may become
overheated. When the clutches
start to become overheated, the
transmission safe protection
mode logic is enabled. If the safe
protection mode logic is
enabled, the gear position indi-
cator on the cluster LCD display
blinks, a chime sounds, and a
warning message will appear.
(Continued)(Continued)
If the dual clutch transmission
starts to become overheated,
the gear shift characteristics
may change. Gear shifts may
become more abrupt. If contin-
ued operation while towing a
trailer includes frequent and
continuous upshifts and down-
shifts, the overheat warning
message on the cluster LCD dis-
play may illuminate. If this
occurs, stop the vehicle, apply
the brakes or shift the vehicle to
(P) Park, and allow the transmis-
sion to cool.
NOTICE
Page 501 of 637

6-18
What to do in an emergency
Follow these steps to change your
vehicle's tire:
1. Park on a level, firm surface.
2. Move the shift lever into P (Park,
for automatic transmission vehi-
cle) or neutral (for manual trans-
mission vehicle), apply the park-
ing brake, and place the ignition
switch in the LOCK/OFF position.
3. Press the hazard warning flasher
button.
4. Remove the wheel lug nut wrench,
jack, jack handle, and spare tire
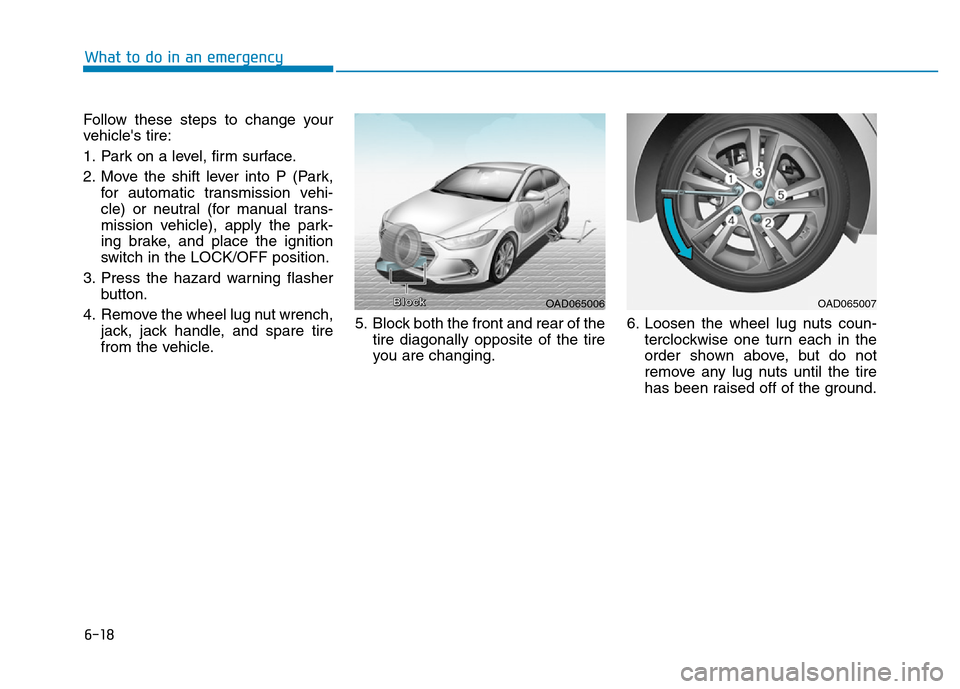
from the vehicle.5. Block both the front and rear of the
tire diagonally opposite of the tire
you are changing.6. Loosen the wheel lug nuts coun-
terclockwise one turn each in the
order shown above, but do not
remove any lug nuts until the tire
has been raised off of the ground.
OAD065006B B
l l
o o
c c
k kOAD065007