Page 528 of 571
7-58
Maintenance
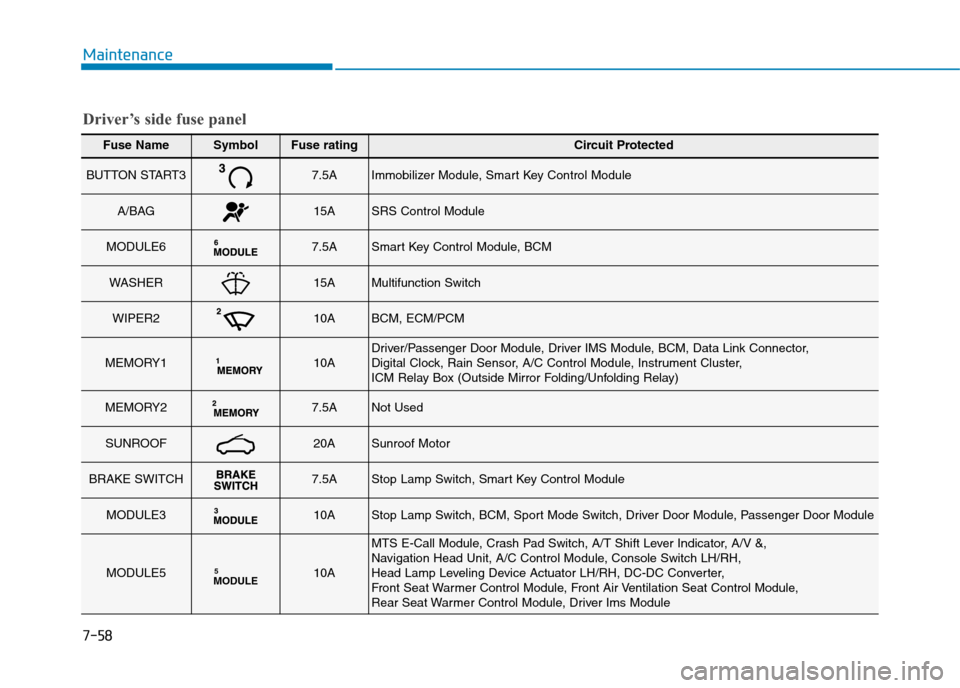
Fuse NameSymbolFuse ratingCircuit Protected
BUTTON START37.5AImmobilizer Module, Smart Key Control Module
A/BAG15ASRS Control Module
MODULE67.5ASmart Key Control Module, BCM
WASHER15AMultifunction Switch
WIPER210ABCM, ECM/PCM
MEMORY110ADriver/Passenger Door Module, Driver IMS Module, BCM, Data Link Connector, Digital Clock, Rain Sensor, A/C Control Module, Instrument Cluster, ICM Relay Box (Outside Mirror Folding/Unfolding Relay)
MEMORY27.5ANot Used
SUNROOF20ASunroof Motor
BRAKE SWITCH7.5AStop Lamp Switch, Smart Key Control Module
MODULE310AStop Lamp Switch, BCM, Sport Mode Switch, Driver Door Module, Passenger Door Module
MODULE5MODULE510A
MTS E-Call Module, Crash Pad Switch, A/T Shift Lever Indicator, A/V &, Navigation Head Unit, A/C Control Module, Console Switch LH/RH,Head Lamp Leveling Device Actuator LH/RH, DC-DC Converter,Front Seat War mer Control Module, Front Air Ventilation Seat Control Module,Rear Seat Warmer Control Module, Driver Ims Module
Driver’s side fuse panel
Page 530 of 571
7-60
Maintenance
Fuse NameSymbolFuse ratingCircuit Protected
S/HEATERFRONT
FRT20AFront Seat War mer Control Module, Front Air Ventilation Seat Control Module
START7.5ABurglar Alarm Relay, Transaxle Range Switch, Ignition Lock & Clutch Switch, Smart KeyControl Module, ECM/PCM, E/R Jnction Block (RLY.4)
BUTTON START1115ASmart Key Control Module
A/CON2210AE/R Junction Block (RLY.12), Blower Motor, Blower Resistor, A/C Control Module
SPARE1SPARE120ASpare
P/WDW LHLH25APower Window LH Rleay Dr iver Safety Power Window Module (LHD)
INTERIOR LAMP10AIgnition Key ILL. & Door Warning Switch, Trunk Room Lamp, Front Vanity Lamp, LH/RH,Room Lamp, Overhead Console Lamp
MODULE2MODULE210ADigital Clock, USB Charging Connector, MTS E-Call Module, Smart Key Control, Module, BCM, Audio, A/V & Navigation Head Unit, Power Outside Mirror Switch, DC-DC Converter, AMP, E/R Junction Block (RLY.14)
Driver’s side fuse panel
Page 539 of 571
7-69
7
Maintenance
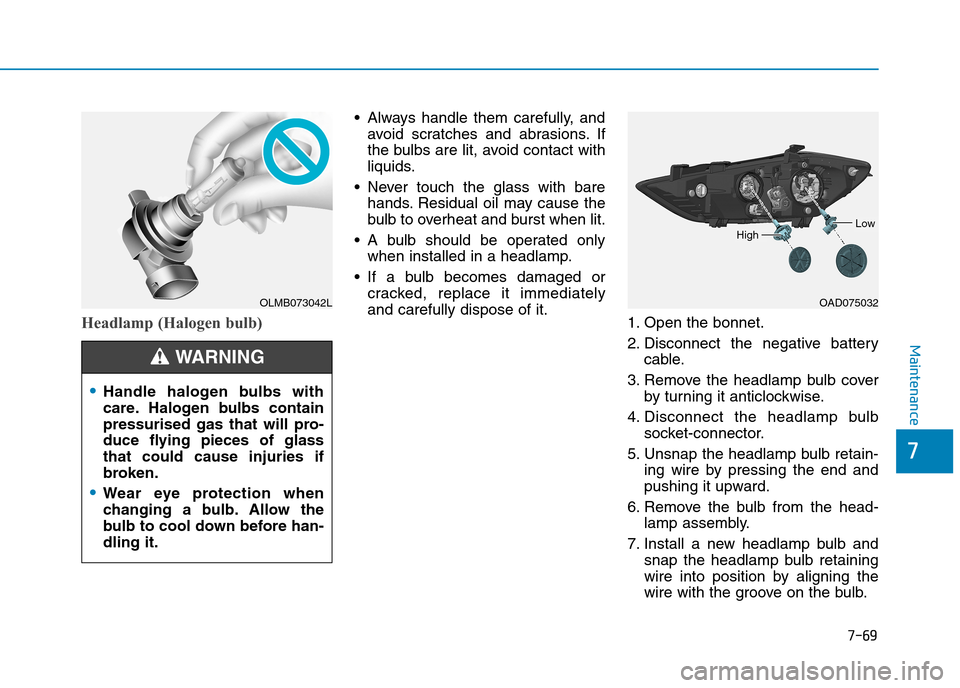
Headlamp (Halogen bulb)
•Always handle them carefully, and
avoid scratches and abrasions. If
the bulbs are lit, avoid contact with
liquids.
•Never touch the glass with bare
hands. Residual oil may cause the
bulb to overheat and burst when lit.
•A bulb should be operated only
when installed in a headlamp.
•If a bulb becomes damaged or
cracked, replace it immediately
and carefully dispose of it.1. Open the bonnet.
2. Disconnect the negative battery
cable.
3. Remove the headlamp bulb cover
by turning it anticlockwise.
4. Disconnect the headlamp bulb
socket-connector.
5. Unsnap the headlamp bulb retain-
ing wire by pressing the end and
pushing it upward.
6. Remove the bulb from the head-
lamp assembly.
7. Install a new headlamp bulb and
snap the headlamp bulb retaining
wire into position by aligning the
wire with the groove on the bulb.
OLMB073042L
•Handle halogen bulbs with
care. Halogen bulbs contain
pressurised gas that will pro-
duce flying pieces of glass
that could cause injuries if
broken.
•Wear eye protection when
changing a bulb. Allow the
bulb to cool down before han-
dling it.
WA R N I N G
OAD075032
HighLow
Page 540 of 571
7-70
Maintenance
8. Connect the headlamp bulb sock-
et-connector.
9. Install the headlamp bulb cover by
turning it clockwise.
Information
The headlamp aiming should be
adjusted after an accident or after the
headlamp assembly is reinstalled at an
authorised HYUNDAI dealer.
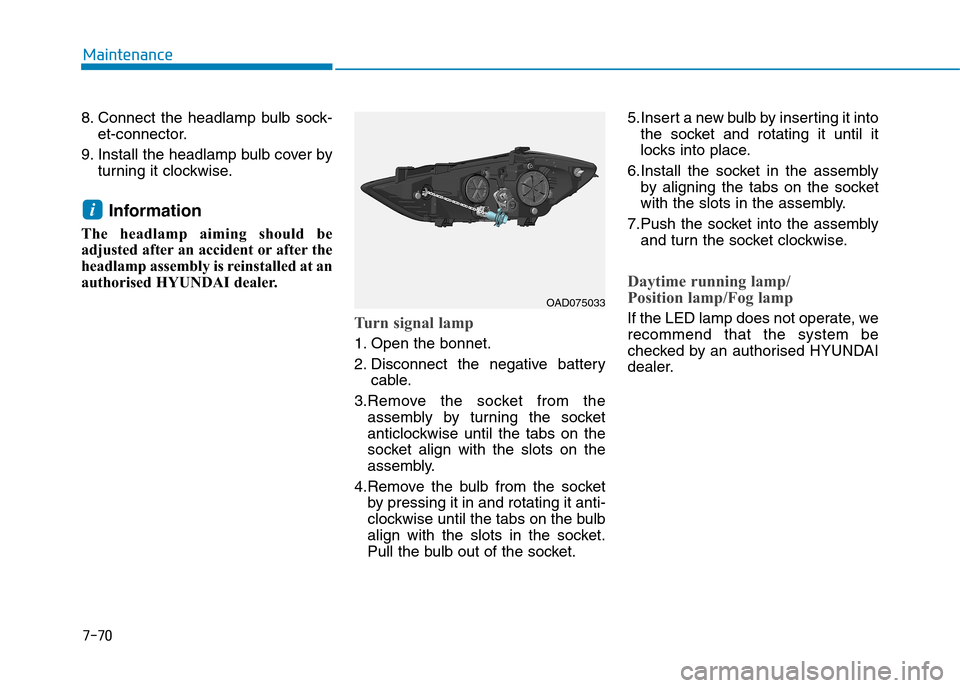
Turn signal lamp
1. Open the bonnet.
2. Disconnect the negative battery
cable.
3.Remove the socket from the
assembly by turning the socket
anticlockwise until the tabs on the
socket align with the slots on the
assembly.
4.Remove the bulb from the socket
by pressing it in and rotating it anti-
clockwise until the tabs on the bulb
align with the slots in the socket.
Pull the bulb out of the socket.
5.Insert a new bulb by inserting it into
the socket and rotating it until it
locks into place.
6.Install the socket in the assembly
by aligning the tabs on the socket
with the slots in the assembly.
7.Push the socket into the assembly
and turn the socket clockwise.
Daytime running lamp/
Position lamp/Fog lamp
If the LED lamp does not operate, we
recommend that the system be
checked by an authorised HYUNDAI
dealer.
i
OAD075033
Page 542 of 571
7-72
Maintenance
•Always handle them carefully, and
avoid scratches and abrasions. If
the bulbs are lit, avoid contact with
liquids.
•Never touch the glass with bare
hands. Residual oil may cause the
bulb to overheat and burst when lit.
•A bulb should be operated only
when installed in a headlamp.
•If a bulb becomes damaged or
cracked, replace it immediately
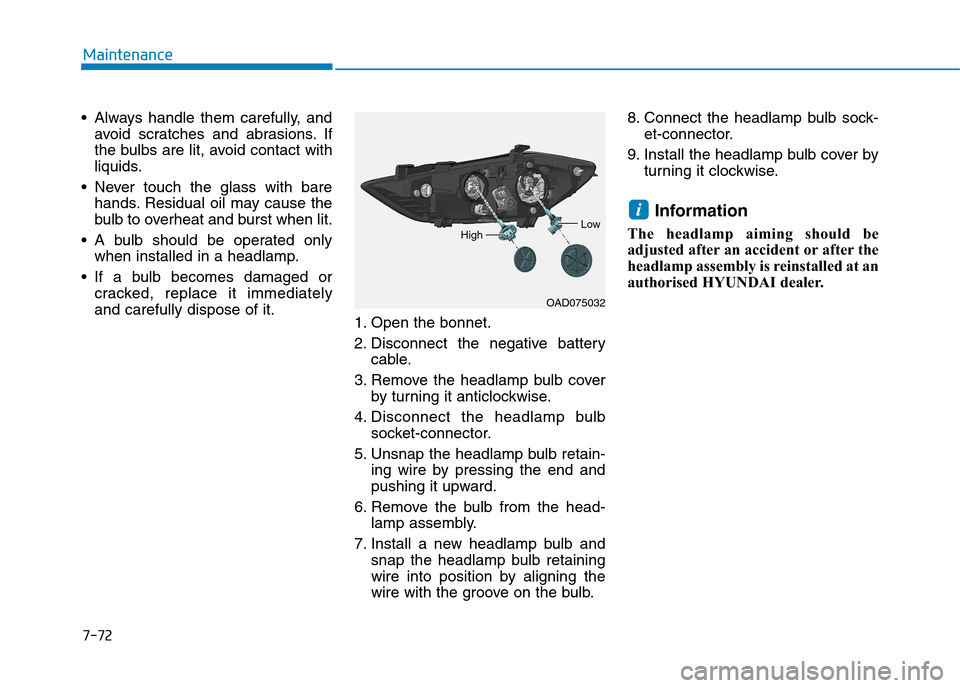
and carefully dispose of it.1. Open the bonnet.
2. Disconnect the negative battery
cable.
3. Remove the headlamp bulb cover
by turning it anticlockwise.
4. Disconnect the headlamp bulb
socket-connector.
5. Unsnap the headlamp bulb retain-
ing wire by pressing the end and
pushing it upward.
6. Remove the bulb from the head-
lamp assembly.
7. Install a new headlamp bulb and
snap the headlamp bulb retaining
wire into position by aligning the
wire with the groove on the bulb.
8. Connect the headlamp bulb sock-
et-connector.
9. Install the headlamp bulb cover by
turning it clockwise.
Information
The headlamp aiming should be
adjusted after an accident or after the
headlamp assembly is reinstalled at an
authorised HYUNDAI dealer.
i
OAD075032
LowHigh
Page 543 of 571
7-73
7
Maintenance
HID Headlight low beam
(if equipped)
Do not attempt to replace or
inspect the low beam (XENON
bulb) due to electric shock dan-
ger. If the low beam (XENON
bulb) is not working, we recom-
mend that the system be
checked by an authorised
HYUNDAI dealer.
WA R N I N G
HID Headlamp (Type C Low)
If the HID lamp does not operate, we
recommend that the system be
checked by an authorised HYUNDAI
dealer.
Information
HID lamps have superior perform-
ance over halogen bulbs.
HID lamps are estimated by the man-
ufacturer to last twice as long or
longer than halogen bulbs depending
on their frequency of use. They will
probably require replacement at some
point in the life of the vehicle. Cycling
the headlights on and off more than is
typical, will shorten HID lamp life.
HID lamps do not fail in the same
manner as halogen incandescent
lamps. If a headlight goes out after a
period of operation but will immedi-
ately relight when the headlight
switch is cycled it is likely the HID
lamp needs to be replaced. HID light-
ing components are more complex
than conventional halogen bulbs thus
have higher replacement cost.
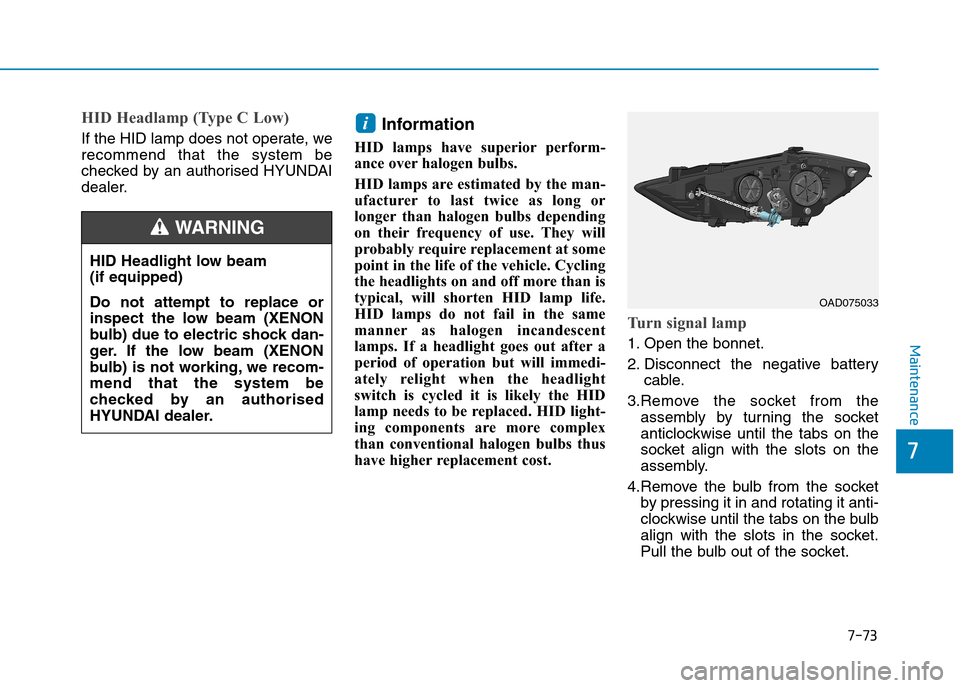
Turn signal lamp
1. Open the bonnet.
2. Disconnect the negative battery
cable.
3.Remove the socket from the
assembly by turning the socket
anticlockwise until the tabs on the
socket align with the slots on the
assembly.
4.Remove the bulb from the socket
by pressing it in and rotating it anti-
clockwise until the tabs on the bulb
align with the slots in the socket.
Pull the bulb out of the socket.
i
OAD075033
Page 544 of 571
7-74
Maintenance
5.Insert a new bulb by inserting it into
the socket and rotating it until it
locks into place.
6.Install the socket in the assembly
by aligning the tabs on the socket
with the slots in the assembly.
7.Push the socket into the assembly
and turn the socket clockwise.
Daytime running lamp/
Position lamp/Fog lamp
If the LED lamp does not operate, we
recommend that the system be
checked by an authorised HYUNDAI
dealer.
Side repeater lamp replace-
ment
If the LED lamp does not operate,
have the vehicle checked by an
authorised HYUNDAI dealer.
OAD075035
Page 546 of 571
7-76
Maintenance
3.Loosen the assembly retaining
nuts.
4.Remove the rear combination light
assembly from the body of the
vehicle.
Stop/Tail lamp and turn signal
lamp
5.Remove the socket from the
assembly by turning the socket
anticlockwise until the tabs on the
socket align with the slots on the
assembly.
OAD075037
OAD075038
■Ty p e A
■Ty p e B , C
Ta i l / s t o p
Tu r n s i g n a l
Tu r n s i g n a l
OAD075051OAD075050