2017 HONDA RIDGELINE ESP
[x] Cancel search: ESPPage 2 of 85

DISCLOSURES
n Devices That Emit Radio Waves
The following products and systems, if on your vehicle, emit radio waves\
when in operation:
•
Audio system
•
Blind spot information system
•
Immobilizer system
•
Bluetooth® Audio
•
Bluetooth HandsFreeLink®
• Collision Mitigation Braking System™
(CMBS™) •
Homelink® Universal Transceiver
•
HondaLink®
• Remote engine starter
•
Remote transmitter
•
Smart entry system*
•
Tire Pressure Monitoring System
Each of the above complies with the appropriate requirements or the requ\
ired
standards of the FCC (Federal Communications Commission) and Industry \
Canada,
described below:
As required by the FCC:
This device complies with Part 15 of the FCC rules. Operation is subject\
to the following two conditions: (1) This device may not cause harmful interf\
erence, and
(2) this device must accept any interference received, including inter\
ference that may cause undesired operation.
Changes or modifi cations not expressly approved by the party responsi\
ble for compliance could void the user’
s authority to operate the equipment.
As required by Industry Canada:
This device complies with Industry Canada Standard RSS-Gen/210/310. Oper\
ation is subject to the following two conditions: (1) this device may not cause\
interference,
and (2) this device must accept any interference, including interferen\
ce that may
cause undesired operation of the device.
n
California Perchlorate Contamination Prevention Act
The airbags, seat belt tensioners, and CR-type batteries in this vehicle\
may contain perchlorate materials—special handling may apply.
See www.dtsc.ca.gov/hazardouswaste/perchlorate/
for more information.
n
California Proposition 65 Warning WARNING: This product contains or emits chemicals known to the state of Californ\
ia to cause cancer and birth defects or other reproductive harm. n
Event Data Recorders
This vehicle is equipped with an event data recorder (EDR). The main purpose of an EDR is to record, in certain crash or near crash-like situations, suc\
h as an airbag deployment or hitting a road obstacle, data that will assist in understa\
nding how a vehicle’s systems performed. The EDR is designed to record data related to vehicle dynamics and safety systems for a short period of time, typically 30 sec\
onds or less.
The EDR in this vehicle is designed to record such data as:
•
How various systems in your vehicle were operating;
•
Whether or not the driver and passenger safety belts were buckled/fasten\
ed;
•
How far (if at all) the driver was depressing the accelerator and/or b\
rake pedal;
and,
•
How fast the vehicle was traveling.
These data can help provide a better understanding of the circumstances \
in which crashes and injuries occur. NOTE: EDR data are recorded by your vehicle only if a non-trivial crash situation occurs; no data are recorded by the EDR unde\
r normal
driving conditions and no personal data (e.g., name, gender, age, and crash location)
are recorded. However, other parties, such as law enforcement, could combine the EDR data with the type of personally identifying data routinely acquired\
during a
crash investigation.
T
o read data recorded by an EDR, special equipment is required, and acces\
s to the
vehicle or the EDR is needed. In addition to the vehicle manufacturer, other parties
such as law enforcement that have the special equipment can read the inf\
ormation if they have access to the vehicle or the EDR. The data belong to the ve\
hicle owner
and may not be accessed by anyone else except as legally required or wit\
h the permission of the vehicle owner.
n
Service Diagnostic Recorders
This vehicle is equipped with service-related devices that record inform\
ation about powertrain performance. The data can be used to verify emissions l\
aw requirements and/or help technicians diagnose and solve service problems\
. It may
also be combined with data from other sources for research purposes, but\
it remains confidential.
Page 7 of 85
QUICK START
6 || 7
S
AFETY
VOICE RECOGNITION QUICK START
Depending on how your car is equipped, you can use voice recognition to \
place phone
calls, adjust the audio and climate-control systems, work with the avail\
able navigation
system and more.
Use these tips for better voice recognition.
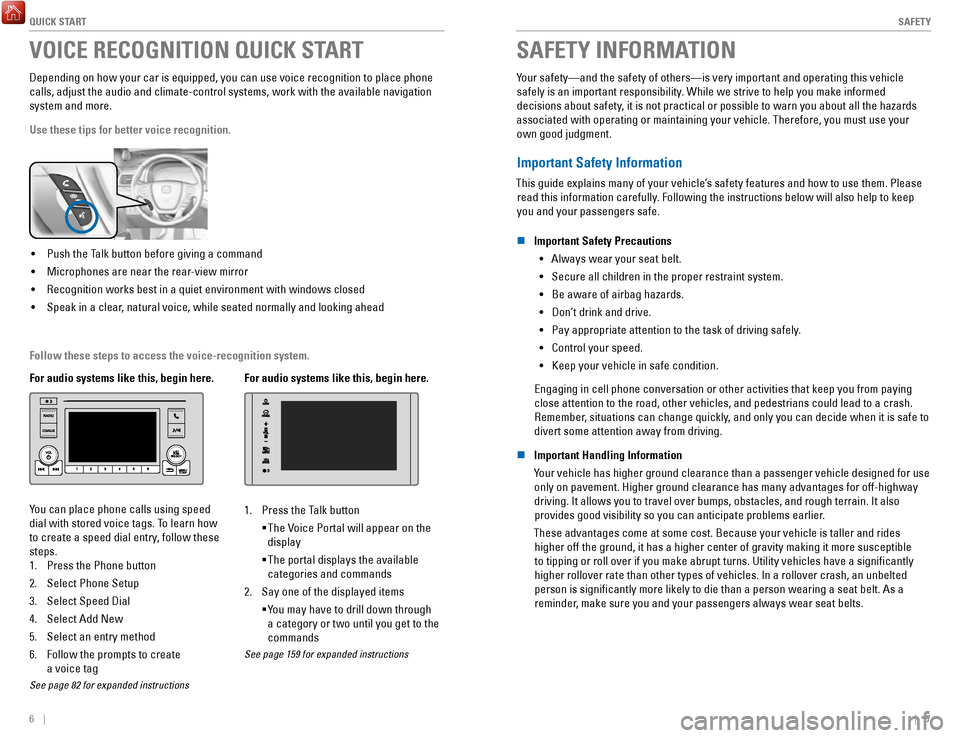
• Push the Talk button before giving a command
•
Microphones are near the rear-view mirror
•
Recognition works best in a quiet environment with windows closed
•
Speak in a clear, natural voice, while seated normally and looking ahead
For audio systems like this, begin here.
You can place phone calls using speed
dial with stored voice tags. To learn how
to create a speed dial entry, follow these
steps.
1.
Press the Phone button
2.
Select Phone Setup
3.
Select Speed Dial
4.
Select Add New
5.
Select an entry method
6.
Follow the prompts to create
a voice tag
See page 82 for expanded instructions
For audio systems like this, begin here.
1. Press the Talk button
The Voice Portal will appear on the
display
The portal displays the available
categories and commands
2.
Say one of the displayed items
You may have to drill down through
a category or two until you get to the
commands
See page 159 for expanded instructions
SAFETY INFORMATION
Your safety—and the safety of others—is very important and operatin\
g this vehicle
safely is an important responsibility. While we strive to help you make informed
decisions about safety, it is not practical or possible to warn you about all the hazards
associated with operating or maintaining your vehicle. Therefore, you mu\
st use your own good judgment.
Important Safety Information
This guide explains many of your vehicle’s safety features and how to use them. Please read this information carefully. Following the instructions below will also help to keep
you and your passengers safe.
n
Important Safety Precautions •
Always wear your seat belt.
•
Secure all children in the proper restraint system.
•
Be aware of airbag hazards.
•
Don’t drink and drive.
•
Pay appropriate attention to the task of driving safely.
•
Control your speed.
•
Keep your vehicle in safe condition.
Engaging in cell phone conversation or other activities that keep you fr\
om paying
close attention to the road, other vehicles, and pedestrians could lead \
to a crash. Remember, situations can change quickly, and only you can decide when it is safe to
divert some attention away from driving.
n
Important Handling Information
Your vehicle has higher ground clearance than a passenger vehicle designe\
d for use only on pavement. Higher ground clearance has many advantages for off-hi\
ghway
driving. It allows you to travel over bumps, obstacles, and rough terrai\
n. It also provides good visibility so you can anticipate problems earlier.
These advantages come at some cost. Because your vehicle is taller and rides higher off the ground, it has a higher center of gravity making it more \
su
sceptible
to tipping or roll over if you make abrupt turns. Utility vehicles have \
a significantly
higher rollover rate than other types of vehicles. In a rollover crash, \
an unbelted
person is significantly more likely to die than a person wearing a sea\
t belt. As a reminder, make sure you and your passengers always wear seat belts.
Follow these steps to access the voice-recognition system.
Page 13 of 85

SAFETY
18 || 19
S
AFETY
Child Safety
Each year, many children are injured or killed in vehicle crashes because they are either
unrestrained or not properly restrained. In fact, vehicle collisions are\
the number one
cause of death of children ages 12 and under.
The National Highway Traffi c Safety Administration and Transport Canada recommend
that all children ages 12 and under be properly restrained in a rear sea\
t. Some states or
provinces/territories have laws restricting where children may ride.
To reduce the number of child deaths and injuries, every state, Canadian \
province and
territory requires that infants and children be properly restrained when\
they ride
in a vehicle.
n
Protecting Child Passengers
•
An inflating front or side airbag can injure or kill a child sitting i\
n the front seat.
•
A child in the front seat is more likely to interfere with the driver’\
s ability to safely
control the vehicle.
•
Statistics show that children of all sizes and ages are safer when they \
are properly restrained in a rear seat.
•
Any child who is too small to wear a seat belt correctly must be restrai\
ned in an
approved child seat that is properly secured to the vehicle using either\
the lap
belt portion of the lap/shoulder belt or the lower anchors of the LATCH system.
•
Never hold a child on your lap because it is impossible to protect them \
in the event of a collision.
•
Never put a seat belt over yourself and a child. During a crash, the bel\
t would likely press deep into the child and cause serious or fatal injuries.
•
Never let two children use the same seat belt. Both children could be ve\
ry
seriously injured in a crash.
•
Do not allow children to operate the doors, windows, or seat adjustments\
.
•
Do not leave children in the vehicle unattended, especially in hot weath\
er when
the inside of the vehicle can get hot enough to kill them. They could al\
so activate vehicle controls, causing it to move unexpectedly.
WARNING
Children who are unrestrained or improperly restrained can be seriously \
injured or killed in a crash.
Any child too small for a seat belt should be properly restrained in a c\
hild
seat. A larger child should be properly restrained with a seat belt, usi\
ng a
booster seat if necessary.
WARNING
Allowing a child to play with a seat belt or wrap one around their neck \
can
result in serious injury or death.
Instruct children not to play with any seat belt and make sure any unuse\
d
seat belt a child can reach is buckled, fully retracted, and locked.
n Protecting Infants
An infant must be properly restrained in a rear-facing, reclining child seat until the
infant reaches the seat manufacturer’s weight or height limit for the seat, and the
infant is at least one year old. Many experts recommend use of a rear-facing seat
for a child up to two years old if the child’s height and weight are appropriate for a
rear
-facing seat.
Child seats must be placed and secured in a rear
seating position. Rear-facing child seats should never
be installed in a forward-facing position.
When properly installed, a rear-facing child seat may prevent the driver or a front
passenger from moving their seat all the way back, or from locking their\
seat-back
in the desired position. If this occurs, we recommend that you install t\
he child seat
directly behind the front passenger’s seat, move the seat as far forward as needed,
and leave it unoccupied. Or, you may wish to get a smaller rear-facing child seat.
WARNING
Placing a rear-facing child seat in the front seat can result in serious
injury or death during a crash.
Always place a rear-facing child seat in the rear seat, not the front.
Page 35 of 85
AUDIO AND CONNECTIVITY
62 || 63
A
UDIO AND CONNECTIVITY
USB Flash Drive
Play and operate a USB flash drive through the vehicle’s audio system. Connect your
device (see page 56).
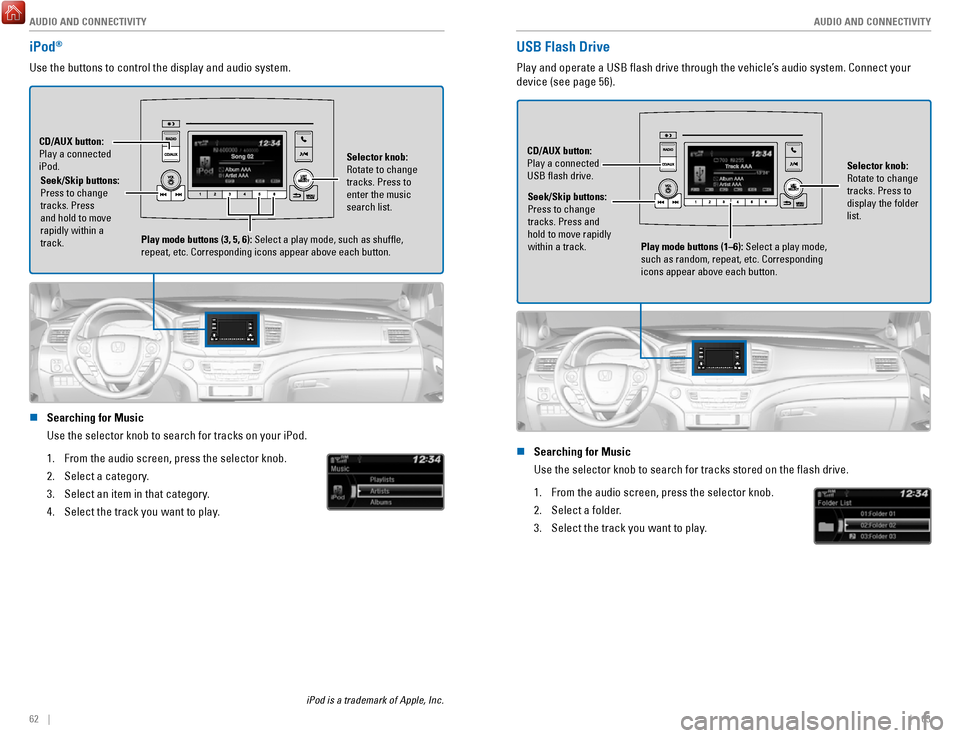
Selector knob:
Rotate to change
tracks. Press to
display the folder
list.
CD/AUX button:
Play a connected
USB flash drive.
Seek/Skip buttons:
Press to change
tracks. Press and
hold to move rapidly
within a track. Play mode buttons (1–6): Select a play mode,
such as random, repeat, etc. Corresponding
icons appear above each button.
n Searching for Music
Use the selector knob to search for tracks stored on the flash drive.
1.
From the audio screen, press the selector knob.
2.
Select a folder.
3.
Select the track you want to play.
iPod®
Use the buttons to control the display and audio system.
Seek/Skip buttons:
Press to change
tracks. Press
and hold to move
rapidly within a
track.
CD/AUX button:
Play a connected
iPod.
Selector knob:
Rotate to change
tracks. Press to
enter the music
search list.
Play mode buttons (3, 5, 6): Select a play mode, such as shuffle,
repeat, etc. Corresponding icons appear above each button.
n Searching for Music
Use the selector knob to search for tracks on your iPod.
1.
From the audio screen, press the selector knob.
2.
Select a category.
3.
Select an item in that category.
4.
Select the track you want to play.
iPod is a trademark of Apple, Inc.
Page 36 of 85
AUDIO AND CONNECTIVITY
64 || 65
A
UDIO AND CONNECTIVITY
Bluetooth® Audio
Play streaming or stored audio from your compatible phone through the ve\
hicle’s audio
system. Visit handsfreelink.com (U.S.) or handsfreelink.ca (Canada) to check phone
compatibility. Standard data rates apply with your phone service provider. Connect your
phone to Bluetooth HandsFreeLink (see page 80).
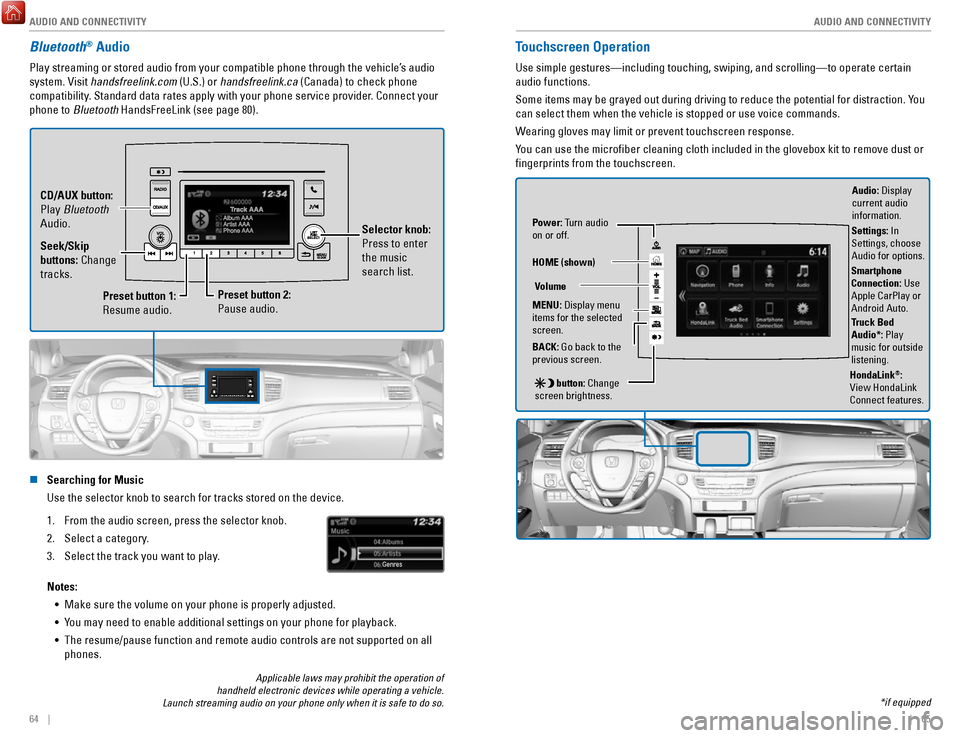
Preset button 1:
Resume audio.
Preset button 2:
Pause audio. Selector knob:
Press to enter
the music
search list.
Seek/Skip
buttons: Change
tracks. CD/AUX button:
Play Bluetooth
Audio.
n Searching for Music
Use the selector knob to search for tracks stored on the device.
1.
From the audio screen, press the selector knob.
2.
Select a category.
3.
Select the track you want to play.
Notes: •
Make sure the volume on your phone is properly adjusted.
•
You may need to enable additional settings on your phone for playback.
•
The resume/pause function and remote audio controls are not supported on\
all
phones.
Touchscreen Operation
Use simple gestures—including touching, swiping, and scrolling—to \
operate certain
audio functions.
Some items may be grayed out during driving to reduce the potential for \
distraction. You
can select them when the vehicle is stopped or use voice commands.
Wearing gloves may limit or prevent touchscreen response.
You can use the microfiber cleaning cloth included in the glovebox kit \
to remove dust or
fingerprints from the touchscreen.
Power: Turn audio
on or off.
HOME (shown)
MENU: Display menu
items for the selected
screen.
BACK: Go back to the
previous screen.
button: Change
screen brightness. Settings: In
Settings, choose
Audio for options.
HondaLink®:
View HondaLink
Connect features.
Volume
Truck Bed
Audio*: Play
music for outside
listening.
Applicable laws may prohibit the operation of
handheld electronic devices while operating a vehicle.
Launch streaming audio on your phone only when it is safe to do so. *if equipped
Audio: Display
current audio
information.
Smartphone
Connection: Use
Apple CarPlay or
Android Auto.
Page 37 of 85
AUDIO AND CONNECTIVITY
66 || 67
A
UDIO AND CONNECTIVITY
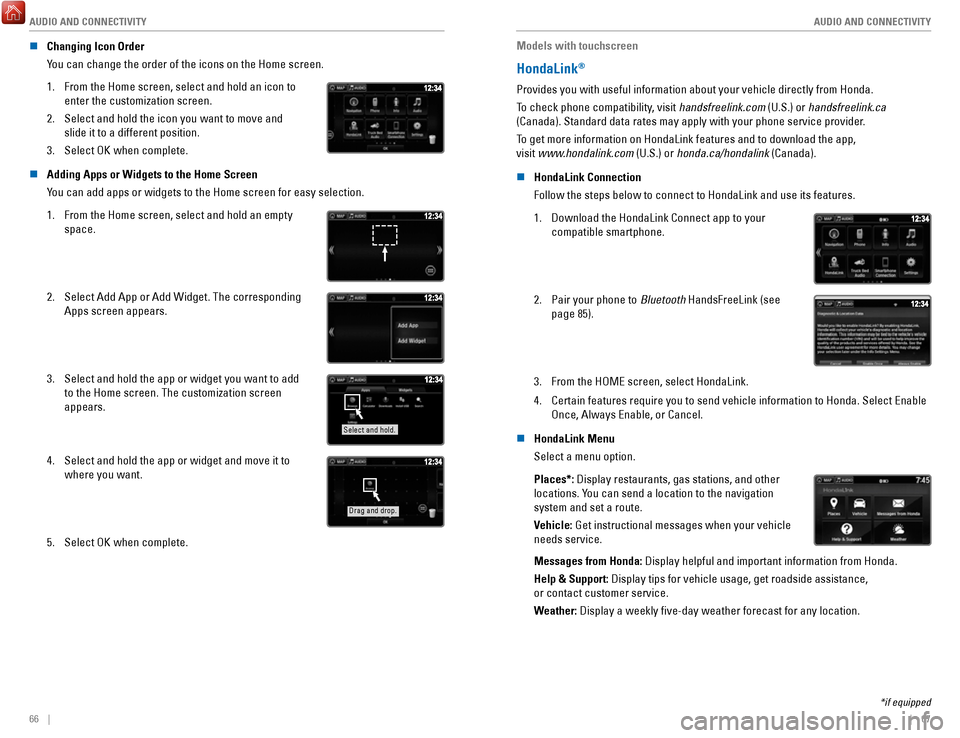
n Changing Icon Order
You can change the order of the icons on the Home screen.
1.
From the Home screen, select and hold an icon to
enter the customization screen.
2.
Select and hold the icon you want to move and
slide it to a different position.
3.
Select OK when complete.
n Adding Apps or Widgets to the Home Screen
You can add apps or widgets to the Home screen for easy selection.
1.
From the Home screen, select and hold an empty
space.
2. Select Add App or Add Widget. The corresponding
Apps screen appears.
3. Select and hold the app or widget you want to add
to the Home screen. The customization screen
appears.
Select and hold.
4. Select and hold the app or widget and move it to
where you want.
Drag and drop.
5. Select OK when complete. Models with touchscreen
HondaLink®
Provides you with useful information about your vehicle directly from Ho\
nda.
To check phone compatibility, visit handsfreelink.com (U.S.) or handsfreelink.ca
(Canada). Standard data rates may apply with your phone service provid\
er.
To get more information on HondaLink features and to download the app,
visit www.hondalink.com (U.S.) or honda.ca/hondalink (Canada).
n
HondaLink Connection
Follow the steps below to connect to HondaLink and use its features.
1.
Download the HondaLink Connect app to your
compatible smartphone.
2. Pair your phone to Bluetooth HandsFreeLink (see
page 85).
3. From the HOME screen, select HondaLink.
4.
Certain features require you to send vehicle information to Honda. Selec\
t Enable
Once, Always Enable, or Cancel.
n
HondaLink Menu
Select a menu option.
Places*: Display restaurants, gas stations, and other
locations. You can send a location to the navigation
system and set a route.
Vehicle: Get instructional messages when your vehicle
needs service.
Messages from Honda: Display helpful and important information from Honda.
Help & Support: Display tips for vehicle usage, get roadside assistance,
or contact customer service.
Weather: Display a weekly five-day weather forecast for any location.
*if equipped
Page 48 of 85
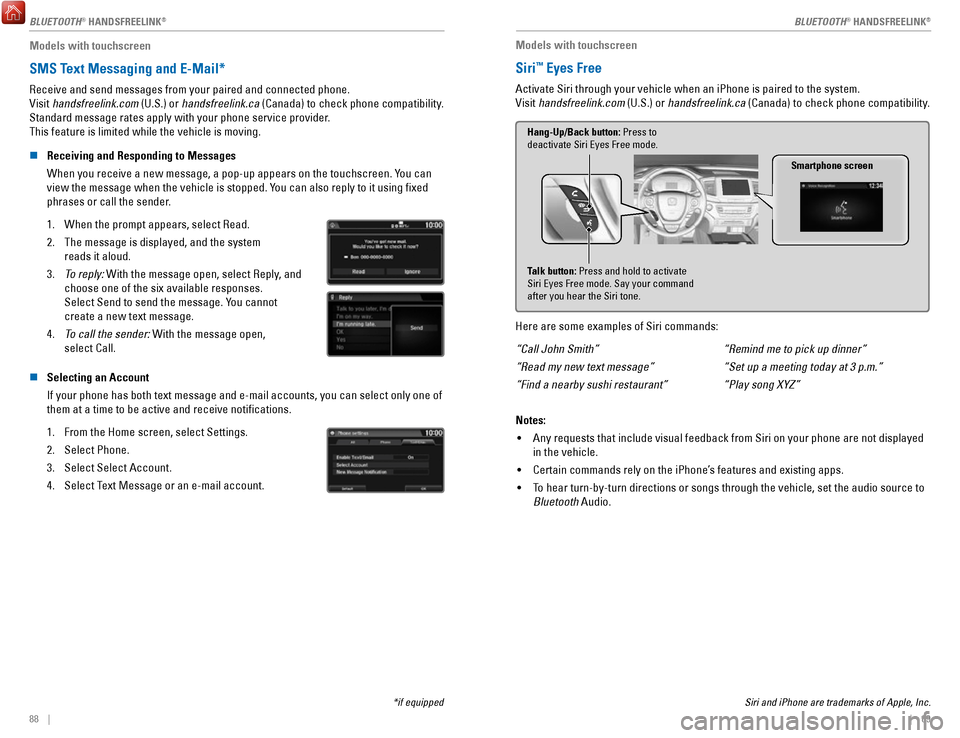
88 || 89
Models with touchscreen
SMS Text Messaging and E-Mail*
Receive and send messages from your paired and connected phone.
Visit handsfreelink.com (U.S.) or handsfreelink.ca (Canada) to check phone compatibility.
Standard message rates apply with your phone service provider.
This feature is limited while the vehicle is moving.
n
Receiving and Responding to Messages
When you receive a new message, a pop-up appears on the touchscreen. You can
view the message when the vehicle is stopped. You can also reply to it using fixed
phrases or call the sender.
1.
When the prompt appears, select Read.
2.
The message is displayed, and the system
reads it aloud.
3.
To reply: With the message open, select Reply, and
choose one of the six available responses.
Select Send to send the message. You cannot
create a new text message.
4.
To call the sender: With the message open,
select Call.
n Selecting an Account
If your phone has both text message and e-mail accounts, you can select \
only one of
them at a time to be active and receive notifications.
1.
From the Home screen, select Settings.
2.
Select Phone.
3.
Select Select Account.
4.
Select Text Message or an e-mail account.
*if equipped Siri and iPhone are trademarks of Apple, Inc.
Models with touchscreen
Siri™ Eyes Free
Activate Siri through your vehicle when an iPhone is paired to the syste\
m.
Visit handsfreelink.com (U.S.) or handsfreelink.ca (Canada) to check phone compatibility.
Smartphone screen
Talk button: Press and hold to activate
Siri Eyes Free mode. Say your command
after you hear the Siri tone. Hang-Up/Back button: Press to
deactivate Siri Eyes Free mode.
Here are some examples of Siri commands:
“Call John Smith”
“Read my new text message”
“Find a nearby sushi restaurant” “Remind me to pick up dinner”
“Set up a meeting today at 3 p.m.”
“Play song XYZ”
Notes: •
Any requests that include visual feedback from Siri on your phone are no\
t displayed
in the vehicle.
•
Certain commands rely on the iPhone’s features and existing apps.
•
To hear turn-by-turn directions or songs through the vehicle, set the aud\
io source to
Bluetooth Audio.
BLUETOOTH® HANDSFREELINK
Page 62 of 85
DRIVING
116 || 117
D
RIVING
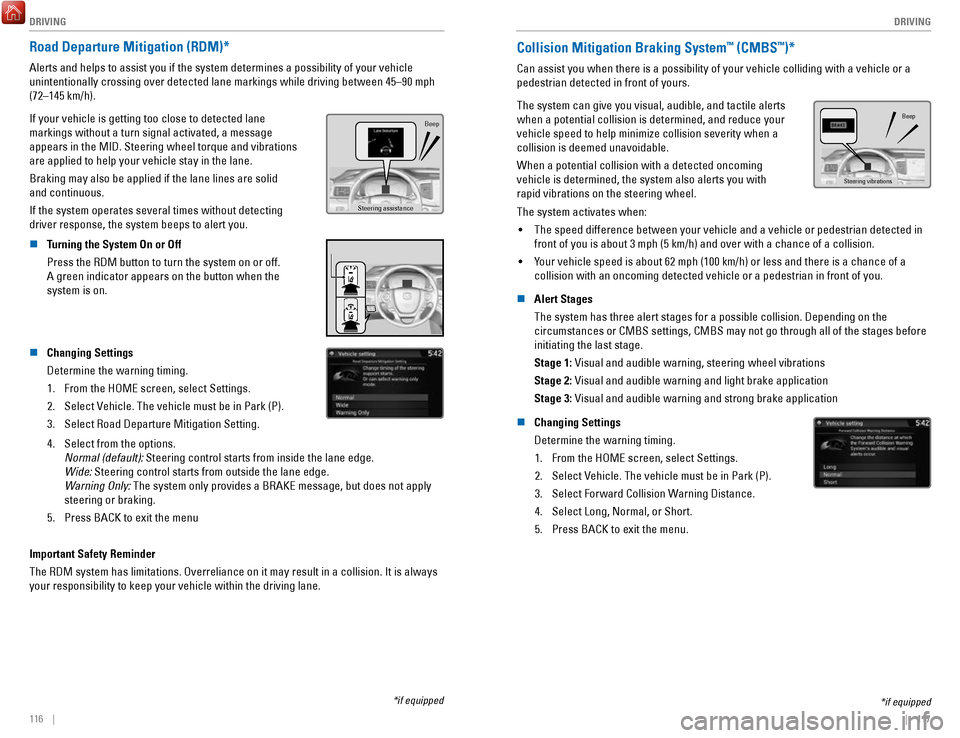
Road Departure Mitigation (RDM)*
Alerts and helps to assist you if the system determines a possibility of\
your vehicle
unintentionally crossing over detected lane markings while driving betwe\
en 45–90 mph
(72–145 km/h).
If your vehicle is getting too close to detected lane
markings without a turn signal activated, a message
appears in the MID. Steering wheel torque and vibrations
are applied to help your vehicle stay in the lane.
Braking may also be applied if the lane lines are solid
and continuous.
If the system operates several times without detecting
driver response, the system beeps to alert you.
Steering assistance
Beep
n Turning the System On or Off
Press the RDM button to turn the system on or off.
A green indicator appears on the button when the
system is on.
n Changing Settings
Determine the warning timing.
1.
From the HOME screen, select Settings.
2.
Select Vehicle. The vehicle must be in Park (P).
3.
Select Road Departure Mitigation Setting.
4. Select from the options.
Normal (default): Steering control starts from inside the lane edge.
Wide: Steering control starts from outside the lane edge.
Warning Only:
The system only provides a BRAKE message, but does not apply
steering or braking.
5.
Press BACK to exit the menu
Important Safety Reminder
The RDM system has limitations. Overreliance on it may result in a colli\
sion. It is always
your responsibility to keep your vehicle within the driving lane.
*if equipped
Collision Mitigation Braking System™ (CMBS™)*
Can assist you when there is a possibility of your vehicle colliding wit\
h a vehicle or a
pedestrian detected in front of yours.
The system can give you visual, audible, and tactile alerts
when a potential collision is determined, and reduce your
vehicle speed to help minimize collision severity when a
collision is deemed unavoidable.
When a potential collision with a detected oncoming
vehicle is determined, the system also alerts you with
rapid vibrations on the steering wheel.
Steering vibrations Beep
The system activates when:
•
The speed difference between your vehicle and a vehicle or pedestrian de\
tected in
front of you is about 3 mph (5 km/h) and over with a chance of a colli\
sion.
•
Your vehicle speed is about 62 mph (100 km/h) or less and there is a ch\
ance of a
collision with an oncoming detected vehicle or a pedestrian in front of \
you.
n
Alert Stages
The system has three alert stages for a possible collision. Depending on\
the circumstances or CMBS settings, CMBS may not go through all of the stage\
s before
initiating the last stage.
Stage 1: Visual and audible warning, steering wheel vibrations
Stage 2: Visual and audible warning and light brake application
Stage 3: Visual and audible warning and strong brake application
n
Changing Settings
Determine the warning timing. 1.
From the HOME screen, select Settings.
2.
Select Vehicle. The vehicle must be in Park (P).
3.
Select Forward Collision Warning Distance.
4.
Select Long, Normal, or Short.
5.
Press BACK to exit the menu.
*if equipped