2017 HONDA RIDGELINE audio
[x] Cancel search: audioPage 42 of 85
AUDIO AND CONNECTIVITY
76 || 77
A
UDIO AND CONNECTIVITY
Models with touchscreen
USB Flash Drive
Play and operate a USB flash drive through the vehicle’s audio system. Connect your
device to the USB port (see page 56).
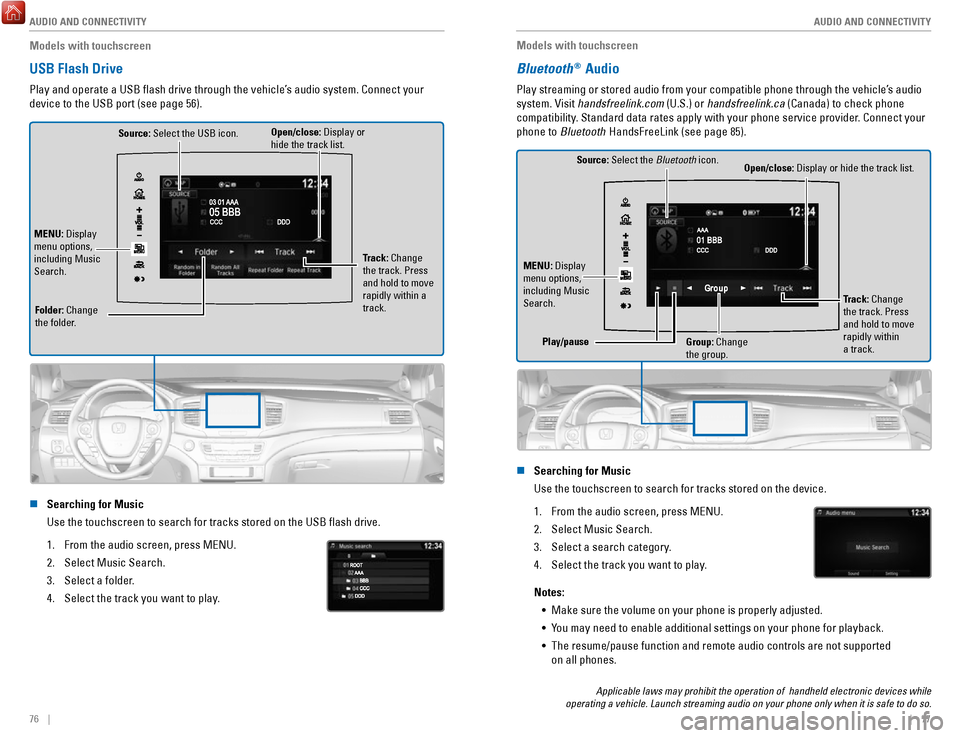
Source: Select the USB icon.
Folder: Change
the folder. Open/close: Display or
hide the track list.
MENU: Display
menu options,
including Music
Search. Track: Change
the track. Press
and hold to move
rapidly within a
track.
n Searching for Music
Use the touchscreen to search for tracks stored on the USB flash drive\
.
1.
From the audio screen, press MENU.
2.
Select Music Search.
3.
Select a folder.
4.
Select the track you want to play.
Models with touchscreen
Bluetooth® Audio
Play streaming or stored audio from your compatible phone through the ve\
hicle’s audio
system. Visit handsfreelink.com (U.S.) or handsfreelink.ca (Canada) to check phone
compatibility. Standard data rates apply with your phone service provider. Connect your
phone to Bluetooth HandsFreeLink (see page 85).
Source: Select the Bluetooth icon.
Open/close: Display or hide the track list.
MENU: Display
menu options,
including Music
Search. Track: Change
the track. Press
and hold to move
rapidly within
a track.
Play/pause
Group: Change
the group.
n Searching for Music
Use the touchscreen to search for tracks stored on the device.
1.
From the audio screen, press MENU.
2.
Select Music Search.
3.
Select a search category.
4.
Select the track you want to play.
Notes: •
Make sure the volume on your phone is properly adjusted.
•
You may need to enable additional settings on your phone for playback.
•
The resume/pause function and remote audio controls are not supported
on all phones.
Applicable laws may prohibit the operation of handheld electronic devic\
es while
operating a vehicle. Launch streaming audio on your phone only when it i\
s safe to do so.
Page 43 of 85
AUDIO AND CONNECTIVITY
78 || 79
A
UDIO AND CONNECTIVITY
Models with touchscreen
Pandora®*
Play and operate Pandora from your compatible phone through the vehicle’\
s audio
system. Visit handsfreelink.com to check phone compatibility. Standard data rates apply
with your phone service provider. Available in the U.S. only.
Connect your phone when the vehicle is stopped.
For iPhone:
•
Connect via Bluetooth HandsFreeLink (see page 85) or USB port
(see page 56).
•
A pop-up may appear on your phone requesting you to allow access for Pan\
dora
to be launched.
•
If you cannot operate Pandora through the audio system, it may be stream\
ing
through Bluetooth Audio. Make sure Pandora is selected on the audio system.
•
If Pandora still does not operate, try rebooting the phone and reconnect\
ing the
cable if necessary.
For other compatible smartphones: •
Connect via Bluetooth HandsFreeLink (see page 85).
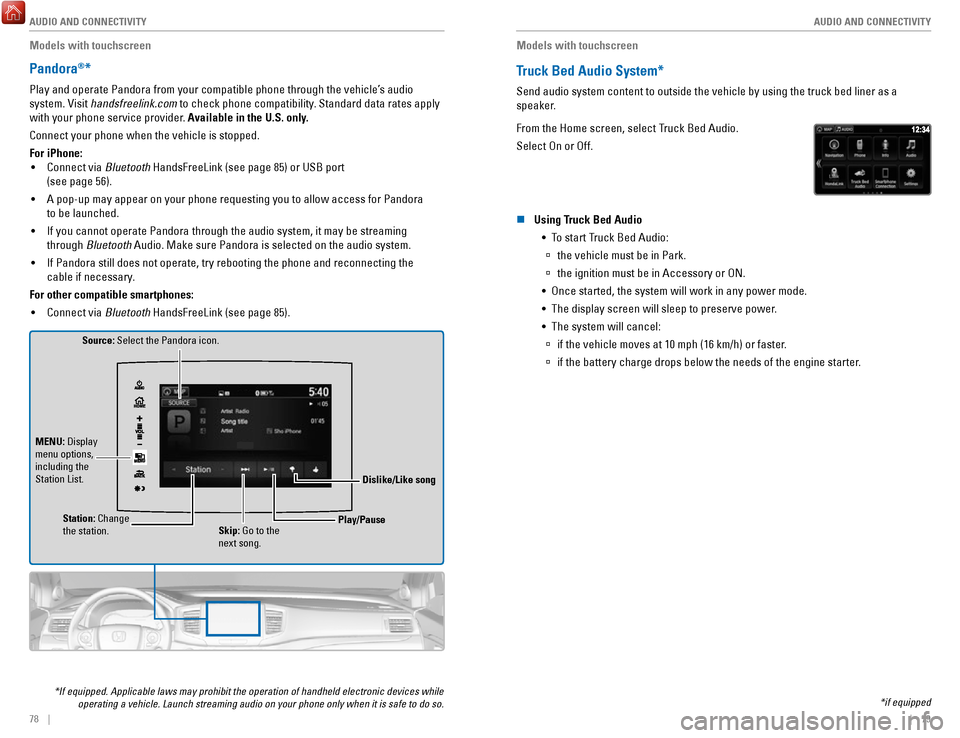
Source: Select the Pandora icon.
Station: Change
the station. Skip: Go to the
next song.
MENU: Display
menu options,
including the
Station List.
Dislike/Like song
Play/Pause
*If equipped. Applicable laws may prohibit the operation of handheld ele\
ctronic devices while operating a vehicle. Launch streaming audio on your phone only when it i\
s safe to do so.
Models with touchscreen
Truck Bed Audio System*
Send audio system content to outside the vehicle by using the truck bed \
liner as a
speaker.
From the Home screen, select Truck Bed Audio.
Select On or Off.
n Using Truck Bed Audio
•
To start Truck Bed Audio:
à the vehicle must be in Park.
àthe ignition must be in Accessory or ON.
•
Once started, the system will work in any power mode.
•
The display screen will sleep to preserve power.
•
The system will cancel:
à if the vehicle moves at 10 mph (16 km/h) or faster.
àif the battery charge drops below the needs of the engine starter.
*if equipped
Page 44 of 85
80 || 81
BLUETOOTH® HANDSFREELINK® (HFL)
Learn how to operate the vehicle’s hands-free calling system.
Color Audio System
Basic HFL Operation
Make and receive phone calls using the vehicle’s audio system, without handling your
phone. Visit handsfreelink.com (U.S.) or handsfreelink.ca (Canada) to check phone
compatibility.
To reduce the potential for driver distraction, certain manual functions \
may be
inoperable or grayed out while the vehicle is moving. Stop or pull over \
to perform
the function.
n
HFL Controls
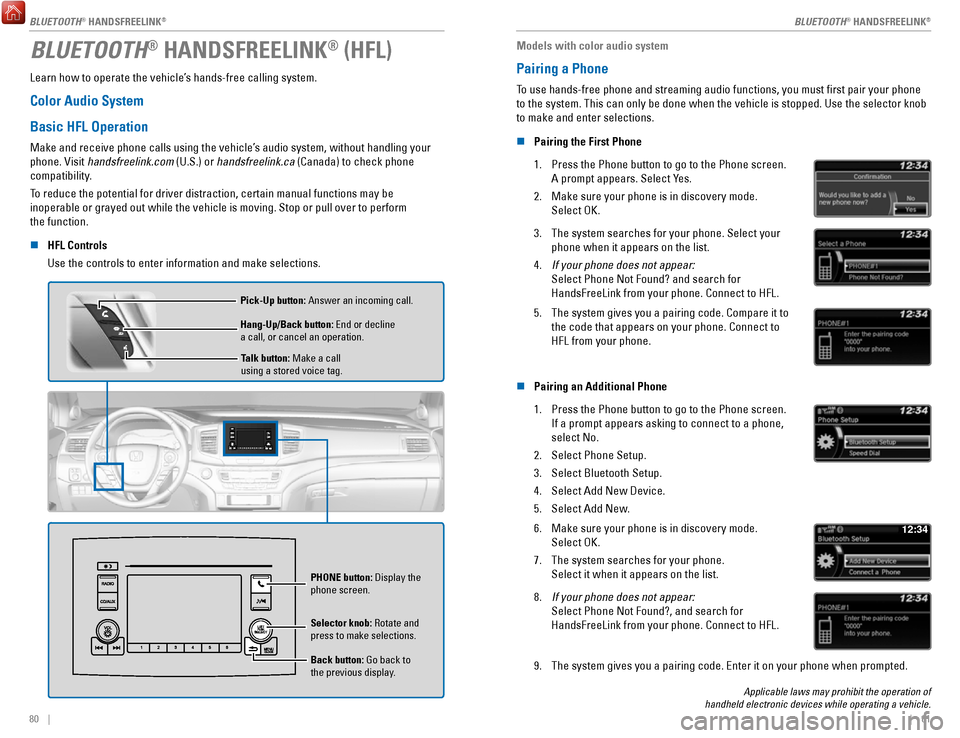
Use the controls to enter information and make selections.
Talk button: Make a call
using a stored voice tag.
Hang-Up/Back button: End or decline
a call, or cancel an operation. Pick-Up button: Answer an incoming call.
Selector knob: Rotate and
press to make selections.
Back button: Go back to
the previous display. PHONE
button: Display the
phone screen.
Models with color audio system
Pairing a Phone
To use hands-free phone and streaming audio functions, you must first p\
air your phone
to the system. This can only be done when the vehicle is stopped. Use th\
e selector knob
to make and enter selections.
n
Pairing the First Phone
1.
Press the Phone button to go to the Phone screen.
A prompt appears. Select Yes.
2.
Make sure your phone is in discovery mode.
Select OK.
3. The system searches for your phone. Select your
phone when it appears on the list.
4.
If your phone does not appear:
Select Phone Not Found? and search for
HandsFreeLink from your phone. Connect to HFL.
5. The system gives you a pairing code. Compare it to
the code that appears on your phone. Connect to
HFL from your phone.
n Pairing an Additional Phone
1.
Press the Phone button to go to the Phone screen.
If a prompt appears asking to connect to a phone,
select No.
2.
Select Phone Setup.
3.
Select Bluetooth Setup.
4.
Select Add New Device.
5.
Select Add New.
6. Make sure your phone is in discovery mode.
Select OK.
7.
The system searches for your phone.
Select it when it appears on the list.
12:34
8. If your phone does not appear:
Select Phone Not Found?, and search for
HandsFreeLink from your phone. Connect to HFL.
9. The system gives you a pairing code. Enter it on your phone when prompte\
d.
Applicable laws may prohibit the operation of
handheld electronic devices while operating a vehicle.
BLUETOOTH® HANDSFREELINK®
BLUETOOTH® HANDSFREELINK®
BLUETOOTH® HANDSFREELINK®
Page 45 of 85
82 || 83
Models with color audio system
Making a Call
You can make a call using several methods.
n
Dialing a Number
Enter a 10-digit phone number to call. Use the selector knob to make and\
enter
selections. This method is inoperable while the vehicle is moving.
1.
Press the Phone button.
2.
Select Dial.
3.
Enter the phone number. Select the green phone
icon to call.
n Using the Phonebook
When your phone is paired, its phonebook is automatically imported to th\
e system.
Use the selector knob to make and enter selections. This method is inope\
rable while the vehicle is moving.
1.
Press the Phone button.
2.
Select Phonebook.
3.
Scroll through the list to find the name and number
you want to call, and select it to call.
n Storing Speed Dial Entries
Store up to 20 numbers for quick dialing. Use the selector knob to make \
and enter selections.
1.
Press the Phone button.
2.
Select Phone Setup.
3.
Select Speed Dial, then select Add New.
4.
Select an entry method.
5.
If desired, you can create a voice tag for the
number. Follow the prompts.
n Using Speed Dial
Make calls quickly using stored speed dial entries. Use the selector kno\
b to make
and enter selections.
1.
Press the Phone button.
2.
Select Speed Dial.
3.
Scroll through the list to find the entry you want to
call, and select it to call.
Speed dial entries with stored voice tags can be called using the Talk button.
Press the Talk button and follow the prompts.
Touchscreen
Basic HFL Operation
Make and receive phone calls using the vehicle’s audio system, without handling your
phone. Visit handsfreelink.com (U.S.) or handsfreelink.ca (Canada) to check phone
compatibility.
To reduce the potential for driver distraction, certain manual functions \
may be
inoperable or grayed out while the vehicle is moving. Stop or pull over \
to perform the
function. Voice commands are also available.
n
HFL Controls
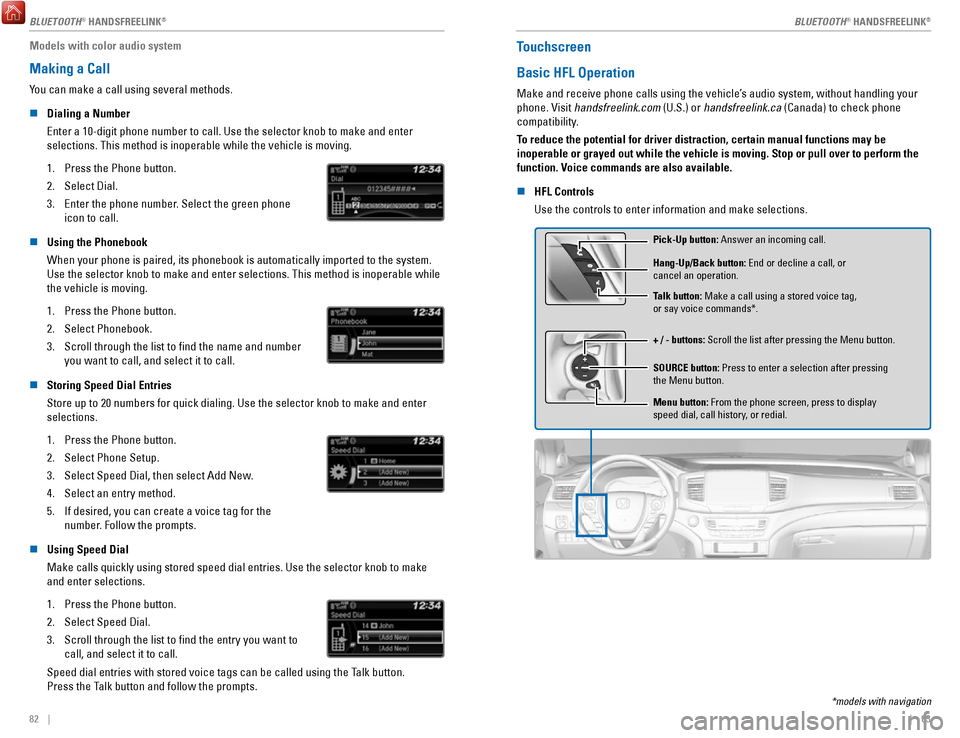
Use the controls to enter information and make selections.
Pick-Up button: Answer an incoming call.
+ / - buttons: Scroll the list after pressing the Menu button. Hang-Up/Back button: End or decline a call, or
cancel an operation.
SOURCE button: Press to enter a selection after pressing
the Menu button. Talk button: Make a call using a stored voice tag,
or say voice commands*.
Menu button: From the phone screen, press to display
speed dial, call history, or redial.
*models with navigation
BLUETOOTH® HANDSFREELINK
Page 46 of 85
84 || 85
n Talk Button Tips
For a list of available phone commands, see page 159.
•
When using the Talk button, wait until you hear a beep before speaking.
•
To bypass the system prompts, simply press the Talk button again to say
your command.
•
When the Talk button is pressed, all available voice commands are highlighted in yellow.
•
Speak in a clear, natural voice.
•
Reduce all background noise.
•
Adjust the dashboard vents away from the microphone on the ceiling.
•
Close the windows and moonroof*.
AAAAA012-3456789AAAAA
012-3456789
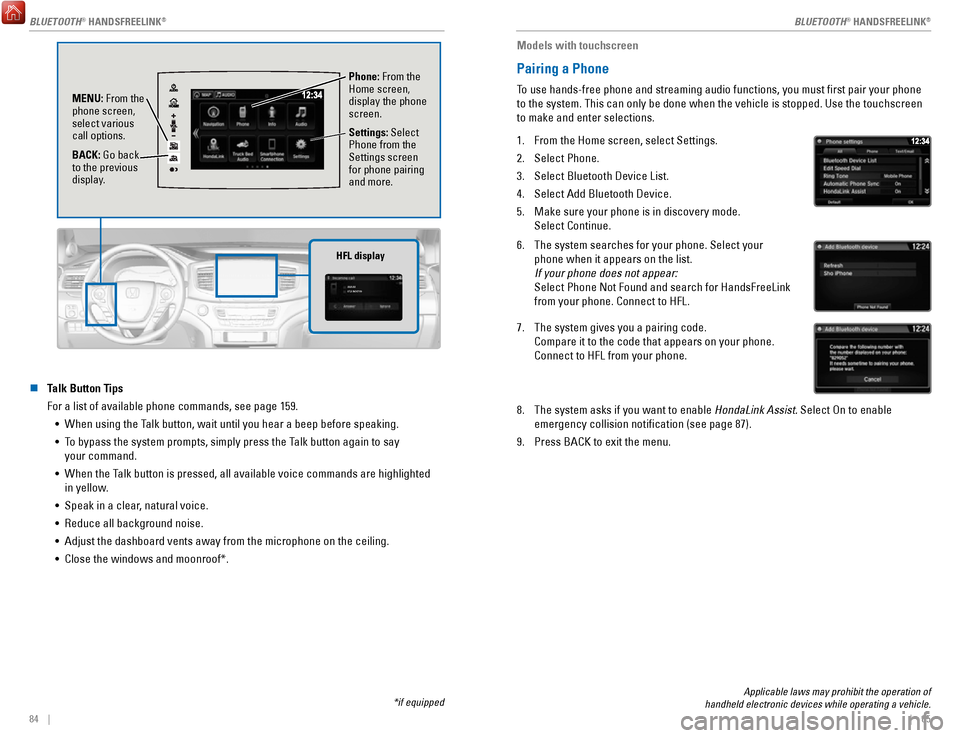
HFL display
Phone: From the
Home screen,
display the phone
screen.
MENU: From the
phone screen,
select various
call options.
BACK: Go back
to the previous
display. Settings: Select
Phone from the
Settings screen
for phone pairing
and more.
*if equipped
Applicable laws may prohibit the operation of
handheld electronic devices while operating a vehicle.
Models with touchscreen
Pairing a Phone
To use hands-free phone and streaming audio functions, you must first p\
air your phone
to the system. This can only be done when the vehicle is stopped. Use th\
e touchscreen
to make and enter selections.
1.
From the Home screen, select Settings.
2.
Select Phone.
3.
Select Bluetooth Device List.
4.
Select Add Bluetooth Device.
5.
Make sure your phone is in discovery mode.
Select Continue.
6. The system searches for your phone. Select your
phone when it appears on the list.
If your phone does not appear:
Select Phone Not Found and search for HandsFreeLink
from your phone. Connect to HFL.
7. The system gives you a pairing code.
Compare it to the code that appears on your phone.
Connect to HFL from your phone.
8. The system asks if you want to enable HondaLink Assist. Select On to enable
emergency collision notification (see page 87).
9.
Press BACK to exit the menu.
BLUETOOTH® HANDSFREELINK®
BLUETOOTH® HANDSFREELINK®
BLUETOOTH® HANDSFREELINK®
Page 48 of 85
88 || 89
Models with touchscreen
SMS Text Messaging and E-Mail*
Receive and send messages from your paired and connected phone.
Visit handsfreelink.com (U.S.) or handsfreelink.ca (Canada) to check phone compatibility.
Standard message rates apply with your phone service provider.
This feature is limited while the vehicle is moving.
n
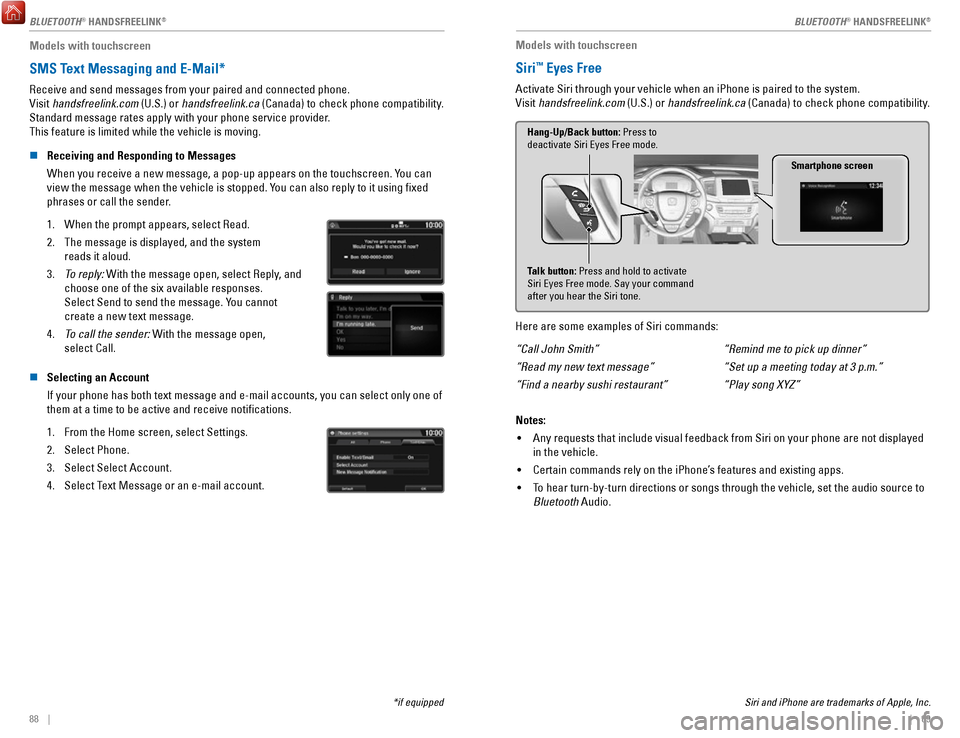
Receiving and Responding to Messages
When you receive a new message, a pop-up appears on the touchscreen. You can
view the message when the vehicle is stopped. You can also reply to it using fixed
phrases or call the sender.
1.
When the prompt appears, select Read.
2.
The message is displayed, and the system
reads it aloud.
3.
To reply: With the message open, select Reply, and
choose one of the six available responses.
Select Send to send the message. You cannot
create a new text message.
4.
To call the sender: With the message open,
select Call.
n Selecting an Account
If your phone has both text message and e-mail accounts, you can select \
only one of
them at a time to be active and receive notifications.
1.
From the Home screen, select Settings.
2.
Select Phone.
3.
Select Select Account.
4.
Select Text Message or an e-mail account.
*if equipped Siri and iPhone are trademarks of Apple, Inc.
Models with touchscreen
Siri™ Eyes Free
Activate Siri through your vehicle when an iPhone is paired to the syste\
m.
Visit handsfreelink.com (U.S.) or handsfreelink.ca (Canada) to check phone compatibility.
Smartphone screen
Talk button: Press and hold to activate
Siri Eyes Free mode. Say your command
after you hear the Siri tone. Hang-Up/Back button: Press to
deactivate Siri Eyes Free mode.
Here are some examples of Siri commands:
“Call John Smith”
“Read my new text message”
“Find a nearby sushi restaurant” “Remind me to pick up dinner”
“Set up a meeting today at 3 p.m.”
“Play song XYZ”
Notes: •
Any requests that include visual feedback from Siri on your phone are no\
t displayed
in the vehicle.
•
Certain commands rely on the iPhone’s features and existing apps.
•
To hear turn-by-turn directions or songs through the vehicle, set the aud\
io source to
Bluetooth Audio.
BLUETOOTH® HANDSFREELINK
Page 64 of 85
DRIVING
120 || 121
D
RIVING
*if equipped
Cross Traffic Monitor*
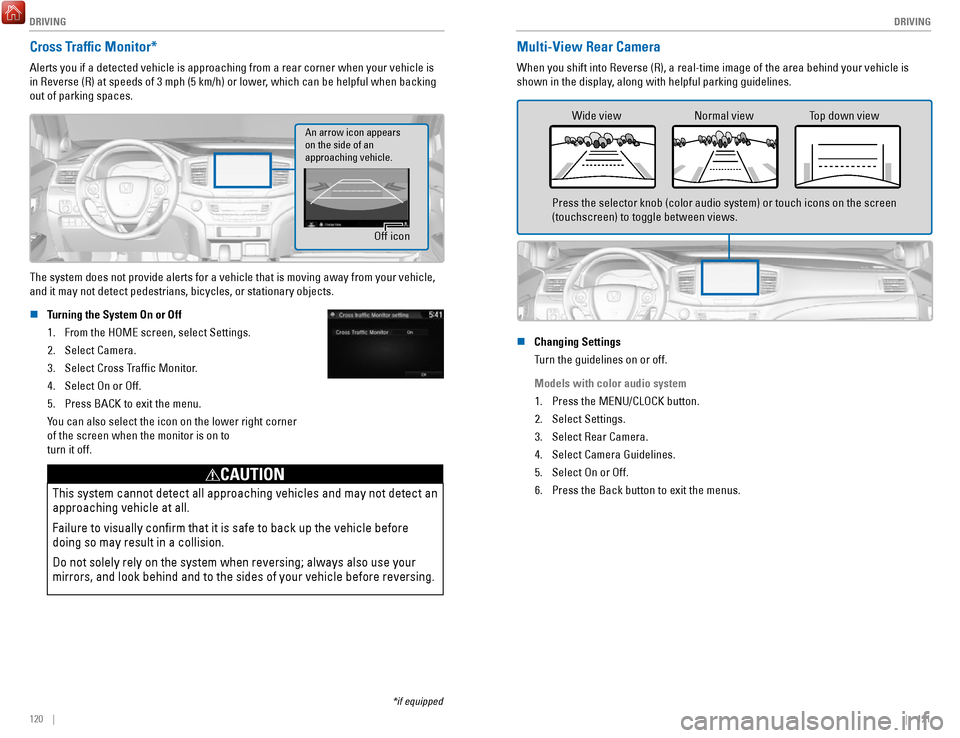
Alerts you if a detected vehicle is approaching from a rear corner when \
your vehicle is
in Reverse (R) at speeds of 3 mph (5 km/h) or lower, which can be helpful when backing
out of parking spaces.
Off icon
An arrow icon appears
on the side of an
approaching vehicle.
The system does not provide alerts for a vehicle that is moving away fro\
m your vehicle,
and it may not detect pedestrians, bicycles, or stationary objects.
n
Turning the System On or Off
1.
From the HOME screen, select Settings.
2.
Select Camera.
3.
Select Cross Traffic Monitor.
4.
Select On or Off.
5.
Press BACK to exit the menu.
You can also select the icon on the lower right corner
of the screen when the monitor is on to
turn it off.
This system cannot detect all approaching vehicles and may not detect an\
approaching vehicle at all.
Failure to visually confirm that it is safe to back up the vehicle bef\
ore
doing so may result in a collision.
Do not solely rely on the system when reversing; always also use your
mirrors, and look behind and to the sides of your vehicle before reversi\
ng.
CAUTION
Multi-View Rear Camera
When you shift into Reverse (R), a real-time image of the area behind \
your vehicle is
shown in the display, along with helpful parking guidelines.
Wide view Normal view Top down view
Press the selector knob (color audio system) or touch icons on the scr\
een
(touchscreen) to toggle between views.
n
Changing Settings
Turn the guidelines on or off.
Models with color audio system 1.
Press the MENU/CLOCK button.
2.
Select Settings.
3.
Select Rear Camera.
4.
Select Camera Guidelines.
5.
Select On or Off.
6.
Press the Back button to exit the menus.
Page 67 of 85

HANDLING THE UNEXPECTED
126 || 127
H
ANDLING THE UNEXPECTED
Jump Starting
Turn off the power to electric devices, such as audio and lights. Turn off the engine, then
open the hood.
1.
Remove the engine compartment cover
(see page 141).
2.
Remove the holding clips and the air intake duct.
3.
Connect the first jumper cable to your vehicle’s battery
(+) terminal.
4.
Connect the other end of the first jumper cable to the
booster battery (+) terminal. Use a 12-volt booster
battery only.
5.
Connect the second jumper cable to the booster
battery (-) terminal.
6.
Connect the other end of the second jumper cable
to the engine hanger as shown. Do not connect this
jumper cable to any other part.
7.
If your vehicle is connected to another vehicle, start
the assisting vehicle’s engine and increase its rpm
slightly.
8.
Attempt to start your vehicle’s engine. If it turns over
slowly, make sure that the jumper cables have good
metal-to-metal contact.
Clip
Air intake duct
Engine cover
Pins
WARNING: Battery posts, terminals, and related accessories contain lead and lead\
compounds. Wash your hands after handling.
A battery can explode if you do not follow the correct procedure, seriou\
sly
injuring anyone nearby.
Keep all sparks, open flames, and smoking materials away from the batt\
ery.
WARNING
n After the Engine Starts
Once your vehicle’s engine has started, remove the jumper cables in the
following order:
1.
Disconnect the jumper cable from the engine hanger.
2.
Disconnect the other end of the jumper cable from the booster
battery’s (-) terminal.
3.
Disconnect the jumper cable from the booster battery’s (+) terminal.
4.
Disconnect the other end of the jumper cable from your vehicle’s (+) terminal.
5.
Have your vehicle inspected by a nearby service station or a dealer.
Overheating
If the temperature gauge needle is at the H mark, the engine suddenly lo\
ses power, or
steam or spray comes out from under the hood, your engine is overheating\
.
1.
Immediately park the vehicle in a safe place. Turn off
all accessories and turn on the hazard warning lights.
2.
If steam or spray is not present: Keep the engine
running and open the hood.
If steam or spray is present: Turn off the engine and
wait until it subsides. Then, open the hood.
Reserve tank
MIN MAX
3. Check that the cooling fan is operating and stop the engine once the tem\
perature
gauge needle comes down. If the cooling fan is not operating, immediatel\
y stop
the engine.
4.
Once the engine has cooled down, inspect the coolant level and check the\
cooling
system components for leaks. If the coolant level in the reserve tank is\
low, add
coolant until it reaches the MAX mark. If there is no coolant in the res\
erve tank,
make sure the radiator is cool, then cover the radiator cap with a heavy\
cloth and
open the cap. If necessary
, add coolant up to the base of the filler neck, and put the
cap back on.
Once the engine has cooled sufficiently, restart it and check the temperature gauge.
If the temperature needle has gone down, resume driving. If it has not g\
one down,
contact a dealer for repairs.
Steam and spray from an overheated engine can seriously scald you.
Do not open the hood if steam is coming out.
WARNING
Removing the radiator cap while the engine is hot can cause the coolant \
to
spray out, seriously scalding you.
Always let the engine and radiator cool down before removing the radiato\
r
cap.
WARNING
Continuing to drive with the temperature gauge needle at the H mark may \
damage
the engine.
NOTICE