Page 4 of 606

Contents
Child Safety P. 53Exhaust Gas Hazard P. 68Safety Labels P. 69
Opening and Closing the Tailgate P. 126 Opening and Closing the Trunk P. 128
Opening and Closing the Moonroof* P. 138 Operating the Switches Around the Steering Wheel P. 140
Interior Lights/Convenience It ems P. 169Climate Control System* P. 186
Audio System Basic Operation P. 204, 222 Audio Error Messages P. 292
Customized Features P. 303
Off-Highway Driving Guidelines P. 416 When Driving P. 418 Braking P. 474
Refueling P. 498 Fuel Economy and CO
2 Emissions P. 501
Maintenance Under the Hood P. 511 Replacing Light Bulbs P. 523
Checking and Maintaining Tires P. 531 Battery P. 540 Remote Transmitter Care P. 541
Cleaning P. 543 Accessories and Modifications P. 549
Engine Does Not Start P. 562Jump Starting P. 565 Shift Lever Does Not Move P. 568
Fuses P. 575 Emergency Towing P. 580
Refueling P. 582
Devices that Emit Radio Waves P. 589 Reporting Safety Defects P. 590
Authorized Manuals P. 595 Customer Service Information P. 596
Quick Reference GuideP. 4
Safe DrivingP. 27
Instrument PanelP. 71
ControlsP. 107
FeaturesP. 197
DrivingP. 395
MaintenanceP. 503
Handling the UnexpectedP. 551
InformationP. 585
IndexP. 597
Page 550 of 606

549
Maintenance
Accessories and Modifications
Accessories
When installing accessories, check the following:
• Do not install accessories on the windsh ield. They can obstruct your view and
delay your reaction to driving conditions.
• Do not install any accessories over areas marked SRS Airbag, on the sides or backs
of the front seats, on front or side pillars, or near the side windows. Accessories
installed in these areas may interfere with proper operation of the vehicle’s
airbags or may be propelled into you or another occupant if the airbags deploy.
• Be sure electronic accessories do not overload electrical circuits or interfere with
proper operation of your vehicle.
2 Fuses P. 575
•Before installing any electro nic accessory, have the installer contact a dealer for
assistance. If possible, have a deal er inspect the final installation.
• Your vehicle should not be used to carry a slide-in camper. If you install a truck
cap, be sure it is properly installed and does not exceed your vehicle’s load limits.
2Maximum Load Limit P. 399
Modifications
Do not modify your vehicle in a manner that may affect its handling, stability, or
reliability, or install non-genuine Honda pa rts or accessories that may have a similar
effect.
Even minor modifications to vehicle systems can affect overall vehicle performance.
Always make sure all equipment is proper ly installed and maintained, and do not
make any modification to your vehicle or its systems that might cause your vehicle
to no longer meet federal, state, pr ovince, territory, and local regulations.
Do not modify or attempt to repair any of the electrical components.
1Accessories and Modifications
Honda Genuine accessor ies are recommended to
ensure proper operati on on your vehicle.
3WARNING
Improper accessories or modifications can
affect your vehicle’s handling, stability, and
performance, and cause a crash in which
you can be seriously hurt or killed.
Follow all instruction s in this owner’s
manual regarding accessories and
modifications.
Page 552 of 606

551
Handling the Unexpected
This chapter explains how to handle unexpected troubles.
ToolsTypes of Tools .................................. 552
If a Tire Goes Flat Changing a Flat Tire ......................... 553
Engine Does Not Start Checking the Engine ........................ 562
If the Smart Entry Remote Battery is Weak .......................................... 563
Emergency Engine Stop ................... 564
Jump Starting .................................... 565
Shift Lever Does Not Move .............. 568Overheating
How to Handle Overheating............. 569
Indicator, Coming On/Blinking
If the Low Oil Pressure Indicator Comes On ............................................. 571
If the Charging System Indicator Comes
On ................................................. 571
If the Malfunction Indicator Lamp Comes On or Blinks ................................... 572
If the Brake System Indicator (Red) Comes On .................................................... 573
If the Electric Power Steering (EPS) System
Indicator Comes On ........................... 573 If the Low Tire Pressure/Tire Pressure
Monitoring System (TPMS) Indicator Comes
On or Blinks........................................ 574
Fuses
Fuse Locations ................................. 575
Inspecting and Changing Fuses ........ 579
Emergency Towing ........................... 580
When You Cannot Unlock the Fuel Fill Door ................................................. 581
Refueling
Refueling From a Portable Fuel Container ................................... 582
Page 563 of 606

562
Handling the Unexpected
Engine Does Not Start
Checking the Engine
If the engine does not start, check the starter.
Starter conditionChecklist
Starter doesn’t turn or turns
over slowly.
The battery may be dead. Check
each of the items on the right and
respond accordingly.Check for a message on the multi-information display.
●If the To Start, Hold Remote Near Start Button message appears
2If the Smart Entry Remote Battery is Weak P. 563
uMake sure the smart entry remote is in its operating range.
2ENGINE START/STOP Button Operating Range P. 140
Check the brightness of the interior lights.
Turn on the interior lights and check the brightness.
●If the interior lights are dim or do not come on at all
2Battery P. 540●If the interior lights come on normally 2 Fuses P. 575
The starter turns over normally
but the engine doesn’t start.
There may be a problem with the
fuse. Check each of the items on
the right and respond accordingly. Review the engine start procedure.
Follow its instructions, and try to start the engine again.
2
Starting the Engine P. 418
Check the immobilizer system indicator.
When the immobilizer system indicator is blinking, the engine cannot be started.
2Immobilizer System P. 131
Check the fuel level.
There should be enough fuel in the tank.
2 Fuel Gauge P. 101
Check the fuse.
Check all fuses, or have the vehicle checked by a dealer.
2Inspecting and Changing Fuses P. 579
If the problem continues:
2Emergency Towing P. 580
1Checking the Engine
If you must start the vehi cle immediately, use an
assisting vehicle to jump start it.
2 Jump Starting P. 565
Page 576 of 606
575Continued
Handling the Unexpected
Fuses
Fuse Locations
If any electrical devices are not working, set the power mode to VEHICLE OFF (LOCK)
and check to see if any applicable fuse is blown.
Fuse locations are shown on the fuse box
cover. Locate the fuse in question by the fuse
number and box cover number.
Located near the passenger’s side damper
house. Push the tabs to open the box.
■Engine Compartment Fuse Box Type A
Tab
Page 577 of 606

576
uuFuses uFuse Locations
Handling the Unexpected
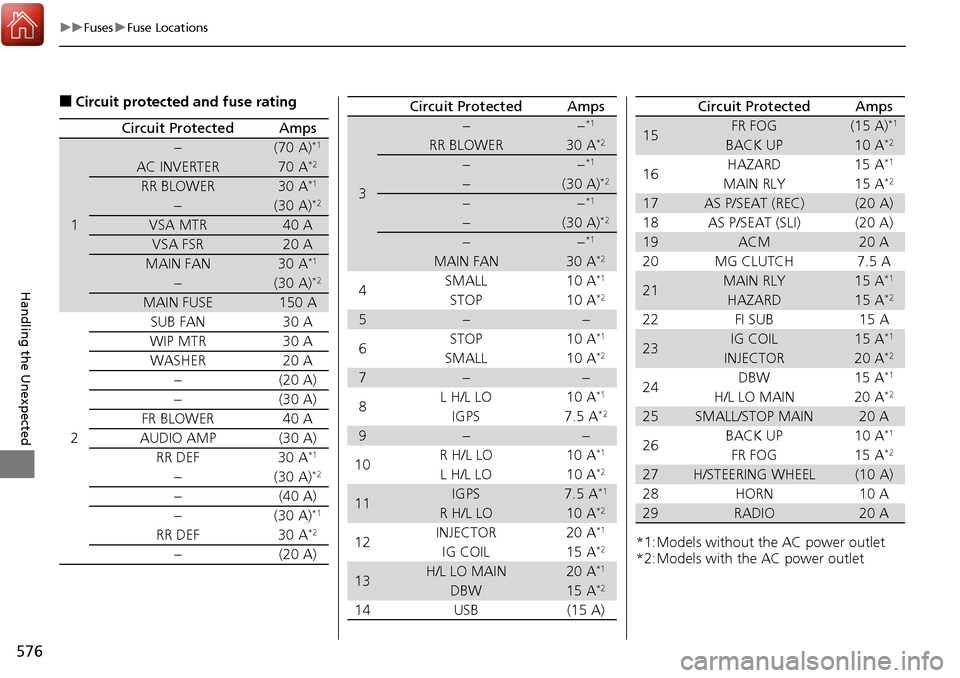
■Circuit protected and fuse rating
Circuit ProtectedAmps
1
−(70 A)*1
AC INVERTER70 A*2
RR BLOWER30 A*1
−(30 A)*2
VSA MTR40 A
VSA FSR20 A
MAIN FAN30 A*1
−(30 A)*2
MAIN FUSE150 A
2
SUB FAN30 A
WIP MTR30 A
WASHER20 A
−(20 A)
−(30 A)
FR BLOWER40 A
AUDIO AMP(30 A)
RR DEF30 A*1
−(30 A)*2
−(40 A)
−(30 A)*1
RR DEF30 A*2
−(20 A)
3
−−*1
RR BLOWER30 A*2
−−*1
−(30 A)*2
−−*1
−(30 A)*2
−−*1
MAIN FAN30 A*2
4SMALL 10 A*1
STOP
10 A*2
5−−
6 STOP 10 A*1
SMALL
10 A*2
7−−
8 L H/L LO 10 A*1
IGPS
7.5 A*2
9−−
10 R H/L LO 10 A*1
L H/L LO
10 A*2
11IGPS7.5 A*1
R H/L LO10 A*2
12INJECTOR 20 A*1
IG COIL
15 A*2
13H/L LO MAIN20 A*1
DBW15 A*2
14USB (15 A)
Circuit ProtectedAmps
*1:Models without the AC power outlet
*2:Models with the AC power outlet
15FR FOG(15 A)*1
BACK UP10 A*2
16HAZARD 15 A*1
MAIN RLY 15 A*2
17AS P/SEAT (REC)(20 A)
18 AS P/SEAT (SLI) (20 A)
19ACM20 A
20 MG CLUTCH 7.5 A
21MAIN RLY15 A*1
HAZARD15 A*2
22 FI SUB 15 A
23IG COIL15 A*1
INJECTOR20 A*2
24DBW
15 A*1
H/L LO MAIN 20 A*2
25SMALL/STOP MAIN20 A
26 BACK UP 10 A*1
FR FOG
15 A*2
27H/STEERING WHEEL(10 A)
28 HORN 10 A
29RADIO20 A
Circuit ProtectedAmps
Page 578 of 606
577
uuFuses uFuse Locations
Continued
Handling the Unexpected
Fuse locations are shown on the fuse box
cover. Locate the fuse in question by the
fuse number and box cover number.
Located near the brake fluid reservoir. Push
the tabs to open the box.
■Engine Compartment Fuse
Box Type B
Tab
■Circuit protected and fuse rating
Circuit ProtectedAmps
1
ST CUT140 A
4WD(20 A)
IG MAIN30 A
IG MAIN230 A
−−
F/B MAIN260 A
F/B MAIN60 A
EPS60 A
2−−
3TRL E-BRAKE(20 A)
4BMS 7.5 A
5H/L HI MAIN20 A
6 +B TRL HAZARD (7.5 A)
7+B TRL BACKUP(7.5 A)
8 CTR ACC SOCKET 20 A
9TRAILER SMALL(20 A)
10 ACC/IG2_MAIN 10 A
11TRL CHARGE(20 A)
12−−
13−−
14−−
15FR DE-ICER(15 A)
16RR _HTD SEAT(20 A)
17STRLD7.5 A
Page 579 of 606

578
uuFuses uFuse Locations
Handling the Unexpected
Located under the dashboard.
Fuse locations are shown on the label on
the side panel.
Locate the fuse in question by the fuse
number and label number.
■Interior Fuse Box
Fuse Box
Fuse Label
■Circuit protected and fuse rating
Circuit ProtectedAmps
1DR P/W20 A
2DOOR LOCK20 A
3SMART7.5 A
4AS P/W20 A
5FR ACC SOCKET20 A
6FUEL PUMP20 A
7ACG15 A
8FRONT WIPER7.5 A
9ABS/VSA7.5 A
10SRS10 A
11REAR LEFT P/W20 A
12BACK P/W(20 A)
13REAR RIGHT P/W20 A
14S/R FUEL LID20 A
15DR P/SEAT (REC)(20 A)
16CARGO LT7.5 A
17FR SEAT HEATER(20 A)
18INTR LT7.5 A
19DR REAR DOOR UNLOCK10 A
20AS SIDE DOOR UNLOCK10 A
21DRL7.5 A
22KEY LOCK7.5 A
23A/C7.5 A
24IG1a FEED BACK7.5 A
25INST PANEL LIGHTS7.5 A
26LUMBAR SUPPORT(7.5 A)
27PARKING LIGHTS7.5 A
28OPTION10 A
29METER7.5 A
30−−
31MISS SOL7.5 A
32SRS7.5 A
33AS SIDE DOOR LOCK10 A
34DR DOOR LOCK10 A
35DR DOOR UNLOCK10 A
36DR P/SEAT (SLIDE)(20 A)
37RIGHT H/L HI10 A
38LEFT H/L HI10 A
39IG1b FEED BACK7.5 A
40ACC7.5 A
41DR REAR DOOR LOCK10 A
42−−
Circuit ProtectedAmps