2017 HONDA RIDGELINE ac system
[x] Cancel search: ac systemPage 574 of 606

573
uuIndicator, Comin g On/BlinkinguIf the Brake System Indicator (Red) Comes On
Handling the Unexpected
If the Brake System Indicator (Red) Comes On
■Reasons for the indicator to come on
• The brake fluid is low.
• There is a malfunction in the brake system.
■What to do when the indicator comes on while driving
Depress the brake pedal lightly to check pedal pressure.
• If normal, check the brake fluid level the next time you stop.
• If abnormal, take immediate acti on. If necessary, downshift the
transmission to slow the vehicle using engine braking.
If the Electric Power Steeri ng (EPS) System Indicator
Comes On
■Reasons for the indicator to come on
• Comes on when there is a problem with the EPS system.
• If you depress the accelerator pedal repeatedly to increase the engine
speed while the engine is idling, the indicator comes on, and
sometimes the steering wheel becomes harder to operate.
■What to do when th e indicator comes on
Stop the vehicle in a safe place and restart the engine.
If the indicator comes on and stays on, immediately have your vehicle
inspected by a dealer.
1 If the Brake System Indicator (Red) Comes On
Have your vehicle re paired immediately.
It is dangerous to drive with low brake fluid. If there
is no resistance from the brake pedal, stop
immediately in a safe plac e. If necessary downshift
the gears.
If the brake system indicator and ABS indicator come
on simultaneously, the elec tronic brake distribution
system is not working. Th is can result in vehicle
instability under sudden braking.
Have your vehicle inspecte d by a dealer immediately.
If both red and amber brake system indicators come
on, stop the vehicle in a safe place and have it
inspected by a dealer immediately.U.S.
Canada
Page 575 of 606

574
uuIndicator, Coming On/Blinking uIf the Low Tire Pressure/Tire Pressure Monitoring System (TPMS) Indicator Comes On or Blinks
Handling the Unexpected
If the Low Tire Pressure/Tire Pressure Monitoring
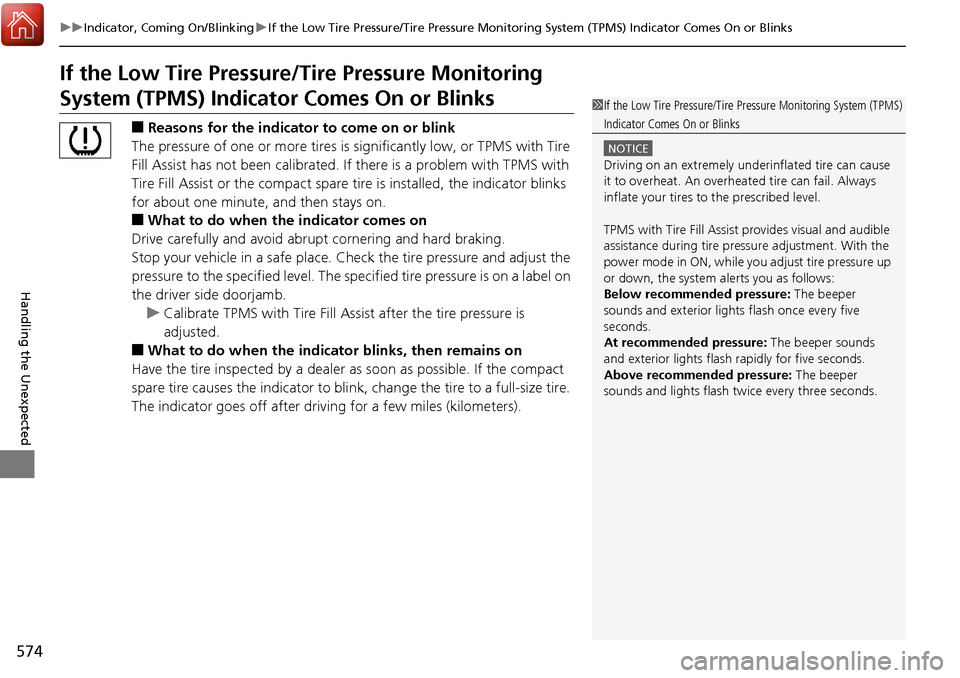
System (TPMS) Indicato r Comes On or Blinks
■Reasons for the indicato r to come on or blink
The pressure of one or more tires is significantly low, or TPMS with Tire
Fill Assist has not been calibrated. If there is a problem with TPMS with
Tire Fill Assist or the compact spare tire is installed, the indicator blinks
for about one minute, and then stays on.
■What to do when the indicator comes on
Drive carefully and avoid abrupt cornering and hard braking.
Stop your vehicle in a safe place. Ch eck the tire pressure and adjust the
pressure to the specified level. The sp ecified tire pressure is on a label on
the driver side doorjamb. u Calibrate TPMS with Tire Fill Assi st after the tire pressure is
adjusted.
■What to do when the indicator blinks, then remains on
Have the tire inspected by a dealer as soon as possible. If the compact
spare tire causes the indicator to blink, change the tire to a full-size tire.
The indicator goes off after driving for a few miles (kilometers).
1 If the Low Tire Pressure/Tire Pressure Monitoring System (TPMS)
Indicator Comes On or Blinks
NOTICE
Driving on an extremely unde rinflated tire can cause
it to overheat. An overheated tire can fail. Always
inflate your tires to the prescribed level.
TPMS with Tire Fill Assist provides visual and audible
assistance during tire pre ssure adjustment. With the
power mode in ON, while y ou adjust tire pressure up
or down, the system alerts you as follows:
Below recommended pressure: The beeper
sounds and exterior lights flash once every five
seconds.
At recommended pressure: The beeper sounds
and exterior lights flash rapidly for five seconds.
Above recommended pressure: The beeper
sounds and lights flash twice every three seconds.
Page 580 of 606

579
uuFuses uInspecting and Changing Fuses
Handling the Unexpected
Inspecting and Changing Fuses
1. Set the power mode to VEHICLE OFF
(LOCK). Turn headlights and all accessories
off.
2. Remove the fuse box cover.
3. Check the large fuse in the engine
compartment.
u If the fuse is blown, use a Phillips-head
screwdriver to remove the screw and
replace it with a new one.
4. Inspect the small fuses in the engine
compartment and the vehicle interior.
u If there is a burned out fuse, remove it
with the fuse puller and replace it with a
new one.1 Inspecting and Changing Fuses
NOTICE
Replacing a fuse with on e that has a higher rating
greatly increases the chances of damaging the
electrical system.
Replace fuse with a spare fuse of the same specified
amperage
Confirm the specified amperage using the charts on
P. 575 to P. 578.
There is a fuse puller in the engine compartment fuse
box located on the passenger’s side.
Combined
Fuse Blown Fuse
Fuse Puller
Page 583 of 606

582
Handling the Unexpected
Refueling
Refueling From a Portable Fuel Container
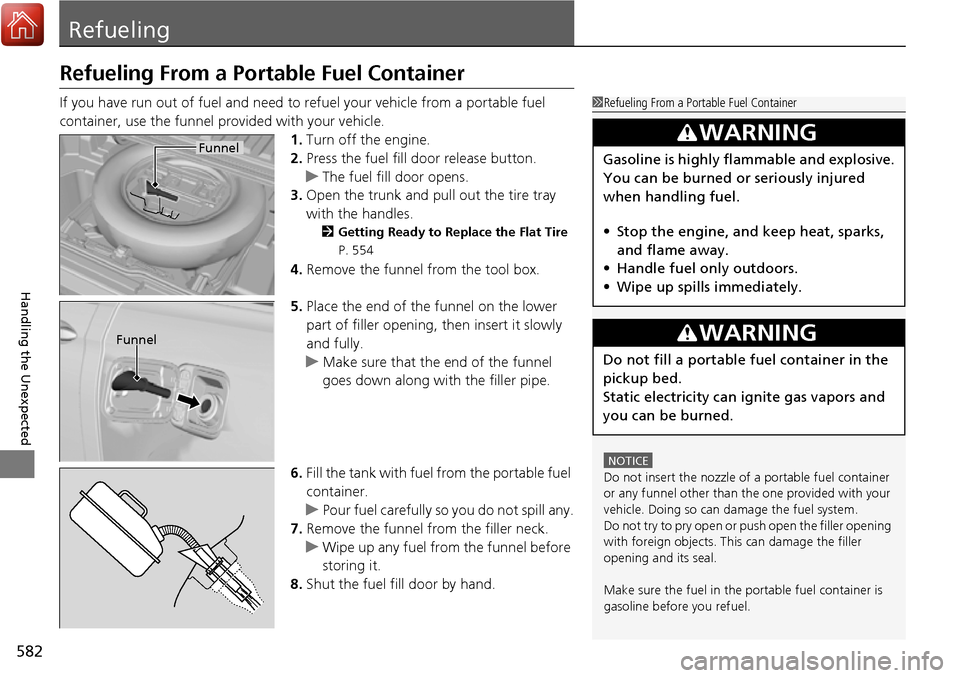
If you have run out of fuel and need to refuel your vehicle from a portable fuel
container, use the funnel provided with your vehicle.1.Turn off the engine.
2. Press the fuel fill door release button.
u The fuel fill door opens.
3. Open the trunk and pull out the tire tray
with the handles.
2 Getting Ready to Replace the Flat Tire
P. 554
4. Remove the funnel from the tool box.
5. Place the end of the funnel on the lower
part of filler opening, then insert it slowly
and fully.
u Make sure that the end of the funnel
goes down along with the filler pipe.
6. Fill the tank with fuel from the portable fuel
container.
u Pour fuel carefully so you do not spill any.
7. Remove the funnel from the filler neck.
u Wipe up any fuel from the funnel before
storing it.
8. Shut the fuel fill door by hand.
1Refueling From a Portable Fuel Container
NOTICE
Do not insert the nozzle of a portable fuel container
or any funnel other than the one provided with your
vehicle. Doing so can damage the fuel system.
Do not try to pry open or push open the filler opening
with foreign objects. This can damage the filler
opening and its seal.
Make sure the fuel in the portable fuel container is
gasoline before you refuel.
3WARNING
Gasoline is highly flammable and explosive.
You can be burned or seriously injured
when handling fuel.
• Stop the engine, and keep heat, sparks,
and flame away.
• Handle fuel only outdoors.
• Wipe up spills immediately.
3WARNING
Do not fill a portable fuel container in the
pickup bed.
Static electricity can ignite gas vapors and
you can be burned.
Funnel
Funnel
Page 590 of 606

589
Information
Devices that Emit Radio Waves
The following products and systems on your vehicle emit radio waves when in operation.
Each of the above complies with the appropriate requirements or the required standards of FCC (Federal Communications Commission)
and Industry Canada Standard, described below:
As required by the FCC:
This device complies with Part 15 of the FCC rules. Operation is subject to the following two conditions: (1)
This device may not cause harmful interference, and (2) this device must accept any interference received,
including interference that may cause undesired operation.
Changes or modifications not expres sly approved by the party responsible for compliance could void the
user’s authority to operate the equipment.
This device complies with indus try Canada licence-exempt RSS standard(s). Operation is subject to the following two conditions: (1) this
device may not cause interference, and (2) this device must ac cept any interference, including interference that may cause unde sired
operation of the device.
HondaLink*
Audio System
Blind spot information System*
Bluetooth ® Audio
Bluetooth® HandsFreeLink ®
HomeLink® Universal Transceiver*
Collision Mitigation Braking SystemTM *
Immobilizer System
Remote Transmitter
Smart Entry System*
Tire Pressure Monitoring System (TPMS)
Remote Engine Start System*
* Not available on all models
Page 592 of 606

591Continued
Information
Emissions Testing
Testing of Readiness Codes
Your vehicle has readiness code as part of the onboard self diagnostic system.
Some States use these codes for testing to verify whether your vehicle’s emissions
components are working properly.
The codes may not be read properly if testing is performed just after the battery has
gone dead or been disconnected.
To check if they are set, set the power m ode to ON, without starting the engine. The
malfunction indicator lamp will come on for several seconds. If it then goes off, the
readiness codes are set. If it blinks fi ve times, the readiness codes are not set.
If you are required to have your vehicle te sted before the readiness codes are ready,
prepare the vehicle for retest ing by doing the following:
1. Fill the gas tank to approximately 3/4 full.
2. Park the vehicle and leave the engine off for 6 hours or more.
3. Make sure the ambient temperature is between 40°F and 95°F (4°C and 35°C).
4. Start the engine without touching the ac celerator pedal, and let it idle for 20
seconds.
5. Keep the vehicle in
(P. Increase the engine speed to 2,000 rpm, and hold it there
for about 3 minutes.
6. Let the engine idle with your foot off the accelerator for 20 seconds.
1Testing of Readiness Codes
The readiness codes are erased when the battery is
disconnected, and set again only after several days of
driving under a variety of conditions.
If a testing facility determines that the readiness
codes are not set, you may be requested to return at
a later date to complete the test.
If the testing facility determines the readiness codes
are still not set, see a dealer.
Page 594 of 606

593Continued
Information
Warranty Coverages
■U.S. Owners
Your new vehicle is covered by these warranties:
New Vehicle Limited Warranty – covers your new vehicle, except for the
emissions control systems and accessorie s, against defects in materials and
workmanship.
Emissions Control Systems Defects Warranty and Emissions Performance
Warranty – these two warranties cover your ve hicle’s emissions control systems.
Time, mileage, and coverage are conditiona l. Please read your warranty booklet for
exact information.
Seat Belt Limited Warranty – a seat belt that fails to function properly is covered
by a limited warranty. Please read your warranty booklet for details.
Rust Perforation Limited Warranty – all exterior body panels are covered against
rusting from the inside out fo r the specified time period, regardless of mileage.
Accessory Limite d Warranty – Honda accessories are covered under this
warranty. Time and mileage limits depend on the type of accessory and other
factors. Please read your warranty booklet for details.
Replacement Parts Limited Warranty – covers all Honda replacement parts
against defects in mate rials and workmanship.
Page 598 of 606

Index
597
Index
Index
A
ABS (Anti-lock Brake System).................. 476
AC Power Outlet ...................................... 182
Accessories and Modifications ................ 549
Accessory Power Sockets ......................... 175
Adaptive Cruise Control (ACC) ................ 441
Indicator ................................................... 83
Additives
Coolant .................................................. 519
Engine Oil ............................................... 514
Washer ................................................... 522
Adjusting Armrest .................................................. 168
Front Seats.............................................. 161
Head Restraints ............................... 166, 167
Mirrors.................................................... 159
Rear Seats ............................................... 164
Steering Wheel ....................................... 158
Temperature ........................................... 104
Agile Handling Assist System .................. 464
Air Conditioning System (Climate Control System) ....................... 186
Changing the Mode................................ 187
Defrosting the Windshield and Windows .............................................. 187
Dust and Pollen Filter .............................. 542
Recirculation/Fresh Air Mode................... 187
Sensor .................................................... 192
Synchronized Mode ................................ 189
Using Automatic Climate Control............ 186 Air Conditioning System (Heating and
Cooling System) ...................................... 193
Cooling ................................................... 195
Defrosting the Windshield and Windows ............................................... 196
Heating ................................................... 194
Air Pressure ....................................... 532, 587
Airbags ........................................................ 40
Advanced Airbags ..................................... 46
After a Collision ......................................... 44
Airbag Care ............................................... 52
Front Airbags (SRS) .................................... 43
Indicator .............................................. 50, 75
Passenger Airbag Off Indicator .................. 51
Sensors ...................................................... 40
Side Airbags .............................................. 47
Side Curtain Airbags .................................. 49
All-wheel drive (AWD) Indicator ............... 81
AM/FM Radio .................................... 211, 247
Android Auto ............................................ 287
Anti-lock Brake System (ABS) .................. 476
Indicator .................................................... 75
Apple CarPlay ........................................... 284
Armrest ..................................................... 168
Audio Remote Controls ............................ 202
Audio System ............................................ 198
Adjusting the Sound ........................ 209, 240
Audio/Information Screen ................ 205, 223
Auxiliary Input Jack .................................. 200
Changing the Home Screen Icon Layout ................................................... 227 Closing Apps ........................................... 237
Display Setup .................................. 210, 241
Error Messages ........................................ 292
General Information ................................ 296
Home Screen........................................... 230
Limitations for Manual Operation ............ 242
MP3/WMA/AAC ...................... 216, 259, 271
Playing a CD............................................ 259
Reactivating ............................................ 201
Recommended CDs ................................. 297
Remote Controls ..................................... 202
Security Code .......................................... 201
Selecting an Audio Source ....................... 242
Status Area ............................................. 236
Theft Protection ...................................... 201
USB Flash Drives ...................................... 299
USB Port.................................................. 199
Wallpaper Setup.............................. 207, 228
Audio/Information Screen ............... 205, 223
Authorized Manuals ................................ 595
Auto Door Locking/Unlocking ................. 122
Customize ............................................... 326
Auto High-Beam ....................................... 149
Auto high-beam Indicator ......................... 79
Automatic Intermittent Wipers ............... 153
Automatic Lighting .................................. 145