2017 HONDA RIDGELINE fuel
[x] Cancel search: fuelPage 510 of 606

509
uuMaintenance MinderTMuTo Use Maintenance MinderTM
Continued
Maintenance
■Maintenance Service Items1Maintenance Service Items
•Independent of the maintenance message in the
multi-information display, replace the brake fluid
every 3 years.
•Inspect idle speed every 160,000 miles
(256,000 km).
•Adjust the valves during services A, B, 1, 2, or 3 if
they are noisy.
Maintenance Minder MessageSystem Message
Indicator
Sub Items
Main
Item
*1: If the message
Maintenance Due Now does not appear more than 12 months after the display
is reset, change the engine oil every year.
# : See information on maintenance and emissions warranty in the first column on page 593.
*2: If you drive in dusty conditions, replace the air cleaner element every 15,000 miles (24,000 km).
*3: If you drive primarily in urban areas that have high concentrations of soot in the air from industry and from diesel-powered vehicles, replace every 15,000 miles (24,000 km).
CODEMaintenance Main Items
A
●Replace engine oil*1
B●Replace engine oil*1 and oil filter●Inspect front and rear brakes●Check parking brake adjustment●Inspect tie rod ends, steering gearbox, and boots●Inspect suspension components●Inspect driveshaft boots●Inspect brake hoses and li nes (Including ABS/VSA)●Inspect all fluid levels and condition of fluids●Inspect exhaust system#
●Inspect fuel lines and connections#
*4: If you drive regularly in very high temperatures (over 110°F, 43°C), in very low temperatures (under
-20°F, -29°C), or towing a trailer, replace every 60,000 miles (U.S.) / 100,000 km (Canada).
*5: Driving in mountainous areas at very low vehicle speeds or trailer towing results in higher level of mechanical (Shear) stress to fluid. This requires differential fluid changes more frequently than
recommended by the Maintenance Minder. If you regularly drive your vehicle under these conditions,
have the differential fluid changed at 7,500 miles (12,000 km), then every 15,000 miles (24,000 km).
CODEMaintenance Sub Items
1
●Rotate tires
2●Replace air cleaner element*2
●Replace dust and pollen filter*3
●Inspect drive belt
3
●Replace transmission fluid and transfer fluid*
4●Replace spark plugs●Replace timing belt and inspect water pump*4
●Inspect valve clearance
5
●Replace engine coolant
6●Replace rear differential fluid*, *5
* Not available on all models
Page 516 of 606

515
uuMaintenance Under the Hood uOil Check
Maintenance
Oil Check
We recommend that you check the engine oil level every time you refuel.
Park the vehicle on level ground.
Wait approximately three minutes after turn ing the engine off before you check the
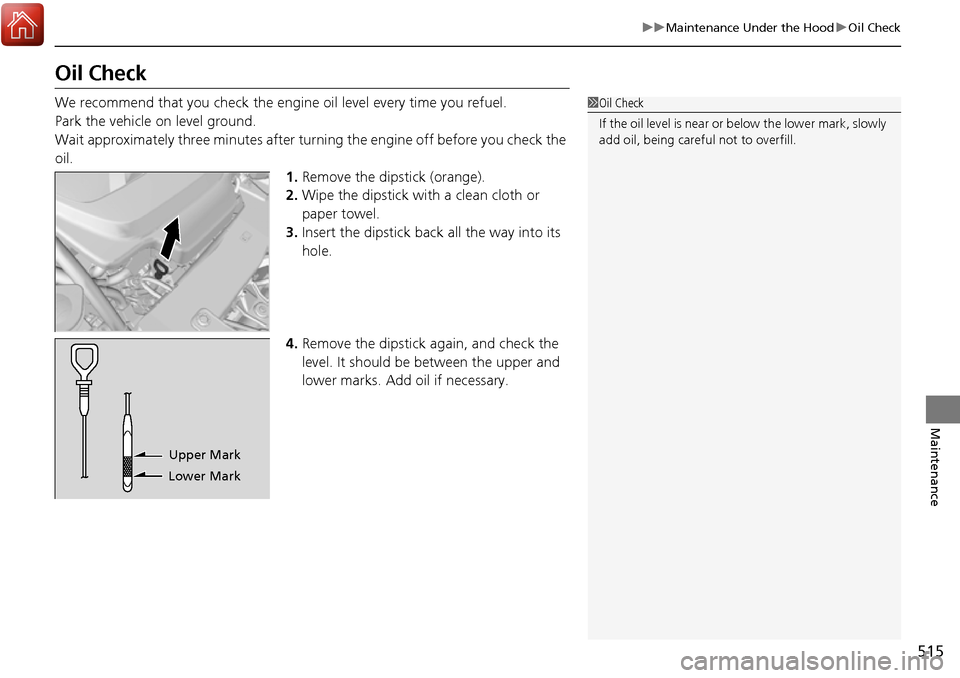
oil. 1.Remove the dipstick (orange).
2. Wipe the dipstick with a clean cloth or
paper towel.
3. Insert the dipstick back all the way into its
hole.
4. Remove the dipstick again, and check the
level. It should be between the upper and
lower marks. Add oil if necessary.1Oil Check
If the oil level is near or below the lower mark, slowly
add oil, being careful not to overfill.
Lower MarkUpper Mark
Page 520 of 606

519
uuMaintenance Under the Hood uEngine Coolant
Continued
Maintenance
Engine Coolant
This coolant is premixed with 50% an tifreeze and 50% water. Do not add any
straight antifreeze or water.
We recommend you check the engine coolant level every time you refuel. Check the
reserve tank first. If it is completely empty, also check the coolant level in the
radiator. Add the engine coolant accordingly.
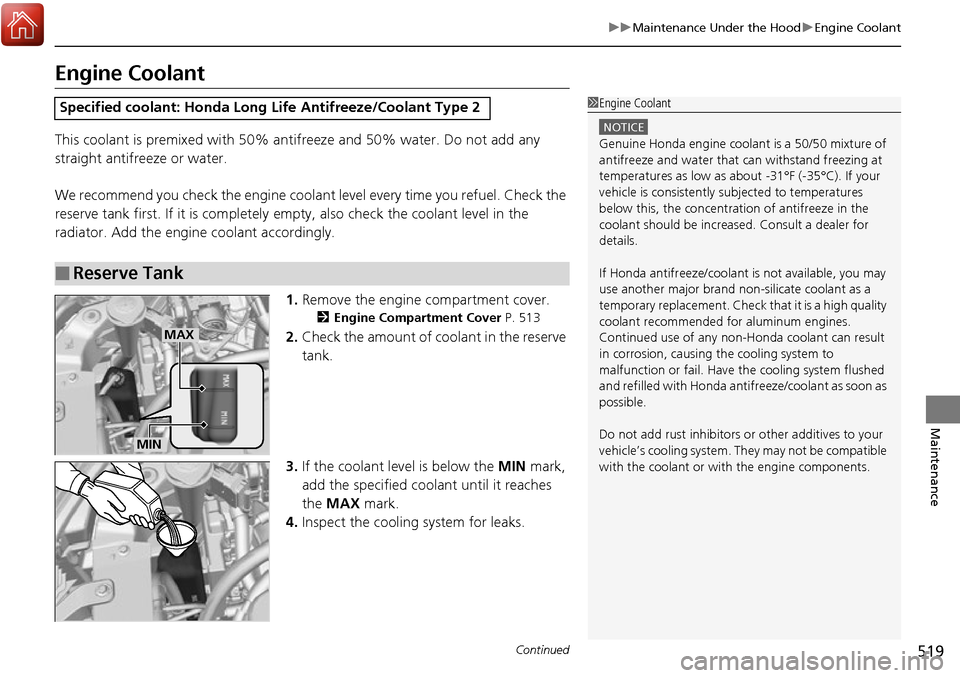
1.Remove the engine compartment cover.
2 Engine Compartment Cover P. 513
2.Check the amount of coolant in the reserve
tank.
3. If the coolant level is below the MIN mark,
add the specified coolant until it reaches
the MAX mark.
4. Inspect the cooling system for leaks.
Specified coolant: Honda Long Li fe Antifreeze/Coolant Type 2
■Reserve Tank
1Engine Coolant
NOTICE
Genuine Honda engine coolan t is a 50/50 mixture of
antifreeze and water that can withstand freezing at
temperatures as low as a bout -31°F (-35°C). If your
vehicle is consistently subjected to temperatures
below this, the concentration of antifreeze in the
coolant should be increased. Consult a dealer for
details.
If Honda antifreeze /coolant is not available, you may
use another major brand non- silicate coolant as a
temporary replacement. Check that it is a high quality
coolant recommended for aluminum engines.
Continued use of any non-Honda coolant can result
in corrosion, causing the cooling system to
malfunction or fail. Have the cooling system flushed
and refilled with Honda anti freeze/coolant as soon as
possible.
Do not add rust inhibitors or other additives to your
vehicle’s cooling system. They may not be compatible
with the coolant or with the engine components.
MAX
MIN
Page 532 of 606

531
Maintenance
Checking and Maintaining Tires
Checking Tires
To safely operate your vehicle, your tires must be of the proper type and size, in
good condition with adequate tread, and properly inflated.
■Inflation guidelines
Properly inflated tires provid e the best combination of handling, tread life, and comfort.
Refer to the driver’s doorjamb label or spec ification’s page for the specified pressure.
Underinflated tires wear unev enly, adversely affect handling and fuel economy, and
are more likely to fail from overheating.
Overinflated tires make your vehicle ride ha rshly, are more prone to road hazards,
and wear unevenly.
Every day before you drive, look at each of the tires. If one looks lower than the
others, check the pressure with a tire gauge.
At least once a month or before long trips , use a gauge to measure the pressure in
all tires, including the spare. Even tires in good condition can lose 1-2 psi (10-20 kPa,
0.1-0.2 kgf/cm
2) per month.
■Inspection guidelines
Every time you check inflation, also examine the tires and valve stems.
Look for:
• Bumps or bulges on the side or in the tr ead. Replace the tire if you find any cuts,
splits, or cracks in the side of the tire . Replace it if you see fabric or cord.
• Remove any foreign objects and inspect for air leaks.
• Uneven tread wear. Have a deal er check the wheel alignment.
• Excessive tread wear.
2 Wear Indicators P. 536
•Cracks or other damage around valve stem.
1Checking Tires
Measure the air pressure when tires are cold. This
means the vehicle has been parked for at least three
hours, or driven less than 1 mile (1.6 km). If
necessary, add or releas e air until the specified
pressure is reached.
If checked when hot, tire pressure can be as much as
4–6 psi (30–40 kPa, 0.3–0.4 kgf/cm
2) higher than if
checked when cold.
Whenever tire pressure is adjusted, you must
calibrate the TPMS. 2 TPMS with Tire Fill Assist P. 466
Have a dealer check the tires if you feel a consistent
vibration while driving. Ne w tires and any that have
been removed and reinst alled should be properly
balanced.
Check the spare tire pressu re once a month or before
long trips.
3WARNING
Using tires that are excessively worn or
improperly inflated can cause a crash in
which you can be seriously hurt or killed.
Follow all instruction s in this owner’s
manual regarding ti re inflation and
maintenance.
Page 552 of 606

551
Handling the Unexpected
This chapter explains how to handle unexpected troubles.
ToolsTypes of Tools .................................. 552
If a Tire Goes Flat Changing a Flat Tire ......................... 553
Engine Does Not Start Checking the Engine ........................ 562
If the Smart Entry Remote Battery is Weak .......................................... 563
Emergency Engine Stop ................... 564
Jump Starting .................................... 565
Shift Lever Does Not Move .............. 568Overheating
How to Handle Overheating............. 569
Indicator, Coming On/Blinking
If the Low Oil Pressure Indicator Comes On ............................................. 571
If the Charging System Indicator Comes
On ................................................. 571
If the Malfunction Indicator Lamp Comes On or Blinks ................................... 572
If the Brake System Indicator (Red) Comes On .................................................... 573
If the Electric Power Steering (EPS) System
Indicator Comes On ........................... 573 If the Low Tire Pressure/Tire Pressure
Monitoring System (TPMS) Indicator Comes
On or Blinks........................................ 574
Fuses
Fuse Locations ................................. 575
Inspecting and Changing Fuses ........ 579
Emergency Towing ........................... 580
When You Cannot Unlock the Fuel Fill Door ................................................. 581
Refueling
Refueling From a Portable Fuel Container ................................... 582
Page 563 of 606

562
Handling the Unexpected
Engine Does Not Start
Checking the Engine
If the engine does not start, check the starter.
Starter conditionChecklist
Starter doesn’t turn or turns
over slowly.
The battery may be dead. Check
each of the items on the right and
respond accordingly.Check for a message on the multi-information display.
●If the To Start, Hold Remote Near Start Button message appears
2If the Smart Entry Remote Battery is Weak P. 563
uMake sure the smart entry remote is in its operating range.
2ENGINE START/STOP Button Operating Range P. 140
Check the brightness of the interior lights.
Turn on the interior lights and check the brightness.
●If the interior lights are dim or do not come on at all
2Battery P. 540●If the interior lights come on normally 2 Fuses P. 575
The starter turns over normally
but the engine doesn’t start.
There may be a problem with the
fuse. Check each of the items on
the right and respond accordingly. Review the engine start procedure.
Follow its instructions, and try to start the engine again.
2
Starting the Engine P. 418
Check the immobilizer system indicator.
When the immobilizer system indicator is blinking, the engine cannot be started.
2Immobilizer System P. 131
Check the fuel level.
There should be enough fuel in the tank.
2 Fuel Gauge P. 101
Check the fuse.
Check all fuses, or have the vehicle checked by a dealer.
2Inspecting and Changing Fuses P. 579
If the problem continues:
2Emergency Towing P. 580
1Checking the Engine
If you must start the vehi cle immediately, use an
assisting vehicle to jump start it.
2 Jump Starting P. 565
Page 579 of 606

578
uuFuses uFuse Locations
Handling the Unexpected
Located under the dashboard.
Fuse locations are shown on the label on
the side panel.
Locate the fuse in question by the fuse
number and label number.
■Interior Fuse Box
Fuse Box
Fuse Label
■Circuit protected and fuse rating
Circuit ProtectedAmps
1DR P/W20 A
2DOOR LOCK20 A
3SMART7.5 A
4AS P/W20 A
5FR ACC SOCKET20 A
6FUEL PUMP20 A
7ACG15 A
8FRONT WIPER7.5 A
9ABS/VSA7.5 A
10SRS10 A
11REAR LEFT P/W20 A
12BACK P/W(20 A)
13REAR RIGHT P/W20 A
14S/R FUEL LID20 A
15DR P/SEAT (REC)(20 A)
16CARGO LT7.5 A
17FR SEAT HEATER(20 A)
18INTR LT7.5 A
19DR REAR DOOR UNLOCK10 A
20AS SIDE DOOR UNLOCK10 A
21DRL7.5 A
22KEY LOCK7.5 A
23A/C7.5 A
24IG1a FEED BACK7.5 A
25INST PANEL LIGHTS7.5 A
26LUMBAR SUPPORT(7.5 A)
27PARKING LIGHTS7.5 A
28OPTION10 A
29METER7.5 A
30−−
31MISS SOL7.5 A
32SRS7.5 A
33AS SIDE DOOR LOCK10 A
34DR DOOR LOCK10 A
35DR DOOR UNLOCK10 A
36DR P/SEAT (SLIDE)(20 A)
37RIGHT H/L HI10 A
38LEFT H/L HI10 A
39IG1b FEED BACK7.5 A
40ACC7.5 A
41DR REAR DOOR LOCK10 A
42−−
Circuit ProtectedAmps
Page 582 of 606

581
Handling the Unexpected
When You Cannot Unlock the Fuel Fill Door
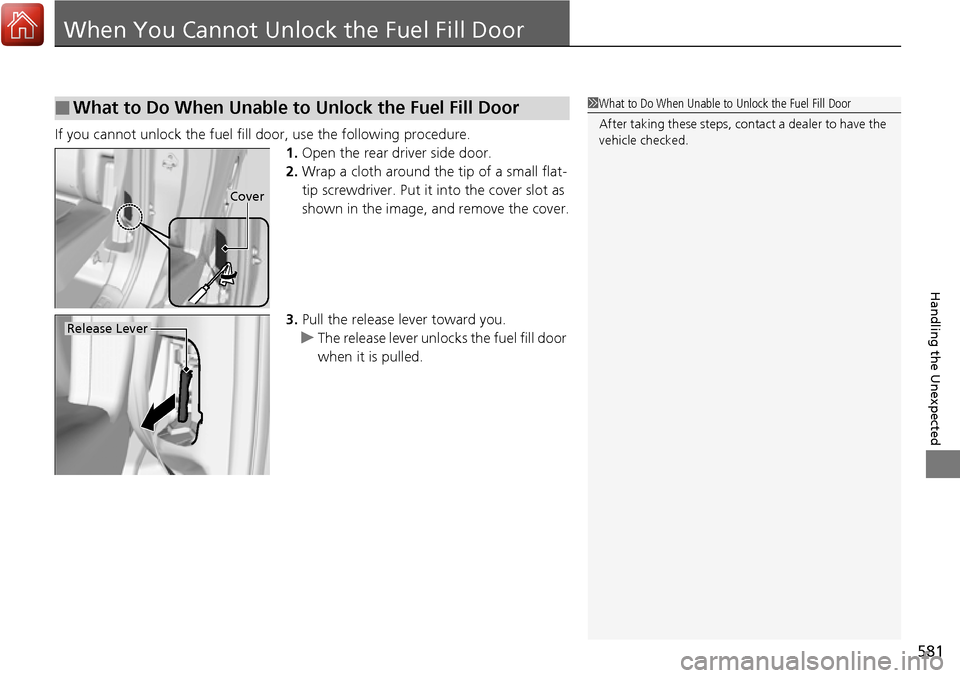
If you cannot unlock the fuel fill door, use the following procedure.
1.Open the rear driver side door.
2. Wrap a cloth around the tip of a small flat-
tip screwdriver. Put it into the cover slot as
shown in the image, and remove the cover.
3. Pull the release lever toward you.
u The release lever unlocks the fuel fill door
when it is pulled.
■What to Do When Unable to Unlock the Fuel Fill Door1What to Do When Unable to Unlock the Fuel Fill Door
After taking these steps, cont act a dealer to have the
vehicle checked.
Cover
Release Lever