Page 167 of 606

166
uuAdjusting the Seats uHead Restraints
Controls
Head Restraints
Your vehicle is equipped with head restraints in all seating positions.
Your vehicle is equipped with head restraints
in all seating positions.
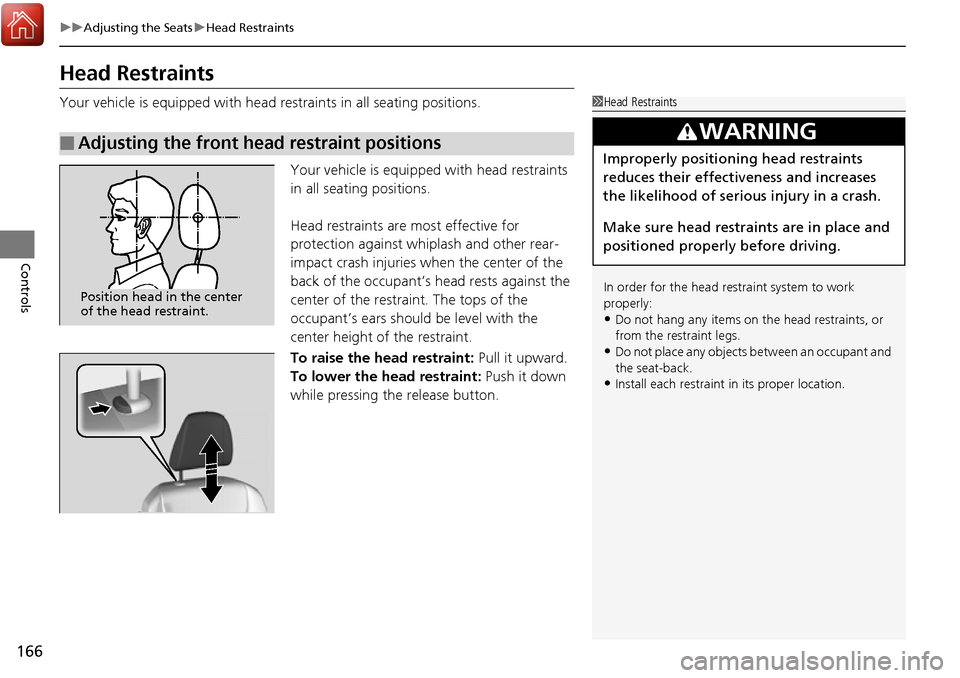
Head restraints are most effective for
protection against whiplash and other rear-
impact crash injuries when the center of the
back of the occupant’s head rests against the
center of the restraint. The tops of the
occupant’s ears should be level with the
center height of the restraint.
To raise the head restraint: Pull it upward.
To lower the head restraint: Push it down
while pressing the release button.
■Adjusting the front head restraint positions
1 Head Restraints
In order for the head restraint system to work
properly:
•Do not hang any items on the head restraints, or
from the restraint legs.
•Do not place any objects between an occupant and
the seat-back.
•Install each restraint in its proper location.
3WARNING
Improperly positioning head restraints
reduces their effectiveness and increases
the likelihood of serious injury in a crash.
Make sure head restraints are in place and
positioned properly before driving.
Position head in the center
of the head restraint.
Page 184 of 606
Continued183
uuInterior Lights/Convenience Items uIn-Bed Convenience Items
Controls
■ON and OFF
Press the AC power outlet button to turn the
system on and off. u The indicator in th e button comes on
when the system is on.
400W (Amber) mode is:
• When the engine running and the shift
lever in
(P.
150W (Green) mode is:
• When the power mode is in ACCESSORY or
ON.
• When the engine running and the shift
lever out of
(P.
• When the truck bed audio system is
activated.
1AC Power Outlet*
The protection circuit may be activated to cut the
power supply if any of th e following conditions apply:
•The engine is started when the pow er outlet switch
on.
•An electrical appliance exceeding the maximum
capacity is used.
•The total power consumed by the electrical
features (head lights, air conditioning, etc.),
including the truck bed audio
*, has exceeded the
maximum vehicle wattage capacity for a prolonged
period of time.
Indicator
* Not available on all models
Page 187 of 606

186
Controls
Climate Control System*
Using Automatic Climate Control
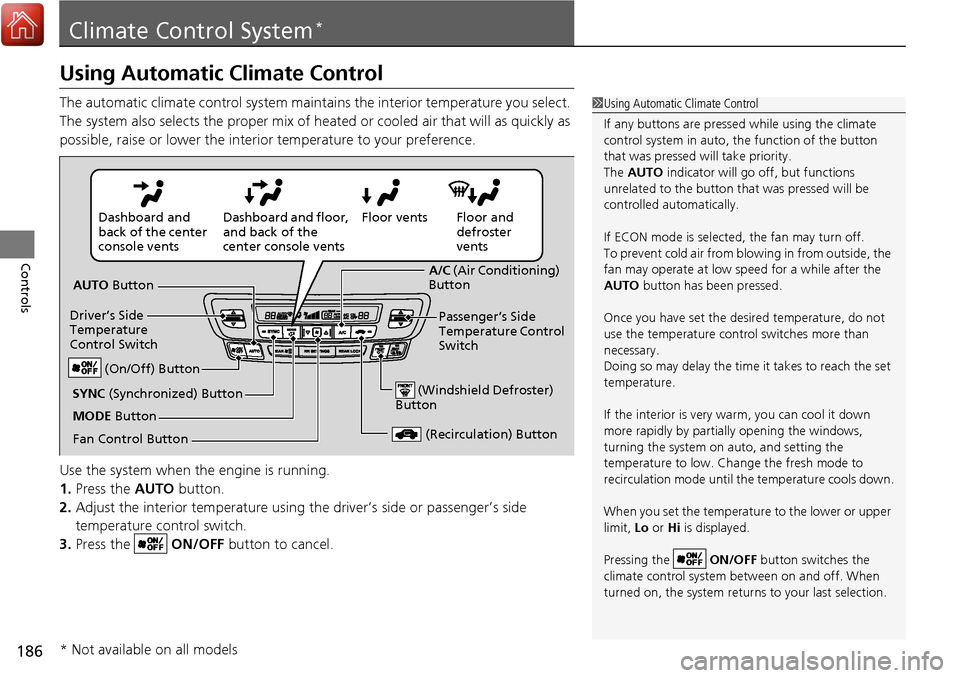
The automatic climate control system maintains the interior temperature you select.
The system also selects the proper mix of heated or cooled air that will as quickly as
possible, raise or lower the interior temperature to your preference.
Use the system when the engine is running.
1. Press the AUTO button.
2. Adjust the interior temperature using the driver’s side or passenger’s side
temperature control switch.
3. Press the ON/OFF button to cancel.1Using Automatic Climate Control
If any buttons are presse d while using the climate
control system in auto, the function of the button
that was pressed will take priority.
The AUTO indicator will go off, but functions
unrelated to the button th at was pressed will be
controlled automatically.
If ECON mode is selected, the fan may turn off.
To prevent cold air from bl owing in from outside, the
fan may operate at low speed for a while after the
AUTO button has been pressed.
Once you have set the de sired temperature, do not
use the temperature control switches more than
necessary.
Doing so may delay the time it takes to reach the set
temperature.
If the interior is very warm, you can cool it down
more rapidly by partial ly opening the windows,
turning the system on auto, and setting the
temperature to low. Change the fresh mode to
recirculation mode until the temperature cools down.
When you set the temperature to the lower or upper
limit, Lo or Hi is displayed.
Pressing the ON/OFF button switches the
climate control system be tween on and off. When
turned on, the system returns to your last selection.
Floor and
defroster
vents
Floor vents
Dashboard and floor,
and back of the
center console vents
Dashboard and
back of the center
console vents
AUTO Button
Driver’s Side
Temperature
Control Switch
(Recirculation) Button
Fan Control Button A/C
(Air Conditioning)
Button
Passenger’s Side
Temperature Control
Switch
(Windshield Defroster)
ButtonSYNC (Synchronized) Button
(On/Off) Button
MODE Button
* Not available on all models
Page 188 of 606

Continued187
uuClimate Control System*uUsing Automatic Climate Control
Controls
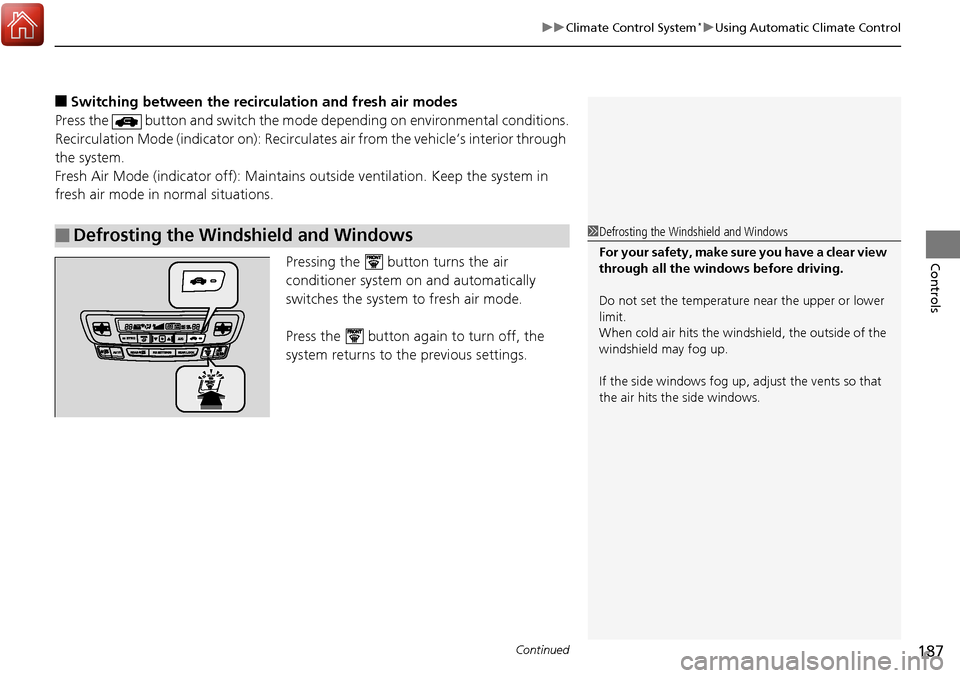
■Switching between the recirc ulation and fresh air modes
Press the button and switch the mode depending on environmental conditions.
Recirculation Mode (indicator on): Recirculates air from the vehicle’s interior through
the system.
Fresh Air Mode (indicator off): Maintains outside ventilation. Keep the system in
fresh air mode in normal situations.
Pressing the button turns the air
conditioner system on and automatically
switches the system to fresh air mode.
Press the button again to turn off, the
system returns to the previous settings.
■Defrosting the Windshield and Windows1Defrosting the Windshield and Windows
For your safety, make sure you have a clear view
through all the windows before driving.
Do not set the temperatur e near the upper or lower
limit.
When cold air hits the windshield, the outside of the
windshield may fog up.
If the side windows fog up, adjust the vents so that
the air hits th e side windows.
Page 189 of 606
uuClimate Control System*uUsing Automatic Climate Control
188
Controls
■To rapidly defrost the windows
1.Press the button.
2. Press the button.1To rapidly defrost the windows
After defrosting or defogging the windows, switch
over to fresh air mode. If you keep the system in
recirculation mode, the windows may fog up from
humidity. This impedes visibility.
Page 190 of 606
189
uuClimate Control System*uUsing Automatic Climate Control
Controls
You can set the temperature synchronously fo r the driver side, front passenger side
and rear seats in synchronized mode.
1. Press the SYNC button.
u The system will switch to synchronized mode.
2. Adjust the temperature using driver’s side temperature control switch.
Press the SYNC button to return to synchronized mode off.
■Synchronized Mode1Synchronized Mode
When you press the button, the system changes
to synchronized mode.
When the system is in synchronized mode off, the
temperature for the driver, front passenger, and rear
seats can be set separately.
Page 191 of 606

190
uuClimate Control System*uRear Climate Control System
Controls
Rear Climate Control System
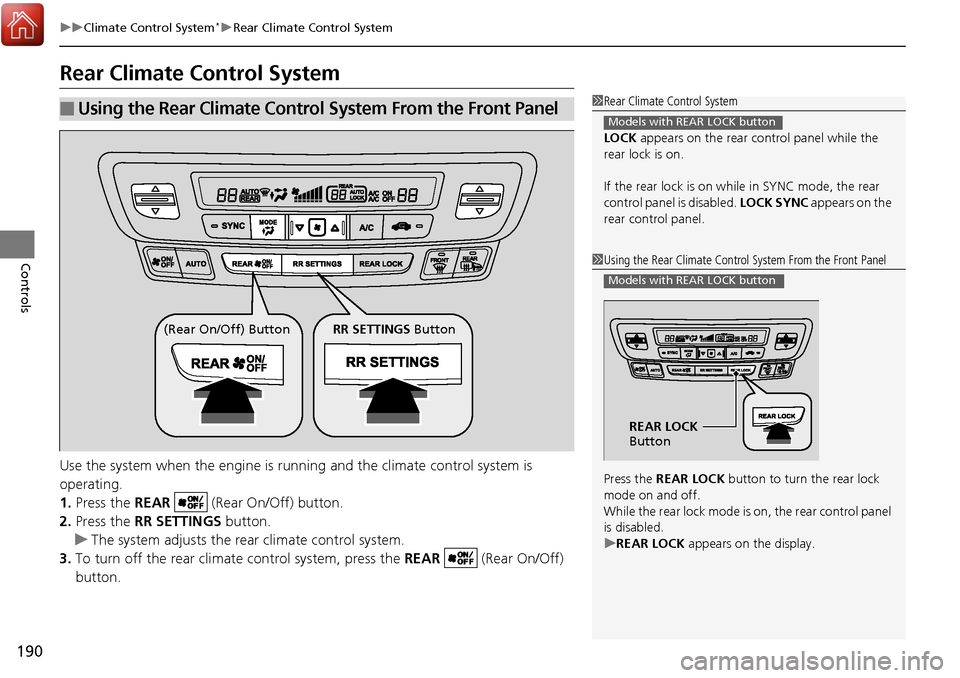
Use the system when the engine is running and the climate control system is
operating.
1. Press the REAR (Rear On/Off) button.
2. Press the RR SETTINGS button.
u The system adjusts the rear climate control system.
3. To turn off the rear climate control system, press the REAR (Rear On/Off)
button.
■Using the Rear Climate Control System From the Front Panel1 Rear Climate Control System
LOCK appears on the rear control panel while the
rear lock is on.
If the rear lock is on while in SYNC mode, the rear
control panel is disabled. LOCK SYNC appears on the
rear control panel.
Models with REAR LOCK button
1 Using the Rear Climate Control System From the Front Panel
Press the REAR LOCK button to turn the rear lock
mode on and off.
While the rear lock mode is on, the rear control panel
is disabled.
u REAR LOCK appears on the display.
Models with REAR LOCK button
REAR LOCK
Button
(Rear On/Off) Button RR SETTINGS Button
Page 192 of 606
191
uuClimate Control System*uRear Climate Control System
Controls
Use the system when the engine is runni ng and the climate control system is
operating.
1. Press the (Rear On/Off) button.
2. Press the Rear AUTO button.
3. Adjust the interior temperature usi ng the rear temperature control button.
4. To turn off the rear climate co ntrol system, press the button.
■Using the Rear Climate Control System From the Rear Panel*1Using the Rear Climate Control System From the Rear Panel*
When the REAR LOCK button on the front control
panel is off, the temperat ure of the rear passenger
compartment can be cont rolled independently.
Rear floor
ventsRear console
vents and
floor vents Rear console
vents
/
(Rear Fan
Control) Buttons
(Rear On/Off) Button
Rear Temperature
Control Buttons
Rear AUTO Button
* Not available on all models