2017 HONDA RIDGELINE automatic transmission
[x] Cancel search: automatic transmissionPage 21 of 606

20
Quick Reference Guide
Driving (P395)
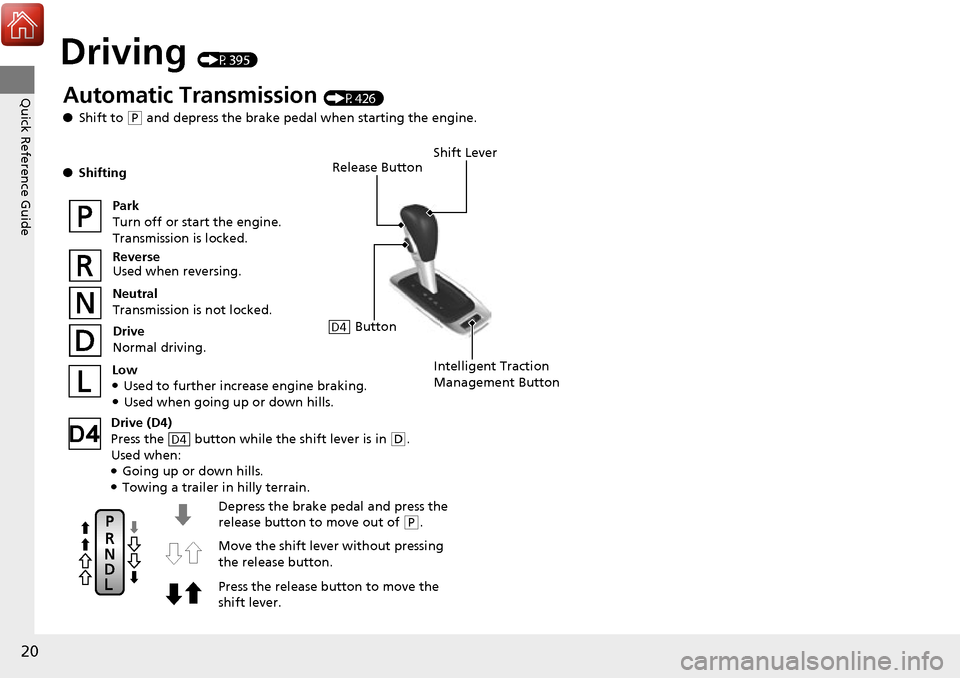
Release Button
Depress the brake pedal and press the
release button to move out of
( P.
Move the shift lever without pressing
the release button.
Press the release button to move the
shift lever.
Automatic Transmission (P426)
● Shift to
(P and depress the brake pedal when starting the engine.
● Shifting
Park
Turn off or start the engine.
Transmission is locked.
Reverse
Used when reversing.
Neutral
Transmission is not locked.
Drive
Normal driving.
Shift Lever
Intelligent Traction
Management ButtonLow●Used to further increase engine braking.●Used when going up or down hills.
Drive (D4)
Press the button while the shift lever is in
( D.
Used when:
●Going up or down hills.●Towing a trailer in hilly terrain.
D4
ButtonD4
Page 157 of 606

156
uuOperating the Switches Around the Steering Wheel uDriving Position Memory System*
Controls
Driving Position Memory System*
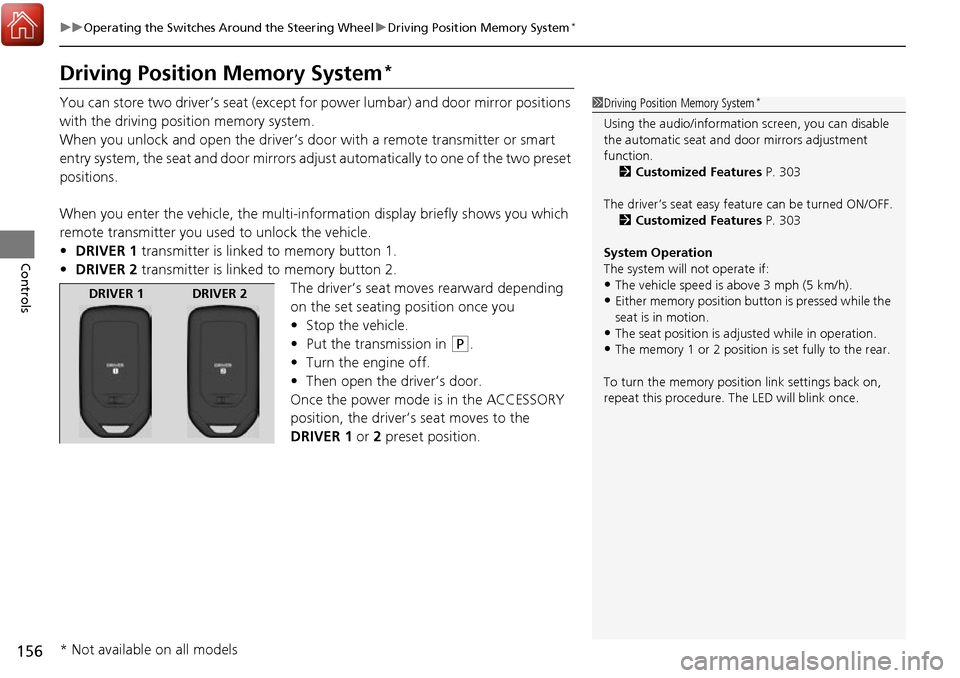
You can store two driver’s seat (except for power lumbar) and door mirror positions
with the driving position memory system.
When you unlock and open the driver’s do or with a remote transmitter or smart
entry system, the seat and door mirrors adju st automatically to one of the two preset
positions.
When you enter the vehicle, the multi-in formation display briefly shows you which
remote transmitter you used to unlock the vehicle.
• DRIVER 1 transmitter is linked to memory button 1.
• DRIVER 2 transmitter is linked to memory button 2.
The driver’s seat moves rearward depending
on the set seating position once you
•Stop the vehicle.
• Put the transmission in
(P.
• Turn the engine off.
• Then open the driver’s door.
Once the power mode is in the ACCESSORY
position, the driver’s seat moves to the
DRIVER 1 or 2 preset position.
1Driving Position Memory System*
Using the audio/informati on screen, you can disable
the automatic seat and d oor mirrors adjustment
function. 2 Customized Features P. 303
The driver’s seat easy feature can be turned ON/OFF. 2 Customized Features P. 303
System Operation
The system will not operate if:
•The vehicle speed is above 3 mph (5 km/h).
•Either memory position button is pressed while the
seat is in motion.
•The seat position is adju sted while in operation.
•The memory 1 or 2 position is set fully to the rear.
To turn the memory positi on link settings back on,
repeat this procedure. The LED will blink once.
DRIVER 1 DRIVER 2
* Not available on all models
Page 396 of 606

395
Driving
This chapter discusses driving, refueling, and information on items such as accessories.
Before Driving................................... 396
Towing a Trailer ................................ 404
Off-Highway Driving Guidelines ..... 416
When Driving Starting the Engine .......................... 418
Precautions While Driving................. 424
Automatic Transmission ................... 425
Shifting ............................................ 426
ECON Button ................................... 428
Intelligent Traction Management...... 429
Cruise Control
*................................ 431
Front Sensor Camera*...................... 434Road Departure Mi tigation (RDM)
System*...................................... 436
Adaptive Cruise Control (ACC)*....... 441
Lane Keeping Assist System (LKAS)*.... 454Vehicle Stability Assist (VSA ®), aka Electronic
Stability Control (ESC), System ............. 462
Agile Handling Assist System............ 464
i-VTM4 (Intelligent Variable Torque
Management)-4 ® System
*.............. 465
TPMS with Tire Fill Assist .................. 466
Tire Pressure Monitoring System (TPMS) -
Required Federal Explanation ......... 468
Blind spot inform ation (BSI) System
*.... 470
LaneWatchTM*.................................. 472 Braking
Brake System ................................... 474
Anti-lock Brake System (ABS) ........... 476
Brake Assist System ......................... 477
Collision Mitigation Braking System
TM
(CMBSTM)*..................................... 478
Parking Your Vehicle When Stopped ................................ 487
Parking Sensor System
*................... 488
Cross Traffic Monitor*..................... 492
Multi-View Rear Camera .................. 496
Refueling Fuel Information .............................. 498
How to Refuel ................................. 499
Fuel Economy and CO
2 Emissions .... 501
* Not available on all models
Page 426 of 606

425
uuWhen Driving uAutomatic Transmission
Driving
Automatic Transmission
The engine runs at a higher id le speed and creeping increases.
Keep the brake pedal firmly depressed when stopped.
Quickly depressing the accelerator peda l while driving uphill may cause the
transmission to drop to a lower gear, unex pectedly increasing vehicle speed. Depress
the accelerator pedal carefully, especi ally on slippery roads and curves.
■Creeping
■Kickdown
1Driving Guidelines for Your Utility Vehicle
Failure to operate your vehicle correctly might result
in a crash or a rollover. 2 Important Handling Information P. 30
2 Precautions While Driving P. 424
Page 466 of 606

465
uuWhen Driving ui-VTM4 (Intelligent Variable Torque Management)-4 ® System*
Driving
i-VTM4 (Intelligent Variable Torque Management)-4 ®
System*
The Intelligent Variable Torque Management System (i-VTM4) is a full time all wheel
drive system that automatically controls and transfers varying amount of engine
torque to all wheels independently according to the driving conditions.
You still need to exercise the same care when accelerating, steering, and braking
that you would in a two wheel drive vehicle.
If the AWD light blinks while driving, it indicates the differential temperature is too
high. If this happens, pull to the side of the ro ad when it is safe, shift to park, an idle
the engine idle until the indi cator goes out. If the indicator does not go out, take
your vehicle to a dealer to have it checked.1 i-VTM4 (Intelligent Variable Torque Management)-4 ® System*
NOTICE
Do not continuously spin the front tires of your
vehicle. Continuously spinning the front tires can
cause transmission or re ar differential damage.
The i-VTM4 system may not function properly if tire
type and size are mixed. Make sure to use the same
size and type of tire, and the air pressures as
specified. 2 Tire and Wheel Replacement P. 537
* Not available on all models
Page 505 of 606

504
Maintenance
Before Performing Maintenance
Inspection and Maintenance
For your safety, perform all listed inspections and maintenance to keep your vehicle
in good condition. If you become aware of any abnormality (noise, smell, insufficient
brake fluid, oil residue on the ground, etc.), have your vehicle inspected by a dealer.
(Note, however, that service at a dealer is not mandatory to keep your warranties in
effect.)
■Daily inspections
Perform inspections before long distance trips, when washing the vehicle, or when
refueling.
■Periodic inspections
• Check the automatic transmission fluid level monthly.
2 Automatic Transmission Fluid P. 521
•Check the brake fluid level monthly.
2 Checking the Brake Fluid P. 522
•Check the tire pressure monthly. Examin e the tread for wear and foreign objects.
2Checking and Maintaining Tires P. 531
•Check the operation of the exterior lights monthly.
2Replacing Light Bulbs P. 523
•Check the condition of the wiper bl ades at least every six months.
2Checking and Maintaining Wiper Blades P. 529
■Types of Inspection and Maintenance
1Inspection and Maintenance
Maintenance, replacement, or repair of
emissions control devices and systems may be
done by any automotive repair establishment or
individuals using parts that are “certified” to
EPA standards.
According to state and fede ral regulations, failure to
perform maintenance on the maintenance main
items marked with # will not void your emissions
warranties. However, all maintenance services should
be performed in accordan ce with the intervals
indicated by the mult i-information display.
2 Maintenance Service Items P. 509
If you want to perform complex maintenance tasks
that require more skills a nd tools, you can purchase a
subscription to the Service Express website at
www.techinfo.honda.com .
2 Authorized Manuals P. 595
If you want to perform ma intenance yourself, make
sure that you have the necessary tools and skills first.
After performing ma intenance, update the records in
the separate maintenance booklet.
U.S. models
Page 512 of 606

511
Maintenance
Maintenance Under the Hood
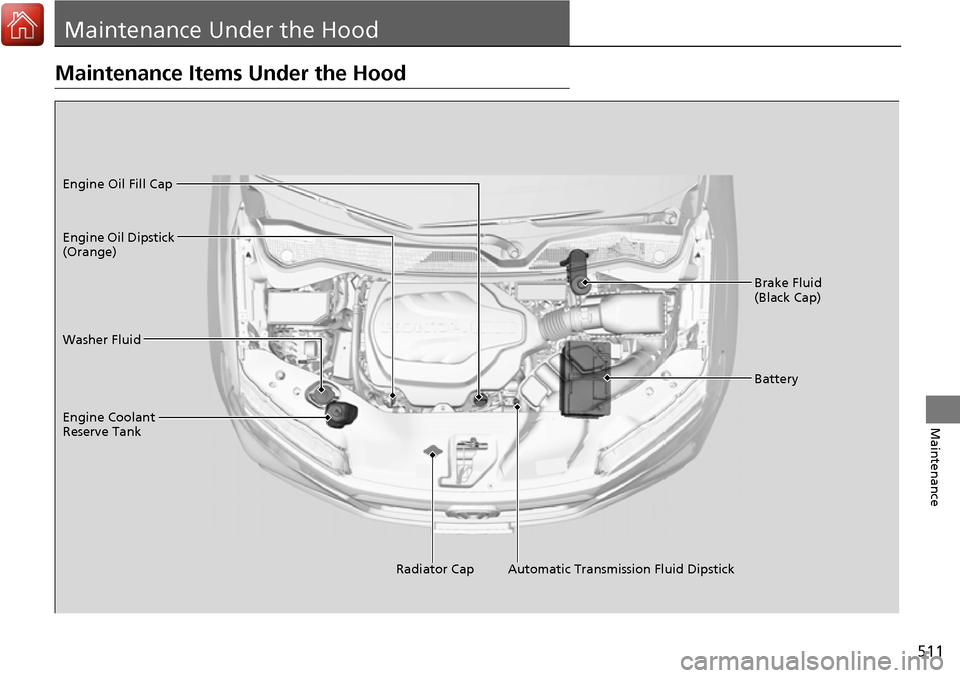
Maintenance Items Under the Hood
Brake Fluid
(Black Cap)
Washer Fluid
Radiator Cap
Engine Coolant
Reserve Tank Engine Oil Dipstick
(Orange) Engine Oil Fill Cap
Battery
Automatic Transmission Fluid Dipstick
Page 522 of 606

521
uuMaintenance Under the Hood uTransmission Fluid
Maintenance
Transmission Fluid
Check the fluid level when the engine is at normal operating temperature.
1. Park on level ground, and start the engine.
2. Wait until the radiator fan starts and then
turn off the engine.
u Perform step 3 after waiting for about
60 seconds (less than 90 seconds).
3. Remove the dipstick from the transmission
and wipe it with a clean cloth.
4. Insert the dipstick all the way back into the
transmission securely , as shown in the
image.
5. Remove the dipstick and check the fluid
level.
u It should be between the upper and
lower marks in the HOT range.
6. If the level is below the lower mark, add
fluid into the dipstick hole to bring it to the
level between the upper and lower marks,
and have your vehicle checked by a dealer
immediately.
■Automatic Transmission Fluid
Specified fluid: Honda ATF DW-1 (automatic transmission fluid)
1Automatic Transmission Fluid
NOTICE
Do not mix Honda ATF DW-1 with other
transmission fluids.
Using a transmission flui d other than Honda ATF
DW-1 may adversely af fect the operation and
durability of your vehicl e’s transmission, and may
even damage it.
Any damage caused by usi ng a transmission fluid that
is not equivalent to Honda ATF DW-1 is not covered
by Honda’s new vehicle warranty.
Pour the fluid slowly and ca refully so you do not spill
any. Clean up any spills immediately, as they can
damage components in the engine compartment.
HOT
Range Upper
Mark
Lower
Mark