2017 HONDA FIT display
[x] Cancel search: displayPage 41 of 76

74 || 75
Models with touchscreen
SMS Text Messaging and E-Mail*
Receive and send messages from your paired and connected phone. Visit
handsfreelink.com (U.S.) or handsfreelink.ca (Canada) to check phone compatibility.
Standard message rates apply with your phone service provider. This feature is
limited while the vehicle is moving.
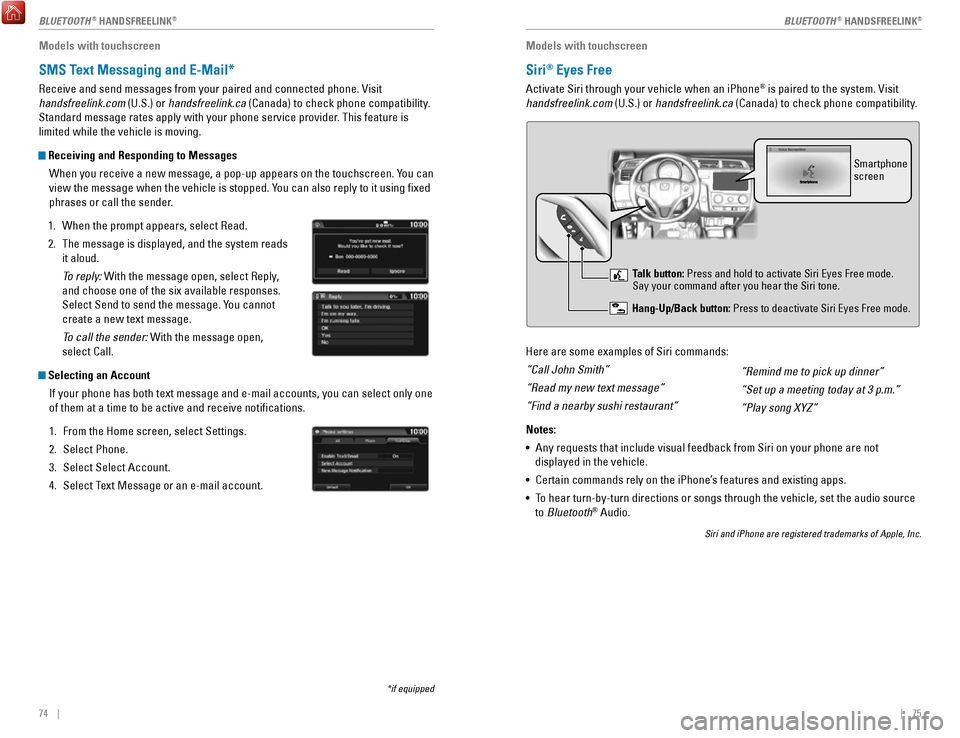
Receiving and Responding to Messages
When you receive a new message, a pop-up appears on the touchscreen. You can
view the message when the vehicle is stopped. You can also reply to it using fixed
phrases or call the sender.
1.
When the prompt appears, select Read.
2.
The message is displayed, and the system reads
it aloud.
To reply: With the message open, select Reply
,
and choose one of the six available responses.
Select Send to send the message. You cannot
create a new text message.
To call the sender: With the message open,
select Call.
Selecting an Account
If your phone has both text message and e-mail accounts, you can select \
only one
of them at a time to be active and receive notifications.
1.
From the Home screen, select Settings.
2.
Select Phone.
3.
Select Select Account.
4.
Select Text Message or an e-mail account.
*if equipped
Models with touchscreen
Siri® Eyes Free
Activate Siri through your vehicle when an iPhone® is paired to the system. Visit
handsfreelink.com (U.S.) or handsfreelink.ca (Canada) to check phone compatibility.
Here are some examples of Siri commands:
“Call John Smith”
“Read my new text message”
“Find a nearby sushi restaurant”
Notes:
•
Any requests that include visual feedback from Siri on your phone are no\
t
displayed in the vehicle.
•
Certain commands rely on the iPhone’s features and existing apps.
•
To hear turn-by-turn directions or songs through the vehicle, set the aud\
io source
to Bluetooth® Audio.
Siri and iPhone are registered trademarks of Apple, Inc.
“Remind me to pick up dinner”
“Set up a meeting today at 3 p.m.”
“Play song XYZ”
Smartphone
screen
Talk button: Press and hold to activate Siri Eyes Free mode.
Say your command after you hear the Siri tone.
Hang-Up/Back button: Press to deactivate Siri Eyes Free mode.
BLUETOOTH® HANDSFREELINK®BLUETOOTH® HANDSFREELINK®
Page 42 of 76

76 || 77
NAVIGATION
NAVIGATION
Learn how to enter a destination and operate the navigation system.
Basic Navigation Operation
A real-time navigation system uses GPS and a map database to show your current
location and help guide you to a desired destination. You can operate the system
using voice commands or the touchscreen.
To reduce the potential for driver distraction, certain manual functions \
may be
inoperable or grayed out while the vehicle is moving. Voice commands are always
available.
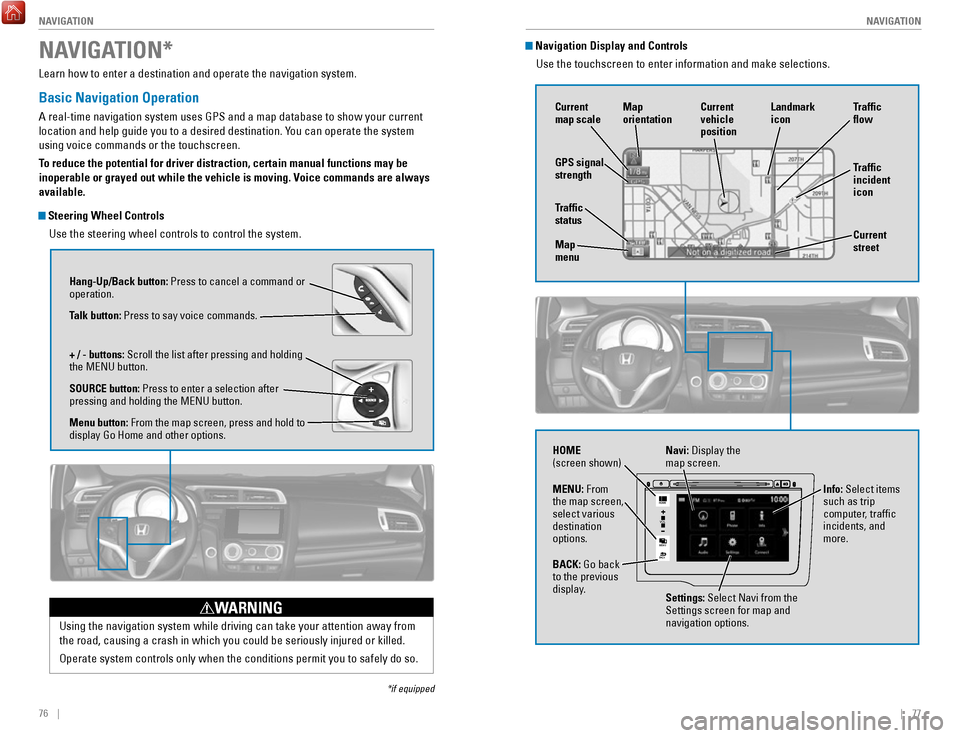
Steering Wheel Controls
Use the steering wheel controls to control the system.
NAVIGATION*
*if equipped
Using the navigation system while driving can take your attention away f\
rom
the road, causing a crash in which you could be seriously injured or kil\
led.
Operate system controls only when the conditions permit you to safely do\
so.
WARNING
Hang-Up/Back button: Press to cancel a command or
operation.
Talk button: Press to say voice commands.
+ / - buttons: Scroll the list after pressing and holding
the MENU button.
SOURCE button: Press to enter a selection after
pressing and holding the MENU button.
Menu button: From the map screen, press and hold to
display Go Home and other options.
Navigation Display and ControlsUse the touchscreen to enter information and make selections.
VO L
MENU
BACK
HOME
Navi: Display the
map screen.
HOME
(screen shown)
Info: Select items
such as trip
computer, traffic
incidents, and
more.
BACK: Go back
to the previous
display. Settings: Select Navi from the
Settings screen for map and
navigation options.
MENU: From
the map screen,
select various
destination
options.
GPS signal
strength
Traffic
incident
icon Traffic
flow
Current
map scale Current
vehicle
position
Map
orientation
Current
street
Traffic
status
Map
menu Landmark
icon
Page 44 of 76

80 || 81
NAVIGATION
NAVIGATION
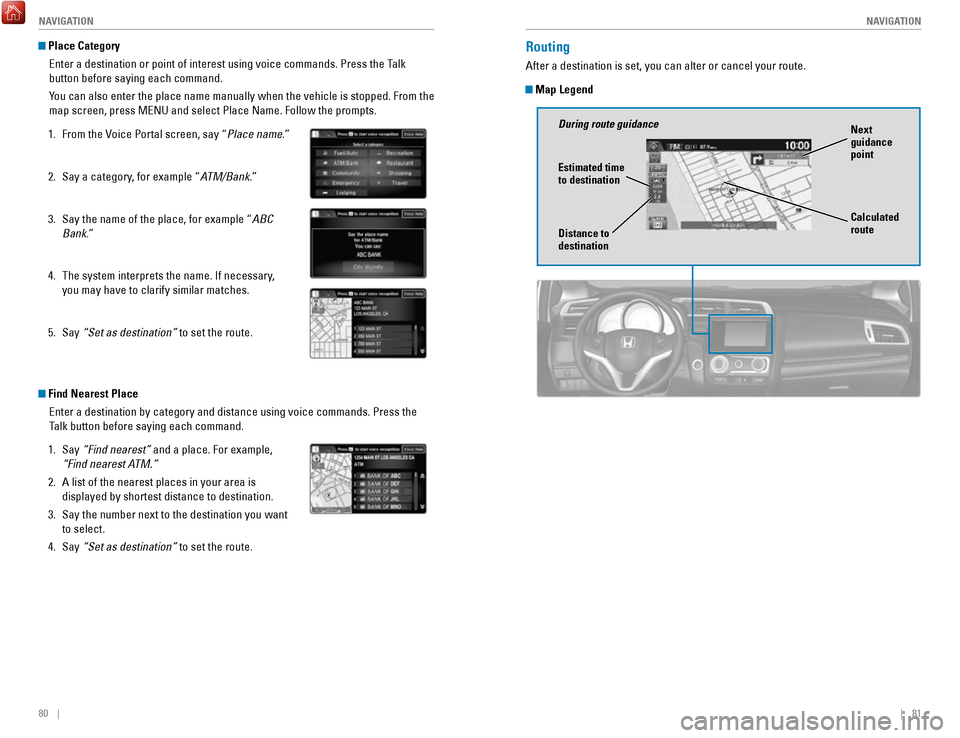
Place Category
Enter a destination or point of interest using voice commands. Press the\
Talk
button before saying each command.
You can also enter the place name manually when the vehicle is stopped. F\
rom the
map screen, press MENU and select Place Name. Follow the prompts.
1.
From the Voice Portal screen, say “Place name
.”
2.
Say a category, for example “A
TM/Bank.”
3.
Say the name of the place, for example “ABC
Bank.”
4.
The system interprets the name. If necessary,
you may have to clarify similar matches.
5.
Say “Set as destination” to set the route.
Find Nearest Place Enter a destination by category and distance using voice commands. Press\
the
Talk button before saying each command.
1.
Say “Find nearest” and a place. For example,
“Find nearest A
TM.”
2.
A list of the nearest places in your area is
displayed by shortest distance to destination.
3.
Say the number next to the destination you want
to select.
4.
Say “Set as destination” to set the route.
Routing
After a destination is set, you can alter or cancel your route.
Map Legend
During route guidance Next
guidance
point
Estimated time
to destination
Distance to
destination Calculated
route
Page 45 of 76

82 || 83
DRIVING
NAVIGATION
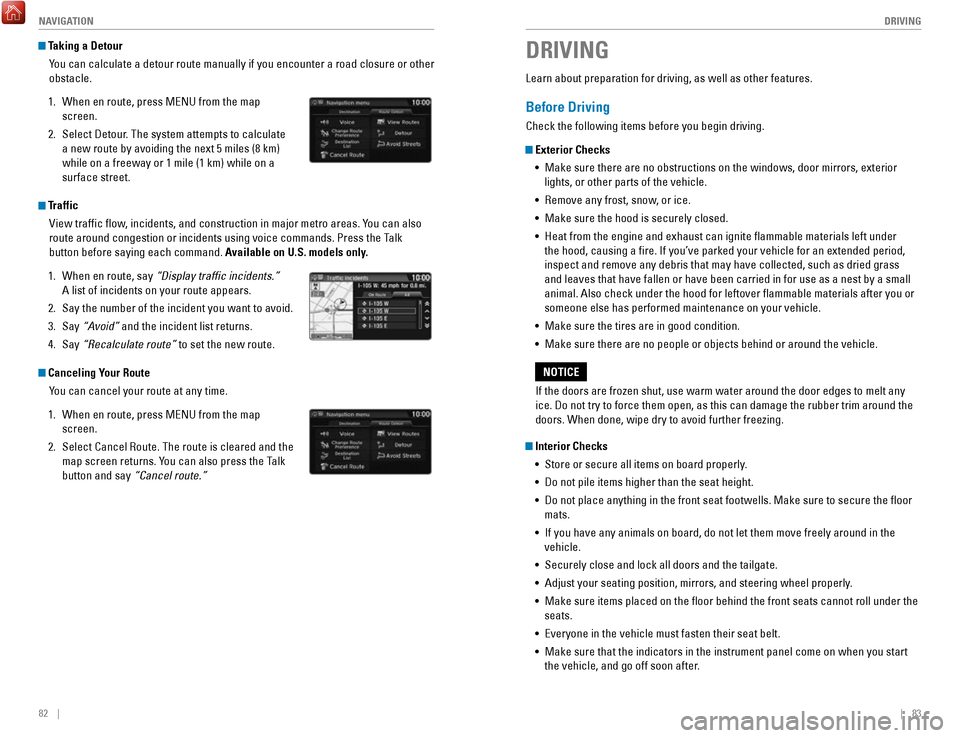
Taking a Detour
You can calculate a detour route manually if you encounter a road closure\
or other
obstacle.
1.
When en route, press MENU from the map
screen.
2.
Select Detour. The system attempts to calculate
a new route by avoiding the next 5 miles (8 km)
while on a freeway or 1 mile (1 km) while on a
surface street.
Traffic View traffic flow, incidents, and construction in major metro areas. You can also
route around congestion or incidents using voice commands. Press the Talk
button before saying each command. Available on U.S. models only.
1.
When en route, say “Display traffic incidents.”
A list of incidents on your route appears.
2.
Say the number of the incident you want to avoid.
3.
Say “Avoid”
and the incident list returns.
4.
Say “Recalculate route” to set the new route.
Canceling Your Route You can cancel your route at any time.
1.
When en route, press MENU from the map
screen.
2.
Select Cancel Route. The route is cleared and the
map screen returns. You can also press the Talk
button and say
“Cancel route.”
Learn about preparation for driving, as well as other features.
Before Driving
Check the following items before you begin driving.
Exterior Checks•
Make sure there are no obstructions on the windows, door mirrors, exteri\
or
lights, or other parts of the vehicle.
•
Remove any frost, snow, or ice.
•
Make sure the hood is securely closed.
•
Heat from the engine and exhaust can ignite flammable materials left u\
nder
the hood, causing a fire. If you’ve parked your vehicle for an exte\
nded period,
inspect and remove any debris that may have collected, such as dried gra\
ss and leaves that have fallen or have been carried in for use as a nest by\
a small animal. Also check under the hood for leftover flammable materials aft\
er you or
someone else has performed maintenance on your vehicle.
•
Make sure the tires are in good condition.
•
Make sure there are no people or objects behind or around the vehicle.
Interior Checks •
Store or secure all items on board properly.
•
Do not pile items higher than the seat height.
•
Do not place anything in the front seat footwells. Make sure to secure t\
he floor
mats.
•
If you have any animals on board, do not let them move freely around in \
the
vehicle.
•
Securely close and lock all doors and the tailgate.
•
Adjust your seating position, mirrors, and steering wheel properly.
•
Make sure items placed on the floor behind the front seats cannot roll\
under the
seats.
•
Everyone in the vehicle must fasten their seat belt.
•
Make sure that the indicators in the instrument panel come on when you s\
tart
the vehicle, and go off soon after.
DRIVING
If the doors are frozen shut, use warm water around the door edges to me\
lt any
ice. Do not try to force them open, as this can damage the rubber trim a\
round the
doors. When done, wipe dry to avoid further freezing.
NOTICE
Page 51 of 76

94 || 95
DRIVING
DRIVING
LaneWatch™*
Check the passenger-side rear areas in the upper display when the right turn signal
is activated.
LaneWatch display
Activating LaneWatch
Activate the right turn signal. The LaneWatch display
appears. Check the display for blind spots, and
visually confirm that it is safe to change lanes.
You can also press the LaneWatch button on the end
of the turn signal switch to view a constant real-time
display. Press it again to turn the display off.
Changing SettingsCustomize the display and how and when the display appears.
1.
From the HOME screen, select Settings.
2.
Select Camera.
3.
Select LaneWatch.
4.
Select an option and make the preferred changes.
5.
Press BACK to exit the menu.
Important Safety Reminder
Like all assistance systems, LaneWatch has limitations. Over-reliance on the
system may result in a collision.
Failure to visually confirm that it is safe to change lanes before doi\
ng so may
result in a crash and serious injury or death.
Do not rely only on LaneWatch while driving. Always look in your mirrors, to
either side of your vehicle, and behind you for other vehicles before ch\
anging
lanes.
WARNING
*if equipped
Multi-View Rear Camera
When you shift into Reverse (R), a real-time image of the area behind \
your vehicle is
shown in the display, along with helpful parking guidelines.
Models with color audio system
Wide view Normal viewTop down view
Changing Camera Settings
Turn the guidelines on or off. Use the selector knob to make and enter se\
lections.
1.
Press the MENU/CLOCK button.
2.
Select Settings.
3.
Select Rear Camera.
4.
Select Camera Guideline.
5.
Select On or Off.
6.
Press the Back button to exit the menu.
Press the selector knob to change views.
Page 52 of 76

96 || 97
DRIVING
DRIVING
The rear camera view is restricted. You cannot see the corner ends of the bumper or what is
underneath the bumper. Its unique lens also makes objects appear closer or farther than they \
actually are.
Visually confirm that it is safe to drive before backing up. Certain c\
onditions (such as weather,
lighting, and high temperatures) may also restrict the rear view. Do not rely on the rearview display,
which does not give you all information about conditions at the rear of \
your vehicle.
Changing Camera Settings
Turn the guidelines on or off.
1.
From the HOME screen, select Settings.
2.
Select Camera.
3.
Select Rear Wide Camera.
4.
Select one of the options.
Fixed Guideline: Guidelines appear when you
shift into Reverse. Select On or Off.
Dynamic Guideline
: Guidelines move as you turn
the steering wheel. Select On or Off.
5.
Press BACK to exit the menu.
Models with touchscreen
Press the icons on the touchscreen to change views.
Wide view Normal view Top down view
Refueling
Use the proper fuel and refueling procedure to ensure the best performan\
ce and
safety of your vehicle.
Fuel Information
Use of unleaded gasoline of 87 octane or higher is recommended.
•
Honda recommends TOP TIER Detergent Gasoline where available.
•
Do NOT use gasoline containing more than 15% ethanol.
•
Do NOT use gasoline containing methanol.
•
Do NOT use gasoline containing MMT.
How to Refuel
1.
The fuel fill door is located at the left rear of the
vehicle. Park next to the service pump that is
most accessible.
2.
Turn off the engine.
3.
Pull the fuel fill door release handle under the
lower left corner of the dashboard. The fuel fill
door opens.
4.
Turn the fuel fill cap slowly to open. Place the fuel
fill cap in the holder.
5.
Insert the filler nozzle fully. When the tank is full,
the fuel nozzle clicks off automatically.
6.
Replace the fuel fill cap. Tighten it until you hear
at least one click. Close the fuel fill door.
W
e recommend quality gasoline containing detergent additives that help
prevent fuel system and engine deposits. In addition, in order to mainta\
in good
performance, fuel economy, and emissions control, we strongly recommend the
use of gasoline that does NOT contain harmful manganese-based fuel addit\
ives
such as MMT, if such gasoline is available.
NOTICE
Gasoline is highly flammable and explosive. You can be burned or seriously
injured when handling fuel.
•
Stop the engine, and keep heat, sparks, and flame away.
•
Handle fuel only outdoors.
•
Wipe up spills immediately.
WARNING
Holder Cap
Page 60 of 76

112 || 113
MAINTENANCE
MAINTENANCE
Safety Precautions
Some of the most important safety precautions are listed below; however, we cannot
warn you of every conceivable hazard that can arise in performing mainte\
nance.
Only you can decide whether or not you should perform a given task.
Maintenance Safety
•
To reduce the possibility of fire or explosion, keep cigarettes, sparks\
, and flames
away from the battery and all fuel-related parts.
•
Never leave rags, towels, or other flammable objects under the hood. H\
eat from
the engine and exhaust can ignite them, causing a fire.
•
To clean parts, use a commercially available degreaser or parts cleaner, not
gasoline.
•
Wear eye protection and protective clothing when working with the battery\
or
compressed air.
•
Do not run the engine in confined spaces where carbon monoxide gas can\
accumulate.
Vehicle Safety
•
The vehicle must be stationary, and parked on level ground with the parking
brake set and the engine off.
•
Be aware that hot parts can burn you.
•
Be aware that moving parts can injure you.
Improperly maintaining this vehicle or failing to correct a problem befo\
re
driving can cause a crash in which you can be seriously hurt or killed. \
Always follow the inspection and maintenance recommendations according
to the schedules in this guide.
WARNING
Failure to properly follow maintenance instructions and precautions can \
cause you to be seriously hurt or killed.
Always follow the procedures and precautions in this guide.
WARNING
Learn about basic maintenance that you can perform on the vehicle yourse\
lf, as well
as information about how to best maintain the vehicle.
MAINTENANCEMaintenance Minder™
When maintenance is due, the Maintenance Minder indicator comes on and a\
message appears on the display every time you turn the vehicle on. Press\
the select/
reset knob to change displays.
See the service code table on page 114 to check which items need mainten\
ance
based on the main and sub items shown in the display.
Maintenance
Minder indicatorMain items
Sub items
Maintenance Minder display
• Independent of the Maintenance Minder information, replace the brake fl\
uid every
3 years.
•
Inspect idle speed every 160,000 miles (256,000 km).
•
Adjust the valves during services A, B, 1, 2, or 3 if they are noisy.
U.S. models
Maintenance, replacement, or repair of emissions control devices and sys\
tems
may be done by any automotive repair establishment or individuals using \
parts that
are certified to EPA standards.
According to state and federal regulations, failure to perform maintenan\
ce on the
maintenance main items marked with # will not void your emissions war
ranties.
However, all maintenance services should be performed in accordance with the
intervals indicated by the multi-information display.
Page 61 of 76

114 || 115
MAINTENANCE
MAINTENANCE
Maintenance Minder Service Codes
These codes indicate what services are due on your vehicle.
*1: If a message SERVICE does not appear more than 12 months after the display is reset, changethe engine oil every year.
#: See information on maintenance and emissions warranty.
CODEMaintenance Main Items
A
�Replace engine oi l*1
B�Replace engine oil and oil �lter
�Inspect front and rear brakes/service as necessary
�Check parking brake adjustment
�Inspect tie rod ends, steering gearbox, and boots
�Inspect suspension component s
�Inspect driveshaft boots
�Inspect brake hoses and lines (Including ABS/VSA)
�Inspect all �uid levels and condition of �uids
�Inspect exhaust system#
�Inspect fuel lines and connections#
*2:If you drive in dusty conditions, replace the air cleaner element every \
15,000 miles (24,000 km).*3:If you drive primarily in urban areas with high concentrations of soot i\
n the air from industryand diesel-powered vehicles, replace the dust and pollen �lter every \
15,000 miles (24,000 km).
CODEMaintenance Sub Items
1
�Rotate tires
2�Replace air cleaner element*2
�Replace dust and pollen �lte r*3
�Inspect drive belt
3
�Replace transmission �uid
4�Replace spark plugs
�Inspect valve clearance
5
�Replace engine coolan t
Under the Hood
Opening the Hood
1.
Park the vehicle on a level surface, and set the
parking brake.
2.
Pull the hood release handle under the lower left
corner of the dashboard.
3.
Push up the hood latch lever in the center of the
hood to release the lock mechanism, and open
the hood.
4.
Remove the support rod from the clamp using the
grip. Mount the support rod in the hood.
When closing, remove the support rod, and
stow it in the clamp, then gently lower the hood.
Remove your hand at a height of approximately
12 inches (30 cm) and let the hood close.
Do not open the hood when the wiper arms are raised. The hood will strik\
e the
wipers, and may damage either the hood or the wipers.
NOTICE
Engine coolant reserve tank
Washer fluid
(blue cap) Engine oil fill cap
Engine oil
dipstick (orange)
Brake fluid
(black cap)
Battery
Radiator cap
Lever
Support
rod Grip
Clamp