2017 HONDA FIT audio
[x] Cancel search: audioPage 39 of 76

70 || 71
Talk Button Tips
For a list of available phone commands, see page 140.
•
When using the Talk button, wait until you hear a beep before speaking.
•
To bypass the system prompts, simply press the Talk button again to say your
command.*
•
When the Talk button is pressed, all available voice commands are highlighted
in yellow
.*
•
Speak in a clear, natural voice.
•
Reduce all background noise.
•
Close the windows and moonroof.
VO L
HOME
MENU
BA CK
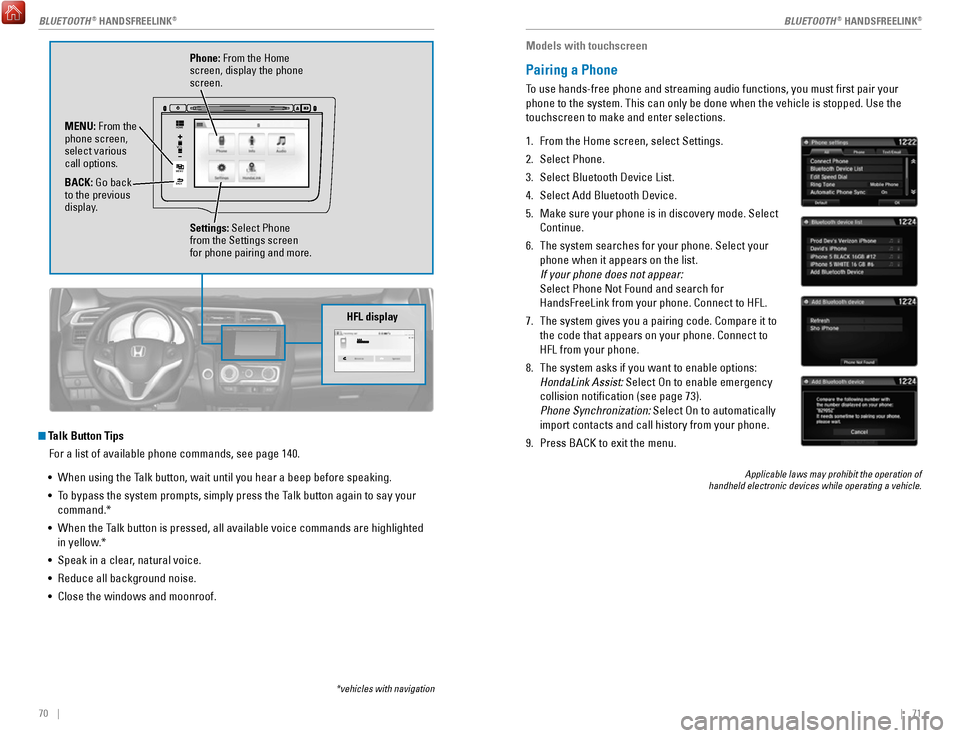
Phone: From the Home
screen, display the phone
screen.
MENU: From the
phone screen,
select various
call options.
BACK: Go back
to the previous
display. Settings: Select Phone
from the Settings screen
for phone pairing and more.
*vehicles with navigation
HFL display
Models with touchscreen
Pairing a Phone
To use hands-free phone and streaming audio functions, you must first p\
air your
phone to the system. This can only be done when the vehicle is stopped. \
Use the
touchscreen to make and enter selections.
1.
From the Home screen, select Settings.
2.
Select Phone.
3.
Select Bluetooth Device List.
4.
Select Add Bluetooth Device.
5.
Make sure your phone is in discovery mode. Select
Continue.
6.
The system searches for your phone. Select your
phone when it appears on the list.
If your phone does not appear:
Select Phone Not Found and search for
HandsFreeLink from your phone. Connect to HFL.
7.
The system gives you a pairing code. Compare it to
the code that appears on your phone. Connect to
HFL from your phone.
8.
The system asks if you want to enable options:
HondaLink Assist: Select On to enable emergency
collision notification (see page 73).
Phone Synchronization:
Select On to automatically
import contacts and call history from your phone.
9.
Press BACK to exit the menu.
Applicable laws may prohibit the operation of
handheld electronic devices while operating a vehicle.
BLUETOOTH® HANDSFREELINK®BLUETOOTH® HANDSFREELINK®
Page 41 of 76

74 || 75
Models with touchscreen
SMS Text Messaging and E-Mail*
Receive and send messages from your paired and connected phone. Visit
handsfreelink.com (U.S.) or handsfreelink.ca (Canada) to check phone compatibility.
Standard message rates apply with your phone service provider. This feature is
limited while the vehicle is moving.
Receiving and Responding to Messages
When you receive a new message, a pop-up appears on the touchscreen. You can
view the message when the vehicle is stopped. You can also reply to it using fixed
phrases or call the sender.
1.
When the prompt appears, select Read.
2.
The message is displayed, and the system reads
it aloud.
To reply: With the message open, select Reply
,
and choose one of the six available responses.
Select Send to send the message. You cannot
create a new text message.
To call the sender: With the message open,
select Call.
Selecting an Account
If your phone has both text message and e-mail accounts, you can select \
only one
of them at a time to be active and receive notifications.
1.
From the Home screen, select Settings.
2.
Select Phone.
3.
Select Select Account.
4.
Select Text Message or an e-mail account.
*if equipped
Models with touchscreen
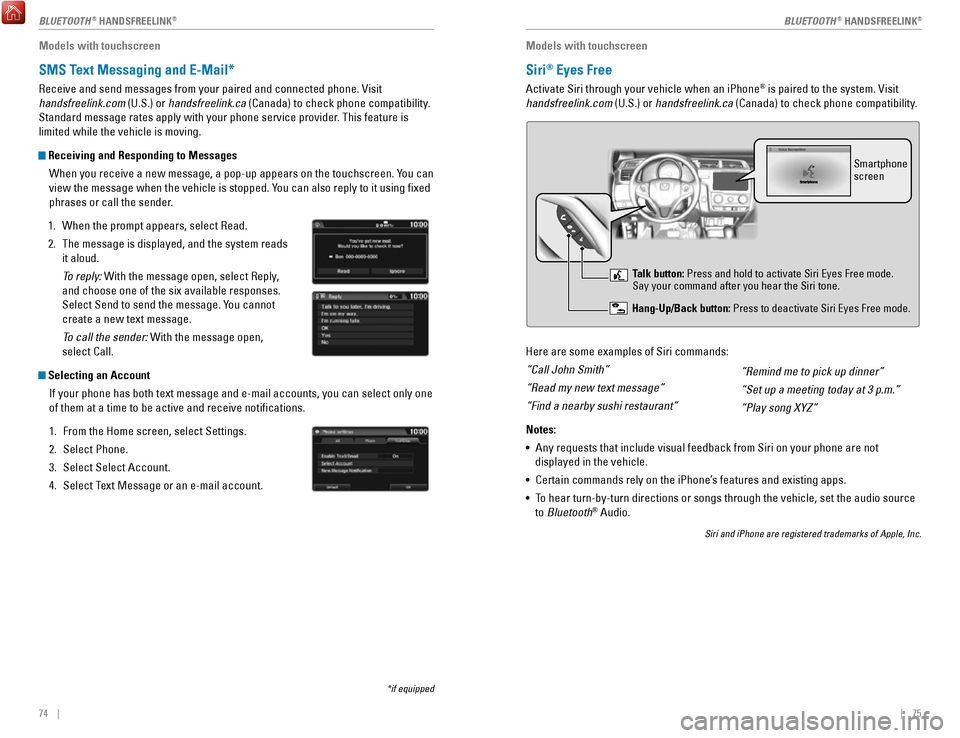
Siri® Eyes Free
Activate Siri through your vehicle when an iPhone® is paired to the system. Visit
handsfreelink.com (U.S.) or handsfreelink.ca (Canada) to check phone compatibility.
Here are some examples of Siri commands:
“Call John Smith”
“Read my new text message”
“Find a nearby sushi restaurant”
Notes:
•
Any requests that include visual feedback from Siri on your phone are no\
t
displayed in the vehicle.
•
Certain commands rely on the iPhone’s features and existing apps.
•
To hear turn-by-turn directions or songs through the vehicle, set the aud\
io source
to Bluetooth® Audio.
Siri and iPhone are registered trademarks of Apple, Inc.
“Remind me to pick up dinner”
“Set up a meeting today at 3 p.m.”
“Play song XYZ”
Smartphone
screen
Talk button: Press and hold to activate Siri Eyes Free mode.
Say your command after you hear the Siri tone.
Hang-Up/Back button: Press to deactivate Siri Eyes Free mode.
BLUETOOTH® HANDSFREELINK®BLUETOOTH® HANDSFREELINK®
Page 43 of 76

78 || 79
NAVIGATION
NAVIGATION
Voice Prompt Volume
Adjust volume for navigation and voice command confirmation. This does\
not
affect audio or Bluetooth
® HandsFreeLink® volume, which is controlled by the
volume bar.
1.
From the Home screen, select Settings.
2.
Select System.
3.
Select Volume.
4.
Adjust the level, or select off.
Voice Prompt Turn the voice feedback feature on or off.
1.
From the Home screen, select Settings.
2.
Select System.
3.
Select Voice Prompt.
4.
Select On or Off.
Talk Button Tips For a full list of navigation commands, see page 135.
•
When using the Talk button, wait until you hear a beep before speaking.
•
To bypass the system prompts, simply press the Talk button again to say your
command.
•
When the Talk button is pressed, all available voice commands are highlighted
in yellow
.
•
Speak in a clear, natural voice.
•
Reduce all background noise.
•
Adjust the dashboard vents away from the microphone on the audio system.\
•
Close the windows and moonroof.
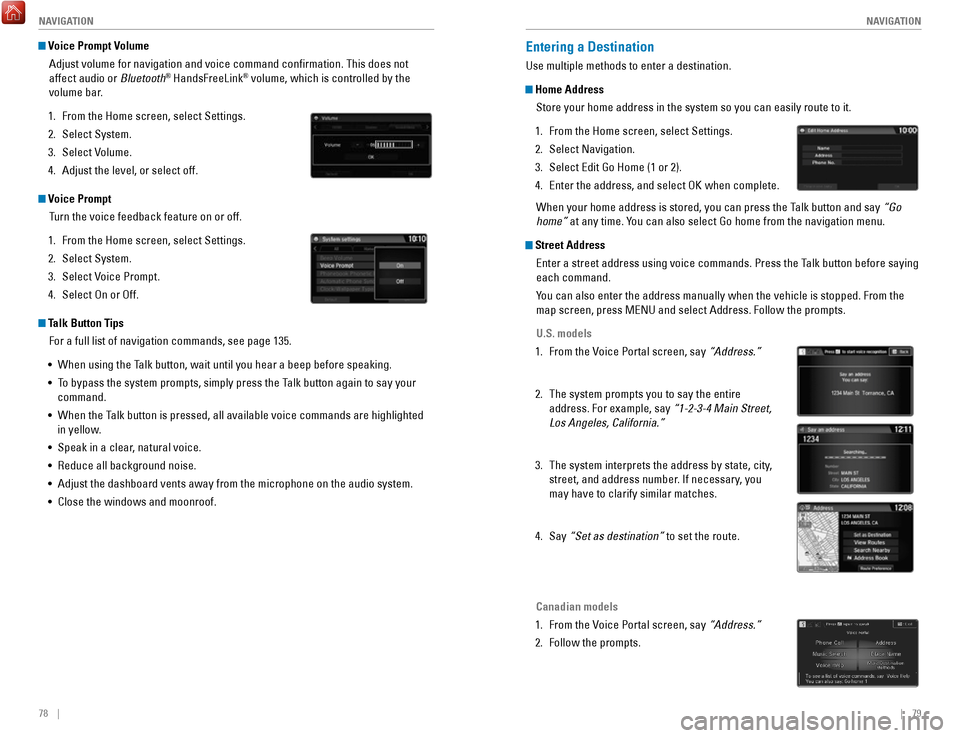
Entering a Destination
Use multiple methods to enter a destination.
Home Address Store your home address in the system so you can easily route to it.
1.
From the Home screen, select Settings.
2.
Select Navigation.
3.
Select Edit Go Home (1 or 2).
4.
Enter the address, and select OK when complete.
When your home address is stored, you can press the Talk
button and say “Go
home”
at any time. You can also select Go home from the navigation menu.
Street AddressEnter a street address using voice commands. Press the Talk button before saying
each command.
You can also enter the address manually when the vehicle is stopped. From the
map screen, press MENU and select Address. Follow the prompts.
U.S. models
1.
From the Voice Portal screen, say “Address.”
2.
The system prompts you to say the entire
address. For example, say “1-2-3-4 Main Street,
Los Angeles, California.”
3.
The system interprets the address by state, city,
street, and address number. If necessary
, you
may have to clarify similar matches.
4.
Say “Set as destination” to set the route.
Canadian models
1.
From the Voice Portal screen, say “Address.”
2.
Follow the prompts.
Page 47 of 76

86 || 87
DRIVING
DRIVING
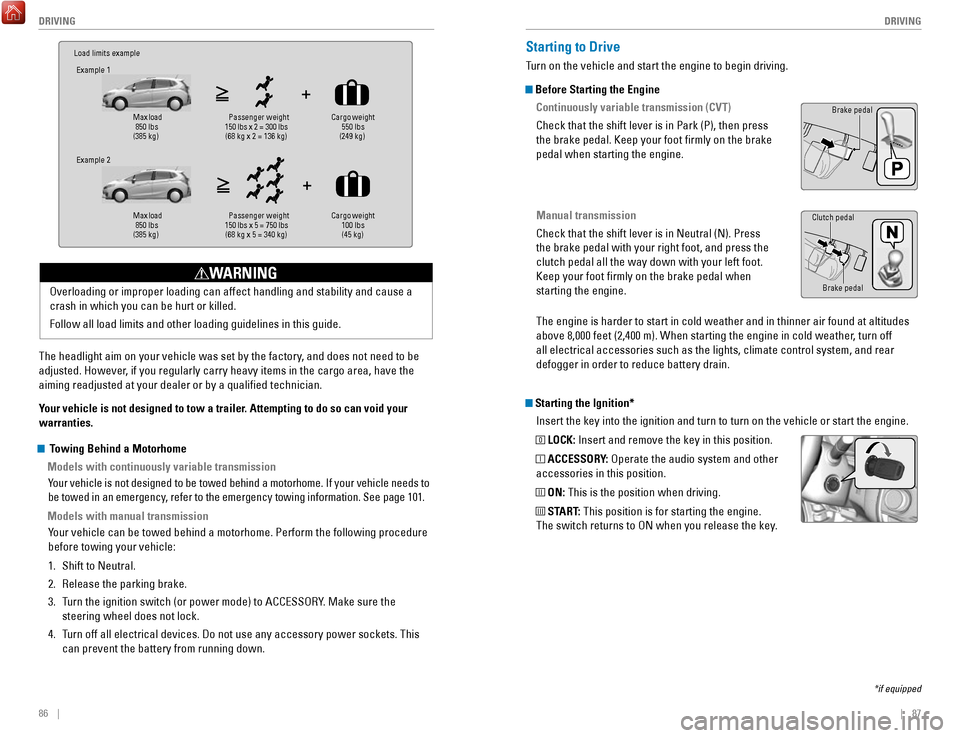
Load limits example
Example 1
Max load
850 lbs
(385 kg) Pass
enger weight
150 lbs x 2 = 300 lbs (68 kg x 2 = 136 kg) Cargo weight
550 lbs
(249 kg)
Example 2
Max load
850 lbs
(385 kg) Pa
ssenger w eight
150 lbs x 5 = 750 lbs (68 kg x 5 = 340 kg) Cargo weight
100 lbs
(45 kg)
The headlight aim on your vehicle was set by the factory, and does not need to be
adjusted. However, if you regularly carry heavy items in the cargo area, have the
aiming readjusted at your dealer or by a qualified technician.
Your vehicle is not designed to tow a trailer. Attempting to do so can void your
warranties. Overloading or improper loading can affect handling and stability and ca\
use a
crash in which you can be hurt or killed.
Follow all load limits and other loading guidelines in this guide.
WARNING
Starting the Ignition*
Insert the key into the ignition and turn to turn on the vehicle or star\
t the engine.
0 LOCK: Insert and remove the key in this position.
I ACCESSORY: Operate the audio system and other
accessories in this position.
II ON: This is the position when driving.
III START: This position is for starting the engine.
The switch returns to ON when you release the key.
Starting to Drive
Turn on the vehicle and start the engine to begin driving.
Before Starting the Engine
Continuously variable transmission (CVT)
Check that the shift lever is in Park (P), then press
the brake pedal. Keep your foot firmly on the brake
pedal when starting the engine.
Manual transmission
Check that the shift lever is in Neutral (N). Press
the brake pedal with your right foot, and press the
clutch pedal all the way down with your left foot.
Keep your foot firmly on the brake pedal when
starting the engine.
Brake pedal
The engine is harder to start in cold weather and in thinner air found a\
t altitudes
above 8,000 feet (2,400 m). When starting the engine in cold weather, turn off
all electrical accessories such as the lights, climate control system, a\
nd rear
defogger in order to reduce battery drain.
*if equipped
Brake pedal
Clutch pedal
Towing Behind a Motorhome
Models with continuously variable transmission
Your vehicle is not designed to be towed behind a motorhome. If your vehi\
cle needs to
be towed in an emergency, refer to the emergency towing information. See page 101.
Models with manual transmissionYour vehicle can be towed behind a motorhome. Perform the following proce\
dure
before towing your vehicle:
1.
Shift to Neutral.
2.
Release the parking brake.
3.
Turn the ignition switch (or power mode) to ACCESSORY. Make sure the
steering wheel does not lock.
4.
Turn off all electrical devices. Do not use any accessory power sockets. This
can prevent the battery from running down.
Page 51 of 76

94 || 95
DRIVING
DRIVING
LaneWatch™*
Check the passenger-side rear areas in the upper display when the right turn signal
is activated.
LaneWatch display
Activating LaneWatch
Activate the right turn signal. The LaneWatch display
appears. Check the display for blind spots, and
visually confirm that it is safe to change lanes.
You can also press the LaneWatch button on the end
of the turn signal switch to view a constant real-time
display. Press it again to turn the display off.
Changing SettingsCustomize the display and how and when the display appears.
1.
From the HOME screen, select Settings.
2.
Select Camera.
3.
Select LaneWatch.
4.
Select an option and make the preferred changes.
5.
Press BACK to exit the menu.
Important Safety Reminder
Like all assistance systems, LaneWatch has limitations. Over-reliance on the
system may result in a collision.
Failure to visually confirm that it is safe to change lanes before doi\
ng so may
result in a crash and serious injury or death.
Do not rely only on LaneWatch while driving. Always look in your mirrors, to
either side of your vehicle, and behind you for other vehicles before ch\
anging
lanes.
WARNING
*if equipped
Multi-View Rear Camera
When you shift into Reverse (R), a real-time image of the area behind \
your vehicle is
shown in the display, along with helpful parking guidelines.
Models with color audio system
Wide view Normal viewTop down view
Changing Camera Settings
Turn the guidelines on or off. Use the selector knob to make and enter se\
lections.
1.
Press the MENU/CLOCK button.
2.
Select Settings.
3.
Select Rear Camera.
4.
Select Camera Guideline.
5.
Select On or Off.
6.
Press the Back button to exit the menu.
Press the selector knob to change views.
Page 53 of 76

98 || 99
HANDLING THE UNEXPECTED
HANDLING THE UNEXPECTED
Learn about what to do in critical or emergency situations.
Smart Entry Remote Battery Strength*
If the battery life in your remote transmitter is weak, follow the below\
steps to start
the engine.
1.
Touch the back of the remote transmitter to the
ENGINE START/STOP button while the indicator is
flashing.
2.
With the brake pedal pressed (and the clutch
pedal for manual transmission), press the ENGINE
START/STOP button within 10 seconds.
Jump Starting
Turn off the power to electric devices, such as audio and lights. Turn off the engine,
then open the hood.
1.
Remove the under-hood fuse box cover (see
page 108). Connect the first jumper cable to your
vehicle’s battery (+) terminal.
2.
Connect the other end of the first jumper cable
to the booster battery (+) terminal. Use a 12-volt
booster battery only.
3.
Connect the second jumper cable to the booster
battery (-) terminal.
4.
Connect the other end of the second jumper cable
to the stud bolt as shown. Do not connect this
jumper cable to any other part.
5.
If your vehicle is connected to another vehicle,
start the assisting vehicle’s engine and increase its
rpm slightly.
6.
Attempt to start your vehicle’s engine. If it turns over slowly, make sure that the
jumper cables have good metal-to-metal contact.
HANDLING THE UNEXPECTED
*if equipped
A battery can explode if you do not follow the correct procedure, seriou\
sly
injuring anyone nearby.
Keep all sparks, open flames, and smoking materials away from the batt\
ery.
WARNING
Booster
battery
WARNING: Battery posts, terminals, and related accessories contain lead and lead\
compounds. Wash your hands after handling.
After the Engine Starts Once your vehicle’s engine has started, remove the jumper cables in the following
order:
1.
Disconnect the jumper cable from your vehicle’s stud bolt.
2.
Disconnect the other end of the jumper cable from the booster battery (\
-)
terminal.
3.
Disconnect the jumper cable from your vehicle’s battery (+) terminal.
4.
Disconnect the other end of the jumper cable from the booster battery (\
+)
terminal.
5.
Have your vehicle inspected by a nearby service station or a dealer.
Shift Lever Does Not Move*
Follow the procedure below if you cannot move the shift lever out of Par\
k (P).
1.
Set the parking brake.
2.
Remove the key from the ignition, or remove the
built-in key from the remote transmitter.
3.
Wrap a cloth around the tip of a small flat-tip
screwdriver. Put it into the shift lock release slot as
shown in the image, and remove the cover
.
4.
Insert the key into the shift release lock.
5.
While pushing the key down, press the shift lever
release button and place the shift lever into Neutral
(N). The lock is now released. Have the shift lever
checked by a dealer as soon as possible.
*if equipped
Slot
Release button Shift lock
release slot
Cover
Page 70 of 76

132 || 133
CUSTOMER INFORMATION
CUSTOMER INFORMATION
Learn about information specific to you as a Honda customer and how to\
get help.
Frequently Asked Questions/Troubleshooting
Below are some frequently asked questions and troubleshooting items that\
you may
have about the vehicle.
Q:
How do I set the vehicle clock?
A:
For vehicles without navigation, see page 45. For vehicles with navigati\
on, the
time is automatically set using GPS signals.
Q:
Why doesn’t the vehicle start when I press the ENGINE START/STOP button?*
A:
The brake pedal must be pressed to start the engine.
Q:
What is the AUTO* setting on my headlight lever?
A:
When in the AUTO position, the vehicle’s exterior lights will automatically turn
on or off depending on the ambient lighting.
Q:
Why won’t the driver’s door unlock when I grab the door handle, even though
the keyless access remote is within range?*
A:
If you pull the handle too quickly, the system may not have time to confirm the
door is unlocked. Wait to hear a beep to confirm the door is unlocked. If you are
wearing gloves, the system may be slow to respond.
Q:
After my battery was disconnected or went dead, the audio system is aski\
ng for
a code. Where do I find this?
A:
In most cases, you do not need to enter a code. Turn on the vehicle and the
audio system, and press and hold the power button until the system react\
ivates.
Q:
Why can’t I operate Pandora® through the audio system?
A:
Audio may be streaming through Bluetooth® Audio. Make sure Pandora mode
is selected and the phone cable is properly connected to the USB adapter\
.
Some phones may prompt you to “Allow” a connection.
Q:
Is my phone compatible with Bluetooth features?
A:
Visit handsfreelink.com (U.S.) or
handsfreelink.ca (Canada) to check phone
compatibility for Bluetooth® Audio, Bluetooth® HandsFreeLink®, and SMS text
messaging.
Q:
Every time I press the Talk button, the system gives me voice prompts. Can I turn
these off?*
A:
From the Home screen, select Settings. Select the Voice Recog tab, then select
Voice Prompt. Select Off.
CUSTOMER INFORMATION
*if equipped
Contact Us
Honda dealer personnel are trained professionals. They should be able to\
answer
all your questions. If you encounter a problem that your dealership does\
not solve
to your satisfaction, please discuss it with the dealership’s service manager or
general manager. If you are dissatisfied with the decision made by the dealership’\
s
management, contact Honda Automobile Customer Service.
U.S. owners
American Honda Motor Co., Inc.
Honda Automobile Customer Service
1919 Torrance Blvd.
Mail Stop 500-2N-7A
Torrance, CA 90501-2746
Tel: (800) 999-1009
In Puerto Rico and
the U.S. Virgin Islands
Bella International
P.O. Box 190816
San Juan, PR 00919-0816
Tel: (787) 620-7546
When you call or write, please give us the following information:
•
Vehicle Identification Number
•
Date of purchase
•
Odometer reading of your vehicle
•
Your name, address, and telephone number
•
A detailed description of the problem
•
Name of the dealer who sold the vehicle to you
Q:
Why can’t I select an item using the selector knob or touchscreen*?
A:
To prevent driver distraction, certain items are limited or inoperable wh\
ile the
vehicle is moving. Use voice commands or pull over to select the items.
Q:
Where can I find the vehicle identification number (VIN)?
A:
Check the label on the driver’s doorjamb.
*if equipped
Canadian owners
Honda Canada, Inc.
Customer Relations
180 Honda Blvd.
Markham, ON
L6C 0H9
Tel: (888) 946-6329
Fax: (877) 939-0909
e-mail: [email protected]
Page 71 of 76

134 || 135
VOICE COMMAND INDEX
CUSTOMER INFORMATION
Honda Roadside Assistance
24-hour emergency road service is available to you in the United States \
and Canada
throughout your 3-year/36,000-mile warranty term. Services include jump starting,
flat tire and lockout assistance, towing, and more (limitations apply\
).
Call (866) 864-5211 (U.S.) or (800) 465-7587 (Canada).
Warranty Coverages
Below is a brief summary of the warranties covering your new vehicle.
New Vehicle Limited Warranty: Covers your new vehicle, except for the emissions
control system and accessories, against defects in materials and workman\
ship.
Emissions Control Systems Defects Warranty and Emissions Performance
Warranty: Covers your vehicle’s emissions control systems. Time, mileage, and
coverage are conditional.
Seat Belt Limited Warranty: Covers seat belts that fail to function properly.
Rust Perforation Limited Warranty: Covers all exterior body panels that rust through
from the inside.
Accessory Limited Warranty: Covers Honda accessories.
Replacement Parts Limited Warranty: Covers all Honda replacement parts against
defects in materials and workmanship.
Replacement Battery Limited Warranty: Provides prorated coverage for a
replacement battery purchased from a Honda dealer.
Replacement Muffler Lifetime Limited Warranty: Covers a replacement muffler for
the duration of the ownership.
Restrictions and exclusions apply to all these warranties. See the Warranty Manual
on the Owner Information CD or at owners.honda.com (U.S.) or myhonda.ca
(Canada) for complete descriptions of each warranty, including time, mileage, and
other conditional limitations.
Your vehicle’s original tires are covered by their manufacturer. Tire warranty
information can be found on the Owner Information CD or at owners.honda.com
(U.S.) or myhonda.ca (Canada). Learn about all available voice commands to help you operate the vehicle\
. Available
on vehicles with navigation.
Press the Talk button before you say a command. To view a list of available
commands in the vehicle, say “Voice help.” Select a category to hear the commands
read aloud. General Commands
The system accepts these commands on any screen.
Navigation CommandsThe system accepts these commands on the map/guidance screen.
General Commands
•
Display map
•
Display navigation
•
Go home 1 (or 2)
Map Display Commands
•
Voice help
•
Display menu
•
Display setting
•
Display navigation
•
Display information •
Display audio
•
Display phone
•
Back/Cancel
•
What is today’s date?
•
What time is it?
•
Display current location
•
Display/Hide (specify icon type):
− AT M
− gas station
− restaurant
− post office
− grocery store
− lodging (hotel, motel)
− parking garage
− parking lot
− school
− hospital
− freeway exit information
− traffic*
− traffic speeds*
− traffic icons*
•
Display north up
•
Display heading up
•
Display 3D map
•
Display zoom in
•
Display zoom out
VOICE COMMAND INDEX
*U.S. models only
EPA Contact Information
An owner may obtain further information
concerning emission warranties or report
violations of the terms of the emission
warranties by contacting: U.S. Environmental Protection Agency
Office of Transportation and Air Quality
Compliance Division,
Light-Duty Vehicles Group
Attn: Warranty Complaints
2000 Traverwood Drive
Ann Arbor, MI 48105
Email: [email protected]