Page 139 of 465

uuAdjusting the Seats uFront Seats
138
Controls
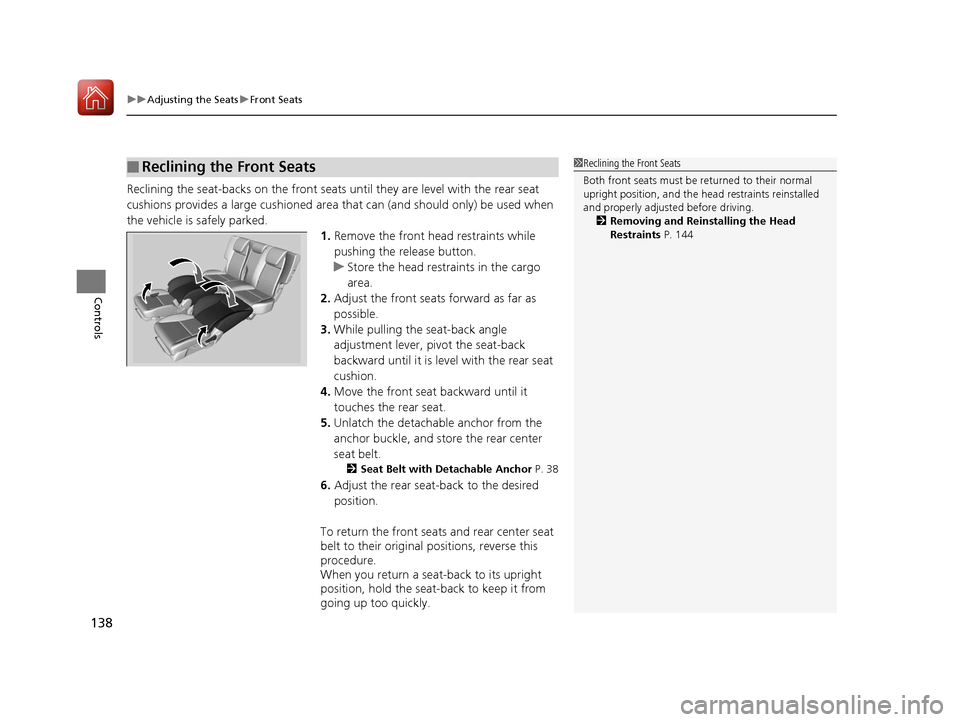
Reclining the seat-backs on the front seats until they are level with the rear seat
cushions provides a large cushioned area that can (and should only) be used when
the vehicle is safely parked.
1.Remove the front head restraints while
pushing the release button.
u Store the head restraints in the cargo
area.
2. Adjust the front seats forward as far as
possible.
3. While pulling the seat-back angle
adjustment lever, pivot the seat-back
backward until it is level with the rear seat
cushion.
4. Move the front seat backward until it
touches the rear seat.
5. Unlatch the detachable anchor from the
anchor buckle, and store the rear center
seat belt.
2 Seat Belt with Detachable Anchor P. 38
6.Adjust the rear sea t-back to the desired
position.
To return the front seats and rear center seat
belt to their original positions, reverse this
procedure.
When you return a seat-back to its upright
position, hold the seat-back to keep it from
going up too quickly.
■Reclining the Front Seats1 Reclining the Front Seats
Both front seats must be returned to their normal
upright position, and the head restraints reinstalled
and properly adjusted before driving.
2 Removing and Reinstalling the Head
Restraints P. 144
17 FIT -31T5A6200.book 138 ページ 2016年5月27日 金曜日 午後6時33分
Page 141 of 465

uuAdjusting the Seats uRear Seats
140
Controls
The rear seats can be folded down separate ly to allow for additional storage space.
■To fold down the seat
1. Store the center seat belt first. Insert the
latch plate into the slot on the side of the
anchor buckle.
2. Retract the seat belt into the holder on the
ceiling.
2 Seat Belt with Detachable Anchor P. 38
3.Lower the head restra int to its lowest
position.
4. Pull the release lever and fold down the
seat-back.
To return the seat to th e original position, pull
up the seat-back in the upright position.
■Folding Down the Rear Seats1 Folding Down the Rear Seats
Make sure all items in the cargo area or items
extending to the rear seats are properly
secured. Loose items can fly forward if you have
to brake hard.
Remove any items from th e rear seat cushion and
floor before you fold down the rear seat.
To lock the seat-back upri ght, push it backwards until
it locks.
Make sure the seat-back, head restraints and seat
cushion are securely latche d back into place before
driving. Also, make sure all rear shoulder belts are
positioned in front of the seat-back, and the center
shoulder belt is re-posit ioned in the holding slot.
Make sure that the folded seat-back does not press
against the front passenger seat, as this can cause the
weight sensors in the front passenger seat to work
improperly.
2 Passenger Airbag Off Indicator P. 52
Anchor
Buckle
Latch Plate
Release Lever
17 FIT -31T5A6200.book 140 ページ 2016年5月27日 金曜日 午後6時33分
Page 142 of 465

141
uuAdjusting the Seats uRear Seats
Controls
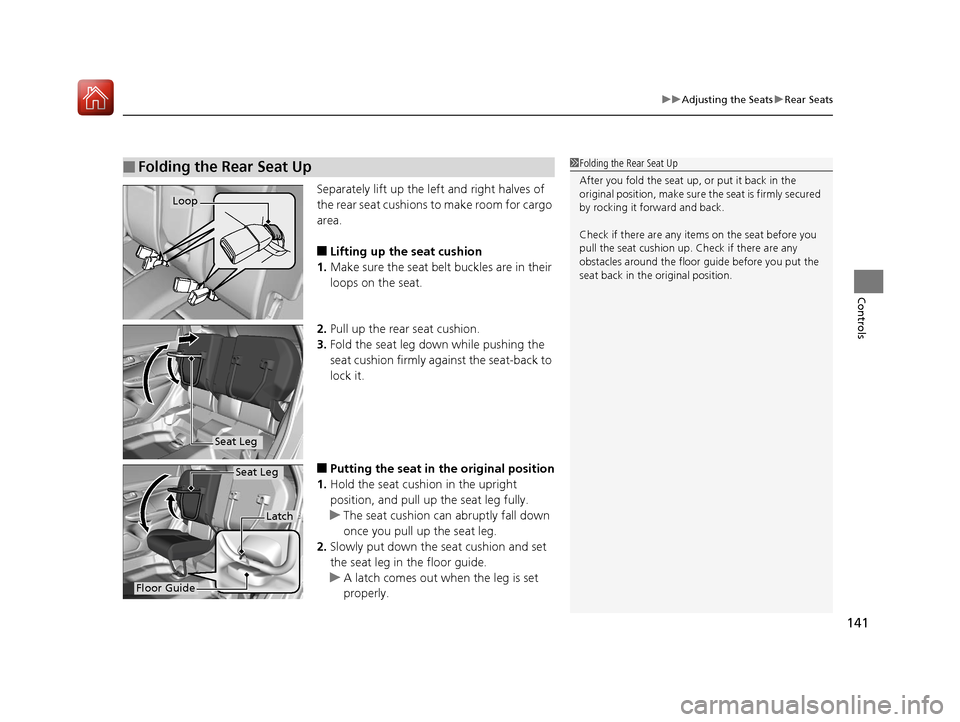
Separately lift up the left and right halves of
the rear seat cushions to make room for cargo
area.
■Lifting up the seat cushion
1. Make sure the seat belt buckles are in their
loops on the seat.
2. Pull up the rear seat cushion.
3. Fold the seat leg do wn while pushing the
seat cushion firmly against the seat-back to
lock it.
■Putting the seat in the original position
1. Hold the seat cushion in the upright
position, and pull up the seat leg fully.
u The seat cushion can abruptly fall down
once you pull up the seat leg.
2. Slowly put down the seat cushion and set
the seat leg in the floor guide.
u A latch comes out when the leg is set
properly.
■Folding the Rear Seat Up1Folding the Rear Seat Up
After you fold the seat up, or put it back in the
original position, make sure the seat is firmly secured
by rocking it forward and back.
Check if there are any items on the seat before you
pull the seat cushion up. Check if there are any
obstacles around the floor guide before you put the
seat back in the original position.
Loop
Seat Leg
Floor Guide
Latch
Seat Leg
17 FIT -31T5A6200.book 141 ページ 2016年5月27日 金曜日 午後6時33分
Page 146 of 465

145
uuAdjusting the Seats uMaintain a Proper Sitting Position
Controls
Maintain a Proper Sitting Position
After all occupants have adjusted their s eats and head restraints, and put on their
seat belts, it is very important that they continue to sit upright, well back in their
seats, with their feet on the floor, until the vehicle is safe ly parked and the engine is
off.
Sitting improperly can increase the chance of injury during a crash. For example, if
an occupant slouches, lies down, turns sideways, sits forward, leans forward or
sideways, or puts one or both feet up, the chance of injury during a crash is greatly
increased.
In addition, an occupant who is out of posi tion in the front seat can be seriously or
fatally injured in a crash by striking interior parts of the vehicle or being struck by an
inflating front airbag.1 Maintain a Proper Sitting Position
3WARNING
Sitting improperly or out of position can
result in serious injury or death in a crash.
Always sit upright, well back in the seat,
with your feet on the floor.
17 FIT -31T5A6200.book 145 ページ 2016年5月27日 金曜日 午後6時33分
Page 150 of 465
149
uuInterior Lights/Interior Convenience Items uInterior Convenience Items
Continued
Controls
Interior Convenience Items
Pull the handle to open the glove box.
Pull the handle to open the console
compartment.
■Glove Box1Glove Box
3WARNING
An open glove box can cause serious injury
to your passenger in a crash, even if the
passenger is wearing the seat belt.
Always keep the glove box closed while
driving.
■Console Compartment*
* Not available on all models
17 FIT -31T5A6200.book 149 ページ 2016年5月27日 金曜日 午後6時33分
Page 309 of 465
308
uuBefore Driving uDriving Preparation
Driving
• Be sure items placed on the floor behind the front seats cannot roll under the
seats.
u They can interfere with the driver’s ability to operate the pedals, the operation
of the seats, or the operation of the sensors under the seats.
• Everyone in the vehicle must fasten their seat belt.
2Fastening a Seat Belt P. 35
•Make sure that the indicators in the ins trument panel come on when you start the
vehicle, and go off soon after.
u Always have a dealer check the vehicle if a problem is indicated.
2 Indicators P. 70
17 FIT -31T5A6200.book 308 ページ 2016年5月27日 金曜日 午後6時33分
Page 370 of 465

369
uuMaintenance MinderTMuTo Use Maintenance MinderTM
Continued
Maintenance
■Maintenance Service Items
Maintenance Minder Message
Maintenance
Minder Indicator
Sub Items Main Item
1Maintenance Service Items
•Independent of the Maintenance Minder
information, replace the brake fluid every 3 years.
•Inspect idle speed every 160,000 miles (256,000
km).
•Adjust the valves during services A, B, 1, 2, or 3 if
they are noisy.
*1: If a message SERVICE does not appear more than 12 months after the display is reset, change the
engine oil every year.
# : See information on maintenance and emissions warranty.
CODEMaintenance Main Items
A
●Replace engine oil*1
B●Replace engine oil and oil filter●Inspect front and rear brakes/service as necessary●Check parking brake adjustment●Inspect tie rod ends, steering gearbox, and boots●Inspect suspension components●Inspect driveshaft boots●Inspect brake hoses and li nes (Including ABS/VSA)●Inspect all fluid levels and condition of fluids●Inspect exhaust system#
●Inspect fuel lines and connections#
*2: If you drive in dusty conditions, replace the air cleaner element every 15,000 miles (24,000 km).
*3: If you drive primarily in urban areas that have high concentrations of soot in the air from industry and
from diesel-powered vehicles, replace the dust and pollen filter every 15,000 miles (24,000 km).
CODEMaintenance Sub Items
1
●Rotate tires
2●Replace air cleaner element*2
●Replace dust and pollen filter*3
●Inspect drive belt
3
●Replace transmission fluid
4●Replace spark plugs●Inspect valve clearance
5
●Replace engine coolant
17 FIT -31T5A6200.book 369 ページ 2016年5月27日 金曜日 午後6時33分
Page 409 of 465

408
Maintenance
Cleaning
Interior Care
Use a damp cloth with a mixture of mild detergent and warm water to remove dirt.
Use a clean cloth to remove detergent residue.
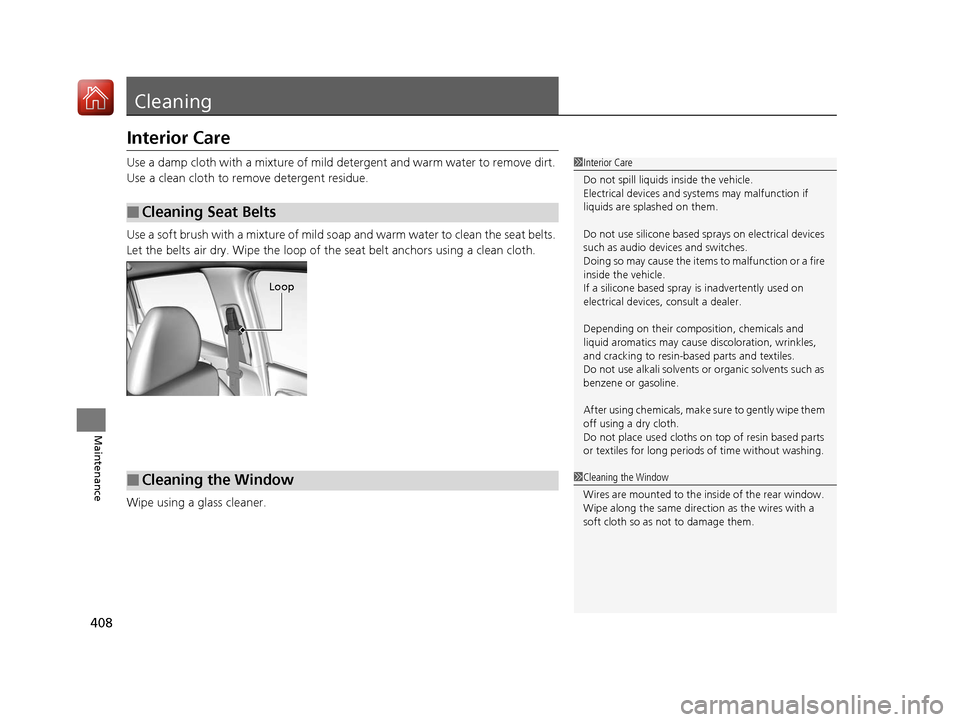
Use a soft brush with a mixture of mild soap and warm water to clean the seat belts.
Let the belts air dry. Wipe the loop of the seat belt anchors using a clean cloth.
Wipe using a glass cleaner.
■Cleaning Seat Belts
1 Interior Care
Do not spill liquids inside the vehicle.
Electrical devices and sy stems may malfunction if
liquids are splashed on them.
Do not use silicone based sprays on electrical devices
such as audio devices and switches.
Doing so may cause the items to malfunction or a fire
inside the vehicle.
If a silicone based spray is inadvertently used on
electrical devices, consult a dealer.
Depending on their compos ition, chemicals and
liquid aromatics may cause discoloration, wrinkles,
and cracking to resin-ba sed parts and textiles.
Do not use alkali solvents or organic solvents such as
benzene or gasoline.
After using chemical s, make sure to gently wipe them
off using a dry cloth.
Do not place used cloths on top of resin based parts
or textiles for long periods of time without washing.
Loop
■Cleaning the Window1Cleaning the Window
Wires are mounted to the in side of the rear window.
Wipe along the same direct ion as the wires with a
soft cloth so as not to damage them.
17 FIT -31T5A6200.book 408 ページ 2016年5月27日 金曜日 午後6時33分