2017 HONDA FIT change wheel
[x] Cancel search: change wheelPage 328 of 465
Continued327
uuWhen Driving uShifting
Driving
Use the paddle shifters to change between 1st and 7th speeds without removing
your hands from the steering wheel. The transmission switches to the 7-speed
manual shift mode when you pull a paddle shifter while driving. This mode is useful
when engine braking is needed.
■When the shift lever is in (D:
The shift mode goes into the 7-speed ma nual shift mode temporarily, and the
number is displayed in the shift indicator.
The 7-speed manual shift mode is canceled automatically if you drive at constant
speed or accelerate, and the number in the shift indicator goes off.
You can cancel this mode by pulling the paddle shifter for a few seconds.
The 7-speed manual shift mode is especial ly useful when reducing the vehicle speed
temporarily before making a turn.
■When the shift lever is in (S:
The shift mode goes into the 7-speed manual shift mode. The M indicator and the
speed number are displayed in the shift indicator. As the vehicle speed slows down,
the transmission automatically shifts down accordingly. When the vehicle comes to
a stop, it automatically shifts down into 1st.
If the vehicle speed increases and the engi ne speed reaches near the tachometer’s
red zone, the transmission automatically shifts up.
You can only pull away in 1st speed.
When canceling the 7-speed manual shift mode, move the shift lever from
(S to
(D. When the 7-speed manual sh ift mode is canceled, the M indicator and shift
indicator go off.
■7-Speed Manual Shift Mode1 7-Speed Manual Shift Mode
To improve fuel economy, the transmission may shift
up to a higher speed than the seventh under certain
circumstances. In this case, the number in the shift
indicator remains as 7.
In the 7-speed manual shif t mode, the transmission
shifts up or down by opera ting either paddle shifter
under the following conditions:
Shift Up: The engine sp eed reaches the lowest
threshold of the higher speed position.
Shift Down: The engine sp eed reaches the highest
threshold of the lower speed position.
When the engine speed reaches near the
tachometer’s red zone, the transmission shifts up
automatically.
When the engine speed reaches the lowest threshold
of the selected speed positi on, the transmission shifts
down automatically.
Operating the paddle shifte rs on slippery surfaces
may cause the tires to lock up. In this case, the 7-
speed manual shift mode is canceled and goes back
to the normal D driving mode.
17 FIT -31T5A6200.book 327 ページ 2016年5月27日 金曜日 午後6時33分
Page 334 of 465
333
uuWhen Driving uCruise Control*
Continued
Driving
Cruise Control*
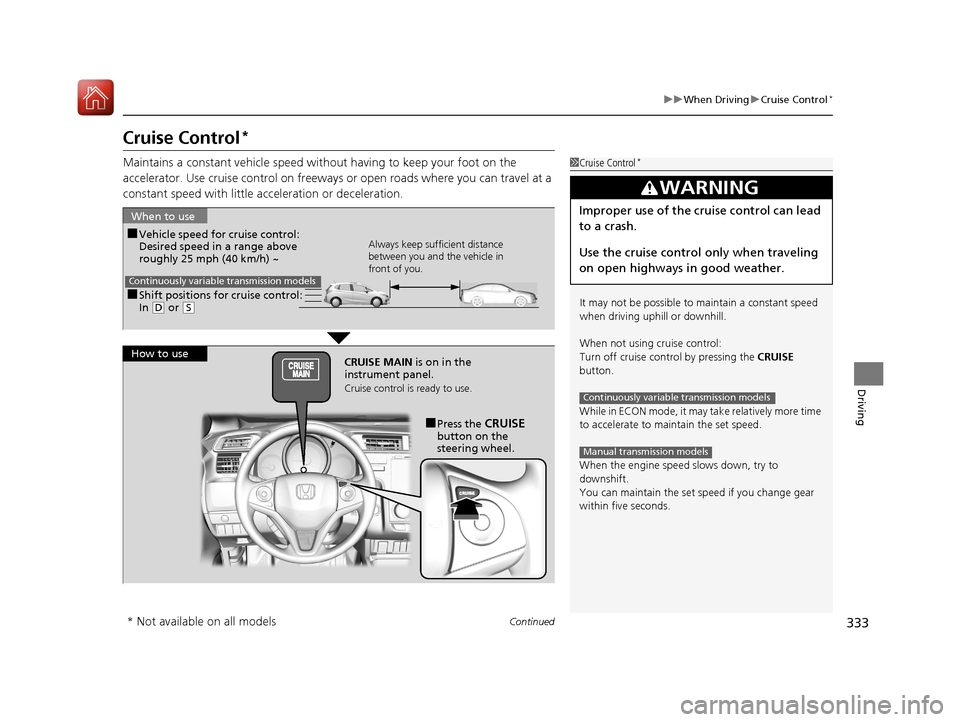
Maintains a constant vehicle speed without having to keep your foot on the
accelerator. Use cruise con trol on freeways or open roads where you can travel at a
constant speed with little ac celeration or deceleration.1Cruise Control*
It may not be possible to maintain a constant speed
when driving uphill or downhill.
When not using cruise control:
Turn off cruise control by pressing the CRUISE
button.
While in ECON mode, it may take relatively more time
to accelerate to maintain the set speed.
When the engine speed slows down, try to
downshift.
You can maintain the set sp eed if you change gear
within five seconds.
3WARNING
Improper use of the cruise control can lead
to a crash.
Use the cruise control only when traveling
on open highways in good weather.
Continuously variable transmission models
Manual transmission models
■Shift positions for cruise control:
In ( D or (S
When to use
Always keep sufficient distance
between you and the vehicle in
front of you.
Continuously variable transmission models
■Vehicle speed for cruise control:
Desired speed in a range above
roughly 25 mph (40 km/h) ~
How to use CRUISE MAIN is on in the
instrument panel.
Cruise control is ready to use.
■Press the CRUISE
button on the
steering wheel.
* Not available on all models
17 FIT -31T5A6200.book 333 ページ 2016年5月27日 金曜日 午後6時33分
Page 343 of 465
uuWhen Driving uLane Departure Warning (LDW)*
342
Driving
LDW may not activate or may not recogniz e lanes, and may activate even when
keeping in the middle of a lane under the following conditions.
■LDW Limitations
Condition
●When you drive in bad weather (rain, fog, etc.).●A heavy load in the rear or modificati ons to the suspension tilts your vehicle.●An abnormal tire condition is detected (wrong tire size, flat tire, etc.).●When the windshield is blocked by dirt, mud, leaves, wet snow, etc.●When the temperature inside the system is high.●A sudden change between light and dark such as an entrance or exit of a tunnel.●You drive into the sunlight (e.g. at dawn or dusk).●When the windshield is dirty or cloudy.●When you drive in the shadows of trees, buildings, etc.●When you drive on a wet road su rface following another vehicle.
uThe camera may perceive the tire tracks in the water as lane lines.●When there is snow or wheel tracks on the side of the road.●When the road has many repaired areas or an erased lane line.●When the vehicle is running over painted signs or crosswalk markings.●When you drive in a lane with worn-out lane markups.
1LDW Camera
If the CAMERA HOT message appears:
•Use the heating and cooling system to cool down
the interior and, if nece ssary, the defroster mode
when windows are fogged.
•Start driving the vehicle to lower the windshield
temperature, which cool s down the area around
the LDW system.
17 FIT -31T5A6200.book 342 ページ 2016年5月27日 金曜日 午後6時33分
Page 346 of 465
345
uuWhen Driving uLaneWatchTM*
Continued
Driving
LaneWatchTM*
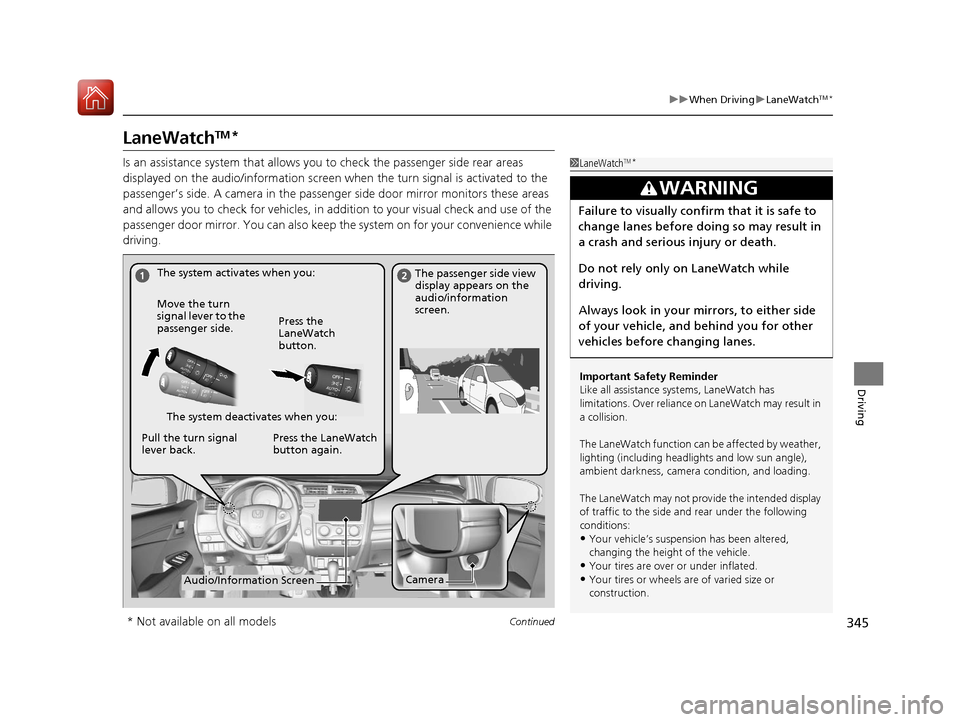
Is an assistance system that allows yo u to check the passenger side rear areas
displayed on the audio/information screen when the turn signal is activated to the
passenger’s side. A camera in the passenge r side door mirror monitors these areas
and allows you to check for ve hicles, in addition to your visual check and use of the
passenger door mirror. You can also keep the system on for your convenience while
driving.1 LaneWatchTM*
Important Safety Reminder
Like all assistance systems, LaneWatch has
limitations. Over reliance on LaneWatch may result in
a collision.
The LaneWatch function can be affected by weather,
lighting (including headli ghts and low sun angle),
ambient darkness, camera condition, and loading.
The LaneWatch may not prov ide the intended display
of traffic to the side and rear under the following
conditions:
•Your vehicle’s suspensi on has been altered,
changing the height of the vehicle.
•Your tires are over or under inflated.
•Your tires or wheels are of varied size or
construction.
3WARNING
Failure to visually confirm that it is safe to
change lanes before do ing so may result in
a crash and serious injury or death.
Do not rely only on LaneWatch while
driving.
Always look in your mirrors, to either side
of your vehicle, and behind you for other
vehicles before changing lanes.
The system activates when you: The passenger side view
display appears on the
audio/information
screen.
Move the turn
signal lever to the
passenger side. Press the
LaneWatch
button.
The system deactivates when you:
Pull the turn signal
lever back. Press the LaneWatch
button again.
CameraAudio/Information Screen
* Not available on all models
17 FIT -31T5A6200.book 345 ページ 2016年5月27日 金曜日 午後6時33分
Page 348 of 465

347
uuWhen Driving uTire Pressure Monitoring System (TPMS)
Continued
Driving
Tire Pressure Monitoring System (TPMS)
Instead of directly measuring the pressure in each tire, the TPMS on this vehicle
monitors and compares the rolling radius and rotational characteristics of each
wheel and tire while you are driving to determine if one or more tires are
significantly under-inflated. This will caus e the low tire pressure/TPMS indicator to
come on.
You must start TPMS calibration every time you:
• Adjust the pressure in one or more tires.
• Rotate the tires.
• Replace one or more tires.
Before calibrating the TPMS:
• Set the cold tire pressure in all four tires.
2 Checking Tires P. 394
Make sure:
• The vehicle is at a complete stop.
• The shift lever is in
(N.
• The shift lever is in
(P.
• The ignition switch is in ON
(w*1.
*1 : Models with the smart entry system have an ENGINE START/STOP button instead of an ignition switch.
■TPMS Calibration
U.S. models only
1Tire Pressure Monitoring System (TPMS)
The system does not monitor the tires when driving
at low speed.
Conditions such as low ambient temperature and
altitude change directly a ffect tire pressure and can
trigger the low tire pressure/TPMS indicator to come on.
Tire pressure checked and inflated in:
•Warm weather can beco me under-inflated in
colder weather.
•Cold weather can become over-inflated in warmer
weather.
The low tire pressure/TPMS indicator will not come
on as a result of over inflation.
The TPMS may not function pr operly if tire type and
size are mixed. Make sure to use the same size and
type of tire. 2 Checking and Maintaining Tires P. 394
The low tire pressure/TPMS indicator may come on
with a delay or may not come on at all when:
•You rapidly accelerate, decelerate, or turn the
steering wheel.
•You drive on snowy or slippery roads.
•Snow chains are used.
The low tire pressure/TPMS indicator may come on
under the following conditions:
•A compact spare tire is used.•There is a heavier and uneve n load on the tires than
the condition at calibration.
•Snow chains are used.
Manual transmission models
Continuously variable transmission models
All models
17 FIT -31T5A6200.book 347 ページ 2016年5月27日 金曜日 午後6時33分
Page 357 of 465
356
Driving
Multi-View Rear Camera
See the Navigation System Manual.
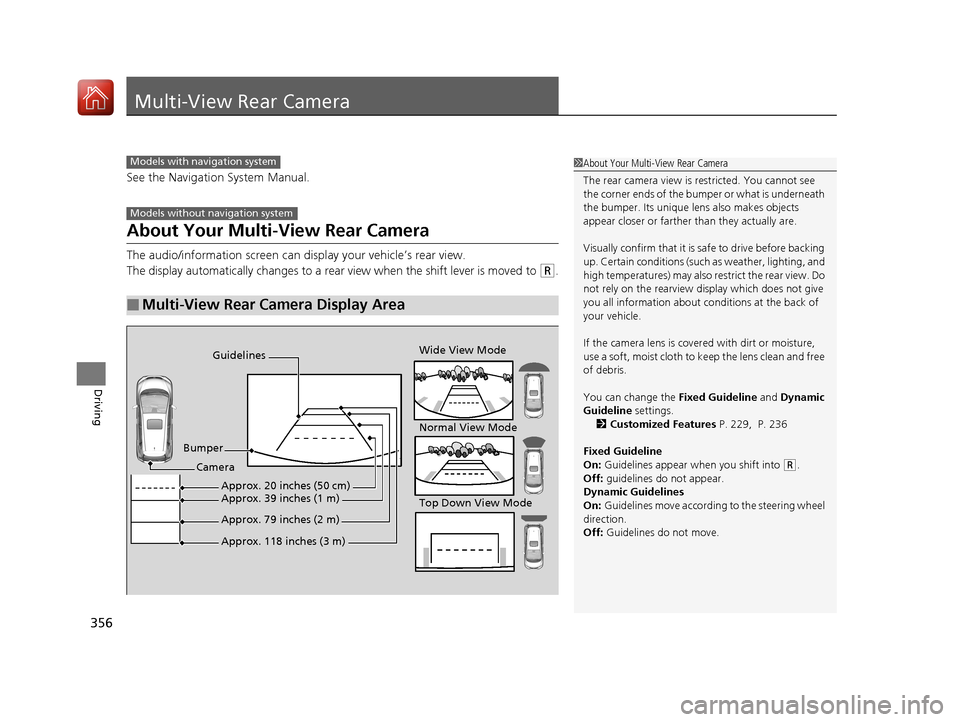
About Your Multi-View Rear Camera
The audio/information screen can display your vehicle’s rear view.
The display automatically changes to a rear view when the shift lever is moved to
(R.
■Multi-View Rear Camera Display Area
Models with navigation system
Models without navigation system
1About Your Multi-View Rear Camera
The rear camera view is restricted. You cannot see
the corner ends of the bum per or what is underneath
the bumper. Its unique le ns also makes objects
appear closer or farther than they actually are.
Visually confirm that it is safe to drive before backing
up. Certain conditions (such as weather, lighting, and
high temperatures) may also restrict the rear view. Do
not rely on the rearview display which does not give
you all information about conditions at the back of
your vehicle.
If the camera lens is cove red with dirt or moisture,
use a soft, moist cloth to keep the lens clean and free
of debris.
You can change the Fixed Guideline and Dynamic
Guideline settings. 2 Customized Features P. 229, P. 236
Fixed Guideline
On: Guidelines appear when you shift into
(R.
Off: guidelines do not appear.
Dynamic Guidelines
On: Guidelines move according to the steering wheel
direction.
Off: Guidelines do not move.
Guidelines
Bumper Wide View Mode
Normal View Mode
Top Down View Mode
Camera
Approx. 118 inches (3 m)
Approx. 79 inches (2 m)
Approx. 39 inches (1 m)Approx. 20 inches (50 cm)
17 FIT -31T5A6200.book 356 ページ 2016年5月27日 金曜日 午後6時33分
Page 419 of 465

uuIf a Tire Goes Flat uChanging a Flat Tire
418
Handling the Unexpected
1. Place the jack under the jacking point
closest to the tire to be changed.
2. Turn the end bracket as shown in the image
until the top of the jack contacts the jacking
point.
u Make sure that the jacking point tab is
resting in the jack notch.
3. Raise the vehicle, using the jack handle bar
and the jack handle, until the tire is off the
ground.
■How to Set Up the Jack1How to Set Up the Jack
Do not use the jack with people or luggage in the
vehicle.
Use the jack provided in your vehicle.
Other jacks may not support the weight (“load”) or
their shape may not match.
The following instructions must be followed to use
the jack safely:
•Do not use while the engine is running.
•Use only where the ground is firm and level.
•Use only at the jacking points.•Do not get in the vehicle while using the jack.
•Do not put anything on top of or underneath the
jack.
3WARNING
The vehicle can easily roll off the jack,
seriously injuring anyone underneath.
Follow the directions for changing a tire
exactly, and never get under the vehicle
when it is supported only by the jack.
Jack
Handle
Bar Wheel Nut
Wrench as Jack Handle
17 FIT -31T5A6200.book 418 ページ 2016年5月27日 金曜日 午後6時33分
Page 424 of 465
423
uuEngine Does Not Start uEmergency Engine Stop
Handling the Unexpected
Emergency Engine Stop
The ENGINE START/STOP button may be used to stop the engine due to an
emergency situation even while driving. If you must stop the engine, do either of the
following operations:
• Press and hold the ENGINE START/STOP button for about two seconds.
• Firmly press the ENGINE START/STOP button twice.
The steering wheel will not lock. However, because turning off the engine disables
the power assist the engine provides to the steering and braking systems, it will
require significantly more physical effort an d time to steer and slow the vehicle. Use
both feet on the brake pedal to slow down the vehicle and stop immediately in a
safe place. With manual transmission models you can also downshift the
transmission to utilize engine braking.
The power mode is in ACCESSORY when the engine is stopped.
To change the mode to VEHICLE OFF, move the shift lever to
(P after the vehicle
comes to a complete stop.
Then press the ENGINE START/STOP button twice without depressing the brake
pedal.
The power mode changes to VEHICLE OFF.
Models with smart entry system
1 Emergency Engine Stop
Do not press the button while driving unless it is
absolutely necessary for th e engine to be switched
off.
Continuously variable transmission models
Canadian continuously variable transmission models
Manual transmission models
17 FIT -31T5A6200.book 423 ページ 2016年5月27日 金曜日 午後6時33分