2017 HONDA CLARITY ELECTRIC clock reset
[x] Cancel search: clock resetPage 203 of 543
Continued201
uuAudio System Basic Operation uAudio/Information Screen
Features
■Info
Displays Trip Computer or Clock/Wallpaper . Select on the Info Menu screen
to see all available options: Trip Computer, Voice Info, Clock/Wallpaper ,
System/Device Information and Vehicle energy .
Trip Computer :
• Current Drive tab: Displays the current trip information.
• History of Trip A tab: Displays information for the three previous drives. The
information is stored every time you reset Trip A.
To delete the history manually, select Delete history on the History of Trip A
tab. The confirmation message appears on the screen, then select Yes.
Voice Info : Displays a list of all voice commands.
Clock/Wallpaper : Displays the clock and wallpaper.
System/Device Information :
• System Info : Displays the software version of the audio system.
• USB Info : Displays the memory usage of the USB device.
Vehicle energy :
Displays the ener gy flow screen.
2Energy flow screen P. 203
■Audio
Displays the current audio information.
1 Audio/Information Screen
Touchscreen operation
•Use simple gestures - in cluding touching, swiping
and scrolling - to operate certain audio functions.
•Some items may be greyed out during driving to
reduce the potential for distraction.
•You can select them when the vehicle is stopped or
use voice commands.
•Wearing gloves may limit or prevent touchscreen
response.
You can change the touchs creen sensitivity setting.
2 Customized Features P. 280
17 CLARITY BEV CSS-31TRV6000.book 201 ページ 2017年4月14日 金曜日 午前11 時8分
Page 283 of 543
281
uuCustomized Features u
Continued
Features
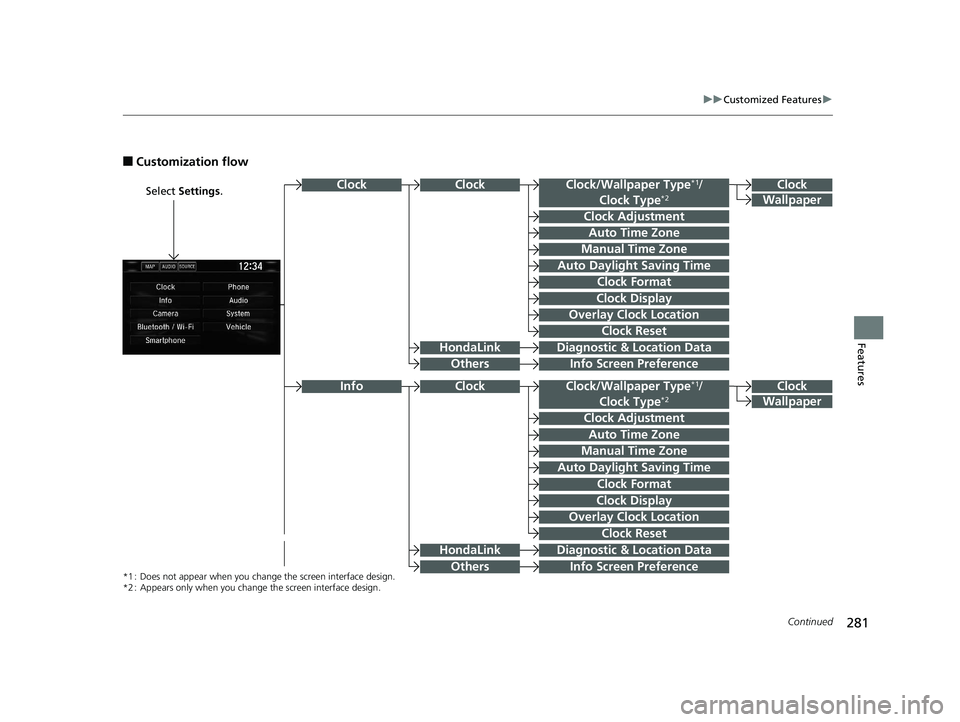
■Customization flow
Select Settings .Clock
Wallpaper
Clock/Wallpaper Type*1/
Clock Type*2
Clock Adjustment
Clock Format
ClockClock
Auto Time Zone
Manual Time Zone
Auto Daylight Saving Time
Clock Display
Overlay Clock Location
Info Screen Preference
Clock
Wallpaper
Clock/Wallpaper Type*1/
Clock Type*2
Clock Adjustment
Clock Format
Auto Time Zone
Manual Time Zone
Auto Daylight Saving Time
Clock Display
Overlay Clock Location
Clock Reset
Info Screen Preference
Info
*1 : Does not appear when you chan ge the screen interface design.
*2 : Appears only when you change the screen interface design.
Diagnostic & Location Data
Diagnostic & Location Data
HondaLink
Others
HondaLink
Others
Clock
Clock Reset
17 CLARITY BEV CSS-31TRV6000.book 281 ページ 2017年4月14日 金曜日 午前11 時8分
Page 287 of 543
285
uuCustomized Features u
Continued
Features
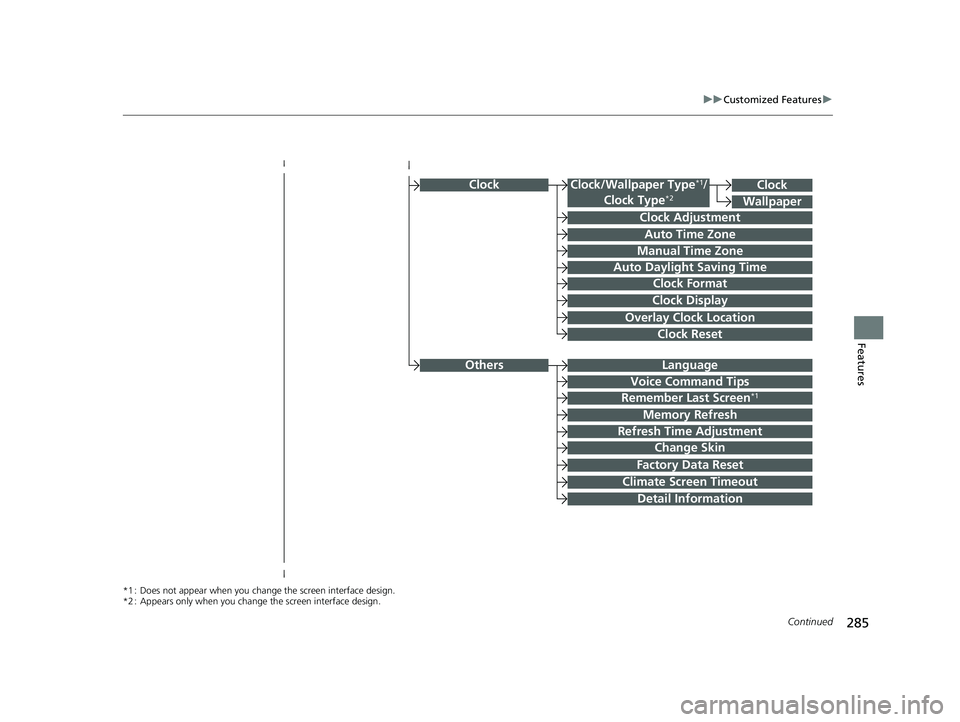
ClockClock/Wallpaper Type*1/
Clock Type*2
Clock Adjustment
Clock Format
Auto Time Zone
Manual Time Zone
Auto Daylight Saving Time
Clock Display
Overlay Clock Location
Clock Reset
Clock
Wallpaper
*1 : Does not appear when you chan ge the screen interface design.
*2 : Appears only when you change the screen interface design.
OthersLanguage
Voice Command Tips
Remember Last Screen*1
Memory Refresh
Refresh Time Adjustment
Change Skin
Factory Data Reset
Climate Screen Timeout
Detail Information
17 CLARITY BEV CSS-31TRV6000.book 285 ページ 2017年4月14日 金曜日 午前11 時8分
Page 290 of 543
288
uuCustomized Features u
Features
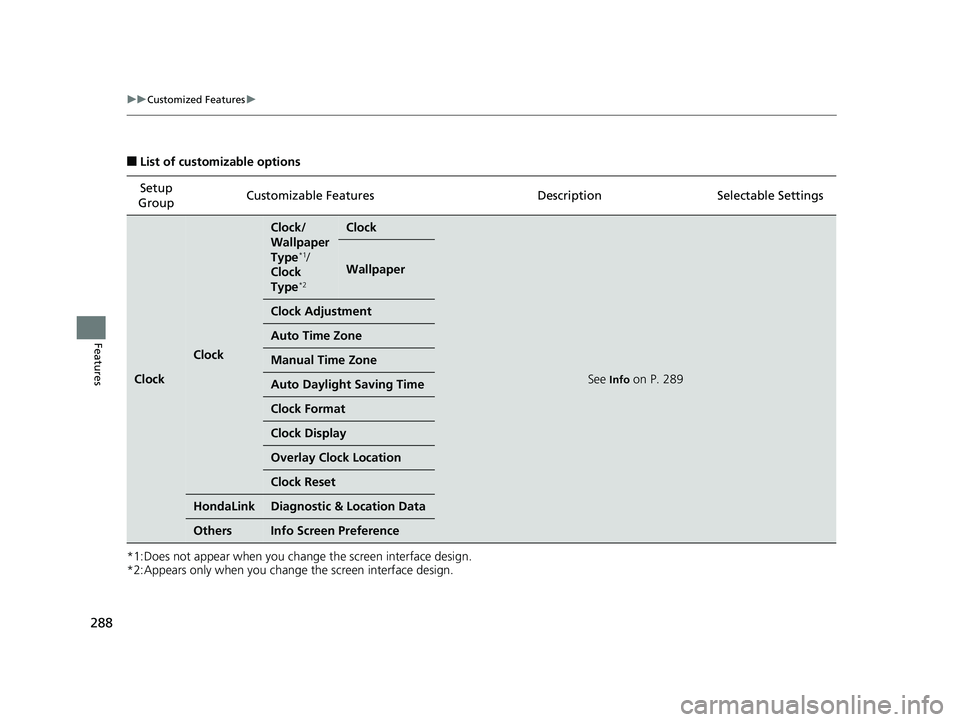
■List of customizable options
*1:Does not appear when you change the screen interface design.
*2:Appears only when you change the screen interface design. Setup
Group Customizable Features Descri
ption Selectable Settings
Clock
Clock
Clock/
Wallpaper
Type
*1/
Clock
Type
*2
Clock
See Info on P. 289
Wallpaper
Clock Adjustment
Auto Time Zone
Manual Time Zone
Auto Daylight Saving Time
Clock Format
Clock Display
Overlay Clock Location
Clock Reset
HondaLinkDiagnostic & Location Data
OthersInfo Screen Preference
17 CLARITY BEV CSS-31TRV6000.book 288 ページ 2017年4月14日 金曜日 午前11 時8分
Page 291 of 543
289
uuCustomized Features u
Continued
Features
*1:Default Setting
*2:Does not appear when you chan ge the screen interface design.
*3:Appears only when you change the screen interface design.
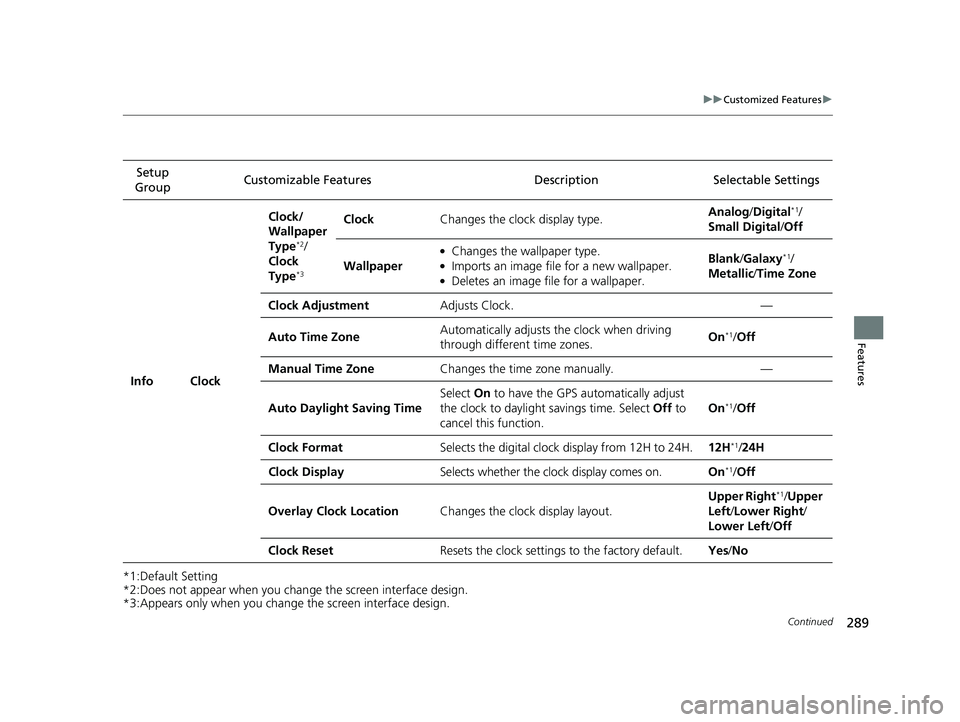
Setup
Group Customizable Features Description Selectable Settings
Info Clock Clock/
Wallpaper
Type
*2/
Clock
Type
*3
Clock Changes the clock display type. Analog
/Digital*1/
Small Digital /Off
Wallpaper
●Changes the wallpaper type.●Imports an image file for a new wallpaper.●Deletes an image file for a wallpaper. Blank
/Galaxy
*1/
Metallic /Time Zone
Clock Adjustment Adjusts Clock. —
Auto Time Zone Automatically adjusts the clock when driving
through different time zones. On
*1/
Off
Manual Time Zone Changes the time zone manually. —
Auto Daylight Saving Time Select
On to have the GPS automatically adjust
the clock to daylight savings time. Select Off to
cancel this function. On
*1/
Off
Clock Format Selects the digital clock display from 12H to 24H. 12H
*1/24H
Clock Display Selects whether the clock display comes on. On
*1/Off
Overlay Clock Location Changes the clock display layout. Upper Right
*1/
Upper
Left/ Lower Right/
Lower Left /Off
Clock Reset Resets the clock settings to the factory default. Yes/No
17 CLARITY BEV CSS-31TRV6000.book 289 ページ 2017年4月14日 金曜日 午前11 時8分
Page 300 of 543
298
uuCustomized Features u
Features
*1:Default Setting
*2:Does not appear when you change the screen interface design.
*3:Appears only when you change the screen interface design.Setup
Group Customizable Features
DescriptionSelectable Settings
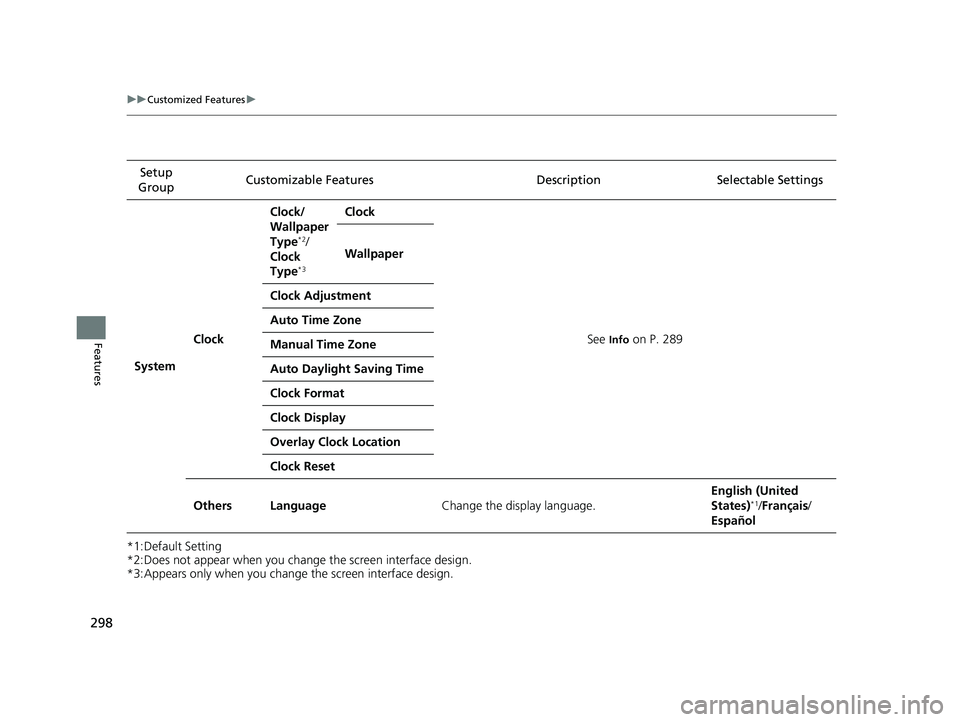
System Clock Clock/
Wallpaper
Type
*2/
Clock
Type
*3
Clock
See
Info on P. 289
Wallpaper
Clock Adjustment
Auto Time Zone
Manual Time Zone
Auto Daylight Saving Time
Clock Format
Clock Display
Overlay Clock Location
Clock Reset
Others Language Change the display language. English (United
States)
*1/
Français /
Español
17 CLARITY BEV CSS-31TRV6000.book 298 ページ 2017年4月14日 金曜日 午前11 時8分
Page 470 of 543
468
Maintenance
12-Volt Battery
Checking the 12-Volt Battery
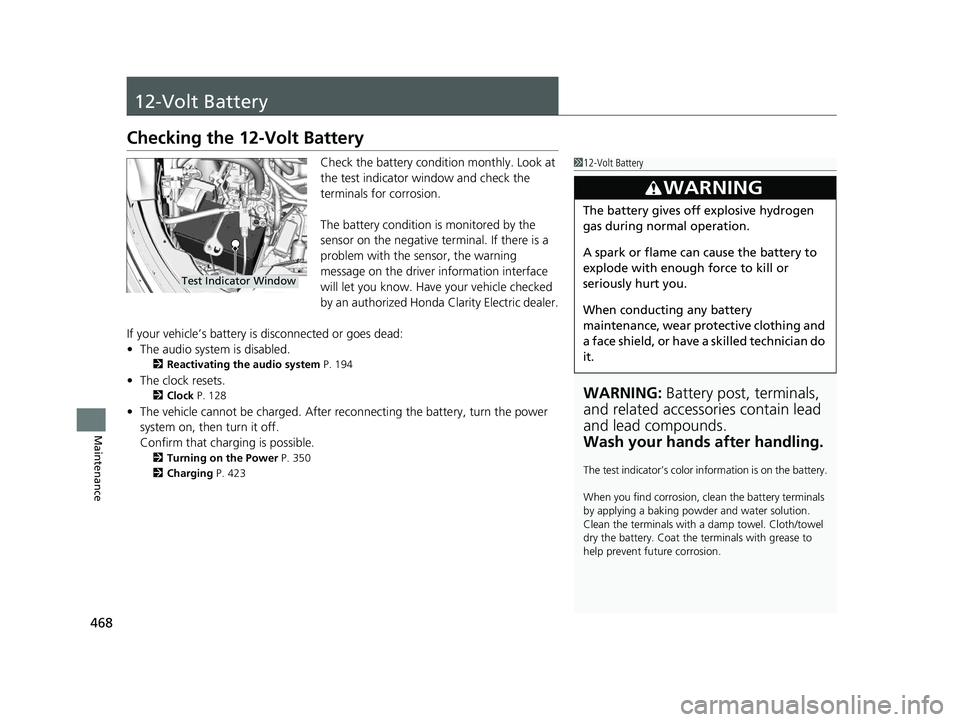
Check the battery condition monthly. Look at
the test indicator window and check the
terminals for corrosion.
The battery condition is monitored by the
sensor on the negative terminal. If there is a
problem with the sensor, the warning
message on the driver information interface
will let you know. Have your vehicle checked
by an authorized Honda Clarity Electric dealer.
If your vehicle’s battery is disconnected or goes dead:
• The audio system is disabled.
2 Reactivating the audio system P. 194
•The clock resets.
2 Clock P. 128
•The vehicle cannot be charged. After reconnecting the batte ry, turn the power
system on, then turn it off.
Confirm that charging is possible.
2 Turning on the Power P. 350
2 Charging P. 423
112-Volt Battery
WARNING: Battery post, terminals,
and related accessories contain lead
and lead compounds.
Wash your hands after handling.
The test indicator’s color in formation is on the battery.
When you find corrosion, cl ean the battery terminals
by applying a baking powder and water solution.
Clean the terminals with a damp towel. Cloth/towel
dry the battery. Coat the terminals with grease to
help prevent future corrosion.
3WARNING
The battery gives off explosive hydrogen
gas during normal operation.
A spark or flame can cause the battery to
explode with enough force to kill or
seriously hurt you.
When conducting any battery
maintenance, wear prot ective clothing and
a face shield, or have a skilled technician do
it.
Test Indicator Window
17 CLARITY BEV CSS-31TRV6000.book 468 ページ 2017年4月14日 金曜日 午前11 時8分
Page 537 of 543
535
Index
O
Odometer................................................. 120
Open Source Licences .............................. 279
Opening Trunk ...................................................... 518
Opening/Closing Hood ...................................................... 450
Power Windows...................................... 147
Trunk ...................................................... 141
Operating the Switches Around the Steering Wheel ....................................... 149
Outside Temperature Display ................. 120
Overheating ............................................. 501
P
Painting the Vehicle ................................ 477
Pandora ®.................................................. 248
Panic Mode ............................................... 146
Parking ..................................................... 419
Parking Brake ........................................... 404
Parking Brake and Brake System Indicator (Red) ........................................ 505
Passenger Front Airb ag Off Indicator....... 63
Passing Indicators ..................................... 153
Playing Bluetooth ® Audio ....................... 253
POWER Button ......................................... 149
Power System Turning on .............................................. 350
POWER SYSTEM Indicator ......................... 83
Power Windows ....................................... 147 POWER/CHARGE Gauge
........................... 115
Precautions While Driving
Rain ......................................................... 353
Pregnant Women ....................................... 48
Puncture (Tire) .......................................... 482
R
Radio (FM/AM).......................................... 229
Radio (SiriusXM ®) ..................................... 233
Radio Data System (RDS) .......................... 231
Range ........................................................ 114
Range Display ........................................... 123
RDS (Radio Data System) .......................... 231
READY Indicator ......................................... 84
Rear Defogger Button .............................. 160
Rear Seats .................................................. 171
Rearview Mirror ........................................ 164
Regenerative Energy and Regenerative Braking ...................................................... 16
Regulations ....................... 400, 434, 462, 523
Remote Transmitter ................................. 135
Replacement Battery .................................................... 470
Bulbs ....................................................... 454
Fuses ............................................... 508, 510
Tires ........................................................ 465
Wiper Blade Rubber ................................. 456
Reporting Safety Defects ......................... 524
Resetting a Trip Meter ............................. 120 Road Departure Mitigation (RDM)
......... 369
On and Off.............................................. 370
S
Safe Driving ................................................ 37
Safety Checklist .......................................... 41
Safety Labels ............................................... 78
Safety Message ............................................. 1
Seat Belts .................................................... 42
Adjusting the Shoulder Anchor.................. 47
Automatic Seat Belt Tensioners ................. 44
Checking................................................... 49
Fastening .................................................. 45
Installing a Child Seat with a Lap/Shoulder
Seat Belt .................................................. 72
Pregnant Women ...................................... 48
Reminder ............................................ 44, 87
Warning Indicator ............................... 44, 87
Seat Heaters .............................................. 181
Seats .......................................................... 166
Adjusting ................................................ 166
Front Seats .............................................. 166
Rear Seats ............................................... 171
Seat Heaters ............................................ 181
Security System ......................................... 144
Immobilizer System Indicator ..................... 92
Security System Alarm Indicator................. 93
Selecting a Child Seat ................................. 69
Setting the Clock ...................................... 128
17 CLARITY BEV CSS-31TRV6000.book 535 ページ 2017年4月14日 金曜日 午前11 時8分