Page 28 of 145

27
uuDisplay Mode Settings uSwitching Display Mode Manually
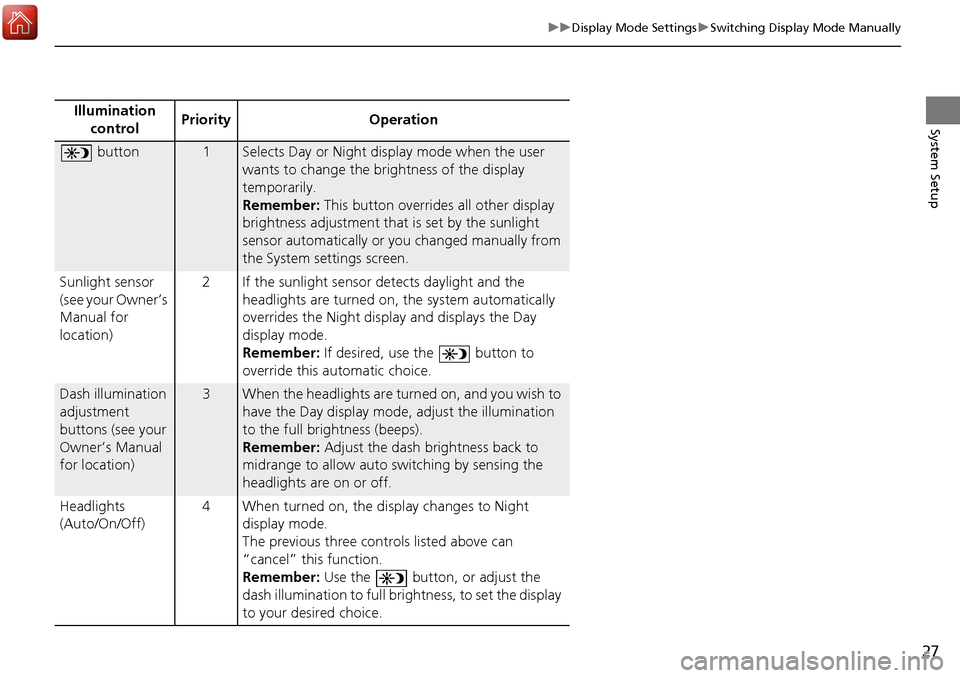
System SetupIllumination
control Priority Operation
button1Selects Day or Night display mode when the user
wants to change the brightness of the display
temporarily.
Remember:
This button overrides all other display
brightness adjustment that is set by the sunlight
sensor automatically or you changed manually from
the System settings screen.
Sunlight sensor
(see your Owner’s
Manual for
location) 2 If the sunlight sensor detects daylight and the
headlights are turned on, the system automatically
overrides the Nigh t display and displays the Day
display mode.
Remember: If desired, use the button to
override this automatic choice.
Dash illumination
adjustment
buttons (see your
Owner’s Manual
for location)3When the headlights are turn ed on, and you wish to
have the Day display mode, adjust the illumination
to the full brightness (beeps).
Remember: Adjust the dash brightness back to
midrange to allow auto switching by sensing the
headlights are on or off.
Headlights
(Auto/On/Off) 4 When turned on, the di
splay changes to Night
display mode.
The previous three controls listed above can
“cancel” this function.
Remember: Use the button, or adjust the
dash illumination to full brightness, to set the display
to your desired choice.
Page 30 of 145
29
uuMap & Vehicle uVehicle
System Setup
Vehicle
H u (Back) uSettings uMap & Vehicle uVehicle
You can choose your vehicle icon. 1.Select an option.
2. Select Save.
Driving Map View (Map Orientation)
H u (Back) uSettings uMap & Vehicle uDriving Map View
Select the map orientation. 1.Select an option.
2. Select Save.
1Vehicle
The factory default is set to .
1 Driving Map View (Map Orientation)
The following opti ons are available:
•Track Up: Displays the map with your direction of
travel faci ng upwards.
•North Up : Displays the map with North always
pointing up.
•3-D (factory default): Displays the map in 3D with
your direction of travel facing upwards.
Page 40 of 145
39
uuNavigation uCustom Avoidances
Continued
System SetupH u (Back) uSettings uNavigation uCustom Avoidances
u Add Avoid Area
1.Select the upper-left (right) corner
of the area to avoid. Select Next.
u The icon is displayed on the
map.
2. Select the lower-right (left) corner
of the area to avoid. Select Next.
u The selected area is shaded on
the map.
■Adding an Avoid Area
Page 41 of 145
40
uuNavigation uCustom Avoidances
System Setup
3. Select Done.
H u (Back) uNavigation uCustom Avoidances uAdd Avoid
Road
1.Select the starting point of the
section of road to avoid. Select
Next .
u The icon is displayed on the
map.
■Adding an Avoid Road
Page 42 of 145
41
uuNavigation uCustom Avoidances
Continued
System Setup
2. Select the ending point of the road
section. Select Next.
u The selected road is displayed in
pink.
3. Select Done.
Page 44 of 145
43
System Setup
Traffic
Hu (Back) uSettings uTraffic
Sets the traffic feature. Select an option.
The following options are available:
• Traffic : Enables the traffic feature.
2Traffic Information P. 84
•Current Provider: Sets the traffic provider to use for traffic data.
• Subscriptions : Displays the lists of the current traffic subscriptions.
• Optimize Route : Sets whether to use optimized alternate routes On Request
(factory default) or Automatic.
Page 49 of 145
48
uuOther Settings uDevice
System Setup
Device
H u (Back) uSettings uDevice
Select an option.
The following options are available:
• About : Displays the device information.
2About P. 49
•Travel History: Allows the system to record information for suggested routes,
previous routes and destinations, and Trip Log features.
• Clear Travel History : Deletes the recorded information.
• Update Map : Displays the description screen of map update.
2Obtaining a Navigation Update P. 132
Page 50 of 145
49
uuOther Settings uDevice
System SetupH u (Back) uSettings uDevice uAbout
Displays the device information.
■ About